# The English User Manual

This page provides English instructions

## [SM Series Electric Module](#sm-series-electric-module)

## [GM Series Electric Module](#gm-series-electric-module)


# SM Series Electric Module


# Wi-Fi Series


# SML-01WB

User Manual for SML-01WB 1CH Wi-Fi Switch Module

***

## Appearance

<figure><img src="https://3898863868-files.gitbook.io/~/files/v0/b/gitbook-x-prod.appspot.com/o/spaces%2F-MDHxt7lj9funy2SIeFB%2Fuploads%2F8JHmLDNyVjL6HlwM7dkc%2Fsml-01wb-1000px.jpg?alt=media&amp;token=7023d6a6-640c-405d-88fb-ea5d046d7b91" alt="" width="375"><figcaption><p>SML-01WB</p></figcaption></figure>

***

## Introduce <a href="#a7ulc" id="a7ulc"></a>

### Short Description <a href="#shellyplus1-snsw-001x16eu-shortdescription" id="shellyplus1-snsw-001x16eu-shortdescription"></a>

* SML-01WB is a small form factor smart switch which allows remote control of electric appliances through a mobile phone, tablet and home automation system.
* SML-01WB can be accessed, controlled and monitored remotely from any place where the user has internet connectivity, as long as the device is connected to a Wi-Fi router and the Internet.
* It can be retrofitted into standard electrical wall boxes, behind power sockets and light switches or other places with limited space.

### Features <a href="#h4js5" id="h4js5"></a>

* No gateway required - You don’t need to purchase a gateway for this device, the device connects directly to your house’s Wi-Fi
* Wi-Fi + Bluetooth dual mode - connect to the network faster, with network provisioning speed 2 times faster than pure Wi-Fi devices
* App remote control - control the device anytime and anywhere through mobile App
* Smart linkage - In smart scene mode, linkage can be set to sound an alarm. The mobile App will also receive prompts, such as garage door open/close status, timeout notifications and overnight notifications, to remind you to close the garage door.
* Voice control - used with Amazon Echo, Google Home, Yandex, Tmall Genie
* Offline function - when the device is offline, the App will remind the device to go offline after 30 minutes
* Home Sharing - Create a smart home with your family
* Set a schedule - turn connected devices on and off at specified times
* Sharing feature - share with family members for joint control
* Supports Siri - This device is not compatible with HomeKit. But you can add click-to-run scenes to Siri shortcuts in the Smart Life App

{% hint style="success" %}
Bluetooth is only used for network signal connection and cannot be used alone to control devices. Wi-Fi + Bluetooth distribution is faster
{% endhint %}

***

## Safety Consultation and Precautions

1. The installation process of this product involves strong electricity and must be installed by professionals in accordance with electrical specifications and product instructions;
2. This product is for indoor use only, please do not use it in humid environments or outdoors;
3. This product is only suitable for safe use in areas below 2,000 meters above sea level;
4. Pay attention to moisture-proof, do not spill water or other liquids on this product;
5. Do not place this product near a heat source;
6. Do not attempt to repair this product yourself, this work should be performed by authorized professionals;
7. Do not use it with overload. Please make sure that the 10A overcurrent protection circuit breaker on the front of this product is working properly before powering on. It is recommended that the stripping length of the terminal connecting wire is 6-8 mm;
8. This product should not be installed or fixed in a place that can be touched by human hands, such as outside the wall. It should be installed in an appliance or a hidden box;
9. The position of the fixed antenna should be as far away as possible from metal, wires and the module itself. (Applicable to external antenna models).

***

## Main Applications <a href="#shellyplus1-snsw-001x16eu-mainapplications" id="shellyplus1-snsw-001x16eu-mainapplications"></a>

* Residential
* MDU (Multi Dwelling Units - apartments, condominiums, hotels, etc.)
* Light commercial (small office buildings, small retail/restaurant/gas station, etc.)
* Government/municipal
* University/college

***

## Integrations <a href="#shellyplus1-snsw-001x16eu-integrations" id="shellyplus1-snsw-001x16eu-integrations"></a>

* Google Assistant
* Amazon Alexa
* Yandex Alice
* Baidu Xiaodu
* Tmall Genie

***

## Supported Load Types <a href="#shellyplus1-snsw-001x16eu-supportedloadtypes" id="shellyplus1-snsw-001x16eu-supportedloadtypes"></a>

* Resistive (incandescent bulbs, heating devices)
* Capacitive (capacitor banks, electronic equipment, motor start capacitors)
* Inductive with RC Snubber (LED light drivers, transformers, fans, refrigerators, air-conditioners)

***

## Installation

{% hint style="danger" %}
Please make sure the main power switch is turned off before installation
{% endhint %}

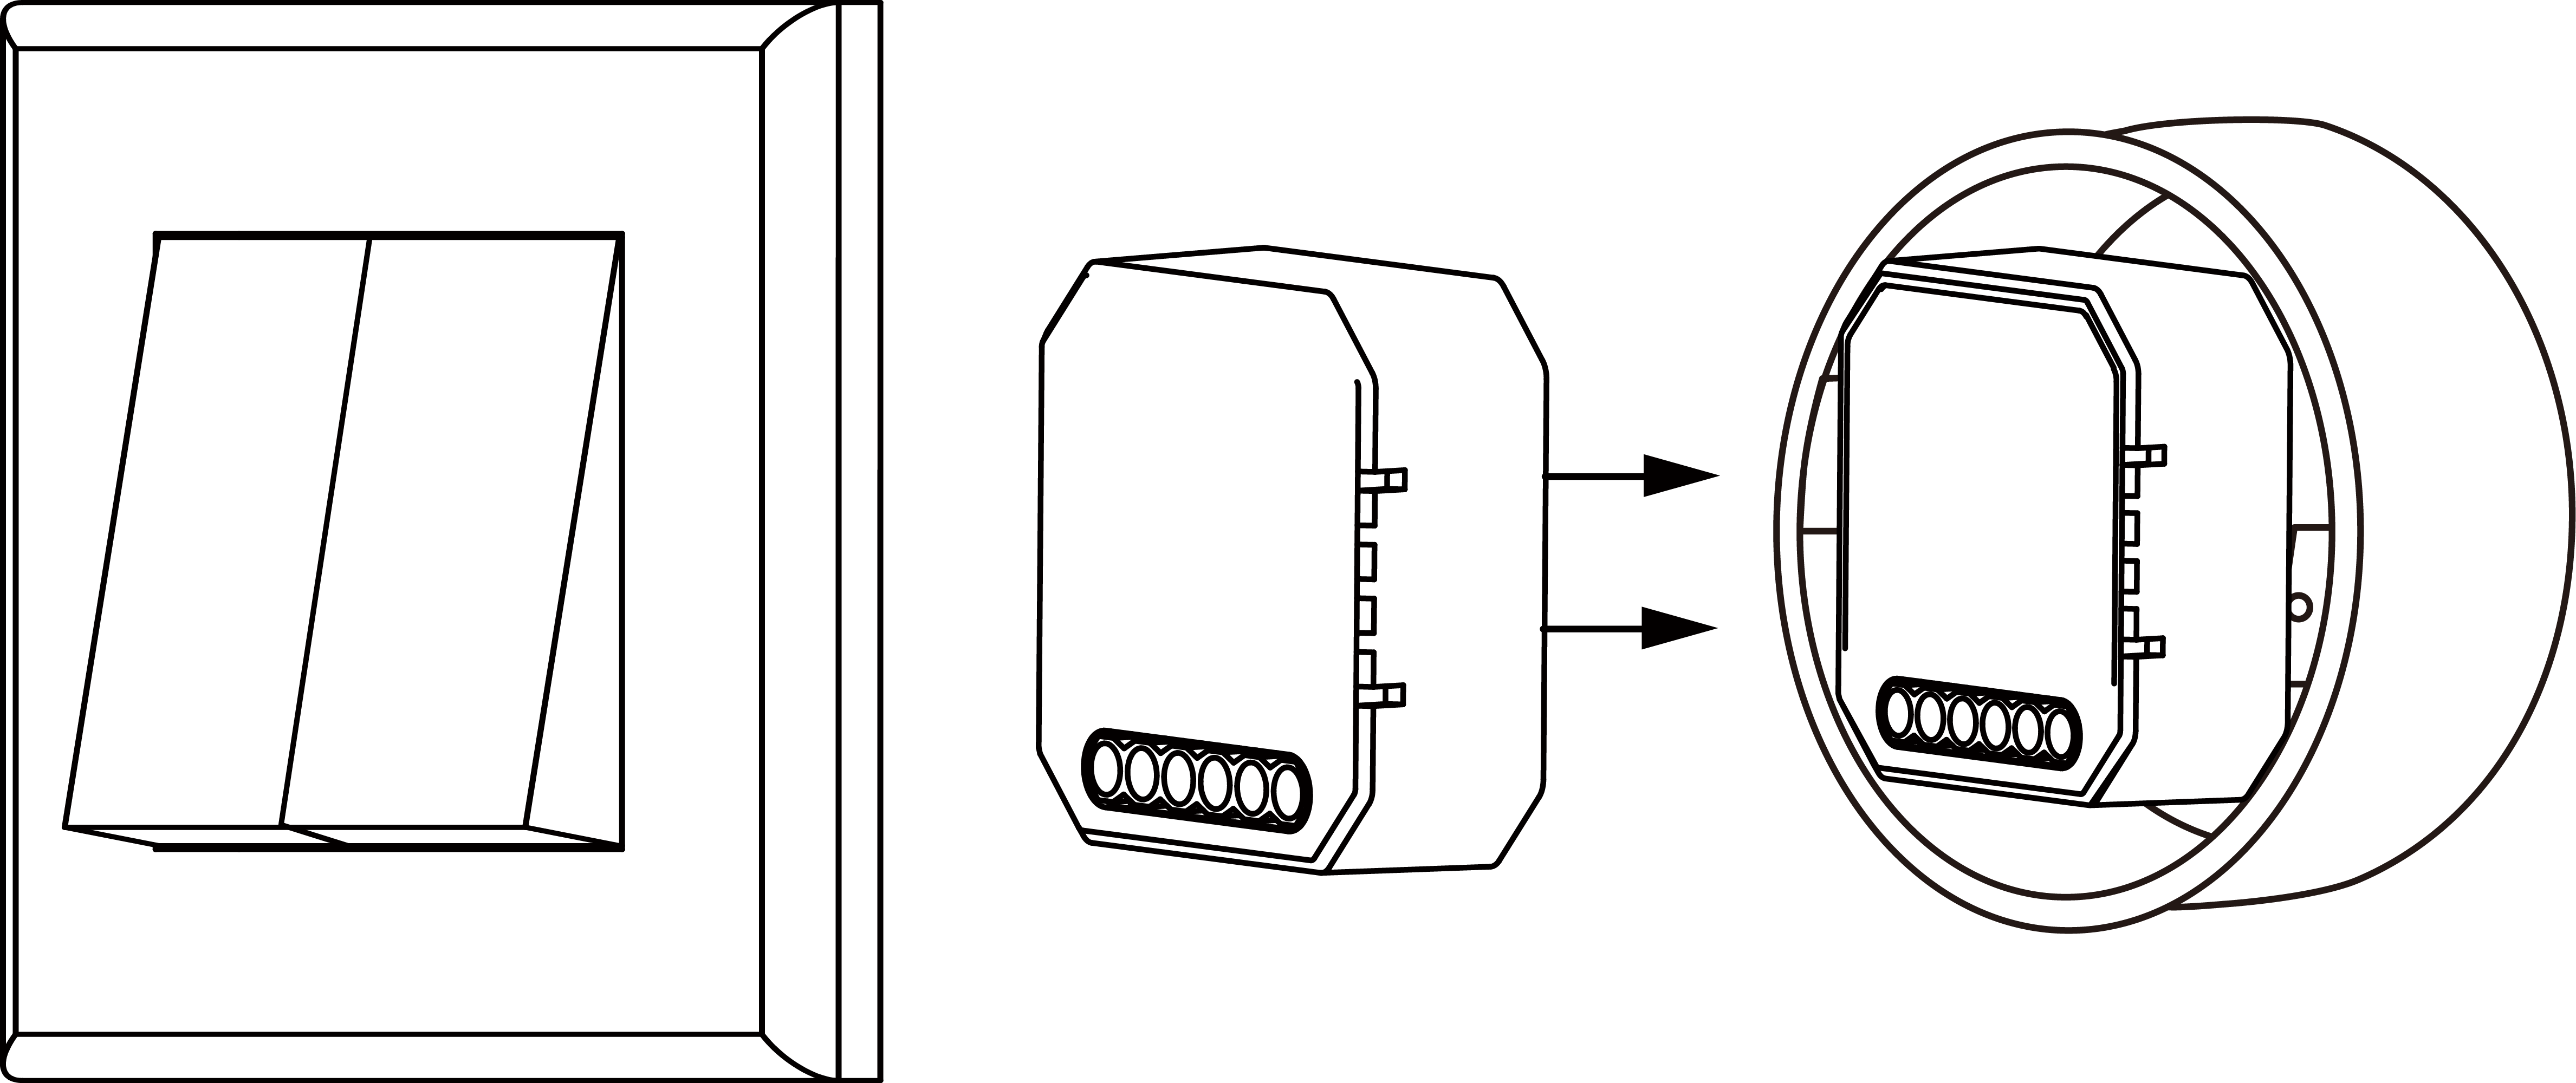
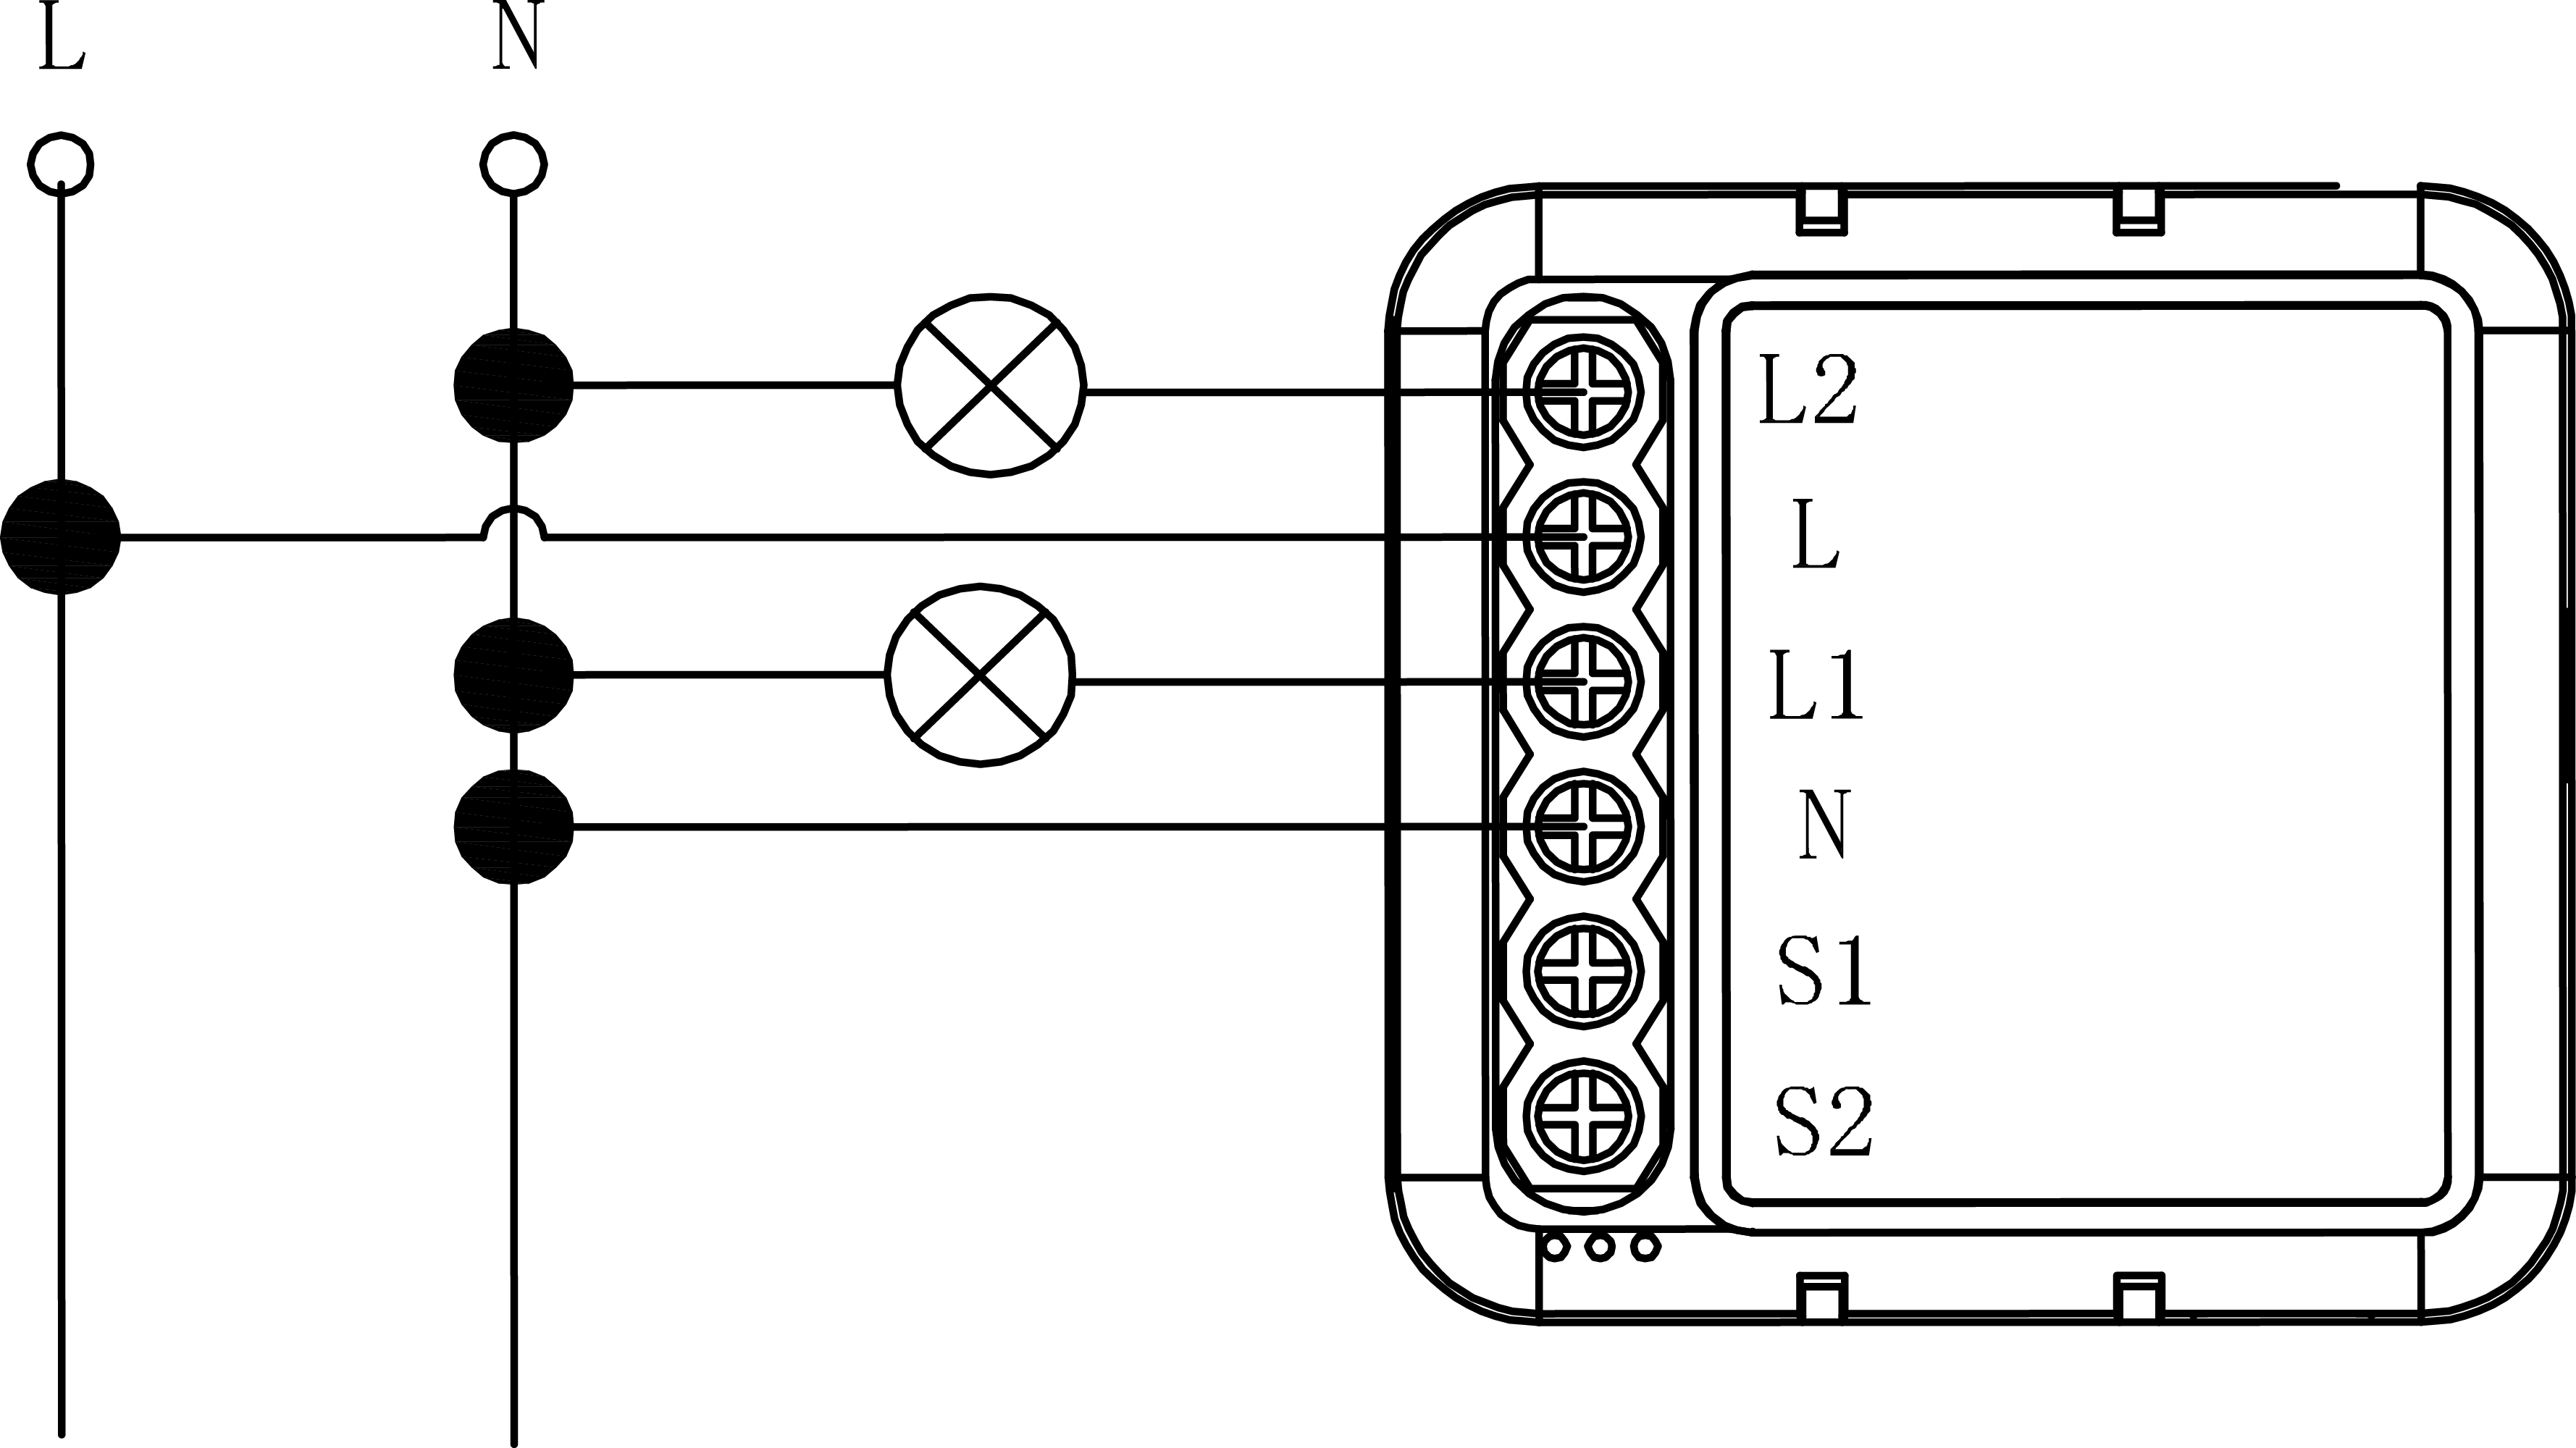
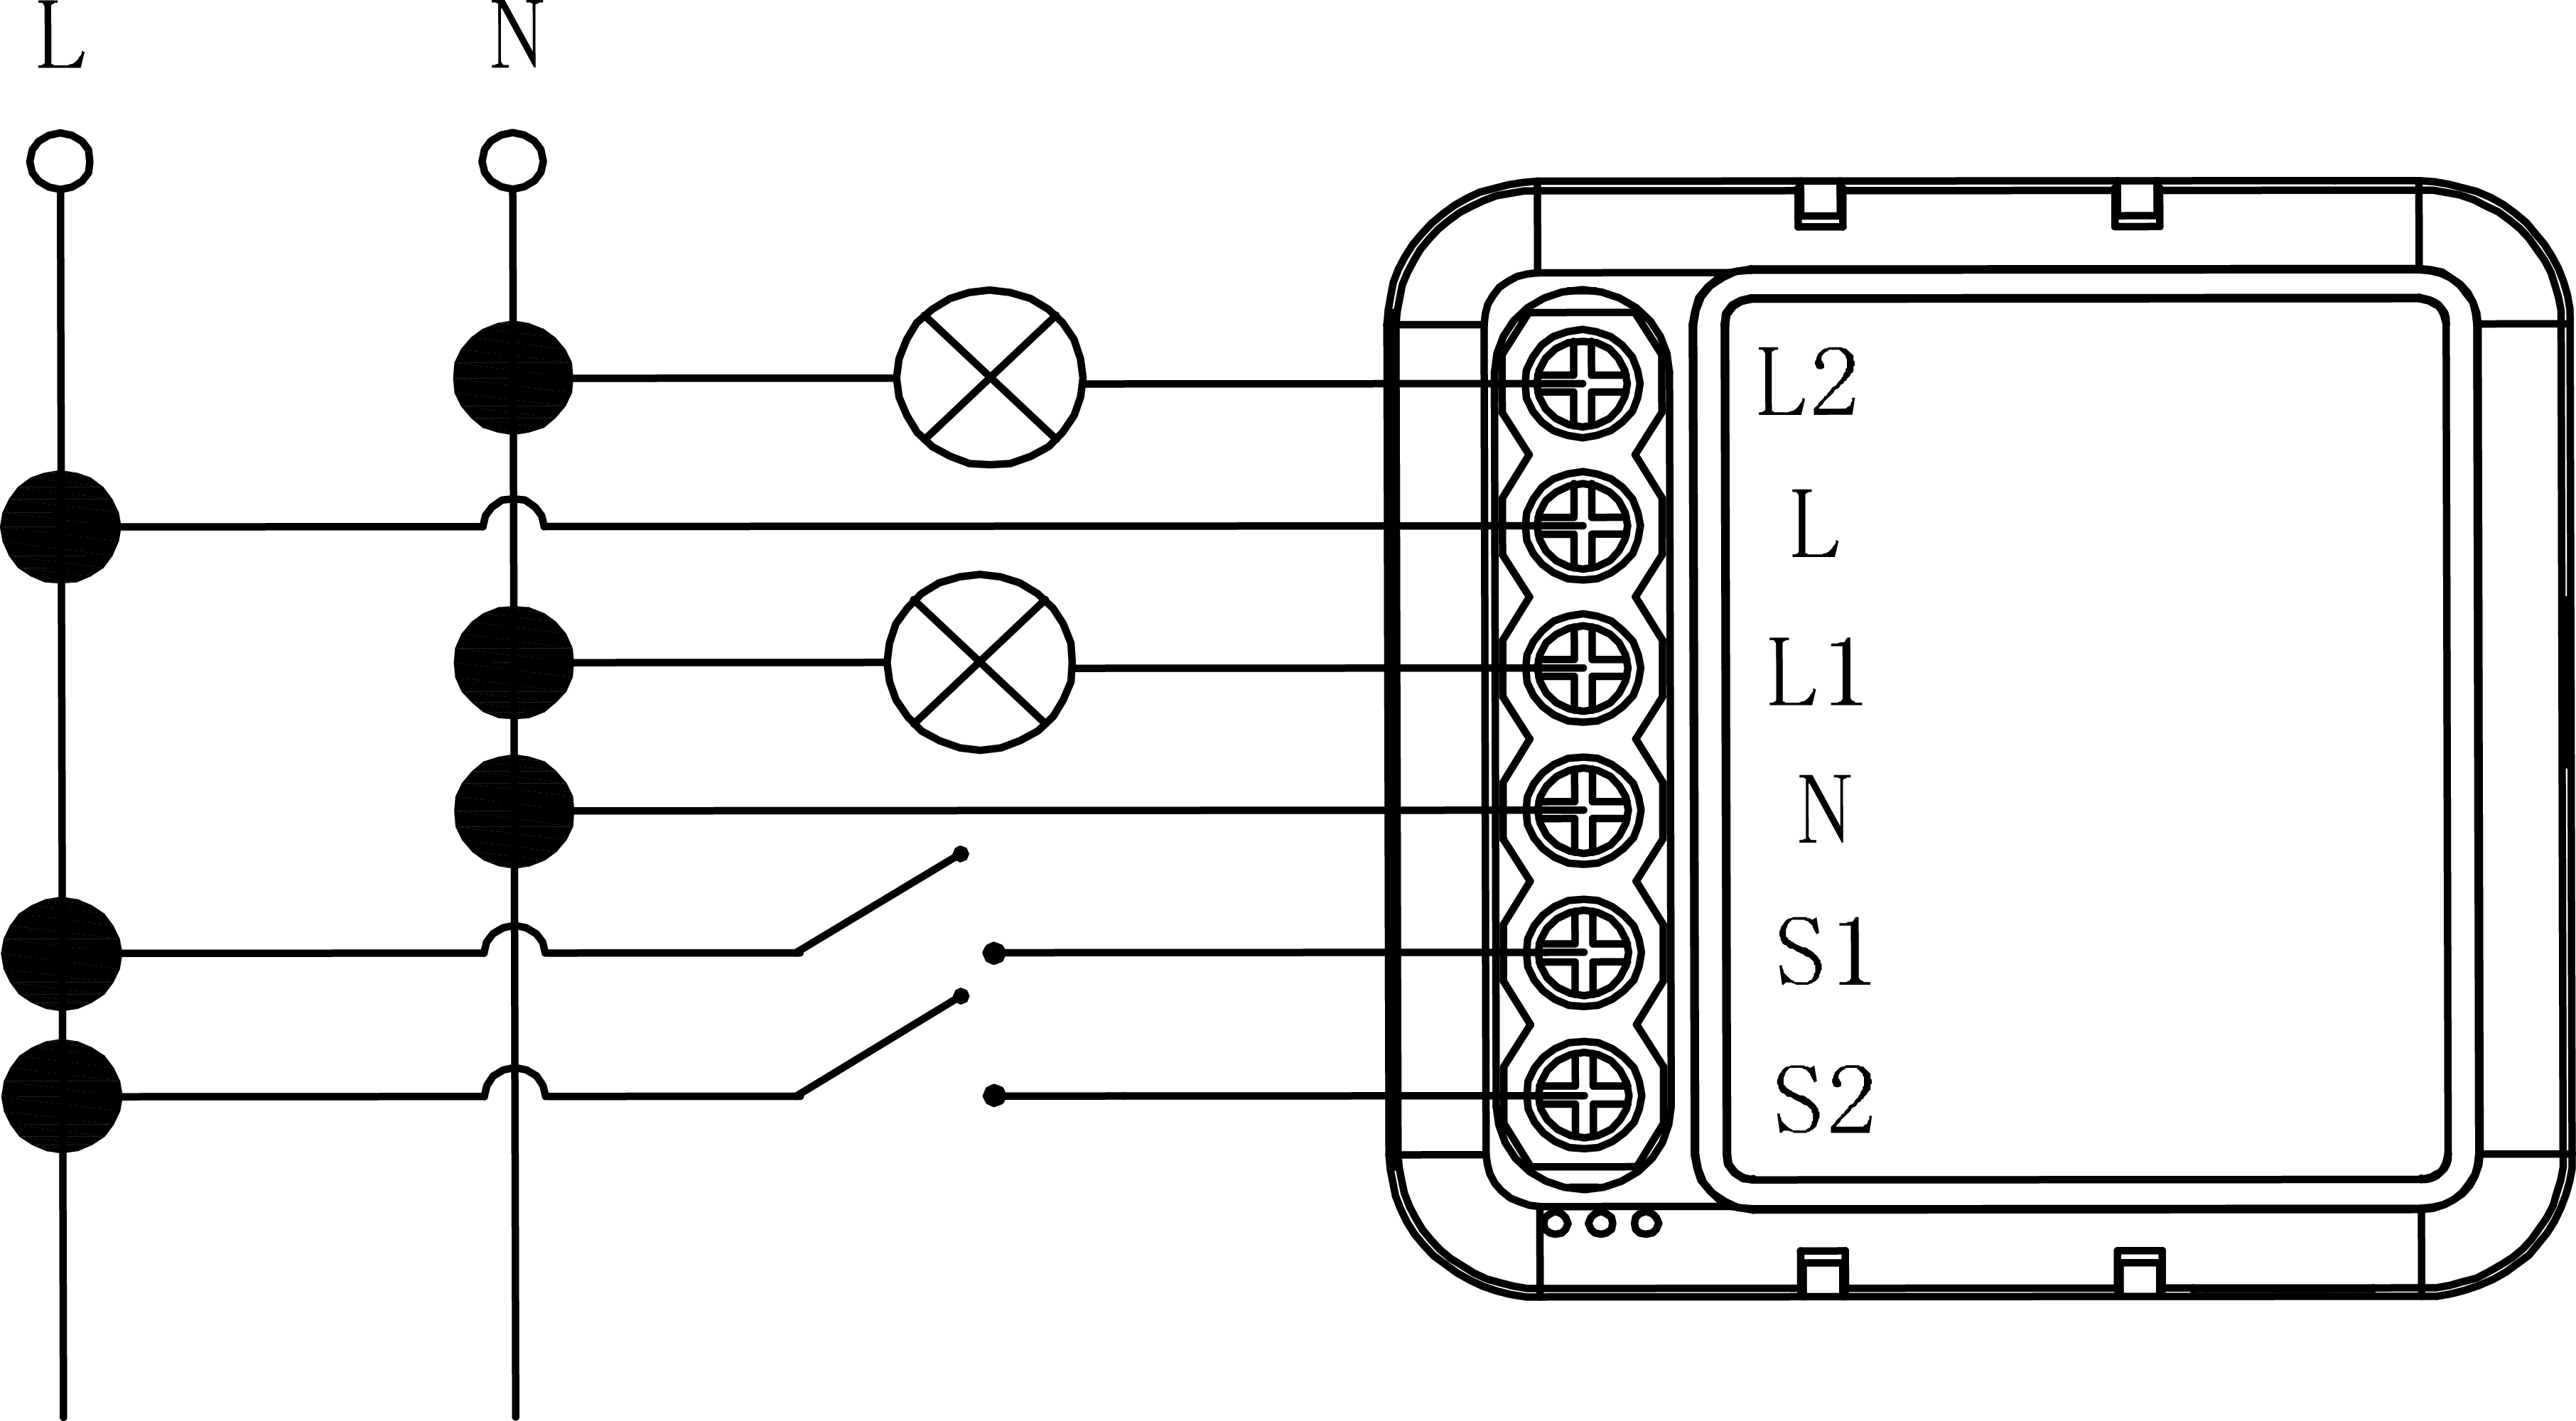
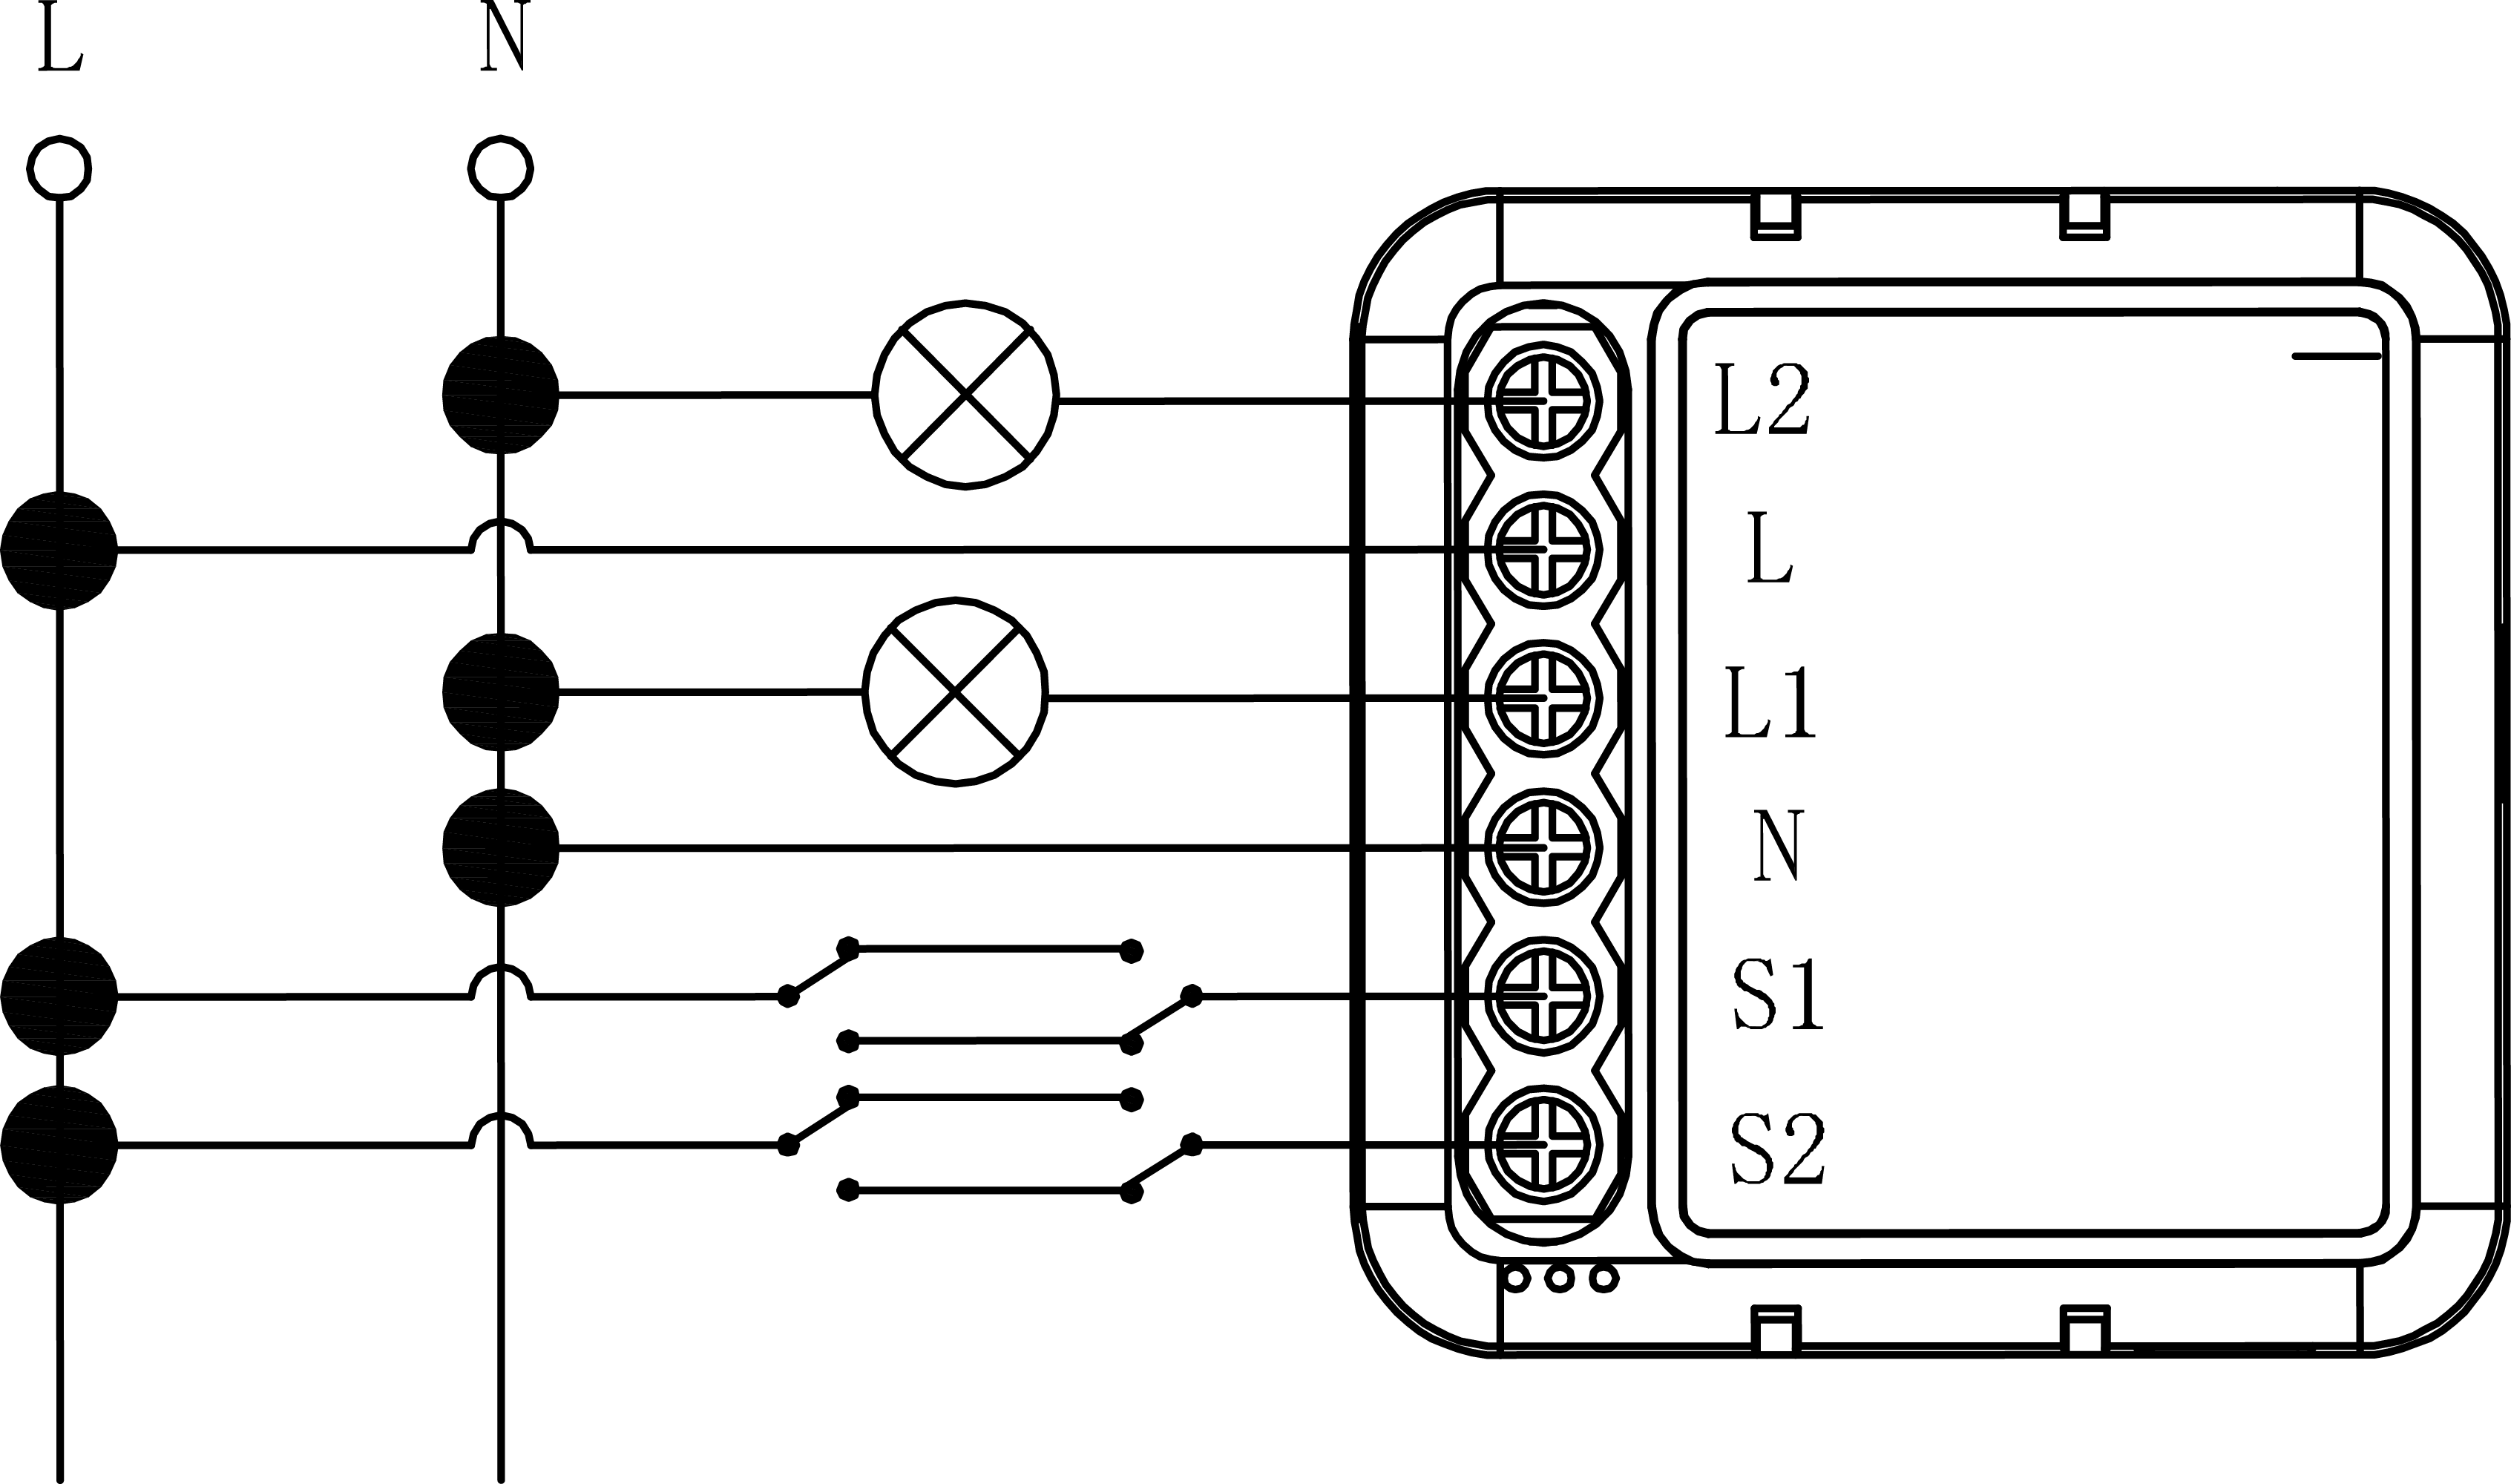
1. Connect wires according to the wiring diagram;
2. Insert the module into the junction box;
3. Turn on the main power switch and add devices according to the [**quick setup.**](#quick-setup)

<figure><img src="https://3898863868-files.gitbook.io/~/files/v0/b/gitbook-x-prod.appspot.com/o/spaces%2F-MDHxt7lj9funy2SIeFB%2Fuploads%2FvdFcwHNV6jJoOXKSA6mC%2Finstall%20to%20the%20wall%20-%201.png?alt=media&amp;token=62270ef7-55d4-47ab-bd75-8ef523921b11" alt=""><figcaption><p>Insert into the junction box</p></figcaption></figure>

***

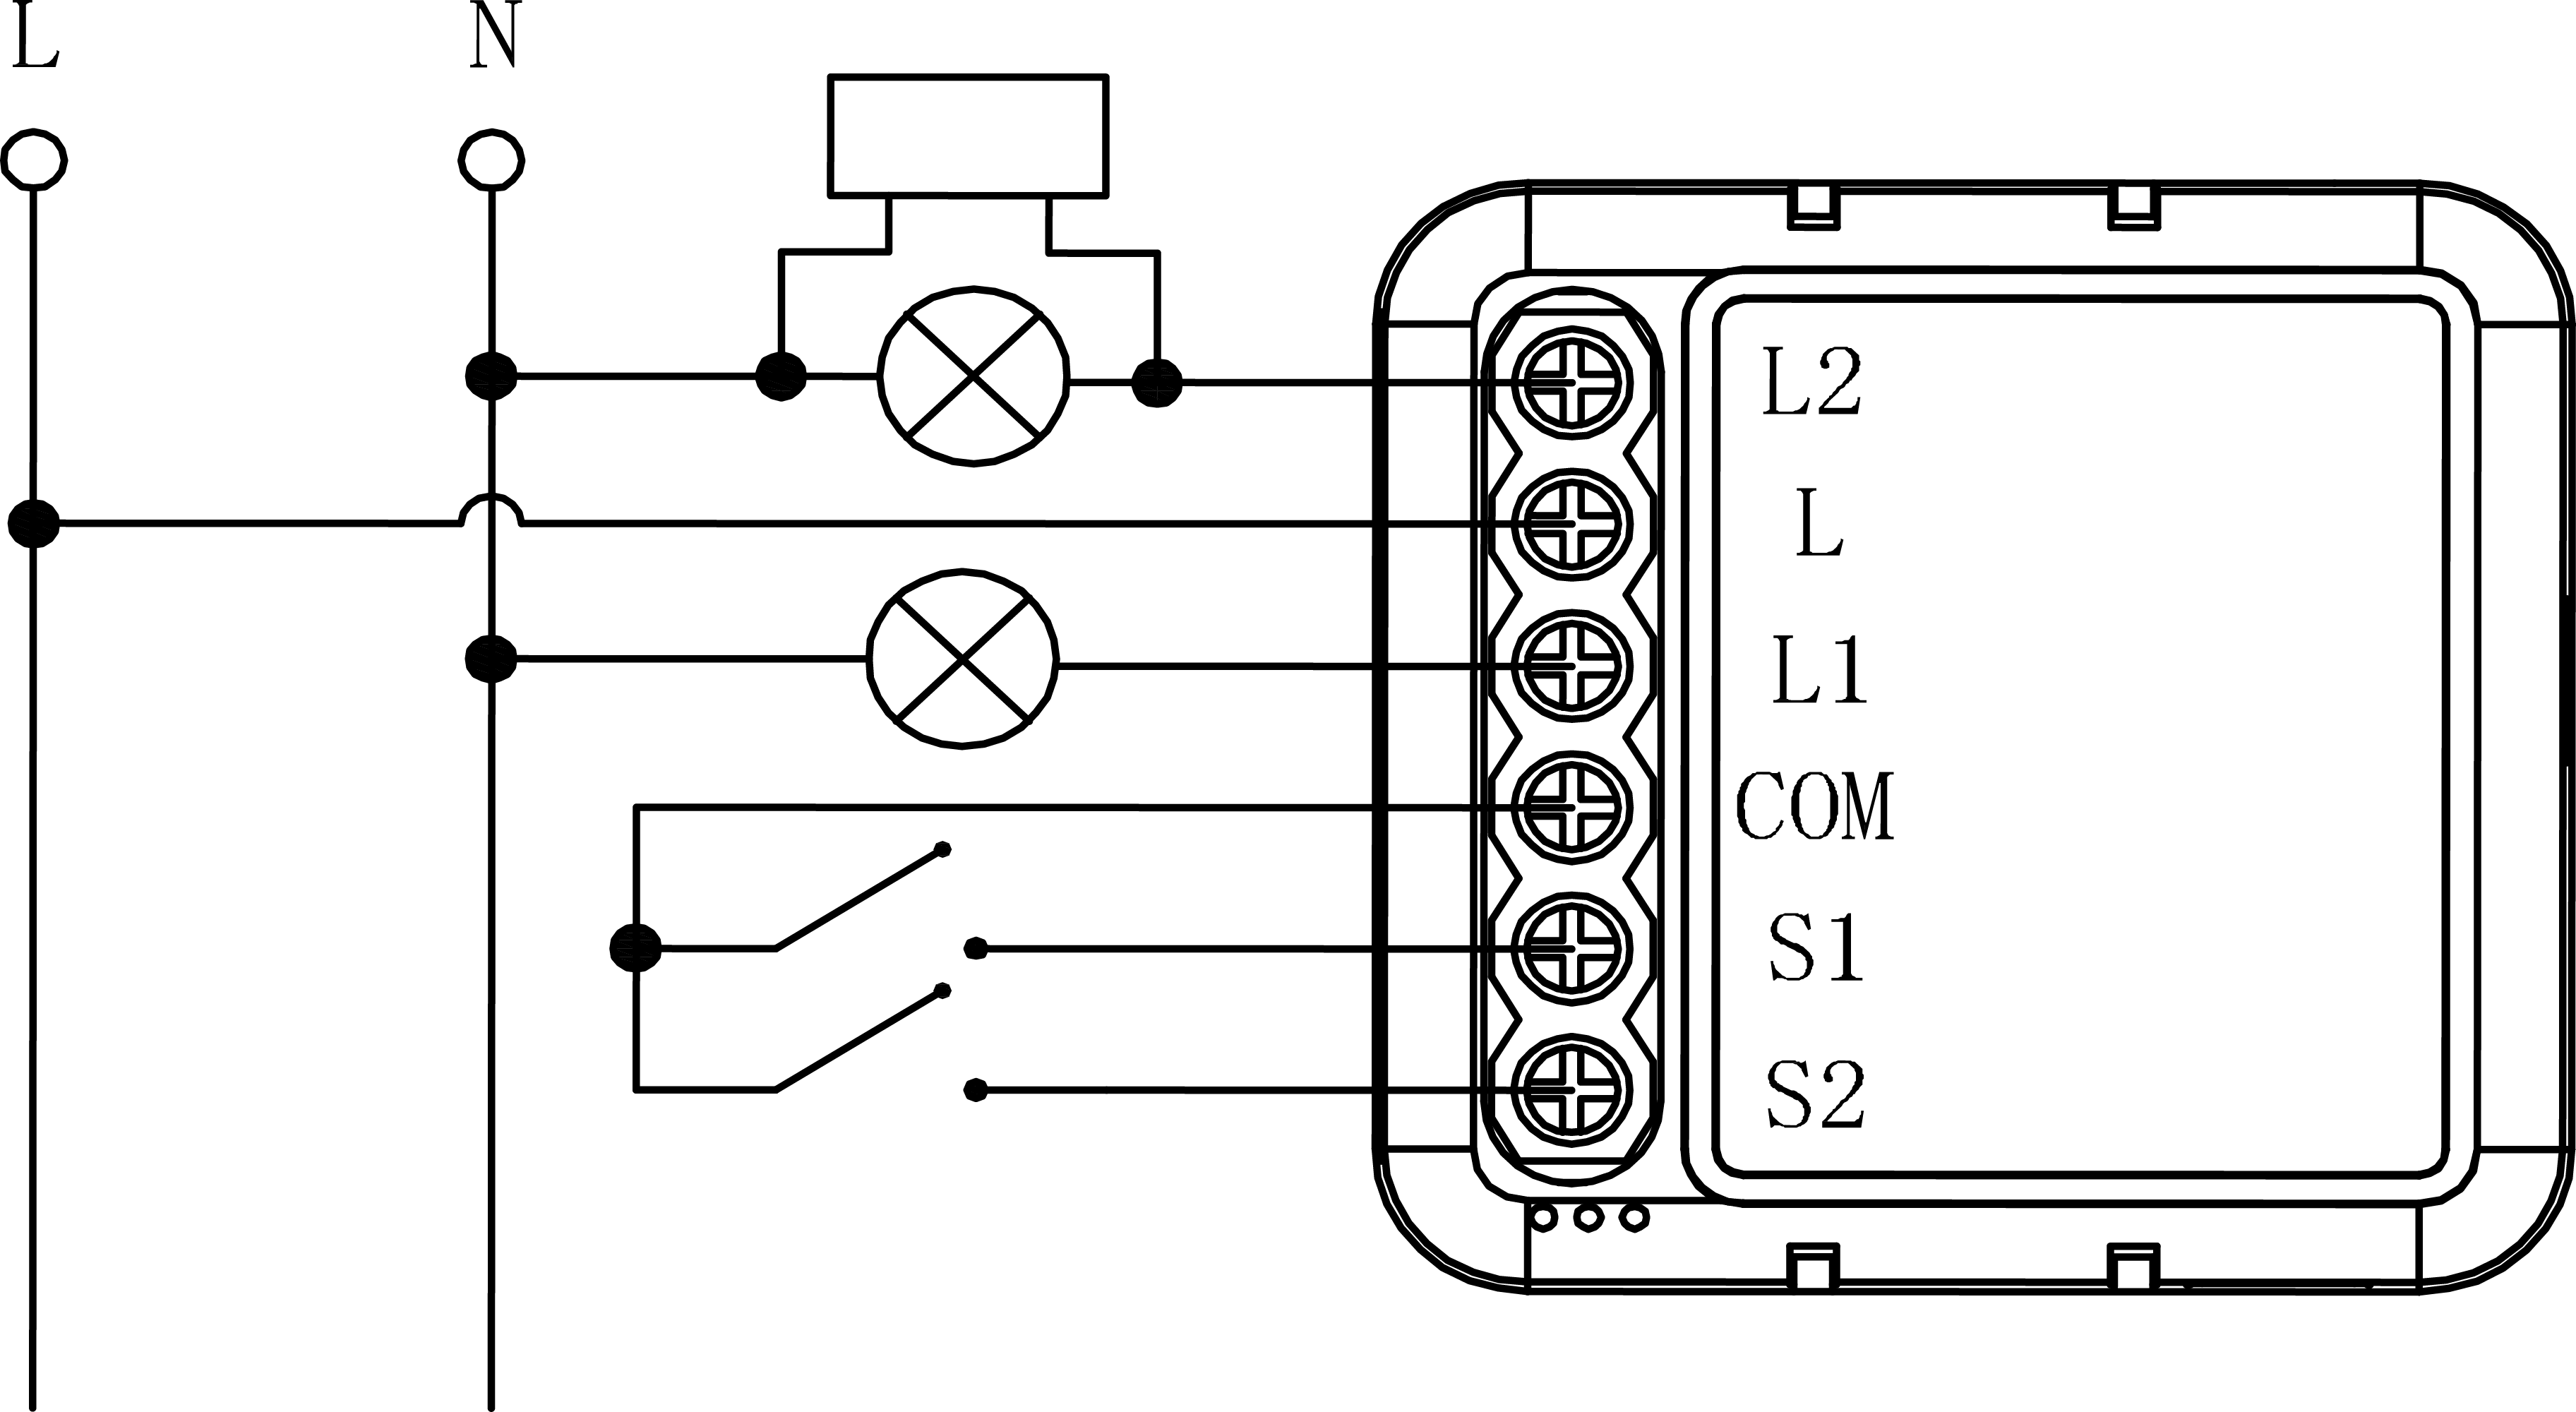
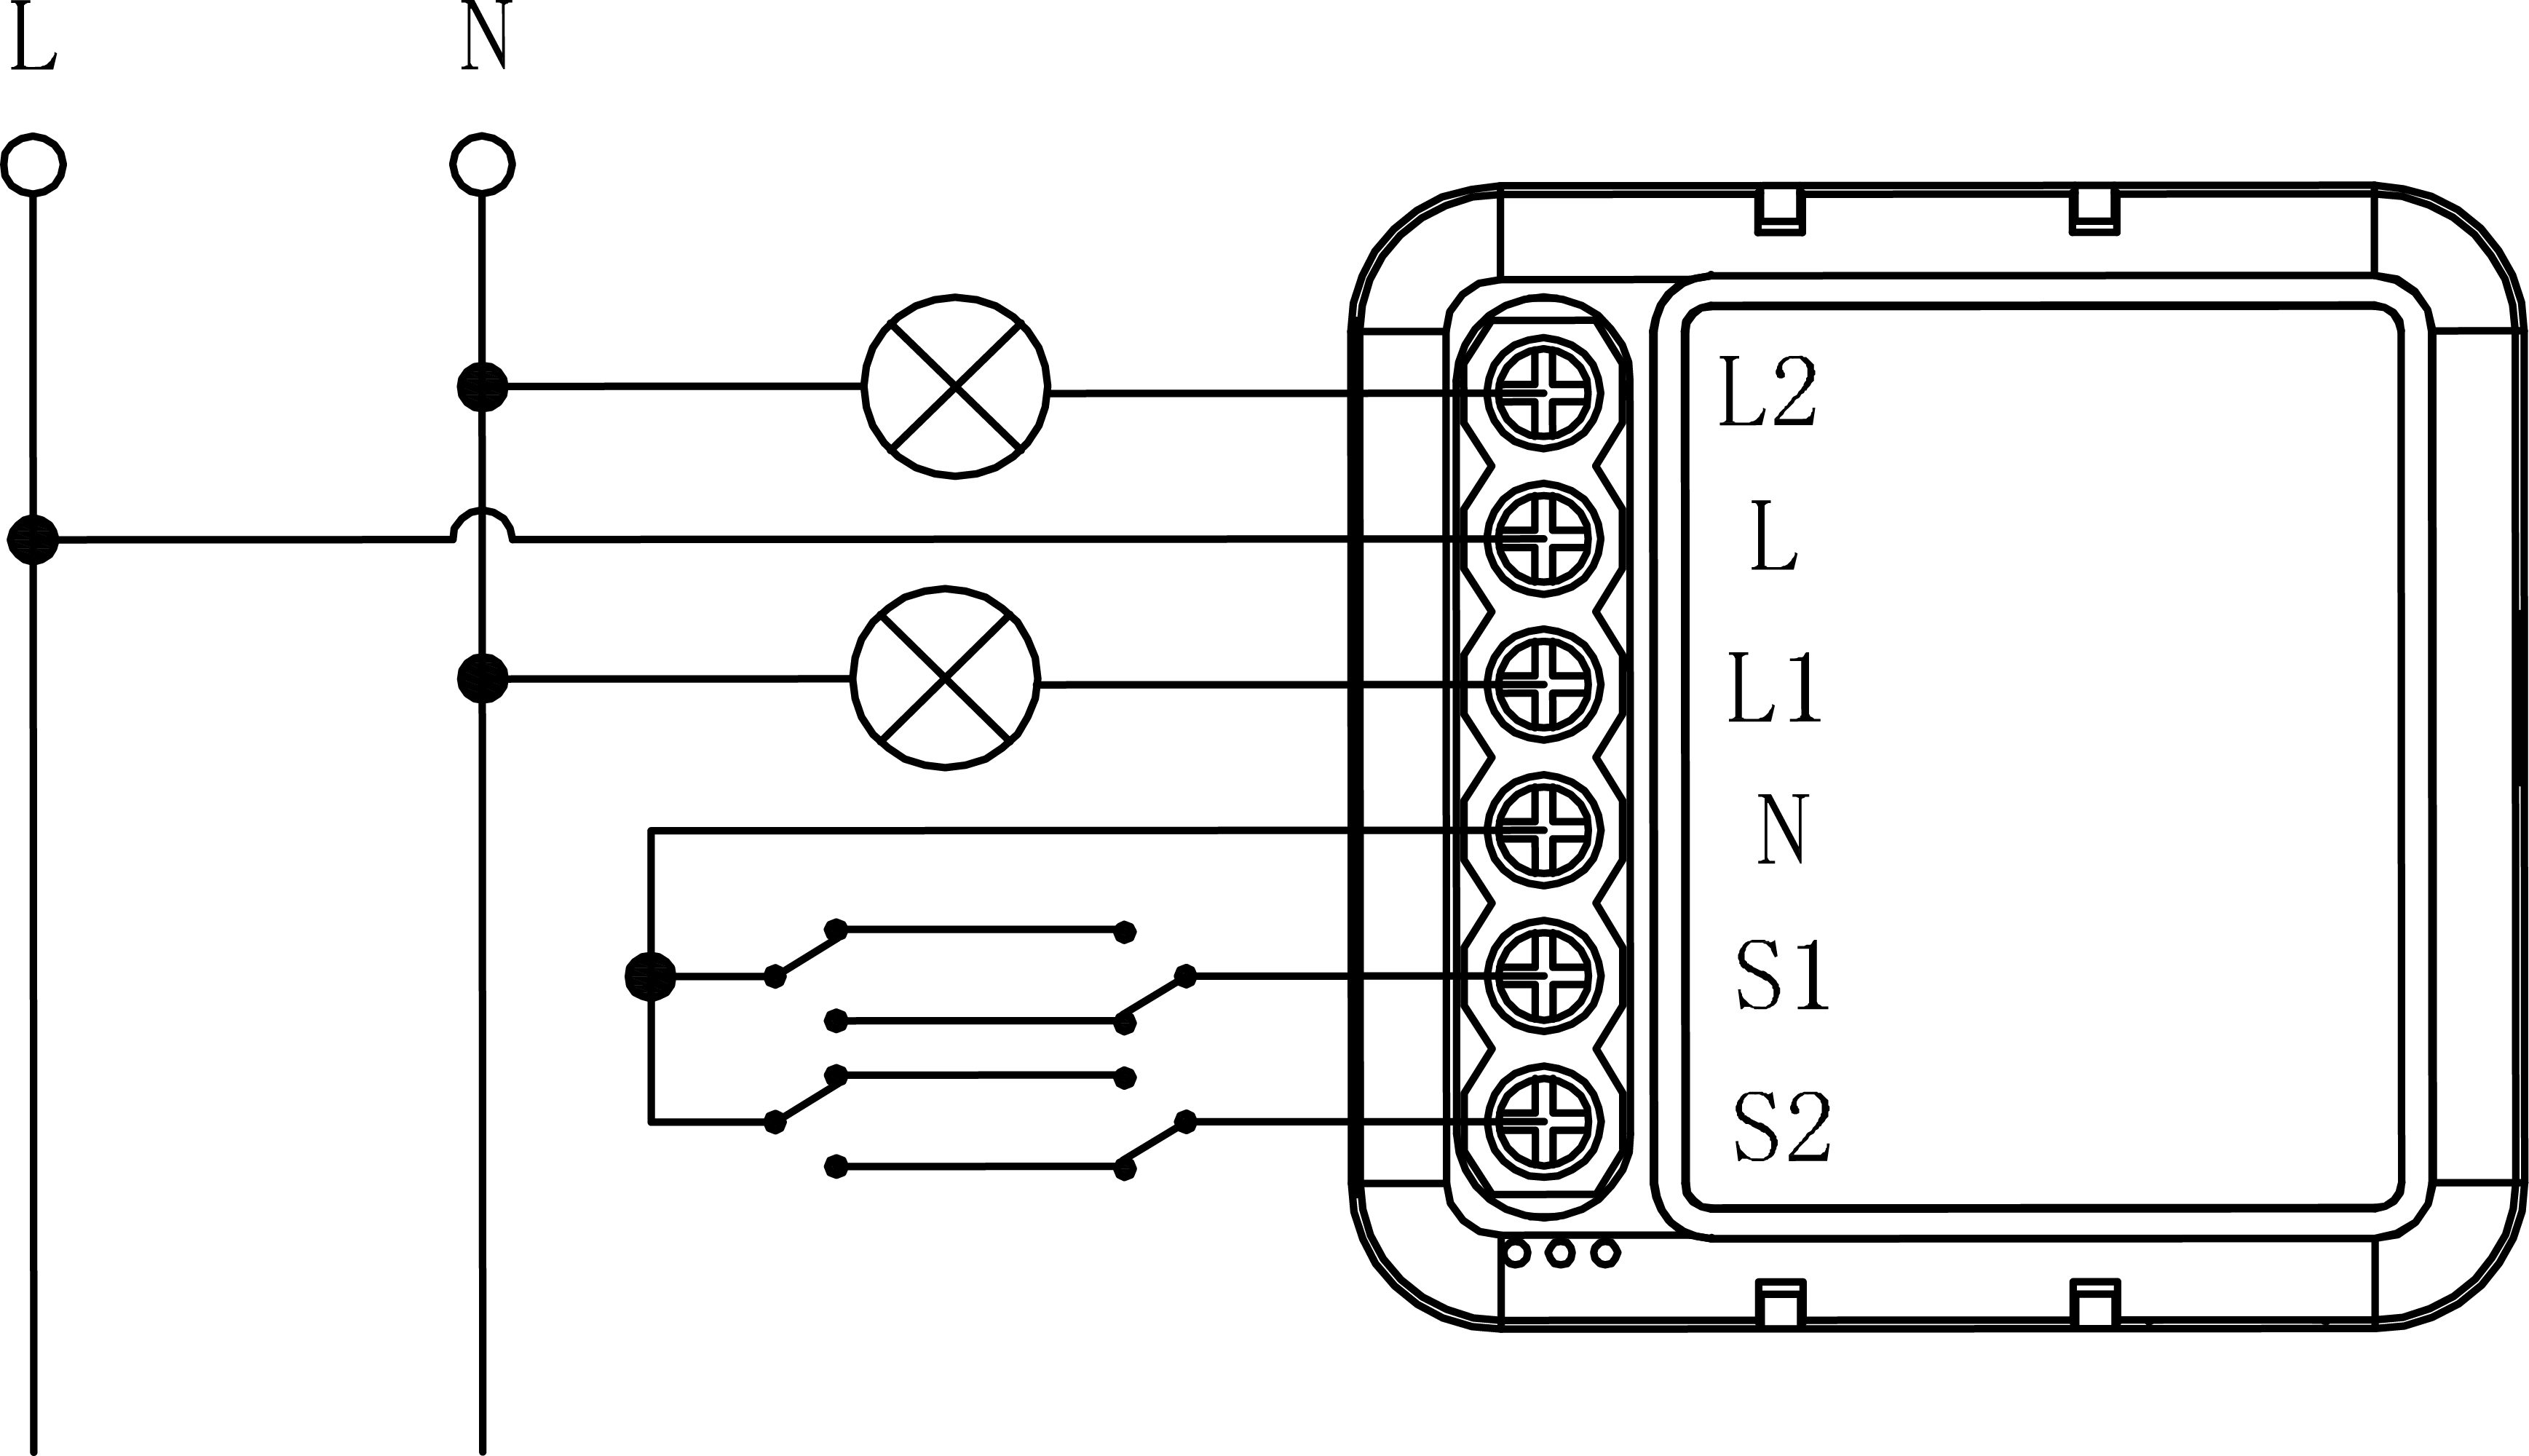
## Wiring Schematic

<figure><img src="https://3898863868-files.gitbook.io/~/files/v0/b/gitbook-x-prod.appspot.com/o/spaces%2F-MDHxt7lj9funy2SIeFB%2Fuploads%2FXQFuKcIyUseqvp14ZhbZ%2F1ch%20-%20without%20switch.png?alt=media&amp;token=dbb0acb8-84a5-44e4-8127-432f175fe4ff" alt=""><figcaption><p>Without Switch</p></figcaption></figure>

<figure><img src="https://3898863868-files.gitbook.io/~/files/v0/b/gitbook-x-prod.appspot.com/o/spaces%2F-MDHxt7lj9funy2SIeFB%2Fuploads%2FVnMQAjf36JSYWatleh0z%2F1ch%20-%201%20switch.png?alt=media&amp;token=ddebd351-10a6-4c5b-b991-f6d74a8e7a98" alt=""><figcaption><p>Connect 1 Switch</p></figcaption></figure>

<figure><img src="https://3898863868-files.gitbook.io/~/files/v0/b/gitbook-x-prod.appspot.com/o/spaces%2F-MDHxt7lj9funy2SIeFB%2Fuploads%2F4zGE93NkO6ue7iYH58jc%2F1ch%20-%202%20switch.png?alt=media&amp;token=0912a5eb-93e7-4300-9df9-673a637e7a8e" alt=""><figcaption><p>Connect 2 3-way Switches</p></figcaption></figure>

{% hint style="success" %}
The mechanical switch can only be used with AC100 - 240V.
{% endhint %}

***

## Tech Specs <a href="#s4dtx" id="s4dtx"></a>

* Voltage: AC100 - 240V | 50/60Hz
* Dimensions: 39.2 x 39.2 x 18mm (without mounting clip) | 43 x 39.2 x 22.3mm (with mounting clip)&#x20;
* Wireless Standard: Wi-Fi - 2.4GHz + Bluetooth
* Max. Load: LED 250W | 10A

<figure><img src="https://3898863868-files.gitbook.io/~/files/v0/b/gitbook-x-prod.appspot.com/o/spaces%2F-MDHxt7lj9funy2SIeFB%2Fuploads%2FBldcfXsEWy89au2EJTd6%2Fx2000px.png?alt=media&amp;token=2b65f422-155d-48cf-9880-7903b97df1bd" alt=""><figcaption><p>Size</p></figcaption></figure>

***

## Quick Setup

### 1. Register an account <a href="#izkpz" id="izkpz"></a>

<details>

<summary>Use the 'Smart Life' App</summary>

Please jump to the '[**Use Smart Life App**](/smart-life/user-manual-for-smart-life)' page to view

</details>

### 2. Add Device <a href="#pxw57" id="pxw57"></a>

Open the Smart Life App, click the '+' in the upper right corner of the homepage, enter the add device (accessory) page, select it, and follow the prompts

{% hint style="success" %}
**2 ways to put the module into network pairing mode**

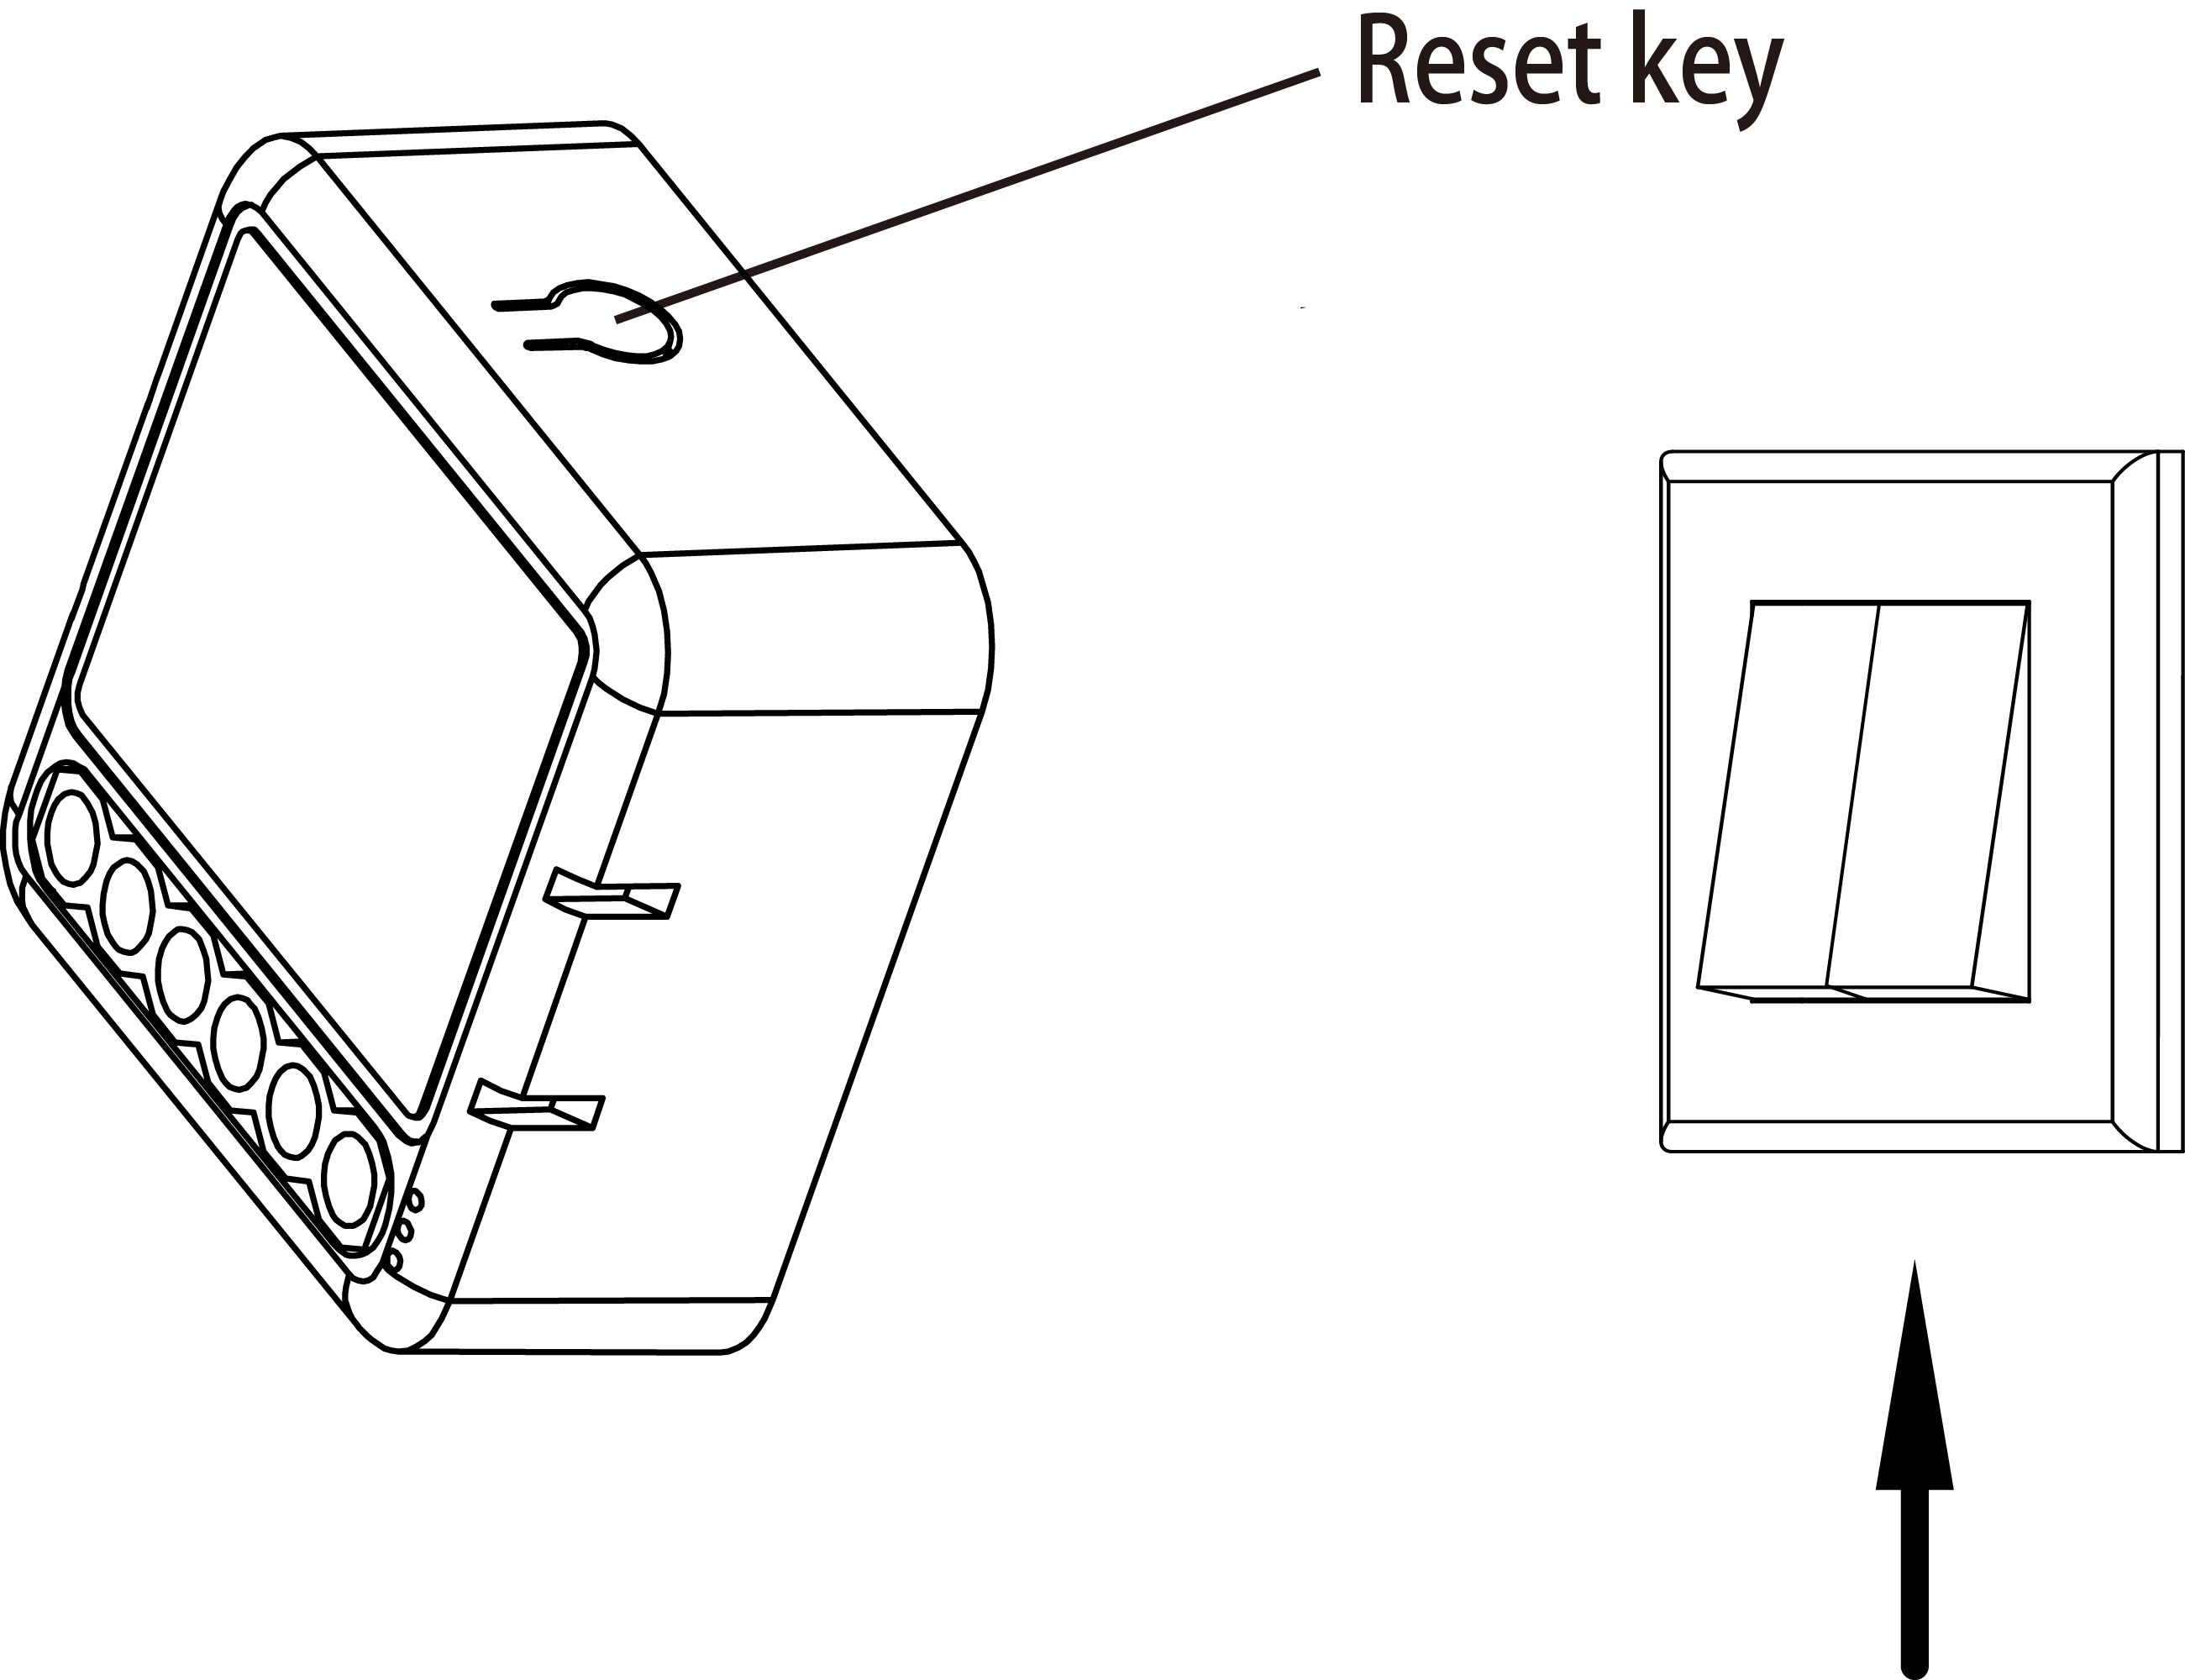
* Press the reset key for about 10 seconds
* Press the traditional switch 5 times until the indicator light is flashing quickly

<img src="https://3898863868-files.gitbook.io/~/files/v0/b/gitbook-x-prod.appspot.com/o/spaces%2F-MDHxt7lj9funy2SIeFB%2Fuploads%2FZNdw6MwnWZiHwEEkzCOr%2F2%20methods%20to%20network%20pairing.png?alt=media&amp;token=0ea66942-0c61-4bac-a806-be01581ab4b3" alt="" data-size="original">
{% endhint %}

{% hint style="success" %}
If the addition fails, please press and hold the network configuration button again and try again.
{% endhint %}

### 3. Control the Device <a href="#kjvoo" id="kjvoo"></a>

Use the App to control. If you can control the device normally, it means the device is working properly.

***

## Indicator Light Status Description

| **Indicator Status** | **Description**              |
| -------------------- | ---------------------------- |
| Blue flashes quickly | Connecting the network       |
| Blue is always on    | Network connection is normal |
| Indicator off        | Device offline/disconnected  |

***

## Toxic and Hazardous Substances Statement

<table data-header-hidden data-full-width="false"><thead><tr><th width="141"></th><th width="91"></th><th width="89"></th><th width="87"></th><th width="96"></th><th width="105"></th><th></th></tr></thead><tbody><tr><td>Part Name</td><td>铅 (Pb)</td><td>汞 (Hg)</td><td>镉(Cd)</td><td>六价铬<br>(Cr(VI))</td><td>多溴联苯<br>(PBB)</td><td>多溴二苯醚<br>(PBDE)</td></tr><tr><td>Plastic Shell</td><td>O</td><td>O</td><td>O</td><td>O</td><td>O</td><td>O</td></tr><tr><td>Plastic bracket</td><td>O</td><td>O</td><td>O</td><td>O</td><td>O</td><td>O</td></tr><tr><td>Electronic Component</td><td>O</td><td>O</td><td>O</td><td>O</td><td>O</td><td>O</td></tr><tr><td>PCBA</td><td>O</td><td>O</td><td>O</td><td>O</td><td>O</td><td>O</td></tr><tr><td>Metal</td><td>O</td><td>O</td><td>O</td><td>O</td><td>O</td><td>O</td></tr></tbody></table>

This form is prepared in accordance with the provisions of SJ/T 11364.

* O: Indicates that the content of the hazardous substance in all homogeneous materials of this part is below the limit requirements specified in GB/T 26572.
* ×: Indicates that the content of the hazardous substance in at least one homogeneous material of this part exceeds the limit requirements specified in GB/T 26572.

***

## Instructions for Use of Micropower Equipment

1. The Wi-Fi technology used in this product complies with the technical requirements of general micropower equipment Class F equipment in the 'Micropower Short-range Radio Transmission Equipment Catalog and Technical Requirements' for data transmission applications. It adopts integrated antenna, control, adjustment and switch Please refer to the relevant content in the product manual for usage instructions;
2. You are not allowed to change the usage scenarios or conditions without authorization, expand the transmission frequency range, increase the transmission power (including installing additional RF power amplifiers), and you are not allowed to change the transmitting antenna without authorization;
3. Shall not cause harmful interference to other legal radio stations, nor shall it offer protection against harmful interference;
4. Should withstand interference from industrial, scientific and medical (ISM) application equipment that radiates radio frequency energy or other legitimate radio stations;
5. If it causes harmful interference to other legal radio stations (stations), you should stop using it immediately and take measures to eliminate the interference before continuing to use it;
6. In aircraft and in accordance with laws and regulations, relevant national regulations, and standards designated radio astronomy observatories, weather radar stations, satellite earth stations (including measurement and control, ranging, receiving, and navigation stations) and other military and civilian radio stations (stations), airports, etc. Micropower equipment used in electromagnetic environment protection areas must comply with the regulations of electromagnetic environment protection and relevant industry authorities;
7. It is prohibited to use all types of model remote controls within a radius of 5,000 meters with the center point of the airport runway as the center;
8. The operating temperature of micropower equipment is -10℃ - 40℃, and the power supply is AC100 - 240V | 50/60Hz

***

## Warranty Instructions

The after-sales service of this product is strictly in accordance with the "Consumer Rights and Interests Protection Law of the People's Republic of China" and the "Product Quality Law of the People's Republic of China" to implement after-sales three-guarantee service. The service content is as follows:

### Warranty Policy

During the validity period of the Three Guarantees, you can enjoy free returns, exchanges, and repair services in accordance with this provision. Returns, exchanges, and repairs should be handled with invoices.

1. Returns without reason within 7 days from the day after receipt (e-commerce purchase channel), the user will bear the logistics costs.
2. This product has performance failures listed in the "Product Performance Failure Table". After after-sales service testing and confirmation, you can enjoy the following services for free:

| Service Type | Service Policy                                                                    |
| ------------ | --------------------------------------------------------------------------------- |
| Return       | Return of product due to quality reasons within 7 days from the day after receipt |
| Exchange     | Exchange for product quality reasons within 15 days from the day after receipt    |
| Repair       | Repair due to product quality within 1 year from the day after receipt            |

{% hint style="info" %}
Friendly reminder: Since packaging boxes are required to ensure the safety of product transportation during transportation, it is recommended that you keep the packaging boxes for at least 30 days from the day after signing for the product.
{% endhint %}

### Non-warranty Regulations

1. Unauthorized repair, misuse, collision, neglect, abuse, liquid intrusion, accident, alteration, incorrect use of non-product accessories, or tearing, alteration of labels, and anti-counterfeiting marks;
2. The three-pack validity period has expired;
3. Damage caused by force majeure;
4. Failure to comply with the performance failures listed in the "Product Performance Failure Table";
5. This product and its accessories have performance failures listed in the "Product Performance Failure Table" due to human reasons.

***


# SML-01WB-16A

User Manual for SML-01WB-16A 1CH High Power Wi-Fi Switch Module

***

## Appearance

<figure><img src="https://3898863868-files.gitbook.io/~/files/v0/b/gitbook-x-prod.appspot.com/o/spaces%2F-MDHxt7lj9funy2SIeFB%2Fuploads%2F9QDwqjYTOceYIR74FUqq%2Fsml-01wb-16a-1000px.jpg?alt=media&amp;token=1e7cf5eb-c3e8-4482-9017-e33308dd078c" alt="" width="375"><figcaption><p>SML-01WB-16A</p></figcaption></figure>

***

## Introduce <a href="#a7ulc" id="a7ulc"></a>

### Short Description <a href="#shellyplus1-snsw-001x16eu-shortdescription" id="shellyplus1-snsw-001x16eu-shortdescription"></a>

* SML-01WB-16A is a small form factor smart switch which allows remote control of electric appliances through a mobile phone, tablet and home automation system.
* SML-01WB-16A can be accessed, controlled and monitored remotely from any place where the user has internet connectivity, as long as the device is connected to a Wi-Fi router and the Internet.
* It can be retrofitted into standard electrical wall boxes, behind power sockets and light switches or other places with limited space.

### Features <a href="#h4js5" id="h4js5"></a>

* No gateway required - You don’t need to purchase a gateway for this device, the device connects directly to your house’s Wi-Fi
* Wi-Fi + Bluetooth dual mode - connect to the network faster, with network provisioning speed 2 times faster than pure Wi-Fi devices
* App remote control - control the device anytime and anywhere through mobile App
* Smart linkage - In smart scene mode, linkage can be set to sound an alarm. The mobile App will also receive prompts, such as garage door open/close status, timeout notifications and overnight notifications, to remind you to close the garage door.
* Voice control - used with Amazon Echo, Google Home, Yandex, Tmall Genie
* Offline function - when the device is offline, the App will remind the device to go offline after 30 minutes
* Home Sharing - Create a smart home with your family
* Set a schedule - turn connected devices on and off at specified times
* Sharing feature - share with family members for joint control
* Supports Siri - This device is not compatible with HomeKit. But you can add click-to-run scenes to Siri shortcuts in the Smart Life App

{% hint style="success" %}
Bluetooth is only used for network signal connection and cannot be used alone to control devices. Wi-Fi + Bluetooth distribution is faster
{% endhint %}

***

## Safety Consultation and Precautions

1. The installation process of this product involves strong electricity and must be installed by professionals in accordance with electrical specifications and product instructions;
2. This product is for indoor use only, please do not use it in humid environments or outdoors;
3. This product is only suitable for safe use in areas below 2,000 meters above sea level;
4. Pay attention to moisture-proof, do not spill water or other liquids on this product;
5. Do not place this product near a heat source;
6. Do not attempt to repair this product yourself, this work should be performed by authorized professionals;
7. Do not use it with overload. Please make sure that the 10A overcurrent protection circuit breaker on the front of this product is working properly before powering on. It is recommended that the stripping length of the terminal connecting wire is 6-8 mm;
8. This product should not be installed or fixed in a place that can be touched by human hands, such as outside the wall. It should be installed in an appliance or a hidden box;
9. The position of the fixed antenna should be as far away as possible from metal, wires and the module itself. (Applicable to external antenna models).

***

## Main Applications <a href="#shellyplus1-snsw-001x16eu-mainapplications" id="shellyplus1-snsw-001x16eu-mainapplications"></a>

* Residential
* MDU (Multi Dwelling Units - apartments, condominiums, hotels, etc.)
* Light commercial (small office buildings, small retail/restaurant/gas station, etc.)
* Government/municipal
* University/college

***

## Integrations <a href="#shellyplus1-snsw-001x16eu-integrations" id="shellyplus1-snsw-001x16eu-integrations"></a>

* Google Assistant
* Amazon Alexa
* Yandex Alice
* Baidu Xiaodu
* Tmall Genie

***

## Supported Load Types <a href="#shellyplus1-snsw-001x16eu-supportedloadtypes" id="shellyplus1-snsw-001x16eu-supportedloadtypes"></a>

* Resistive (incandescent bulbs, heating devices)
* Capacitive (capacitor banks, electronic equipment, motor start capacitors)
* Inductive with RC Snubber (LED light drivers, transformers, fans, refrigerators, air-conditioners)

***

## Installation

{% hint style="danger" %}
Please make sure the main power switch is turned off before installation
{% endhint %}

1. Connect wires according to the wiring diagram;
2. Insert the module into the junction box;
3. Turn on the main power switch and add devices according to the [**quick setup.**](#quick-setup)

<figure><img src="https://3898863868-files.gitbook.io/~/files/v0/b/gitbook-x-prod.appspot.com/o/spaces%2F-MDHxt7lj9funy2SIeFB%2Fuploads%2FvdFcwHNV6jJoOXKSA6mC%2Finstall%20to%20the%20wall%20-%201.png?alt=media&amp;token=62270ef7-55d4-47ab-bd75-8ef523921b11" alt=""><figcaption><p>Insert into the junction box</p></figcaption></figure>

***

## Wiring Schematic

<figure><img src="https://3898863868-files.gitbook.io/~/files/v0/b/gitbook-x-prod.appspot.com/o/spaces%2F-MDHxt7lj9funy2SIeFB%2Fuploads%2FXQFuKcIyUseqvp14ZhbZ%2F1ch%20-%20without%20switch.png?alt=media&amp;token=dbb0acb8-84a5-44e4-8127-432f175fe4ff" alt=""><figcaption><p>Without Switch</p></figcaption></figure>

<figure><img src="https://3898863868-files.gitbook.io/~/files/v0/b/gitbook-x-prod.appspot.com/o/spaces%2F-MDHxt7lj9funy2SIeFB%2Fuploads%2FVnMQAjf36JSYWatleh0z%2F1ch%20-%201%20switch.png?alt=media&amp;token=ddebd351-10a6-4c5b-b991-f6d74a8e7a98" alt=""><figcaption><p>Connect 1 Switch</p></figcaption></figure>

<figure><img src="https://3898863868-files.gitbook.io/~/files/v0/b/gitbook-x-prod.appspot.com/o/spaces%2F-MDHxt7lj9funy2SIeFB%2Fuploads%2F4zGE93NkO6ue7iYH58jc%2F1ch%20-%202%20switch.png?alt=media&amp;token=0912a5eb-93e7-4300-9df9-673a637e7a8e" alt=""><figcaption><p>Connect 2 3-way Switches</p></figcaption></figure>

{% hint style="success" %}
The mechanical switch can only be used with AC100 - 240V.
{% endhint %}

***

## Tech Specs <a href="#s4dtx" id="s4dtx"></a>

* Voltage: AC100 - 240V | 50/60Hz
* Dimensions: 39.2 x 39.2 x 18mm (without mounting clip) | 43 x 39.2 x 22.3mm (with mounting clip)&#x20;
* Wireless Standard: Wi-Fi - 2.4GHz + Bluetooth
* Max. Load: LED 300W | 16A

<figure><img src="https://3898863868-files.gitbook.io/~/files/v0/b/gitbook-x-prod.appspot.com/o/spaces%2F-MDHxt7lj9funy2SIeFB%2Fuploads%2FBldcfXsEWy89au2EJTd6%2Fx2000px.png?alt=media&amp;token=2b65f422-155d-48cf-9880-7903b97df1bd" alt=""><figcaption><p>Size</p></figcaption></figure>

***

## Quick Setup

### 1. Register an account <a href="#izkpz" id="izkpz"></a>

<details>

<summary>Use the 'Smart Life' App</summary>

Please jump to the '[**Use Smart Life App**](/smart-life/user-manual-for-smart-life)' page to view

</details>

### 2. Add Device <a href="#pxw57" id="pxw57"></a>

Open the Smart Life App, click the '+' in the upper right corner of the homepage, enter the add device (accessory) page, select it, and follow the prompts

{% hint style="success" %}
**2 ways to put the module into network pairing mode**

* Press the reset key for about 10 seconds
* Press the traditional switch 5 times until the indicator light is flashing quickly

<img src="https://3898863868-files.gitbook.io/~/files/v0/b/gitbook-x-prod.appspot.com/o/spaces%2F-MDHxt7lj9funy2SIeFB%2Fuploads%2FZNdw6MwnWZiHwEEkzCOr%2F2%20methods%20to%20network%20pairing.png?alt=media&amp;token=0ea66942-0c61-4bac-a806-be01581ab4b3" alt="" data-size="original">
{% endhint %}

{% hint style="success" %}
If the addition fails, please press and hold the network configuration button again and try again.
{% endhint %}

### 3. Control the Device <a href="#kjvoo" id="kjvoo"></a>

Use the App to control. If you can control the device normally, it means the device is working properly.

***

## Indicator Light Status Description

| **Indicator Status** | **Description**              |
| -------------------- | ---------------------------- |
| Blue flashes quickly | Connecting the network       |
| Blue is always on    | Network connection is normal |
| Indicator off        | Device offline/disconnected  |

***

## Toxic and Hazardous Substances Statement

<table data-header-hidden data-full-width="false"><thead><tr><th width="141"></th><th width="91"></th><th width="89"></th><th width="87"></th><th width="96"></th><th width="105"></th><th></th></tr></thead><tbody><tr><td>Part Name</td><td>铅 (Pb)</td><td>汞 (Hg)</td><td>镉(Cd)</td><td>六价铬<br>(Cr(VI))</td><td>多溴联苯<br>(PBB)</td><td>多溴二苯醚<br>(PBDE)</td></tr><tr><td>Plastic Shell</td><td>O</td><td>O</td><td>O</td><td>O</td><td>O</td><td>O</td></tr><tr><td>Plastic bracket</td><td>O</td><td>O</td><td>O</td><td>O</td><td>O</td><td>O</td></tr><tr><td>Electronic Component</td><td>O</td><td>O</td><td>O</td><td>O</td><td>O</td><td>O</td></tr><tr><td>PCBA</td><td>O</td><td>O</td><td>O</td><td>O</td><td>O</td><td>O</td></tr><tr><td>Metal</td><td>O</td><td>O</td><td>O</td><td>O</td><td>O</td><td>O</td></tr></tbody></table>

This form is prepared in accordance with the provisions of SJ/T 11364.

* O: Indicates that the content of the hazardous substance in all homogeneous materials of this part is below the limit requirements specified in GB/T 26572.
* ×: Indicates that the content of the hazardous substance in at least one homogeneous material of this part exceeds the limit requirements specified in GB/T 26572.

***

## Instructions for Use of Micropower Equipment

1. The Wi-Fi technology used in this product complies with the technical requirements of general micropower equipment Class F equipment in the 'Micropower Short-range Radio Transmission Equipment Catalog and Technical Requirements' for data transmission applications. It adopts integrated antenna, control, adjustment and switch Please refer to the relevant content in the product manual for usage instructions;
2. You are not allowed to change the usage scenarios or conditions without authorization, expand the transmission frequency range, increase the transmission power (including installing additional RF power amplifiers), and you are not allowed to change the transmitting antenna without authorization;
3. Shall not cause harmful interference to other legal radio stations, nor shall it offer protection against harmful interference;
4. Should withstand interference from industrial, scientific and medical (ISM) application equipment that radiates radio frequency energy or other legitimate radio stations;
5. If it causes harmful interference to other legal radio stations (stations), you should stop using it immediately and take measures to eliminate the interference before continuing to use it;
6. In aircraft and in accordance with laws and regulations, relevant national regulations, and standards designated radio astronomy observatories, weather radar stations, satellite earth stations (including measurement and control, ranging, receiving, and navigation stations) and other military and civilian radio stations (stations), airports, etc. Micropower equipment used in electromagnetic environment protection areas must comply with the regulations of electromagnetic environment protection and relevant industry authorities;
7. It is prohibited to use all types of model remote controls within a radius of 5,000 meters with the center point of the airport runway as the center;
8. The operating temperature of micropower equipment is -10℃ - 40℃, and the power supply is AC100 - 240V | 50/60Hz

***

## Warranty Instructions

The after-sales service of this product is strictly in accordance with the "Consumer Rights and Interests Protection Law of the People's Republic of China" and the "Product Quality Law of the People's Republic of China" to implement after-sales three-guarantee service. The service content is as follows:

### Warranty Policy

During the validity period of the Three Guarantees, you can enjoy free returns, exchanges, and repair services in accordance with this provision. Returns, exchanges, and repairs should be handled with invoices.

1. Returns without reason within 7 days from the day after receipt (e-commerce purchase channel), the user will bear the logistics costs.
2. This product has performance failures listed in the "Product Performance Failure Table". After after-sales service testing and confirmation, you can enjoy the following services for free:

| Service Type | Service Policy                                                                    |
| ------------ | --------------------------------------------------------------------------------- |
| Return       | Return of product due to quality reasons within 7 days from the day after receipt |
| Exchange     | Exchange for product quality reasons within 15 days from the day after receipt    |
| Repair       | Repair due to product quality within 1 year from the day after receipt            |

{% hint style="info" %}
Friendly reminder: Since packaging boxes are required to ensure the safety of product transportation during transportation, it is recommended that you keep the packaging boxes for at least 30 days from the day after signing for the product.
{% endhint %}

### Non-warranty Regulations

1. Unauthorized repair, misuse, collision, neglect, abuse, liquid intrusion, accident, alteration, incorrect use of non-product accessories, or tearing, alteration of labels, and anti-counterfeiting marks;
2. The three-pack validity period has expired;
3. Damage caused by force majeure;
4. Failure to comply with the performance failures listed in the "Product Performance Failure Table";
5. This product and its accessories have performance failures listed in the "Product Performance Failure Table" due to human reasons.

***


# SML-01WB-ES-16A

User Manual for SML-01WB-ES-16A 1CH High Power Wi-Fi Switch Module - Energy Monitor

***

## Appearance

<figure><img src="https://3898863868-files.gitbook.io/~/files/v0/b/gitbook-x-prod.appspot.com/o/spaces%2F-MDHxt7lj9funy2SIeFB%2Fuploads%2FKWKJJf2pl83FTpFAEvLA%2Fsml-01wb-es-16a-1000px.jpg?alt=media&amp;token=41afb556-8114-4181-8f5b-da7b1aef0186" alt="" width="375"><figcaption><p>SML-01WB-ES-16A</p></figcaption></figure>

***

## Introduce <a href="#a7ulc" id="a7ulc"></a>

### Short Description <a href="#shellyplus1-snsw-001x16eu-shortdescription" id="shellyplus1-snsw-001x16eu-shortdescription"></a>

* SML-01WB-ES-16A is a small form factor smart switch which allows remote control of electric appliances through a mobile phone, tablet and home automation system.
* SML-01WB-ES-16A can be accessed, controlled and monitored remotely from any place where the user has internet connectivity, as long as the device is connected to a Wi-Fi router and the Internet.
* It can be retrofitted into standard electrical wall boxes, behind power sockets and light switches or other places with limited space.

### Features <a href="#h4js5" id="h4js5"></a>

* No gateway required - You don’t need to purchase a gateway for this device, the device connects directly to your house’s Wi-Fi
* Wi-Fi + Bluetooth dual mode - connect to the network faster, with network provisioning speed 2 times faster than pure Wi-Fi devices
* App remote control - control the device anytime and anywhere through mobile App
* Smart linkage - In smart scene mode, linkage can be set to sound an alarm. The mobile App will also receive prompts, such as garage door open/close status, timeout notifications and overnight notifications, to remind you to close the garage door.
* Voice control - used with Amazon Echo, Google Home, Yandex, Tmall Genie
* Offline function - when the device is offline, the App will remind the device to go offline after 30 minutes
* Home Sharing - Create a smart home with your family
* Set a schedule - turn connected devices on and off at specified times
* Sharing feature - share with family members for joint control
* Supports Siri - This device is not compatible with HomeKit. But you can add click-to-run scenes to Siri shortcuts in the Smart Life App
* <mark style="color:red;">**With Energy Monitor function**</mark>

{% hint style="success" %}
Bluetooth is only used for network signal connection and cannot be used alone to control devices. Wi-Fi + Bluetooth distribution is faster
{% endhint %}

***

## Safety Consultation and Precautions

1. The installation process of this product involves strong electricity and must be installed by professionals in accordance with electrical specifications and product instructions;
2. This product is for indoor use only, please do not use it in humid environments or outdoors;
3. This product is only suitable for safe use in areas below 2,000 meters above sea level;
4. Pay attention to moisture-proof, do not spill water or other liquids on this product;
5. Do not place this product near a heat source;
6. Do not attempt to repair this product yourself, this work should be performed by authorized professionals;
7. Do not use it with overload. Please make sure that the 10A overcurrent protection circuit breaker on the front of this product is working properly before powering on. It is recommended that the stripping length of the terminal connecting wire is 6-8 mm;
8. This product should not be installed or fixed in a place that can be touched by human hands, such as outside the wall. It should be installed in an appliance or a hidden box;
9. The position of the fixed antenna should be as far away as possible from metal, wires and the module itself. (Applicable to external antenna models).

***

## Main Applications <a href="#shellyplus1-snsw-001x16eu-mainapplications" id="shellyplus1-snsw-001x16eu-mainapplications"></a>

* Residential
* MDU (Multi Dwelling Units - apartments, condominiums, hotels, etc.)
* Light commercial (small office buildings, small retail/restaurant/gas station, etc.)
* Government/municipal
* University/college

***

## Integrations <a href="#shellyplus1-snsw-001x16eu-integrations" id="shellyplus1-snsw-001x16eu-integrations"></a>

* Google Assistant
* Amazon Alexa
* Yandex Alice
* Baidu Xiaodu
* Tmall Genie

***

## Supported Load Types <a href="#shellyplus1-snsw-001x16eu-supportedloadtypes" id="shellyplus1-snsw-001x16eu-supportedloadtypes"></a>

* Resistive (incandescent bulbs, heating devices)
* Capacitive (capacitor banks, electronic equipment, motor start capacitors)
* Inductive with RC Snubber (LED light drivers, transformers, fans, refrigerators, air-conditioners)

***

## Installation

{% hint style="danger" %}
Please make sure the main power switch is turned off before installation
{% endhint %}

1. Connect wires according to the wiring diagram;
2. Insert the module into the junction box;
3. Turn on the main power switch and add devices according to the [**quick setup.**](#quick-setup)

<figure><img src="https://3898863868-files.gitbook.io/~/files/v0/b/gitbook-x-prod.appspot.com/o/spaces%2F-MDHxt7lj9funy2SIeFB%2Fuploads%2FvdFcwHNV6jJoOXKSA6mC%2Finstall%20to%20the%20wall%20-%201.png?alt=media&amp;token=62270ef7-55d4-47ab-bd75-8ef523921b11" alt=""><figcaption><p>Insert into the junction box</p></figcaption></figure>

***

## Wiring Schematic

<figure><img src="https://3898863868-files.gitbook.io/~/files/v0/b/gitbook-x-prod.appspot.com/o/spaces%2F-MDHxt7lj9funy2SIeFB%2Fuploads%2F5y98sisckOaGZIvWIcso%2F1ch-es.png?alt=media&amp;token=e9c33ae9-9ed3-41ef-8f34-27cc2cc2af22" alt=""><figcaption><p>Without Switch</p></figcaption></figure>

<figure><img src="https://3898863868-files.gitbook.io/~/files/v0/b/gitbook-x-prod.appspot.com/o/spaces%2F-MDHxt7lj9funy2SIeFB%2Fuploads%2F0ERz66jyTN9DhYpKMkps%2F1ch-es%20-%201.png?alt=media&amp;token=b5750906-7f87-4f84-8e7e-7bc41d73c80a" alt=""><figcaption><p>Connect 1 Switch</p></figcaption></figure>

<figure><img src="https://3898863868-files.gitbook.io/~/files/v0/b/gitbook-x-prod.appspot.com/o/spaces%2F-MDHxt7lj9funy2SIeFB%2Fuploads%2F4dXHEBA0tNsUTMwCiG0w%2F1ch-es%20-%201%203-way.png?alt=media&amp;token=ca5c5384-45b0-4b3d-b6bc-d505be279238" alt=""><figcaption><p>Connect 2 3-way Switches</p></figcaption></figure>

{% hint style="success" %}
The mechanical switch can only be used with AC100 - 240V.
{% endhint %}

***

## Tech Specs <a href="#s4dtx" id="s4dtx"></a>

* Voltage: AC100 - 240V | 50/60Hz
* Dimensions: 39.2 x 39.2 x 18mm (without mounting clip) | 43 x 39.2 x 22.3mm (with mounting clip)&#x20;
* Wireless Standard: Wi-Fi - 2.4GHz + Bluetooth
* Max. Load: LED 300W | 16A

<figure><img src="https://3898863868-files.gitbook.io/~/files/v0/b/gitbook-x-prod.appspot.com/o/spaces%2F-MDHxt7lj9funy2SIeFB%2Fuploads%2FBldcfXsEWy89au2EJTd6%2Fx2000px.png?alt=media&amp;token=2b65f422-155d-48cf-9880-7903b97df1bd" alt=""><figcaption><p>Size</p></figcaption></figure>

***

## Quick Setup

### 1. Register an account <a href="#izkpz" id="izkpz"></a>

<details>

<summary>Use the 'Smart Life' App</summary>

Please jump to the '[**Use Smart Life App**](/smart-life/user-manual-for-smart-life)' page to view

</details>

### 2. Add Device <a href="#pxw57" id="pxw57"></a>

Open the Smart Life App, click the '+' in the upper right corner of the homepage, enter the add device (accessory) page, select it, and follow the prompts

{% hint style="success" %}
**2 ways to put the module into network pairing mode**

* Press the reset key for about 10 seconds
* Press the traditional switch 5 times until the indicator light is flashing quickly

<img src="https://3898863868-files.gitbook.io/~/files/v0/b/gitbook-x-prod.appspot.com/o/spaces%2F-MDHxt7lj9funy2SIeFB%2Fuploads%2FZNdw6MwnWZiHwEEkzCOr%2F2%20methods%20to%20network%20pairing.png?alt=media&amp;token=0ea66942-0c61-4bac-a806-be01581ab4b3" alt="" data-size="original">
{% endhint %}

{% hint style="success" %}
If the addition fails, please press and hold the network configuration button again and try again.
{% endhint %}

### 3. Control the Device <a href="#kjvoo" id="kjvoo"></a>

Use the App to control. If you can control the device normally, it means the device is working properly.

***

## Indicator Light Status Description

| **Indicator Status** | **Description**              |
| -------------------- | ---------------------------- |
| Blue flashes quickly | Connecting the network       |
| Blue is always on    | Network connection is normal |
| Indicator off        | Device offline/disconnected  |

***

## Toxic and Hazardous Substances Statement

<table data-header-hidden data-full-width="false"><thead><tr><th width="141"></th><th width="91"></th><th width="89"></th><th width="87"></th><th width="96"></th><th width="105"></th><th></th></tr></thead><tbody><tr><td>Part Name</td><td>铅 (Pb)</td><td>汞 (Hg)</td><td>镉(Cd)</td><td>六价铬<br>(Cr(VI))</td><td>多溴联苯<br>(PBB)</td><td>多溴二苯醚<br>(PBDE)</td></tr><tr><td>Plastic Shell</td><td>O</td><td>O</td><td>O</td><td>O</td><td>O</td><td>O</td></tr><tr><td>Plastic bracket</td><td>O</td><td>O</td><td>O</td><td>O</td><td>O</td><td>O</td></tr><tr><td>Electronic Component</td><td>O</td><td>O</td><td>O</td><td>O</td><td>O</td><td>O</td></tr><tr><td>PCBA</td><td>O</td><td>O</td><td>O</td><td>O</td><td>O</td><td>O</td></tr><tr><td>Metal</td><td>O</td><td>O</td><td>O</td><td>O</td><td>O</td><td>O</td></tr></tbody></table>

This form is prepared in accordance with the provisions of SJ/T 11364.

* O: Indicates that the content of the hazardous substance in all homogeneous materials of this part is below the limit requirements specified in GB/T 26572.
* ×: Indicates that the content of the hazardous substance in at least one homogeneous material of this part exceeds the limit requirements specified in GB/T 26572.

***

## Instructions for Use of Micropower Equipment

1. The Wi-Fi technology used in this product complies with the technical requirements of general micropower equipment Class F equipment in the 'Micropower Short-range Radio Transmission Equipment Catalog and Technical Requirements' for data transmission applications. It adopts integrated antenna, control, adjustment and switch Please refer to the relevant content in the product manual for usage instructions;
2. You are not allowed to change the usage scenarios or conditions without authorization, expand the transmission frequency range, increase the transmission power (including installing additional RF power amplifiers), and you are not allowed to change the transmitting antenna without authorization;
3. Shall not cause harmful interference to other legal radio stations, nor shall it offer protection against harmful interference;
4. Should withstand interference from industrial, scientific and medical (ISM) application equipment that radiates radio frequency energy or other legitimate radio stations;
5. If it causes harmful interference to other legal radio stations (stations), you should stop using it immediately and take measures to eliminate the interference before continuing to use it;
6. In aircraft and in accordance with laws and regulations, relevant national regulations, and standards designated radio astronomy observatories, weather radar stations, satellite earth stations (including measurement and control, ranging, receiving, and navigation stations) and other military and civilian radio stations (stations), airports, etc. Micropower equipment used in electromagnetic environment protection areas must comply with the regulations of electromagnetic environment protection and relevant industry authorities;
7. It is prohibited to use all types of model remote controls within a radius of 5,000 meters with the center point of the airport runway as the center;
8. The operating temperature of micropower equipment is -10℃ - 40℃, and the power supply is AC100 - 240V | 50/60Hz

***

## Warranty Instructions

The after-sales service of this product is strictly in accordance with the "Consumer Rights and Interests Protection Law of the People's Republic of China" and the "Product Quality Law of the People's Republic of China" to implement after-sales three-guarantee service. The service content is as follows:

### Warranty Policy

During the validity period of the Three Guarantees, you can enjoy free returns, exchanges, and repair services in accordance with this provision. Returns, exchanges, and repairs should be handled with invoices.

1. Returns without reason within 7 days from the day after receipt (e-commerce purchase channel), the user will bear the logistics costs.
2. This product has performance failures listed in the "Product Performance Failure Table". After after-sales service testing and confirmation, you can enjoy the following services for free:

| Service Type | Service Policy                                                                    |
| ------------ | --------------------------------------------------------------------------------- |
| Return       | Return of product due to quality reasons within 7 days from the day after receipt |
| Exchange     | Exchange for product quality reasons within 15 days from the day after receipt    |
| Repair       | Repair due to product quality within 1 year from the day after receipt            |

{% hint style="info" %}
Friendly reminder: Since packaging boxes are required to ensure the safety of product transportation during transportation, it is recommended that you keep the packaging boxes for at least 30 days from the day after signing for the product.
{% endhint %}

### Non-warranty Regulations

1. Unauthorized repair, misuse, collision, neglect, abuse, liquid intrusion, accident, alteration, incorrect use of non-product accessories, or tearing, alteration of labels, and anti-counterfeiting marks;
2. The three-pack validity period has expired;
3. Damage caused by force majeure;
4. Failure to comply with the performance failures listed in the "Product Performance Failure Table";
5. This product and its accessories have performance failures listed in the "Product Performance Failure Table" due to human reasons.

***


# SML-02WB

User Manual for SML-02WB 2CH Wi-Fi Switch Module

***

## Appearance

<figure><img src="https://3898863868-files.gitbook.io/~/files/v0/b/gitbook-x-prod.appspot.com/o/spaces%2F-MDHxt7lj9funy2SIeFB%2Fuploads%2FipGJnEi2qMaHAfpGNHdU%2Fsml-02wb-1000px.jpg?alt=media&amp;token=4cd8f2fb-d7ad-470e-8052-54ecf6136ad3" alt="" width="375"><figcaption><p>SML-02WB</p></figcaption></figure>

***

## Introduce <a href="#a7ulc" id="a7ulc"></a>

### Short Description <a href="#shellyplus1-snsw-001x16eu-shortdescription" id="shellyplus1-snsw-001x16eu-shortdescription"></a>

* SML-02WB is a small form factor smart switch which allows remote control of electric appliances through a mobile phone, tablet and home automation system.
* SML-02WB can be accessed, controlled and monitored remotely from any place where the user has internet connectivity, as long as the device is connected to a Wi-Fi router and the Internet.
* It can be retrofitted into standard electrical wall boxes, behind power sockets and light switches or other places with limited space.

### Features <a href="#h4js5" id="h4js5"></a>

* No gateway required - You don’t need to purchase a gateway for this device, the device connects directly to your house’s Wi-Fi
* Wi-Fi + Bluetooth dual mode - connect to the network faster, with network provisioning speed 2 times faster than pure Wi-Fi devices
* App remote control - control the device anytime and anywhere through mobile App
* Smart linkage - In smart scene mode, linkage can be set to sound an alarm. The mobile App will also receive prompts, such as garage door open/close status, timeout notifications and overnight notifications, to remind you to close the garage door.
* Voice control - used with Amazon Echo, Google Home, Yandex, Tmall Genie
* Offline function - when the device is offline, the App will remind the device to go offline after 30 minutes
* Home Sharing - Create a smart home with your family
* Set a schedule - turn connected devices on and off at specified times
* Sharing feature - share with family members for joint control
* Supports Siri - This device is not compatible with HomeKit. But you can add click-to-run scenes to Siri shortcuts in the Smart Life App

{% hint style="success" %}
Bluetooth is only used for network signal connection and cannot be used alone to control devices. Wi-Fi + Bluetooth distribution is faster
{% endhint %}

***

## Safety Consultation and Precautions

1. The installation process of this product involves strong electricity and must be installed by professionals in accordance with electrical specifications and product instructions;
2. This product is for indoor use only, please do not use it in humid environments or outdoors;
3. This product is only suitable for safe use in areas below 2,000 meters above sea level;
4. Pay attention to moisture-proof, do not spill water or other liquids on this product;
5. Do not place this product near a heat source;
6. Do not attempt to repair this product yourself, this work should be performed by authorized professionals;
7. Do not use it with overload. Please make sure that the 10A overcurrent protection circuit breaker on the front of this product is working properly before powering on. It is recommended that the stripping length of the terminal connecting wire is 6-8 mm;
8. This product should not be installed or fixed in a place that can be touched by human hands, such as outside the wall. It should be installed in an appliance or a hidden box;
9. The position of the fixed antenna should be as far away as possible from metal, wires and the module itself. (Applicable to external antenna models).

***

## Main Applications <a href="#shellyplus1-snsw-001x16eu-mainapplications" id="shellyplus1-snsw-001x16eu-mainapplications"></a>

* Residential
* MDU (Multi Dwelling Units - apartments, condominiums, hotels, etc.)
* Light commercial (small office buildings, small retail/restaurant/gas station, etc.)
* Government/municipal
* University/college

***

## Integrations <a href="#shellyplus1-snsw-001x16eu-integrations" id="shellyplus1-snsw-001x16eu-integrations"></a>

* Google Assistant
* Amazon Alexa
* Yandex Alice
* Baidu Xiaodu
* Tmall Genie

***

## Supported Load Types <a href="#shellyplus1-snsw-001x16eu-supportedloadtypes" id="shellyplus1-snsw-001x16eu-supportedloadtypes"></a>

* Resistive (incandescent bulbs, heating devices)
* Capacitive (capacitor banks, electronic equipment, motor start capacitors)
* Inductive with RC Snubber (LED light drivers, transformers, fans, refrigerators, air-conditioners)

***

## Installation

{% hint style="danger" %}
Please make sure the main power switch is turned off before installation
{% endhint %}

1. Connect wires according to the wiring diagram;
2. Insert the module into the junction box;
3. Turn on the main power switch and add devices according to the [**quick setup.**](#quick-setup)

<figure><img src="https://3898863868-files.gitbook.io/~/files/v0/b/gitbook-x-prod.appspot.com/o/spaces%2F-MDHxt7lj9funy2SIeFB%2Fuploads%2FdQ7dTAdyeGetY5btYv0P%2Finstall%20to%20the%20wall%20-%202.png?alt=media&amp;token=336ec27e-24a9-4048-bc69-2e08a7bc732c" alt=""><figcaption><p>Insert into the junction box</p></figcaption></figure>

***

## Wiring Schematic

<figure><img src="https://3898863868-files.gitbook.io/~/files/v0/b/gitbook-x-prod.appspot.com/o/spaces%2F-MDHxt7lj9funy2SIeFB%2Fuploads%2FEE1moGuvXq1tlR3iNu5j%2F2ch%20-%20without%20swith.png?alt=media&amp;token=b238fd94-0e87-48ba-aa23-792ed7f2a239" alt=""><figcaption><p>Without Switch</p></figcaption></figure>

<figure><img src="https://3898863868-files.gitbook.io/~/files/v0/b/gitbook-x-prod.appspot.com/o/spaces%2F-MDHxt7lj9funy2SIeFB%2Fuploads%2FVICWnrdlTybxSYj68805%2F2ch%20-%202switvh.png?alt=media&amp;token=603fa5e2-9c51-45d6-ad82-d9c08d72a1b3" alt=""><figcaption><p>Connect 2 Switches</p></figcaption></figure>

<figure><img src="https://3898863868-files.gitbook.io/~/files/v0/b/gitbook-x-prod.appspot.com/o/spaces%2F-MDHxt7lj9funy2SIeFB%2Fuploads%2FuHosUGOcAtibCx1Y2ggE%2F2ch%20-%204switch.png?alt=media&amp;token=8351e586-dc3b-4df6-a99d-19a3d1cf6ac7" alt=""><figcaption><p>Connect 4 3-way Switches</p></figcaption></figure>

{% hint style="success" %}
The mechanical switch can only be used with AC100 - 240V.
{% endhint %}

***

## Tech Specs <a href="#s4dtx" id="s4dtx"></a>

* Voltage: AC100 - 240V | 50/60Hz
* Dimensions: 39.2 x 39.2 x 18mm (without mounting clip) | 43 x 39.2 x 22.3mm (with mounting clip)&#x20;
* Wireless Standard: Wi-Fi - 2.4GHz + Bluetooth
* Max. Load: LED 150W x 2 | 5A x 2

<figure><img src="https://3898863868-files.gitbook.io/~/files/v0/b/gitbook-x-prod.appspot.com/o/spaces%2F-MDHxt7lj9funy2SIeFB%2Fuploads%2FVvk232aj1uBlKC6NcWUC%2F2ch%20-%20size.png?alt=media&amp;token=2d9dd954-0031-46c8-888f-31082100d94b" alt=""><figcaption><p>Size</p></figcaption></figure>

***

## Quick Setup

### 1. Register an account <a href="#izkpz" id="izkpz"></a>

<details>

<summary>Use the 'Smart Life' App</summary>

Please jump to the '[**Use Smart Life App**](/smart-life/user-manual-for-smart-life)' page to view

</details>

### 2. Add Device <a href="#pxw57" id="pxw57"></a>

Open the Smart Life App, click the '+' in the upper right corner of the homepage, enter the add device (accessory) page, select it, and follow the prompts

{% hint style="success" %}
**2 ways to put the module into network pairing mode**

* Press the reset key for about 10 seconds
* Press the traditional switch 5 times until the indicator light is flashing quickly

<img src="https://3898863868-files.gitbook.io/~/files/v0/b/gitbook-x-prod.appspot.com/o/spaces%2F-MDHxt7lj9funy2SIeFB%2Fuploads%2FSiZuXLXBpOA1YuJ5mZta%2F2ch%20dimmer%20-%20pair%20network.png?alt=media&amp;token=fd60dc10-9db8-43c2-b9f7-eb93782260aa" alt="" data-size="original">
{% endhint %}

{% hint style="success" %}
If the addition fails, please press and hold the network configuration button again and try again.
{% endhint %}

### 3. Control the Device <a href="#kjvoo" id="kjvoo"></a>

Use the App to control. If you can control the device normally, it means the device is working properly.

***

## Indicator Light Status Description

| **Indicator Status** | **Description**              |
| -------------------- | ---------------------------- |
| Blue flashes quickly | Connecting the network       |
| Blue is always on    | Network connection is normal |
| Indicator off        | Device offline/disconnected  |

***

## Toxic and Hazardous Substances Statement

<table data-header-hidden data-full-width="false"><thead><tr><th width="141"></th><th width="91"></th><th width="89"></th><th width="87"></th><th width="96"></th><th width="105"></th><th></th></tr></thead><tbody><tr><td>Part Name</td><td>铅 (Pb)</td><td>汞 (Hg)</td><td>镉(Cd)</td><td>六价铬<br>(Cr(VI))</td><td>多溴联苯<br>(PBB)</td><td>多溴二苯醚<br>(PBDE)</td></tr><tr><td>Plastic Shell</td><td>O</td><td>O</td><td>O</td><td>O</td><td>O</td><td>O</td></tr><tr><td>Plastic bracket</td><td>O</td><td>O</td><td>O</td><td>O</td><td>O</td><td>O</td></tr><tr><td>Electronic Component</td><td>O</td><td>O</td><td>O</td><td>O</td><td>O</td><td>O</td></tr><tr><td>PCBA</td><td>O</td><td>O</td><td>O</td><td>O</td><td>O</td><td>O</td></tr><tr><td>Metal</td><td>O</td><td>O</td><td>O</td><td>O</td><td>O</td><td>O</td></tr></tbody></table>

This form is prepared in accordance with the provisions of SJ/T 11364.

* O: Indicates that the content of the hazardous substance in all homogeneous materials of this part is below the limit requirements specified in GB/T 26572.
* ×: Indicates that the content of the hazardous substance in at least one homogeneous material of this part exceeds the limit requirements specified in GB/T 26572.

***

## Instructions for Use of Micropower Equipment

1. The Wi-Fi technology used in this product complies with the technical requirements of general micropower equipment Class F equipment in the 'Micropower Short-range Radio Transmission Equipment Catalog and Technical Requirements' for data transmission applications. It adopts integrated antenna, control, adjustment and switch Please refer to the relevant content in the product manual for usage instructions;
2. You are not allowed to change the usage scenarios or conditions without authorization, expand the transmission frequency range, increase the transmission power (including installing additional RF power amplifiers), and you are not allowed to change the transmitting antenna without authorization;
3. Shall not cause harmful interference to other legal radio stations, nor shall it offer protection against harmful interference;
4. Should withstand interference from industrial, scientific and medical (ISM) application equipment that radiates radio frequency energy or other legitimate radio stations;
5. If it causes harmful interference to other legal radio stations (stations), you should stop using it immediately and take measures to eliminate the interference before continuing to use it;
6. In aircraft and in accordance with laws and regulations, relevant national regulations, and standards designated radio astronomy observatories, weather radar stations, satellite earth stations (including measurement and control, ranging, receiving, and navigation stations) and other military and civilian radio stations (stations), airports, etc. Micropower equipment used in electromagnetic environment protection areas must comply with the regulations of electromagnetic environment protection and relevant industry authorities;
7. It is prohibited to use all types of model remote controls within a radius of 5,000 meters with the center point of the airport runway as the center;
8. The operating temperature of micropower equipment is -10℃ - 40℃, and the power supply is AC100 - 240V | 50/60Hz

***

## Warranty Instructions

The after-sales service of this product is strictly in accordance with the "Consumer Rights and Interests Protection Law of the People's Republic of China" and the "Product Quality Law of the People's Republic of China" to implement after-sales three-guarantee service. The service content is as follows:

### Warranty Policy

During the validity period of the Three Guarantees, you can enjoy free returns, exchanges, and repair services in accordance with this provision. Returns, exchanges, and repairs should be handled with invoices.

1. Returns without reason within 7 days from the day after receipt (e-commerce purchase channel), the user will bear the logistics costs.
2. This product has performance failures listed in the "Product Performance Failure Table". After after-sales service testing and confirmation, you can enjoy the following services for free:

| Service Type | Service Policy                                                                    |
| ------------ | --------------------------------------------------------------------------------- |
| Return       | Return of product due to quality reasons within 7 days from the day after receipt |
| Exchange     | Exchange for product quality reasons within 15 days from the day after receipt    |
| Repair       | Repair due to product quality within 1 year from the day after receipt            |

{% hint style="info" %}
Friendly reminder: Since packaging boxes are required to ensure the safety of product transportation during transportation, it is recommended that you keep the packaging boxes for at least 30 days from the day after signing for the product.
{% endhint %}

### Non-warranty Regulations

1. Unauthorized repair, misuse, collision, neglect, abuse, liquid intrusion, accident, alteration, incorrect use of non-product accessories, or tearing, alteration of labels, and anti-counterfeiting marks;
2. The three-pack validity period has expired;
3. Damage caused by force majeure;
4. Failure to comply with the performance failures listed in the "Product Performance Failure Table";
5. This product and its accessories have performance failures listed in the "Product Performance Failure Table" due to human reasons.

***


# SML-02WB-ES

User Manual for SML-02WB-ES 2CH Wi-Fi Switch Module - Energy Monitor

***

## Appearance

<figure><img src="https://3898863868-files.gitbook.io/~/files/v0/b/gitbook-x-prod.appspot.com/o/spaces%2F-MDHxt7lj9funy2SIeFB%2Fuploads%2FMwpl4VamOJ3gQdXMEgUK%2Fsml-02wb-es-1000px.jpg?alt=media&amp;token=9e8cfc07-5f74-4fd9-a7ce-e010b9016826" alt="" width="375"><figcaption><p>SML-02WB-ES</p></figcaption></figure>

***

## Introduce <a href="#a7ulc" id="a7ulc"></a>

### Short Description <a href="#shellyplus1-snsw-001x16eu-shortdescription" id="shellyplus1-snsw-001x16eu-shortdescription"></a>

* SML-02WB-ES is a small form factor smart switch which allows remote control of electric appliances through a mobile phone, tablet and home automation system.
* SML-02WB-ES can be accessed, controlled and monitored remotely from any place where the user has internet connectivity, as long as the device is connected to a Wi-Fi router and the Internet.
* It can be retrofitted into standard electrical wall boxes, behind power sockets and light switches or other places with limited space.

### Features <a href="#h4js5" id="h4js5"></a>

* No gateway required - You don’t need to purchase a gateway for this device, the device connects directly to your house’s Wi-Fi
* Wi-Fi + Bluetooth dual mode - connect to the network faster, with network provisioning speed 2 times faster than pure Wi-Fi devices
* App remote control - control the device anytime and anywhere through mobile App
* Smart linkage - In smart scene mode, linkage can be set to sound an alarm. The mobile App will also receive prompts, such as garage door open/close status, timeout notifications and overnight notifications, to remind you to close the garage door.
* Voice control - used with Amazon Echo, Google Home, Yandex, Tmall Genie
* Offline function - when the device is offline, the App will remind the device to go offline after 30 minutes
* Home Sharing - Create a smart home with your family
* Set a schedule - turn connected devices on and off at specified times
* Sharing feature - share with family members for joint control
* Supports Siri - This device is not compatible with HomeKit. But you can add click-to-run scenes to Siri shortcuts in the Smart Life App
* <mark style="color:red;">**With Energy Monitor function**</mark>

{% hint style="success" %}
Bluetooth is only used for network signal connection and cannot be used alone to control devices. Wi-Fi + Bluetooth distribution is faster
{% endhint %}

***

## Safety Consultation and Precautions

1. The installation process of this product involves strong electricity and must be installed by professionals in accordance with electrical specifications and product instructions;
2. This product is for indoor use only, please do not use it in humid environments or outdoors;
3. This product is only suitable for safe use in areas below 2,000 meters above sea level;
4. Pay attention to moisture-proof, do not spill water or other liquids on this product;
5. Do not place this product near a heat source;
6. Do not attempt to repair this product yourself, this work should be performed by authorized professionals;
7. Do not use it with overload. Please make sure that the 10A overcurrent protection circuit breaker on the front of this product is working properly before powering on. It is recommended that the stripping length of the terminal connecting wire is 6-8 mm;
8. This product should not be installed or fixed in a place that can be touched by human hands, such as outside the wall. It should be installed in an appliance or a hidden box;
9. The position of the fixed antenna should be as far away as possible from metal, wires and the module itself. (Applicable to external antenna models).

***

## Main Applications <a href="#shellyplus1-snsw-001x16eu-mainapplications" id="shellyplus1-snsw-001x16eu-mainapplications"></a>

* Residential
* MDU (Multi Dwelling Units - apartments, condominiums, hotels, etc.)
* Light commercial (small office buildings, small retail/restaurant/gas station, etc.)
* Government/municipal
* University/college

***

## Integrations <a href="#shellyplus1-snsw-001x16eu-integrations" id="shellyplus1-snsw-001x16eu-integrations"></a>

* Google Assistant
* Amazon Alexa
* Yandex Alice
* Baidu Xiaodu
* Tmall Genie

***

## Supported Load Types <a href="#shellyplus1-snsw-001x16eu-supportedloadtypes" id="shellyplus1-snsw-001x16eu-supportedloadtypes"></a>

* Resistive (incandescent bulbs, heating devices)
* Capacitive (capacitor banks, electronic equipment, motor start capacitors)
* Inductive with RC Snubber (LED light drivers, transformers, fans, refrigerators, air-conditioners)

***

## Installation

{% hint style="danger" %}
Please make sure the main power switch is turned off before installation
{% endhint %}

1. Connect wires according to the wiring diagram;
2. Insert the module into the junction box;
3. Turn on the main power switch and add devices according to the [**quick setup.**](#quick-setup)

<figure><img src="https://3898863868-files.gitbook.io/~/files/v0/b/gitbook-x-prod.appspot.com/o/spaces%2F-MDHxt7lj9funy2SIeFB%2Fuploads%2FdQ7dTAdyeGetY5btYv0P%2Finstall%20to%20the%20wall%20-%202.png?alt=media&amp;token=336ec27e-24a9-4048-bc69-2e08a7bc732c" alt=""><figcaption><p>Insert into the junction box</p></figcaption></figure>

***

## Wiring Schematic

<figure><img src="https://3898863868-files.gitbook.io/~/files/v0/b/gitbook-x-prod.appspot.com/o/spaces%2F-MDHxt7lj9funy2SIeFB%2Fuploads%2FEE1moGuvXq1tlR3iNu5j%2F2ch%20-%20without%20swith.png?alt=media&amp;token=b238fd94-0e87-48ba-aa23-792ed7f2a239" alt=""><figcaption><p>Without Switch</p></figcaption></figure>

<figure><img src="https://3898863868-files.gitbook.io/~/files/v0/b/gitbook-x-prod.appspot.com/o/spaces%2F-MDHxt7lj9funy2SIeFB%2Fuploads%2F3YWgfwpr59eu3szyQAPI%2F2ch-es%20-%202.png?alt=media&amp;token=7a28a7d8-75bf-410c-bf18-d3642aba5b8d" alt=""><figcaption><p>Connect 2 Switches</p></figcaption></figure>

<figure><img src="https://3898863868-files.gitbook.io/~/files/v0/b/gitbook-x-prod.appspot.com/o/spaces%2F-MDHxt7lj9funy2SIeFB%2Fuploads%2F7Tu4cD8qGtAlMjhCfned%2F2ch-es%20-%202%203-way.png?alt=media&amp;token=33dfc42e-b0d1-45af-99fb-873260e95dfb" alt=""><figcaption><p>Connect 4 3-way Switches</p></figcaption></figure>

{% hint style="success" %}
The mechanical switch can only be used with AC100 - 240V.
{% endhint %}

***

## Tech Specs <a href="#s4dtx" id="s4dtx"></a>

* Voltage: AC100 - 240V | 50/60Hz
* Dimensions: 39.2 x 39.2 x 18mm (without mounting clip) | 43 x 39.2 x 22.3mm (with mounting clip)&#x20;
* Wireless Standard: Wi-Fi - 2.4GHz + Bluetooth
* Max. Load: LED 150W x 2 | 5A x 2

<figure><img src="https://3898863868-files.gitbook.io/~/files/v0/b/gitbook-x-prod.appspot.com/o/spaces%2F-MDHxt7lj9funy2SIeFB%2Fuploads%2FVvk232aj1uBlKC6NcWUC%2F2ch%20-%20size.png?alt=media&amp;token=2d9dd954-0031-46c8-888f-31082100d94b" alt=""><figcaption><p>Size</p></figcaption></figure>

***

## Quick Setup

### 1. Register an account <a href="#izkpz" id="izkpz"></a>

<details>

<summary>Use the 'Smart Life' App</summary>

Please jump to the '[**Use Smart Life App**](/smart-life/user-manual-for-smart-life)' page to view

</details>

### 2. Add Device <a href="#pxw57" id="pxw57"></a>

Open the Smart Life App, click the '+' in the upper right corner of the homepage, enter the add device (accessory) page, select it, and follow the prompts

{% hint style="success" %}
**2 ways to put the module into network pairing mode**

* Press the reset key for about 10 seconds
* Press the traditional switch 5 times until the indicator light is flashing quickly

<img src="https://3898863868-files.gitbook.io/~/files/v0/b/gitbook-x-prod.appspot.com/o/spaces%2F-MDHxt7lj9funy2SIeFB%2Fuploads%2FSiZuXLXBpOA1YuJ5mZta%2F2ch%20dimmer%20-%20pair%20network.png?alt=media&amp;token=fd60dc10-9db8-43c2-b9f7-eb93782260aa" alt="" data-size="original">
{% endhint %}

{% hint style="success" %}
If the addition fails, please press and hold the network configuration button again and try again.
{% endhint %}

### 3. Control the Device <a href="#kjvoo" id="kjvoo"></a>

Use the App to control. If you can control the device normally, it means the device is working properly.

***

## Indicator Light Status Description

| **Indicator Status** | **Description**              |
| -------------------- | ---------------------------- |
| Blue flashes quickly | Connecting the network       |
| Blue is always on    | Network connection is normal |
| Indicator off        | Device offline/disconnected  |

***

## Toxic and Hazardous Substances Statement

<table data-header-hidden data-full-width="false"><thead><tr><th width="141"></th><th width="91"></th><th width="89"></th><th width="87"></th><th width="96"></th><th width="105"></th><th></th></tr></thead><tbody><tr><td>Part Name</td><td>铅 (Pb)</td><td>汞 (Hg)</td><td>镉(Cd)</td><td>六价铬<br>(Cr(VI))</td><td>多溴联苯<br>(PBB)</td><td>多溴二苯醚<br>(PBDE)</td></tr><tr><td>Plastic Shell</td><td>O</td><td>O</td><td>O</td><td>O</td><td>O</td><td>O</td></tr><tr><td>Plastic bracket</td><td>O</td><td>O</td><td>O</td><td>O</td><td>O</td><td>O</td></tr><tr><td>Electronic Component</td><td>O</td><td>O</td><td>O</td><td>O</td><td>O</td><td>O</td></tr><tr><td>PCBA</td><td>O</td><td>O</td><td>O</td><td>O</td><td>O</td><td>O</td></tr><tr><td>Metal</td><td>O</td><td>O</td><td>O</td><td>O</td><td>O</td><td>O</td></tr></tbody></table>

This form is prepared in accordance with the provisions of SJ/T 11364.

* O: Indicates that the content of the hazardous substance in all homogeneous materials of this part is below the limit requirements specified in GB/T 26572.
* ×: Indicates that the content of the hazardous substance in at least one homogeneous material of this part exceeds the limit requirements specified in GB/T 26572.

***

## Instructions for Use of Micropower Equipment

1. The Wi-Fi technology used in this product complies with the technical requirements of general micropower equipment Class F equipment in the 'Micropower Short-range Radio Transmission Equipment Catalog and Technical Requirements' for data transmission applications. It adopts integrated antenna, control, adjustment and switch Please refer to the relevant content in the product manual for usage instructions;
2. You are not allowed to change the usage scenarios or conditions without authorization, expand the transmission frequency range, increase the transmission power (including installing additional RF power amplifiers), and you are not allowed to change the transmitting antenna without authorization;
3. Shall not cause harmful interference to other legal radio stations, nor shall it offer protection against harmful interference;
4. Should withstand interference from industrial, scientific and medical (ISM) application equipment that radiates radio frequency energy or other legitimate radio stations;
5. If it causes harmful interference to other legal radio stations (stations), you should stop using it immediately and take measures to eliminate the interference before continuing to use it;
6. In aircraft and in accordance with laws and regulations, relevant national regulations, and standards designated radio astronomy observatories, weather radar stations, satellite earth stations (including measurement and control, ranging, receiving, and navigation stations) and other military and civilian radio stations (stations), airports, etc. Micropower equipment used in electromagnetic environment protection areas must comply with the regulations of electromagnetic environment protection and relevant industry authorities;
7. It is prohibited to use all types of model remote controls within a radius of 5,000 meters with the center point of the airport runway as the center;
8. The operating temperature of micropower equipment is -10℃ - 40℃, and the power supply is AC100 - 240V | 50/60Hz

***

## Warranty Instructions

The after-sales service of this product is strictly in accordance with the "Consumer Rights and Interests Protection Law of the People's Republic of China" and the "Product Quality Law of the People's Republic of China" to implement after-sales three-guarantee service. The service content is as follows:

### Warranty Policy

During the validity period of the Three Guarantees, you can enjoy free returns, exchanges, and repair services in accordance with this provision. Returns, exchanges, and repairs should be handled with invoices.

1. Returns without reason within 7 days from the day after receipt (e-commerce purchase channel), the user will bear the logistics costs.
2. This product has performance failures listed in the "Product Performance Failure Table". After after-sales service testing and confirmation, you can enjoy the following services for free:

| Service Type | Service Policy                                                                    |
| ------------ | --------------------------------------------------------------------------------- |
| Return       | Return of product due to quality reasons within 7 days from the day after receipt |
| Exchange     | Exchange for product quality reasons within 15 days from the day after receipt    |
| Repair       | Repair due to product quality within 1 year from the day after receipt            |

{% hint style="info" %}
Friendly reminder: Since packaging boxes are required to ensure the safety of product transportation during transportation, it is recommended that you keep the packaging boxes for at least 30 days from the day after signing for the product.
{% endhint %}

### Non-warranty Regulations

1. Unauthorized repair, misuse, collision, neglect, abuse, liquid intrusion, accident, alteration, incorrect use of non-product accessories, or tearing, alteration of labels, and anti-counterfeiting marks;
2. The three-pack validity period has expired;
3. Damage caused by force majeure;
4. Failure to comply with the performance failures listed in the "Product Performance Failure Table";
5. This product and its accessories have performance failures listed in the "Product Performance Failure Table" due to human reasons.

***


# SML-03WB

User Manual for SML-03WB 3CH Wi-Fi Switch Module

***

## Appearance

<figure><img src="https://3898863868-files.gitbook.io/~/files/v0/b/gitbook-x-prod.appspot.com/o/spaces%2F-MDHxt7lj9funy2SIeFB%2Fuploads%2FEIYA1RBHNth3n1XeUvjQ%2Fsml-03wb-1000px.jpg?alt=media&amp;token=d96123ca-109f-425a-9602-662ac7db5276" alt="" width="375"><figcaption><p>SML-03WB</p></figcaption></figure>

***

## Introduce <a href="#a7ulc" id="a7ulc"></a>

### Short Description <a href="#shellyplus1-snsw-001x16eu-shortdescription" id="shellyplus1-snsw-001x16eu-shortdescription"></a>

* SML-03WB is a small form factor smart switch which allows remote control of electric appliances through a mobile phone, tablet and home automation system.
* SML-03WB can be accessed, controlled and monitored remotely from any place where the user has internet connectivity, as long as the device is connected to a Wi-Fi router and the Internet.
* It can be retrofitted into standard electrical wall boxes, behind power sockets and light switches or other places with limited space.

### Features <a href="#h4js5" id="h4js5"></a>

* No gateway required - You don’t need to purchase a gateway for this device, the device connects directly to your house’s Wi-Fi
* Wi-Fi + Bluetooth dual mode - connect to the network faster, with network provisioning speed 2 times faster than pure Wi-Fi devices
* App remote control - control the device anytime and anywhere through mobile App
* Smart linkage - In smart scene mode, linkage can be set to sound an alarm. The mobile App will also receive prompts, such as garage door open/close status, timeout notifications and overnight notifications, to remind you to close the garage door.
* Voice control - used with Amazon Echo, Google Home, Yandex, Tmall Genie
* Offline function - when the device is offline, the App will remind the device to go offline after 30 minutes
* Home Sharing - Create a smart home with your family
* Set a schedule - turn connected devices on and off at specified times
* Sharing feature - share with family members for joint control
* Supports Siri - This device is not compatible with HomeKit. But you can add click-to-run scenes to Siri shortcuts in the Smart Life App

{% hint style="success" %}
Bluetooth is only used for network signal connection and cannot be used alone to control devices. Wi-Fi + Bluetooth distribution is faster
{% endhint %}

***

## Safety Consultation and Precautions

1. The installation process of this product involves strong electricity and must be installed by professionals in accordance with electrical specifications and product instructions;
2. This product is for indoor use only, please do not use it in humid environments or outdoors;
3. This product is only suitable for safe use in areas below 2,000 meters above sea level;
4. Pay attention to moisture-proof, do not spill water or other liquids on this product;
5. Do not place this product near a heat source;
6. Do not attempt to repair this product yourself, this work should be performed by authorized professionals;
7. Do not use it with overload. Please make sure that the 10A overcurrent protection circuit breaker on the front of this product is working properly before powering on. It is recommended that the stripping length of the terminal connecting wire is 6-8 mm;
8. This product should not be installed or fixed in a place that can be touched by human hands, such as outside the wall. It should be installed in an appliance or a hidden box;
9. The position of the fixed antenna should be as far away as possible from metal, wires and the module itself. (Applicable to external antenna models).

***

## Main Applications <a href="#shellyplus1-snsw-001x16eu-mainapplications" id="shellyplus1-snsw-001x16eu-mainapplications"></a>

* Residential
* MDU (Multi Dwelling Units - apartments, condominiums, hotels, etc.)
* Light commercial (small office buildings, small retail/restaurant/gas station, etc.)
* Government/municipal
* University/college

***

## Integrations <a href="#shellyplus1-snsw-001x16eu-integrations" id="shellyplus1-snsw-001x16eu-integrations"></a>

* Google Assistant
* Amazon Alexa
* Yandex Alice
* Baidu Xiaodu
* Tmall Genie

***

## Supported Load Types <a href="#shellyplus1-snsw-001x16eu-supportedloadtypes" id="shellyplus1-snsw-001x16eu-supportedloadtypes"></a>

* Resistive (incandescent bulbs, heating devices)
* Capacitive (capacitor banks, electronic equipment, motor start capacitors)
* Inductive with RC Snubber (LED light drivers, transformers, fans, refrigerators, air-conditioners)

***

## Installation

{% hint style="danger" %}
Please make sure the main power switch is turned off before installation
{% endhint %}

1. Connect wires according to the wiring diagram;
2. Insert the module into the junction box;
3. Turn on the main power switch and add devices according to the [**quick setup.**](#quick-setup)

<figure><img src="https://3898863868-files.gitbook.io/~/files/v0/b/gitbook-x-prod.appspot.com/o/spaces%2F-MDHxt7lj9funy2SIeFB%2Fuploads%2FJRM6W5sRONNjjFOWdYI4%2Finstall%20to%20the%20wall%20-%203.png?alt=media&amp;token=54f09de9-3920-493f-a21d-250f037b479c" alt=""><figcaption><p>Insert into the junction box</p></figcaption></figure>

***

## Wiring Schematic

<figure><img src="https://3898863868-files.gitbook.io/~/files/v0/b/gitbook-x-prod.appspot.com/o/spaces%2F-MDHxt7lj9funy2SIeFB%2Fuploads%2FAnwbBJtW5waUDnYRlH8o%2F3CH.png?alt=media&amp;token=cf1c09e7-8ac9-4fda-b39a-233ab71e1b56" alt=""><figcaption><p>Without Switch</p></figcaption></figure>

<figure><img src="https://3898863868-files.gitbook.io/~/files/v0/b/gitbook-x-prod.appspot.com/o/spaces%2F-MDHxt7lj9funy2SIeFB%2Fuploads%2FNypUU7qcpQFNkVM9QxLy%2F3CH%20-%203%20switches.png?alt=media&amp;token=0a1d3cfc-4f9e-4315-93dc-fa8ddb387507" alt=""><figcaption><p>Connect 3 Switches</p></figcaption></figure>

<figure><img src="https://3898863868-files.gitbook.io/~/files/v0/b/gitbook-x-prod.appspot.com/o/spaces%2F-MDHxt7lj9funy2SIeFB%2Fuploads%2F9kZCoxQDIWlt2F66RByS%2F3CH%20-%206%20switches.png?alt=media&amp;token=49c8d94d-353f-4b36-82ca-00dc95abb0fe" alt=""><figcaption><p>Connect 6 3-way Switches</p></figcaption></figure>

{% hint style="success" %}
The mechanical switch can only be used with AC100 - 240V.
{% endhint %}

***

## Tech Specs <a href="#s4dtx" id="s4dtx"></a>

* Voltage: AC100 - 240V | 50/60Hz
* Dimensions: 39.2 x 39.2 x 18mm (without mounting clip) | 43 x 39.2 x 22.3mm (with mounting clip)&#x20;
* Wireless Standard: Wi-Fi - 2.4GHz + Bluetooth
* Max. Load: LED 150W x 3 | 3.3A x 3

<figure><img src="https://3898863868-files.gitbook.io/~/files/v0/b/gitbook-x-prod.appspot.com/o/spaces%2F-MDHxt7lj9funy2SIeFB%2Fuploads%2FVvk232aj1uBlKC6NcWUC%2F2ch%20-%20size.png?alt=media&amp;token=2d9dd954-0031-46c8-888f-31082100d94b" alt=""><figcaption><p>Size</p></figcaption></figure>

***

## Quick Setup

### 1. Register an account <a href="#izkpz" id="izkpz"></a>

<details>

<summary>Use the 'Smart Life' App</summary>

Please jump to the '[**Use Smart Life App**](/smart-life/user-manual-for-smart-life)' page to view

</details>

### 2. Add Device <a href="#pxw57" id="pxw57"></a>

Open the Smart Life App, click the '+' in the upper right corner of the homepage, enter the add device (accessory) page, select it, and follow the prompts

{% hint style="success" %}
**2 ways to put the module into network pairing mode**

* Press the reset key for about 10 seconds
* Press the traditional switch 5 times until the indicator light is flashing quickly

<img src="https://3898863868-files.gitbook.io/~/files/v0/b/gitbook-x-prod.appspot.com/o/spaces%2F-MDHxt7lj9funy2SIeFB%2Fuploads%2FiXqn2d1J7giLWLWYB6uv%2F3ch%20-%20pair%20network.png?alt=media&amp;token=f51d94f0-1969-44fb-95ff-31cfc1d09c80" alt="" data-size="original">
{% endhint %}

{% hint style="success" %}
If the addition fails, please press and hold the network configuration button again and try again.
{% endhint %}

### 3. Control the Device <a href="#kjvoo" id="kjvoo"></a>

Use the App to control. If you can control the device normally, it means the device is working properly.

***

## Indicator Light Status Description

| **Indicator Status** | **Description**              |
| -------------------- | ---------------------------- |
| Blue flashes quickly | Connecting the network       |
| Blue is always on    | Network connection is normal |
| Indicator off        | Device offline/disconnected  |

***

## Toxic and Hazardous Substances Statement

<table data-header-hidden data-full-width="false"><thead><tr><th width="141"></th><th width="91"></th><th width="89"></th><th width="87"></th><th width="96"></th><th width="105"></th><th></th></tr></thead><tbody><tr><td>Part Name</td><td>铅 (Pb)</td><td>汞 (Hg)</td><td>镉(Cd)</td><td>六价铬<br>(Cr(VI))</td><td>多溴联苯<br>(PBB)</td><td>多溴二苯醚<br>(PBDE)</td></tr><tr><td>Plastic Shell</td><td>O</td><td>O</td><td>O</td><td>O</td><td>O</td><td>O</td></tr><tr><td>Plastic bracket</td><td>O</td><td>O</td><td>O</td><td>O</td><td>O</td><td>O</td></tr><tr><td>Electronic Component</td><td>O</td><td>O</td><td>O</td><td>O</td><td>O</td><td>O</td></tr><tr><td>PCBA</td><td>O</td><td>O</td><td>O</td><td>O</td><td>O</td><td>O</td></tr><tr><td>Metal</td><td>O</td><td>O</td><td>O</td><td>O</td><td>O</td><td>O</td></tr></tbody></table>

This form is prepared in accordance with the provisions of SJ/T 11364.

* O: Indicates that the content of the hazardous substance in all homogeneous materials of this part is below the limit requirements specified in GB/T 26572.
* ×: Indicates that the content of the hazardous substance in at least one homogeneous material of this part exceeds the limit requirements specified in GB/T 26572.

***

## Instructions for Use of Micropower Equipment

1. The Wi-Fi technology used in this product complies with the technical requirements of general micropower equipment Class F equipment in the 'Micropower Short-range Radio Transmission Equipment Catalog and Technical Requirements' for data transmission applications. It adopts integrated antenna, control, adjustment and switch Please refer to the relevant content in the product manual for usage instructions;
2. You are not allowed to change the usage scenarios or conditions without authorization, expand the transmission frequency range, increase the transmission power (including installing additional RF power amplifiers), and you are not allowed to change the transmitting antenna without authorization;
3. Shall not cause harmful interference to other legal radio stations, nor shall it offer protection against harmful interference;
4. Should withstand interference from industrial, scientific and medical (ISM) application equipment that radiates radio frequency energy or other legitimate radio stations;
5. If it causes harmful interference to other legal radio stations (stations), you should stop using it immediately and take measures to eliminate the interference before continuing to use it;
6. In aircraft and in accordance with laws and regulations, relevant national regulations, and standards designated radio astronomy observatories, weather radar stations, satellite earth stations (including measurement and control, ranging, receiving, and navigation stations) and other military and civilian radio stations (stations), airports, etc. Micropower equipment used in electromagnetic environment protection areas must comply with the regulations of electromagnetic environment protection and relevant industry authorities;
7. It is prohibited to use all types of model remote controls within a radius of 5,000 meters with the center point of the airport runway as the center;
8. The operating temperature of micropower equipment is -10℃ - 40℃, and the power supply is AC100 - 240V | 50/60Hz

***

## Warranty Instructions

The after-sales service of this product is strictly in accordance with the "Consumer Rights and Interests Protection Law of the People's Republic of China" and the "Product Quality Law of the People's Republic of China" to implement after-sales three-guarantee service. The service content is as follows:

### Warranty Policy

During the validity period of the Three Guarantees, you can enjoy free returns, exchanges, and repair services in accordance with this provision. Returns, exchanges, and repairs should be handled with invoices.

1. Returns without reason within 7 days from the day after receipt (e-commerce purchase channel), the user will bear the logistics costs.
2. This product has performance failures listed in the "Product Performance Failure Table". After after-sales service testing and confirmation, you can enjoy the following services for free:

| Service Type | Service Policy                                                                    |
| ------------ | --------------------------------------------------------------------------------- |
| Return       | Return of product due to quality reasons within 7 days from the day after receipt |
| Exchange     | Exchange for product quality reasons within 15 days from the day after receipt    |
| Repair       | Repair due to product quality within 1 year from the day after receipt            |

{% hint style="info" %}
Friendly reminder: Since packaging boxes are required to ensure the safety of product transportation during transportation, it is recommended that you keep the packaging boxes for at least 30 days from the day after signing for the product.
{% endhint %}

### Non-warranty Regulations

1. Unauthorized repair, misuse, collision, neglect, abuse, liquid intrusion, accident, alteration, incorrect use of non-product accessories, or tearing, alteration of labels, and anti-counterfeiting marks;
2. The three-pack validity period has expired;
3. Damage caused by force majeure;
4. Failure to comply with the performance failures listed in the "Product Performance Failure Table";
5. This product and its accessories have performance failures listed in the "Product Performance Failure Table" due to human reasons.

***


# SML-04WB

User Manual for SML-04WB 4CH Wi-Fi Switch Module

***

## Appearance

<figure><img src="https://3898863868-files.gitbook.io/~/files/v0/b/gitbook-x-prod.appspot.com/o/spaces%2F-MDHxt7lj9funy2SIeFB%2Fuploads%2F7cUNtW6LoZdhxtw9lgTE%2Fsml-04wb-1000px.jpg?alt=media&amp;token=58e3e977-e725-4727-b66c-ab2aa69b9ca5" alt="" width="375"><figcaption><p>SML-04WB</p></figcaption></figure>

***

## Introduce <a href="#a7ulc" id="a7ulc"></a>

### Short Description <a href="#shellyplus1-snsw-001x16eu-shortdescription" id="shellyplus1-snsw-001x16eu-shortdescription"></a>

* SML-04WB is a small form factor smart switch which allows remote control of electric appliances through a mobile phone, tablet and home automation system.
* SML-04WB can be accessed, controlled and monitored remotely from any place where the user has internet connectivity, as long as the device is connected to a Wi-Fi router and the Internet.
* It can be retrofitted into standard electrical wall boxes, behind power sockets and light switches or other places with limited space.

### Features <a href="#h4js5" id="h4js5"></a>

* No gateway required - You don’t need to purchase a gateway for this device, the device connects directly to your house’s Wi-Fi
* Wi-Fi + Bluetooth dual mode - connect to the network faster, with network provisioning speed 2 times faster than pure Wi-Fi devices
* App remote control - control the device anytime and anywhere through mobile App
* Smart linkage - In smart scene mode, linkage can be set to sound an alarm. The mobile App will also receive prompts, such as garage door open/close status, timeout notifications and overnight notifications, to remind you to close the garage door.
* Voice control - used with Amazon Echo, Google Home, Yandex, Tmall Genie
* Offline function - when the device is offline, the App will remind the device to go offline after 30 minutes
* Home Sharing - Create a smart home with your family
* Set a schedule - turn connected devices on and off at specified times
* Sharing feature - share with family members for joint control
* Supports Siri - This device is not compatible with HomeKit. But you can add click-to-run scenes to Siri shortcuts in the Smart Life App

{% hint style="success" %}
Bluetooth is only used for network signal connection and cannot be used alone to control devices. Wi-Fi + Bluetooth distribution is faster
{% endhint %}

***

## Safety Consultation and Precautions

1. The installation process of this product involves strong electricity and must be installed by professionals in accordance with electrical specifications and product instructions;
2. This product is for indoor use only, please do not use it in humid environments or outdoors;
3. This product is only suitable for safe use in areas below 2,000 meters above sea level;
4. Pay attention to moisture-proof, do not spill water or other liquids on this product;
5. Do not place this product near a heat source;
6. Do not attempt to repair this product yourself, this work should be performed by authorized professionals;
7. Do not use it with overload. Please make sure that the 10A overcurrent protection circuit breaker on the front of this product is working properly before powering on. It is recommended that the stripping length of the terminal connecting wire is 6-8 mm;
8. This product should not be installed or fixed in a place that can be touched by human hands, such as outside the wall. It should be installed in an appliance or a hidden box;
9. The position of the fixed antenna should be as far away as possible from metal, wires and the module itself. (Applicable to external antenna models).

***

## Main Applications <a href="#shellyplus1-snsw-001x16eu-mainapplications" id="shellyplus1-snsw-001x16eu-mainapplications"></a>

* Residential
* MDU (Multi Dwelling Units - apartments, condominiums, hotels, etc.)
* Light commercial (small office buildings, small retail/restaurant/gas station, etc.)
* Government/municipal
* University/college

***

## Integrations <a href="#shellyplus1-snsw-001x16eu-integrations" id="shellyplus1-snsw-001x16eu-integrations"></a>

* Google Assistant
* Amazon Alexa
* Yandex Alice
* Baidu Xiaodu
* Tmall Genie

***

## Supported Load Types <a href="#shellyplus1-snsw-001x16eu-supportedloadtypes" id="shellyplus1-snsw-001x16eu-supportedloadtypes"></a>

* Resistive (incandescent bulbs, heating devices)
* Capacitive (capacitor banks, electronic equipment, motor start capacitors)
* Inductive with RC Snubber (LED light drivers, transformers, fans, refrigerators, air-conditioners)

***

## Installation

{% hint style="danger" %}
Please make sure the main power switch is turned off before installation
{% endhint %}

1. Connect wires according to the wiring diagram;
2. Insert the module into the junction box;
3. Turn on the main power switch and add devices according to the [**quick setup.**](#quick-setup)

<figure><img src="https://3898863868-files.gitbook.io/~/files/v0/b/gitbook-x-prod.appspot.com/o/spaces%2F-MDHxt7lj9funy2SIeFB%2Fuploads%2FWriST4LRJ7OfjHUSsR1i%2Finstall%20to%20the%20wall%20-%204.png?alt=media&amp;token=0cca0471-7fa5-4d9f-ba59-6e41c00d4bfc" alt=""><figcaption><p>Insert into the junction box</p></figcaption></figure>

***

## Wiring Schematic

<figure><img src="https://3898863868-files.gitbook.io/~/files/v0/b/gitbook-x-prod.appspot.com/o/spaces%2F-MDHxt7lj9funy2SIeFB%2Fuploads%2FGkv4qBglnfksLaN9yLlK%2F4ch%20-%20witchout%20switch.png?alt=media&amp;token=d3def268-3015-444c-99d2-a1b6e87f1844" alt=""><figcaption><p>Without Switch</p></figcaption></figure>

<figure><img src="https://3898863868-files.gitbook.io/~/files/v0/b/gitbook-x-prod.appspot.com/o/spaces%2F-MDHxt7lj9funy2SIeFB%2Fuploads%2FbHg6dgO6n2admdkEe1IO%2F4ch%20-%204.png?alt=media&amp;token=9508769d-bd97-46a5-9354-996f46ad8663" alt=""><figcaption><p>Connect 4 Switches</p></figcaption></figure>

<figure><img src="https://3898863868-files.gitbook.io/~/files/v0/b/gitbook-x-prod.appspot.com/o/spaces%2F-MDHxt7lj9funy2SIeFB%2Fuploads%2FwF69JWjlg7H2yWZNq6sv%2F4ch%20-%204-3way.png?alt=media&amp;token=f7aba3c1-8ab0-4002-9e92-12effccf2a3f" alt=""><figcaption><p>Connect 8 3-way Switches</p></figcaption></figure>

{% hint style="success" %}
The mechanical switch can only be used with AC100 - 240V.
{% endhint %}

***

## Tech Specs <a href="#s4dtx" id="s4dtx"></a>

* Voltage: AC100 - 240V | 50/60Hz
* Dimensions: 39.2 x 39.2 x 18mm (without mounting clip) | 43 x 39.2 x 22.3mm (with mounting clip)&#x20;
* Wireless Standard: Wi-Fi - 2.4GHz + Bluetooth
* Max. Load: LED 150W x 4 | 2.5A x 4

<figure><img src="https://3898863868-files.gitbook.io/~/files/v0/b/gitbook-x-prod.appspot.com/o/spaces%2F-MDHxt7lj9funy2SIeFB%2Fuploads%2FVvk232aj1uBlKC6NcWUC%2F2ch%20-%20size.png?alt=media&amp;token=2d9dd954-0031-46c8-888f-31082100d94b" alt=""><figcaption><p>Size</p></figcaption></figure>

***

## Quick Setup

### 1. Register an account <a href="#izkpz" id="izkpz"></a>

<details>

<summary>Use the 'Smart Life' App</summary>

Please jump to the '[**Use Smart Life App**](/smart-life/user-manual-for-smart-life)' page to view

</details>

### 2. Add Device <a href="#pxw57" id="pxw57"></a>

Open the Smart Life App, click the '+' in the upper right corner of the homepage, enter the add device (accessory) page, select it, and follow the prompts

{% hint style="success" %}
**2 ways to put the module into network pairing mode**

* Press the reset key for about 10 seconds
* Press the traditional switch 5 times until the indicator light is flashing quickly

<img src="https://3898863868-files.gitbook.io/~/files/v0/b/gitbook-x-prod.appspot.com/o/spaces%2F-MDHxt7lj9funy2SIeFB%2Fuploads%2Fa3B1Hyb5N2g9TDlFvEy6%2F4ch%20-%20pair%20network.png?alt=media&amp;token=bcf7cfc6-80b8-4f80-906f-4c93f8c6bfea" alt="" data-size="original">
{% endhint %}

{% hint style="success" %}
If the addition fails, please press and hold the network configuration button again and try again.
{% endhint %}

### 3. Control the Device <a href="#kjvoo" id="kjvoo"></a>

Use the App to control. If you can control the device normally, it means the device is working properly.

***

## Indicator Light Status Description

| **Indicator Status** | **Description**              |
| -------------------- | ---------------------------- |
| Blue flashes quickly | Connecting the network       |
| Blue is always on    | Network connection is normal |
| Indicator off        | Device offline/disconnected  |

***

## Toxic and Hazardous Substances Statement

<table data-header-hidden data-full-width="false"><thead><tr><th width="141"></th><th width="91"></th><th width="89"></th><th width="87"></th><th width="96"></th><th width="105"></th><th></th></tr></thead><tbody><tr><td>Part Name</td><td>铅 (Pb)</td><td>汞 (Hg)</td><td>镉(Cd)</td><td>六价铬<br>(Cr(VI))</td><td>多溴联苯<br>(PBB)</td><td>多溴二苯醚<br>(PBDE)</td></tr><tr><td>Plastic Shell</td><td>O</td><td>O</td><td>O</td><td>O</td><td>O</td><td>O</td></tr><tr><td>Plastic bracket</td><td>O</td><td>O</td><td>O</td><td>O</td><td>O</td><td>O</td></tr><tr><td>Electronic Component</td><td>O</td><td>O</td><td>O</td><td>O</td><td>O</td><td>O</td></tr><tr><td>PCBA</td><td>O</td><td>O</td><td>O</td><td>O</td><td>O</td><td>O</td></tr><tr><td>Metal</td><td>O</td><td>O</td><td>O</td><td>O</td><td>O</td><td>O</td></tr></tbody></table>

This form is prepared in accordance with the provisions of SJ/T 11364.

* O: Indicates that the content of the hazardous substance in all homogeneous materials of this part is below the limit requirements specified in GB/T 26572.
* ×: Indicates that the content of the hazardous substance in at least one homogeneous material of this part exceeds the limit requirements specified in GB/T 26572.

***

## Instructions for Use of Micropower Equipment

1. The Wi-Fi technology used in this product complies with the technical requirements of general micropower equipment Class F equipment in the 'Micropower Short-range Radio Transmission Equipment Catalog and Technical Requirements' for data transmission applications. It adopts integrated antenna, control, adjustment and switch Please refer to the relevant content in the product manual for usage instructions;
2. You are not allowed to change the usage scenarios or conditions without authorization, expand the transmission frequency range, increase the transmission power (including installing additional RF power amplifiers), and you are not allowed to change the transmitting antenna without authorization;
3. Shall not cause harmful interference to other legal radio stations, nor shall it offer protection against harmful interference;
4. Should withstand interference from industrial, scientific and medical (ISM) application equipment that radiates radio frequency energy or other legitimate radio stations;
5. If it causes harmful interference to other legal radio stations (stations), you should stop using it immediately and take measures to eliminate the interference before continuing to use it;
6. In aircraft and in accordance with laws and regulations, relevant national regulations, and standards designated radio astronomy observatories, weather radar stations, satellite earth stations (including measurement and control, ranging, receiving, and navigation stations) and other military and civilian radio stations (stations), airports, etc. Micropower equipment used in electromagnetic environment protection areas must comply with the regulations of electromagnetic environment protection and relevant industry authorities;
7. It is prohibited to use all types of model remote controls within a radius of 5,000 meters with the center point of the airport runway as the center;
8. The operating temperature of micropower equipment is -10℃ - 40℃, and the power supply is AC100 - 240V | 50/60Hz

***

## Warranty Instructions

The after-sales service of this product is strictly in accordance with the "Consumer Rights and Interests Protection Law of the People's Republic of China" and the "Product Quality Law of the People's Republic of China" to implement after-sales three-guarantee service. The service content is as follows:

### Warranty Policy

During the validity period of the Three Guarantees, you can enjoy free returns, exchanges, and repair services in accordance with this provision. Returns, exchanges, and repairs should be handled with invoices.

1. Returns without reason within 7 days from the day after receipt (e-commerce purchase channel), the user will bear the logistics costs.
2. This product has performance failures listed in the "Product Performance Failure Table". After after-sales service testing and confirmation, you can enjoy the following services for free:

| Service Type | Service Policy                                                                    |
| ------------ | --------------------------------------------------------------------------------- |
| Return       | Return of product due to quality reasons within 7 days from the day after receipt |
| Exchange     | Exchange for product quality reasons within 15 days from the day after receipt    |
| Repair       | Repair due to product quality within 1 year from the day after receipt            |

{% hint style="info" %}
Friendly reminder: Since packaging boxes are required to ensure the safety of product transportation during transportation, it is recommended that you keep the packaging boxes for at least 30 days from the day after signing for the product.
{% endhint %}

### Non-warranty Regulations

1. Unauthorized repair, misuse, collision, neglect, abuse, liquid intrusion, accident, alteration, incorrect use of non-product accessories, or tearing, alteration of labels, and anti-counterfeiting marks;
2. The three-pack validity period has expired;
3. Damage caused by force majeure;
4. Failure to comply with the performance failures listed in the "Product Performance Failure Table";
5. This product and its accessories have performance failures listed in the "Product Performance Failure Table" due to human reasons.

***


# SMC-01WB

User Manual for SMC-01WB 1CH Wi-Fi Curtain Module

***

## Appearance

<figure><img src="https://3898863868-files.gitbook.io/~/files/v0/b/gitbook-x-prod.appspot.com/o/spaces%2F-MDHxt7lj9funy2SIeFB%2Fuploads%2FgCimACxSt710j1wprAkk%2Fsmc-01wb-1000px.jpg?alt=media&amp;token=149ee656-572a-4892-9e01-a5c103428945" alt="" width="375"><figcaption><p>SMC-01WB</p></figcaption></figure>

***

## Introduce <a href="#a7ulc" id="a7ulc"></a>

### Short Description <a href="#shellyplus1-snsw-001x16eu-shortdescription" id="shellyplus1-snsw-001x16eu-shortdescription"></a>

* SMC-01WB is a small form factor smart switch which allows remote control of curtain/blind motors through a mobile phone, tablet and home automation system.
* SMC-01WB can be accessed, controlled and monitored remotely from any place where the user has internet connectivity, as long as the device is connected to a Wi-Fi router and the Internet.
* It can be retrofitted into standard electrical wall boxes, behind power sockets and light switches or other places with limited space.

### Features <a href="#h4js5" id="h4js5"></a>

* No gateway required - You don’t need to purchase a gateway for this device, the device connects directly to your house’s Wi-Fi
* Wi-Fi + Bluetooth dual mode - connect to the network faster, with network provisioning speed 2 times faster than pure Wi-Fi devices
* App remote control - control the device anytime and anywhere through mobile App
* Smart linkage - In smart scene mode, linkage can be set to sound an alarm. The mobile App will also receive prompts, such as garage door open/close status, timeout notifications and overnight notifications, to remind you to close the garage door.
* Voice control - used with Amazon Echo, Google Home, Yandex, Tmall Genie
* Offline function - when the device is offline, the App will remind the device to go offline after 30 minutes
* Home Sharing - Create a smart home with your family
* Set a schedule - turn connected devices on and off at specified times
* Sharing feature - share with family members for joint control
* Supports Siri - This device is not compatible with HomeKit. But you can add click-to-run scenes to Siri shortcuts in the Smart Life App

{% hint style="success" %}
Bluetooth is only used for network signal connection and cannot be used alone to control devices. Wi-Fi + Bluetooth distribution is faster
{% endhint %}

***

## Safety Consultation and Precautions

1. The installation process of this product involves strong electricity and must be installed by professionals in accordance with electrical specifications and product instructions;
2. This product is for indoor use only, please do not use it in humid environments or outdoors;
3. This product is only suitable for safe use in areas below 2,000 meters above sea level;
4. Pay attention to moisture-proof, do not spill water or other liquids on this product;
5. Do not place this product near a heat source;
6. Do not attempt to repair this product yourself, this work should be performed by authorized professionals;
7. Do not use it with overload. Please make sure that the 10A overcurrent protection circuit breaker on the front of this product is working properly before powering on. It is recommended that the stripping length of the terminal connecting wire is 6-8 mm;
8. This product should not be installed or fixed in a place that can be touched by human hands, such as outside the wall. It should be installed in an appliance or a hidden box;
9. The position of the fixed antenna should be as far away as possible from metal, wires and the module itself. (Applicable to external antenna models).

***

## Main Applications <a href="#shellyplus1-snsw-001x16eu-mainapplications" id="shellyplus1-snsw-001x16eu-mainapplications"></a>

* Residential
* MDU (Multi Dwelling Units - apartments, condominiums, hotels, etc.)
* Government/municipal
* University/college

***

## Integrations <a href="#shellyplus1-snsw-001x16eu-integrations" id="shellyplus1-snsw-001x16eu-integrations"></a>

* Google Assistant
* Amazon Alexa
* Yandex Alice
* Baidu Xiaodu
* Tmall Genie

***

## Supported Load Types <a href="#shellyplus1-snsw-001x16eu-supportedloadtypes" id="shellyplus1-snsw-001x16eu-supportedloadtypes"></a>

* Curtain Motor
* Blind Motor

***

## Installation

{% hint style="danger" %}
Please make sure the main power switch is turned off before installation
{% endhint %}

1. Connect wires according to the wiring diagram;
2. Insert the module into the junction box;
3. Turn on the main power switch and add devices according to the [**quick setup.**](#quick-setup)

<figure><img src="https://3898863868-files.gitbook.io/~/files/v0/b/gitbook-x-prod.appspot.com/o/spaces%2F-MDHxt7lj9funy2SIeFB%2Fuploads%2Fm9dMfSejS9yt0DPawY25%2Finstall%20to%20the%20wall.png?alt=media&amp;token=332b07b8-865b-42f2-9463-2f10738bfec5" alt=""><figcaption><p>Insert into the junction box</p></figcaption></figure>

***

## Wiring Schematic

<figure><img src="https://3898863868-files.gitbook.io/~/files/v0/b/gitbook-x-prod.appspot.com/o/spaces%2F-MDHxt7lj9funy2SIeFB%2Fuploads%2FB1Mcqb6hK5iM2q7HENxa%2F1ch%20curtain.png?alt=media&amp;token=a3e312e0-c535-494e-a70e-30e5e1cdb977" alt=""><figcaption><p>1CH Curtain Module</p></figcaption></figure>

{% hint style="success" %}
The mechanical switch can only be used with AC100 - 240V.
{% endhint %}

***

## Tech Specs <a href="#s4dtx" id="s4dtx"></a>

* Voltage: AC100 - 240V | 50/60Hz
* Dimensions: 39.2 x 39.2 x 18mm (without mounting clip) | 43 x 39.2 x 22.3mm (with mounting clip)&#x20;
* Wireless Standard: Wi-Fi - 2.4GHz + Bluetooth
* Max. Load: 3A | 600W

<figure><img src="https://3898863868-files.gitbook.io/~/files/v0/b/gitbook-x-prod.appspot.com/o/spaces%2F-MDHxt7lj9funy2SIeFB%2Fuploads%2FVvk232aj1uBlKC6NcWUC%2F2ch%20-%20size.png?alt=media&amp;token=2d9dd954-0031-46c8-888f-31082100d94b" alt=""><figcaption><p>Size</p></figcaption></figure>

***

## Quick Setup

### 1. Register an account <a href="#izkpz" id="izkpz"></a>

<details>

<summary>Use the 'Smart Life' App</summary>

Please jump to the '[**Use Smart Life App**](/smart-life/user-manual-for-smart-life)' page to view

</details>

### 2. Add Device <a href="#pxw57" id="pxw57"></a>

Open the Smart Life App, click the '+' in the upper right corner of the homepage, enter the add device (accessory) page, select it, and follow the prompts

{% hint style="success" %}
**2 ways to put the module into network pairing mode**

* Press the reset key for about 10 seconds
* Press the traditional switch 10 seconds until the indicator light is flashing quickly

<img src="https://3898863868-files.gitbook.io/~/files/v0/b/gitbook-x-prod.appspot.com/o/spaces%2F-MDHxt7lj9funy2SIeFB%2Fuploads%2FmbInGDysXabAi1dyhJj1%2F1ch%20curtain%20-%20pair%20network.png?alt=media&amp;token=acd23bac-53e8-4201-8d5e-4c0fa1c9050e" alt="" data-size="original">
{% endhint %}

{% hint style="success" %}
If the addition fails, please press and hold the network configuration button again and try again.
{% endhint %}

### 3. Control the Device <a href="#kjvoo" id="kjvoo"></a>

Use the App to control. If you can control the device normally, it means the device is working properly.

***

## Indicator Light Status Description

| **Indicator Status** | **Description**              |
| -------------------- | ---------------------------- |
| Blue flashes quickly | Connecting the network       |
| Blue is always on    | Network connection is normal |
| Indicator off        | Device offline/disconnected  |

***

## Toxic and Hazardous Substances Statement

<table data-header-hidden data-full-width="false"><thead><tr><th width="141"></th><th width="91"></th><th width="89"></th><th width="87"></th><th width="96"></th><th width="105"></th><th></th></tr></thead><tbody><tr><td>Part Name</td><td>铅 (Pb)</td><td>汞 (Hg)</td><td>镉(Cd)</td><td>六价铬<br>(Cr(VI))</td><td>多溴联苯<br>(PBB)</td><td>多溴二苯醚<br>(PBDE)</td></tr><tr><td>Plastic Shell</td><td>O</td><td>O</td><td>O</td><td>O</td><td>O</td><td>O</td></tr><tr><td>Plastic bracket</td><td>O</td><td>O</td><td>O</td><td>O</td><td>O</td><td>O</td></tr><tr><td>Electronic Component</td><td>O</td><td>O</td><td>O</td><td>O</td><td>O</td><td>O</td></tr><tr><td>PCBA</td><td>O</td><td>O</td><td>O</td><td>O</td><td>O</td><td>O</td></tr><tr><td>Metal</td><td>O</td><td>O</td><td>O</td><td>O</td><td>O</td><td>O</td></tr></tbody></table>

This form is prepared in accordance with the provisions of SJ/T 11364.

* O: Indicates that the content of the hazardous substance in all homogeneous materials of this part is below the limit requirements specified in GB/T 26572.
* ×: Indicates that the content of the hazardous substance in at least one homogeneous material of this part exceeds the limit requirements specified in GB/T 26572.

***

## Instructions for Use of Micropower Equipment

1. The Wi-Fi technology used in this product complies with the technical requirements of general micropower equipment Class F equipment in the 'Micropower Short-range Radio Transmission Equipment Catalog and Technical Requirements' for data transmission applications. It adopts integrated antenna, control, adjustment and switch Please refer to the relevant content in the product manual for usage instructions;
2. You are not allowed to change the usage scenarios or conditions without authorization, expand the transmission frequency range, increase the transmission power (including installing additional RF power amplifiers), and you are not allowed to change the transmitting antenna without authorization;
3. Shall not cause harmful interference to other legal radio stations, nor shall it offer protection against harmful interference;
4. Should withstand interference from industrial, scientific and medical (ISM) application equipment that radiates radio frequency energy or other legitimate radio stations;
5. If it causes harmful interference to other legal radio stations (stations), you should stop using it immediately and take measures to eliminate the interference before continuing to use it;
6. In aircraft and in accordance with laws and regulations, relevant national regulations, and standards designated radio astronomy observatories, weather radar stations, satellite earth stations (including measurement and control, ranging, receiving, and navigation stations) and other military and civilian radio stations (stations), airports, etc. Micropower equipment used in electromagnetic environment protection areas must comply with the regulations of electromagnetic environment protection and relevant industry authorities;
7. It is prohibited to use all types of model remote controls within a radius of 5,000 meters with the center point of the airport runway as the center;
8. The operating temperature of micropower equipment is -10℃ - 40℃, and the power supply is AC100 - 240V | 50/60Hz

***

## Warranty Instructions

The after-sales service of this product is strictly in accordance with the "Consumer Rights and Interests Protection Law of the People's Republic of China" and the "Product Quality Law of the People's Republic of China" to implement after-sales three-guarantee service. The service content is as follows:

### Warranty Policy

During the validity period of the Three Guarantees, you can enjoy free returns, exchanges, and repair services in accordance with this provision. Returns, exchanges, and repairs should be handled with invoices.

1. Returns without reason within 7 days from the day after receipt (e-commerce purchase channel), the user will bear the logistics costs.
2. This product has performance failures listed in the "Product Performance Failure Table". After after-sales service testing and confirmation, you can enjoy the following services for free:

| Service Type | Service Policy                                                                    |
| ------------ | --------------------------------------------------------------------------------- |
| Return       | Return of product due to quality reasons within 7 days from the day after receipt |
| Exchange     | Exchange for product quality reasons within 15 days from the day after receipt    |
| Repair       | Repair due to product quality within 1 year from the day after receipt            |

{% hint style="info" %}
Friendly reminder: Since packaging boxes are required to ensure the safety of product transportation during transportation, it is recommended that you keep the packaging boxes for at least 30 days from the day after signing for the product.
{% endhint %}

### Non-warranty Regulations

1. Unauthorized repair, misuse, collision, neglect, abuse, liquid intrusion, accident, alteration, incorrect use of non-product accessories, or tearing, alteration of labels, and anti-counterfeiting marks;
2. The three-pack validity period has expired;
3. Damage caused by force majeure;
4. Failure to comply with the performance failures listed in the "Product Performance Failure Table";
5. This product and its accessories have performance failures listed in the "Product Performance Failure Table" due to human reasons.

***


# SMC-02WB

User Manual for SMC-02WB 2CH Wi-Fi Curtain Module

***

## Appearance

<figure><img src="https://3898863868-files.gitbook.io/~/files/v0/b/gitbook-x-prod.appspot.com/o/spaces%2F-MDHxt7lj9funy2SIeFB%2Fuploads%2FGT5PZAvEb6WQR78VTkgz%2Fsmc-02wb-1000px.jpg?alt=media&amp;token=18bffe63-c6d7-4857-8324-ed980f31da10" alt="" width="375"><figcaption><p>SMC-02WB</p></figcaption></figure>

***

## Introduce <a href="#a7ulc" id="a7ulc"></a>

### Short Description <a href="#shellyplus1-snsw-001x16eu-shortdescription" id="shellyplus1-snsw-001x16eu-shortdescription"></a>

* SMC-02WB is a small form factor smart switch which allows remote control of curtain/blind motors through a mobile phone, tablet and home automation system.
* SMC-02WB can be accessed, controlled and monitored remotely from any place where the user has internet connectivity, as long as the device is connected to a Wi-Fi router and the Internet.
* It can be retrofitted into standard electrical wall boxes, behind power sockets and light switches or other places with limited space.

### Features <a href="#h4js5" id="h4js5"></a>

* No gateway required - You don’t need to purchase a gateway for this device, the device connects directly to your house’s Wi-Fi
* Wi-Fi + Bluetooth dual mode - connect to the network faster, with network provisioning speed 2 times faster than pure Wi-Fi devices
* App remote control - control the device anytime and anywhere through mobile App
* Smart linkage - In smart scene mode, linkage can be set to sound an alarm. The mobile App will also receive prompts, such as garage door open/close status, timeout notifications and overnight notifications, to remind you to close the garage door.
* Voice control - used with Amazon Echo, Google Home, Yandex, Tmall Genie
* Offline function - when the device is offline, the App will remind the device to go offline after 30 minutes
* Home Sharing - Create a smart home with your family
* Set a schedule - turn connected devices on and off at specified times
* Sharing feature - share with family members for joint control
* Supports Siri - This device is not compatible with HomeKit. But you can add click-to-run scenes to Siri shortcuts in the Smart Life App

{% hint style="success" %}
Bluetooth is only used for network signal connection and cannot be used alone to control devices. Wi-Fi + Bluetooth distribution is faster
{% endhint %}

***

## Safety Consultation and Precautions

1. The installation process of this product involves strong electricity and must be installed by professionals in accordance with electrical specifications and product instructions;
2. This product is for indoor use only, please do not use it in humid environments or outdoors;
3. This product is only suitable for safe use in areas below 2,000 meters above sea level;
4. Pay attention to moisture-proof, do not spill water or other liquids on this product;
5. Do not place this product near a heat source;
6. Do not attempt to repair this product yourself, this work should be performed by authorized professionals;
7. Do not use it with overload. Please make sure that the 10A overcurrent protection circuit breaker on the front of this product is working properly before powering on. It is recommended that the stripping length of the terminal connecting wire is 6-8 mm;
8. This product should not be installed or fixed in a place that can be touched by human hands, such as outside the wall. It should be installed in an appliance or a hidden box;
9. The position of the fixed antenna should be as far away as possible from metal, wires and the module itself. (Applicable to external antenna models).

***

## Main Applications <a href="#shellyplus1-snsw-001x16eu-mainapplications" id="shellyplus1-snsw-001x16eu-mainapplications"></a>

* Residential
* MDU (Multi Dwelling Units - apartments, condominiums, hotels, etc.)
* Government/municipal
* University/college

***

## Integrations <a href="#shellyplus1-snsw-001x16eu-integrations" id="shellyplus1-snsw-001x16eu-integrations"></a>

* Google Assistant
* Amazon Alexa
* Yandex Alice
* Baidu Xiaodu
* Tmall Genie

***

## Supported Load Types <a href="#shellyplus1-snsw-001x16eu-supportedloadtypes" id="shellyplus1-snsw-001x16eu-supportedloadtypes"></a>

* Curtain Motor
* Blind Motor

***

## Installation

{% hint style="danger" %}
Please make sure the main power switch is turned off before installation
{% endhint %}

1. Connect wires according to the wiring diagram;
2. Insert the module into the junction box;
3. Turn on the main power switch and add devices according to the [**quick setup.**](#quick-setup)

<figure><img src="https://3898863868-files.gitbook.io/~/files/v0/b/gitbook-x-prod.appspot.com/o/spaces%2F-MDHxt7lj9funy2SIeFB%2Fuploads%2FsRrwsABswF31EDBA1SGW%2F2ch%20curtain%20-%20into%20the%20wall.png?alt=media&amp;token=da946875-e21e-430c-a02a-da4bb4f3a840" alt=""><figcaption><p>Insert into the junction box</p></figcaption></figure>

***

## Wiring Schematic

<figure><img src="https://3898863868-files.gitbook.io/~/files/v0/b/gitbook-x-prod.appspot.com/o/spaces%2F-MDHxt7lj9funy2SIeFB%2Fuploads%2FaxMOkQdTtNC6zGB5gXJQ%2F2ch%20curtain.png?alt=media&amp;token=2e23cffd-f9e1-4c0d-8946-972bef01c5aa" alt=""><figcaption><p>2CH Curtain Module</p></figcaption></figure>

{% hint style="success" %}
The mechanical switch can only be used with AC100 - 240V.
{% endhint %}

***

## Tech Specs <a href="#s4dtx" id="s4dtx"></a>

* Voltage: AC100 - 240V | 50/60Hz
* Dimensions: 39.2 x 39.2 x 18mm (without mounting clip) | 43 x 39.2 x 22.3mm (with mounting clip)&#x20;
* Wireless Standard: Wi-Fi - 2.4GHz + Bluetooth
* Max. Load: 3A | 600W) x 2

<figure><img src="https://3898863868-files.gitbook.io/~/files/v0/b/gitbook-x-prod.appspot.com/o/spaces%2F-MDHxt7lj9funy2SIeFB%2Fuploads%2FVvk232aj1uBlKC6NcWUC%2F2ch%20-%20size.png?alt=media&amp;token=2d9dd954-0031-46c8-888f-31082100d94b" alt=""><figcaption><p>Size</p></figcaption></figure>

***

## Quick Setup

### 1. Register an account <a href="#izkpz" id="izkpz"></a>

<details>

<summary>Use the 'Smart Life' App</summary>

Please jump to the '[**Use Smart Life App**](/smart-life/user-manual-for-smart-life)' page to view

</details>

### 2. Add Device <a href="#pxw57" id="pxw57"></a>

Open the Smart Life App, click the '+' in the upper right corner of the homepage, enter the add device (accessory) page, select it, and follow the prompts

{% hint style="success" %}
**2 ways to put the module into network pairing mode**

* Press the reset key for about 10 seconds
* Press the traditional switch 10 seconds until the indicator light is flashing quickly

<img src="https://3898863868-files.gitbook.io/~/files/v0/b/gitbook-x-prod.appspot.com/o/spaces%2F-MDHxt7lj9funy2SIeFB%2Fuploads%2FjHmtPUEsQuVfkQZHZ7MR%2F2ch%20curtain%20-%20pair%20network.png?alt=media&amp;token=861488a5-a4d7-4565-8ac8-3747151056b9" alt="" data-size="original">
{% endhint %}

{% hint style="success" %}
If the addition fails, please press and hold the network configuration button again and try again.
{% endhint %}

### 3. Control the Device <a href="#kjvoo" id="kjvoo"></a>

Use the App to control. If you can control the device normally, it means the device is working properly.

***

## Indicator Light Status Description

| **Indicator Status** | **Description**              |
| -------------------- | ---------------------------- |
| Blue flashes quickly | Connecting the network       |
| Blue is always on    | Network connection is normal |
| Indicator off        | Device offline/disconnected  |

***

## Toxic and Hazardous Substances Statement

<table data-header-hidden data-full-width="false"><thead><tr><th width="141"></th><th width="91"></th><th width="89"></th><th width="87"></th><th width="96"></th><th width="105"></th><th></th></tr></thead><tbody><tr><td>Part Name</td><td>铅 (Pb)</td><td>汞 (Hg)</td><td>镉(Cd)</td><td>六价铬<br>(Cr(VI))</td><td>多溴联苯<br>(PBB)</td><td>多溴二苯醚<br>(PBDE)</td></tr><tr><td>Plastic Shell</td><td>O</td><td>O</td><td>O</td><td>O</td><td>O</td><td>O</td></tr><tr><td>Plastic bracket</td><td>O</td><td>O</td><td>O</td><td>O</td><td>O</td><td>O</td></tr><tr><td>Electronic Component</td><td>O</td><td>O</td><td>O</td><td>O</td><td>O</td><td>O</td></tr><tr><td>PCBA</td><td>O</td><td>O</td><td>O</td><td>O</td><td>O</td><td>O</td></tr><tr><td>Metal</td><td>O</td><td>O</td><td>O</td><td>O</td><td>O</td><td>O</td></tr></tbody></table>

This form is prepared in accordance with the provisions of SJ/T 11364.

* O: Indicates that the content of the hazardous substance in all homogeneous materials of this part is below the limit requirements specified in GB/T 26572.
* ×: Indicates that the content of the hazardous substance in at least one homogeneous material of this part exceeds the limit requirements specified in GB/T 26572.

***

## Instructions for Use of Micropower Equipment

1. The Wi-Fi technology used in this product complies with the technical requirements of general micropower equipment Class F equipment in the 'Micropower Short-range Radio Transmission Equipment Catalog and Technical Requirements' for data transmission applications. It adopts integrated antenna, control, adjustment and switch Please refer to the relevant content in the product manual for usage instructions;
2. You are not allowed to change the usage scenarios or conditions without authorization, expand the transmission frequency range, increase the transmission power (including installing additional RF power amplifiers), and you are not allowed to change the transmitting antenna without authorization;
3. Shall not cause harmful interference to other legal radio stations, nor shall it offer protection against harmful interference;
4. Should withstand interference from industrial, scientific and medical (ISM) application equipment that radiates radio frequency energy or other legitimate radio stations;
5. If it causes harmful interference to other legal radio stations (stations), you should stop using it immediately and take measures to eliminate the interference before continuing to use it;
6. In aircraft and in accordance with laws and regulations, relevant national regulations, and standards designated radio astronomy observatories, weather radar stations, satellite earth stations (including measurement and control, ranging, receiving, and navigation stations) and other military and civilian radio stations (stations), airports, etc. Micropower equipment used in electromagnetic environment protection areas must comply with the regulations of electromagnetic environment protection and relevant industry authorities;
7. It is prohibited to use all types of model remote controls within a radius of 5,000 meters with the center point of the airport runway as the center;
8. The operating temperature of micropower equipment is -10℃ - 40℃, and the power supply is AC100 - 240V | 50/60Hz

***

## Warranty Instructions

The after-sales service of this product is strictly in accordance with the "Consumer Rights and Interests Protection Law of the People's Republic of China" and the "Product Quality Law of the People's Republic of China" to implement after-sales three-guarantee service. The service content is as follows:

### Warranty Policy

During the validity period of the Three Guarantees, you can enjoy free returns, exchanges, and repair services in accordance with this provision. Returns, exchanges, and repairs should be handled with invoices.

1. Returns without reason within 7 days from the day after receipt (e-commerce purchase channel), the user will bear the logistics costs.
2. This product has performance failures listed in the "Product Performance Failure Table". After after-sales service testing and confirmation, you can enjoy the following services for free:

| Service Type | Service Policy                                                                    |
| ------------ | --------------------------------------------------------------------------------- |
| Return       | Return of product due to quality reasons within 7 days from the day after receipt |
| Exchange     | Exchange for product quality reasons within 15 days from the day after receipt    |
| Repair       | Repair due to product quality within 1 year from the day after receipt            |

{% hint style="info" %}
Friendly reminder: Since packaging boxes are required to ensure the safety of product transportation during transportation, it is recommended that you keep the packaging boxes for at least 30 days from the day after signing for the product.
{% endhint %}

### Non-warranty Regulations

1. Unauthorized repair, misuse, collision, neglect, abuse, liquid intrusion, accident, alteration, incorrect use of non-product accessories, or tearing, alteration of labels, and anti-counterfeiting marks;
2. The three-pack validity period has expired;
3. Damage caused by force majeure;
4. Failure to comply with the performance failures listed in the "Product Performance Failure Table";
5. This product and its accessories have performance failures listed in the "Product Performance Failure Table" due to human reasons.

***


# SMD-01WB

User Manual for SMD-01WB 1CH Wi-Fi Dimmer Module

***

## Appearance

<figure><img src="https://3898863868-files.gitbook.io/~/files/v0/b/gitbook-x-prod.appspot.com/o/spaces%2F-MDHxt7lj9funy2SIeFB%2Fuploads%2FaQf6dN9KTCjIQLX3GHTN%2Fsmd-01wb-1000px.jpg?alt=media&amp;token=7c7ac591-1657-4d86-bffb-80cd2baf99eb" alt="" width="375"><figcaption><p>SMD-01WB</p></figcaption></figure>

***

## Introduce <a href="#a7ulc" id="a7ulc"></a>

### Short Description <a href="#shellyplus1-snsw-001x16eu-shortdescription" id="shellyplus1-snsw-001x16eu-shortdescription"></a>

* SMD-01WB is a small form factor smart switch which allows remote control of light through a mobile phone, tablet and home automation system.
* SMD-01WB can be accessed, controlled and monitored remotely from any place where the user has internet connectivity, as long as the device is connected to a Wi-Fi router and the Internet.
* It can be retrofitted into standard electrical wall boxes, behind power sockets and light switches or other places with limited space.

### Features <a href="#h4js5" id="h4js5"></a>

* No gateway required - You don’t need to purchase a gateway for this device, the device connects directly to your house’s Wi-Fi
* Wi-Fi + Bluetooth dual mode - connect to the network faster, with network provisioning speed 2 times faster than pure Wi-Fi devices
* App remote control - control the device anytime and anywhere through mobile App
* Smart linkage - In smart scene mode, linkage can be set to sound an alarm. The mobile App will also receive prompts, such as garage door open/close status, timeout notifications and overnight notifications, to remind you to close the garage door.
* Voice control - used with Amazon Echo, Google Home, Yandex, Tmall Genie
* Offline function - when the device is offline, the App will remind the device to go offline after 30 minutes
* Home Sharing - Create a smart home with your family
* Set a schedule - turn connected devices on and off at specified times
* Sharing feature - share with family members for joint control
* Supports Siri - This device is not compatible with HomeKit. But you can add click-to-run scenes to Siri shortcuts in the Smart Life App

{% hint style="success" %}
Bluetooth is only used for network signal connection and cannot be used alone to control devices. Wi-Fi + Bluetooth distribution is faster
{% endhint %}

***

## Safety Consultation and Precautions

1. The installation process of this product involves strong electricity and must be installed by professionals in accordance with electrical specifications and product instructions;
2. This product is for indoor use only, please do not use it in humid environments or outdoors;
3. This product is only suitable for safe use in areas below 2,000 meters above sea level;
4. Pay attention to moisture-proof, do not spill water or other liquids on this product;
5. Do not place this product near a heat source;
6. Do not attempt to repair this product yourself, this work should be performed by authorized professionals;
7. Do not use it with overload. Please make sure that the 10A overcurrent protection circuit breaker on the front of this product is working properly before powering on. It is recommended that the stripping length of the terminal connecting wire is 6-8 mm;
8. This product should not be installed or fixed in a place that can be touched by human hands, such as outside the wall. It should be installed in an appliance or a hidden box;
9. The position of the fixed antenna should be as far away as possible from metal, wires and the module itself. (Applicable to external antenna models).

***

## Main Applications <a href="#shellyplus1-snsw-001x16eu-mainapplications" id="shellyplus1-snsw-001x16eu-mainapplications"></a>

* Residential
* MDU (Multi Dwelling Units - apartments, condominiums, hotels, etc.)
* Light commercial (small office buildings, small retail/restaurant/gas station, etc.)
* Government/municipal
* University/college

***

## Integrations <a href="#shellyplus1-snsw-001x16eu-integrations" id="shellyplus1-snsw-001x16eu-integrations"></a>

* Google Assistant
* Amazon Alexa
* Yandex Alice
* Baidu Xiaodu
* Tmall Genie

***

## Supported Load Types <a href="#shellyplus1-snsw-001x16eu-supportedloadtypes" id="shellyplus1-snsw-001x16eu-supportedloadtypes"></a>

* Incandescent bulb
* LED light

***

## Installation

{% hint style="danger" %}
Please make sure the main power switch is turned off before installation
{% endhint %}

1. Connect wires according to the wiring diagram;
2. Insert the module into the junction box;
3. Turn on the main power switch and add devices according to the [**quick setup**](#quick-setup)[**.**](#quick-setup)

<figure><img src="https://3898863868-files.gitbook.io/~/files/v0/b/gitbook-x-prod.appspot.com/o/spaces%2F-MDHxt7lj9funy2SIeFB%2Fuploads%2FvdFcwHNV6jJoOXKSA6mC%2Finstall%20to%20the%20wall%20-%201.png?alt=media&amp;token=62270ef7-55d4-47ab-bd75-8ef523921b11" alt=""><figcaption><p>Insert into the junction box</p></figcaption></figure>

***

## Wiring Schematic

<figure><img src="https://3898863868-files.gitbook.io/~/files/v0/b/gitbook-x-prod.appspot.com/o/spaces%2F-MDHxt7lj9funy2SIeFB%2Fuploads%2FXQFuKcIyUseqvp14ZhbZ%2F1ch%20-%20without%20switch.png?alt=media&amp;token=dbb0acb8-84a5-44e4-8127-432f175fe4ff" alt=""><figcaption><p>Without Switch</p></figcaption></figure>

<figure><img src="https://3898863868-files.gitbook.io/~/files/v0/b/gitbook-x-prod.appspot.com/o/spaces%2F-MDHxt7lj9funy2SIeFB%2Fuploads%2FVnMQAjf36JSYWatleh0z%2F1ch%20-%201%20switch.png?alt=media&amp;token=ddebd351-10a6-4c5b-b991-f6d74a8e7a98" alt=""><figcaption><p>Connect 1 Switch</p></figcaption></figure>

<figure><img src="https://3898863868-files.gitbook.io/~/files/v0/b/gitbook-x-prod.appspot.com/o/spaces%2F-MDHxt7lj9funy2SIeFB%2Fuploads%2F4zGE93NkO6ue7iYH58jc%2F1ch%20-%202%20switch.png?alt=media&amp;token=0912a5eb-93e7-4300-9df9-673a637e7a8e" alt=""><figcaption><p>Connect 2 3-way Switches</p></figcaption></figure>

{% hint style="success" %}
The mechanical switch can only be used with AC100 - 240V.
{% endhint %}

***

## Tech Specs <a href="#s4dtx" id="s4dtx"></a>

* Voltage: AC100 - 240V | 50/60Hz
* Dimensions: 39.2 x 39.2 x 18mm (without mounting clip) | 43 x 39.2 x 22.3mm (with mounting clip)&#x20;
* Wireless Standard: Wi-Fi - 2.4GHz + Bluetooth
* Max. Load: LED 150W - 220V | LED 80W - 110V

<figure><img src="https://3898863868-files.gitbook.io/~/files/v0/b/gitbook-x-prod.appspot.com/o/spaces%2F-MDHxt7lj9funy2SIeFB%2Fuploads%2FBldcfXsEWy89au2EJTd6%2Fx2000px.png?alt=media&amp;token=2b65f422-155d-48cf-9880-7903b97df1bd" alt=""><figcaption><p>Size</p></figcaption></figure>

***

## Quick Setup

### 1. Register an account <a href="#izkpz" id="izkpz"></a>

<details>

<summary>Use the 'Smart Life' App</summary>

Please jump to the '[**Use Smart Life App**](/smart-life/user-manual-for-smart-life)' page to view

</details>

### 2. Add Device <a href="#pxw57" id="pxw57"></a>

Open the Smart Life App, click the '+' in the upper right corner of the homepage, enter the add device (accessory) page, select it, and follow the prompts

{% hint style="success" %}
**2 ways to put the module into network pairing mode**

* Press the reset key for about 10 seconds
* Press the traditional dimmer off 10 seconds until the indicator light is flashing quickly

<img src="https://3898863868-files.gitbook.io/~/files/v0/b/gitbook-x-prod.appspot.com/o/spaces%2F-MDHxt7lj9funy2SIeFB%2Fuploads%2FZNdw6MwnWZiHwEEkzCOr%2F2%20methods%20to%20network%20pairing.png?alt=media&amp;token=0ea66942-0c61-4bac-a806-be01581ab4b3" alt="" data-size="original">
{% endhint %}

{% hint style="success" %}
If the addition fails, please press and hold the network configuration button again and try again.
{% endhint %}

### 3. Control the Device <a href="#kjvoo" id="kjvoo"></a>

Use the App to control. If you can control the device normally, it means the device is working properly.

***

## Indicator Light Status Description

| **Indicator Status** | **Description**              |
| -------------------- | ---------------------------- |
| Blue flashes quickly | Connecting the network       |
| Blue is always on    | Network connection is normal |
| Indicator off        | Device offline/disconnected  |

***

## Toxic and Hazardous Substances Statement

<table data-header-hidden data-full-width="false"><thead><tr><th width="141"></th><th width="91"></th><th width="89"></th><th width="87"></th><th width="96"></th><th width="105"></th><th></th></tr></thead><tbody><tr><td>Part Name</td><td>铅 (Pb)</td><td>汞 (Hg)</td><td>镉(Cd)</td><td>六价铬<br>(Cr(VI))</td><td>多溴联苯<br>(PBB)</td><td>多溴二苯醚<br>(PBDE)</td></tr><tr><td>Plastic Shell</td><td>O</td><td>O</td><td>O</td><td>O</td><td>O</td><td>O</td></tr><tr><td>Plastic bracket</td><td>O</td><td>O</td><td>O</td><td>O</td><td>O</td><td>O</td></tr><tr><td>Electronic Component</td><td>O</td><td>O</td><td>O</td><td>O</td><td>O</td><td>O</td></tr><tr><td>PCBA</td><td>O</td><td>O</td><td>O</td><td>O</td><td>O</td><td>O</td></tr><tr><td>Metal</td><td>O</td><td>O</td><td>O</td><td>O</td><td>O</td><td>O</td></tr></tbody></table>

This form is prepared in accordance with the provisions of SJ/T 11364.

* O: Indicates that the content of the hazardous substance in all homogeneous materials of this part is below the limit requirements specified in GB/T 26572.
* ×: Indicates that the content of the hazardous substance in at least one homogeneous material of this part exceeds the limit requirements specified in GB/T 26572.

***

## Instructions for Use of Micropower Equipment

1. The Wi-Fi technology used in this product complies with the technical requirements of general micropower equipment Class F equipment in the 'Micropower Short-range Radio Transmission Equipment Catalog and Technical Requirements' for data transmission applications. It adopts integrated antenna, control, adjustment and switch Please refer to the relevant content in the product manual for usage instructions;
2. You are not allowed to change the usage scenarios or conditions without authorization, expand the transmission frequency range, increase the transmission power (including installing additional RF power amplifiers), and you are not allowed to change the transmitting antenna without authorization;
3. Shall not cause harmful interference to other legal radio stations, nor shall it offer protection against harmful interference;
4. Should withstand interference from industrial, scientific and medical (ISM) application equipment that radiates radio frequency energy or other legitimate radio stations;
5. If it causes harmful interference to other legal radio stations (stations), you should stop using it immediately and take measures to eliminate the interference before continuing to use it;
6. In aircraft and in accordance with laws and regulations, relevant national regulations, and standards designated radio astronomy observatories, weather radar stations, satellite earth stations (including measurement and control, ranging, receiving, and navigation stations) and other military and civilian radio stations (stations), airports, etc. Micropower equipment used in electromagnetic environment protection areas must comply with the regulations of electromagnetic environment protection and relevant industry authorities;
7. It is prohibited to use all types of model remote controls within a radius of 5,000 meters with the center point of the airport runway as the center;
8. The operating temperature of micropower equipment is -10℃ - 40℃, and the power supply is AC100 - 240V | 50/60Hz

***

## Warranty Instructions

The after-sales service of this product is strictly in accordance with the "Consumer Rights and Interests Protection Law of the People's Republic of China" and the "Product Quality Law of the People's Republic of China" to implement after-sales three-guarantee service. The service content is as follows:

### Warranty Policy

During the validity period of the Three Guarantees, you can enjoy free returns, exchanges, and repair services in accordance with this provision. Returns, exchanges, and repairs should be handled with invoices.

1. Returns without reason within 7 days from the day after receipt (e-commerce purchase channel), the user will bear the logistics costs.
2. This product has performance failures listed in the "Product Performance Failure Table". After after-sales service testing and confirmation, you can enjoy the following services for free:

| Service Type | Service Policy                                                                    |
| ------------ | --------------------------------------------------------------------------------- |
| Return       | Return of product due to quality reasons within 7 days from the day after receipt |
| Exchange     | Exchange for product quality reasons within 15 days from the day after receipt    |
| Repair       | Repair due to product quality within 1 year from the day after receipt            |

{% hint style="info" %}
Friendly reminder: Since packaging boxes are required to ensure the safety of product transportation during transportation, it is recommended that you keep the packaging boxes for at least 30 days from the day after signing for the product.
{% endhint %}

### Non-warranty Regulations

1. Unauthorized repair, misuse, collision, neglect, abuse, liquid intrusion, accident, alteration, incorrect use of non-product accessories, or tearing, alteration of labels, and anti-counterfeiting marks;
2. The three-pack validity period has expired;
3. Damage caused by force majeure;
4. Failure to comply with the performance failures listed in the "Product Performance Failure Table";
5. This product and its accessories have performance failures listed in the "Product Performance Failure Table" due to human reasons.

***


# SMD-02WB

User Manual for SMD-02WB 2CH Wi-Fi Dimmer Module

***

## Appearance

<figure><img src="https://3898863868-files.gitbook.io/~/files/v0/b/gitbook-x-prod.appspot.com/o/spaces%2F-MDHxt7lj9funy2SIeFB%2Fuploads%2FevvWGX1O95IgdtHTEcVx%2Fsmd-02wb-1000px.jpg?alt=media&amp;token=a4f8248d-c439-42e1-8c07-554d2e3360a0" alt="" width="375"><figcaption><p>SMD-02WB</p></figcaption></figure>

***

## Introduce <a href="#a7ulc" id="a7ulc"></a>

### Short Description <a href="#shellyplus1-snsw-001x16eu-shortdescription" id="shellyplus1-snsw-001x16eu-shortdescription"></a>

* SML-0DWB is a small form factor smart switch which allows remote control of light through a mobile phone, tablet and home automation system.
* SMD-02WB can be accessed, controlled and monitored remotely from any place where the user has internet connectivity, as long as the device is connected to a Wi-Fi router and the Internet.
* It can be retrofitted into standard electrical wall boxes, behind power sockets and light switches or other places with limited space.

### Features <a href="#h4js5" id="h4js5"></a>

* No gateway required - You don’t need to purchase a gateway for this device, the device connects directly to your house’s Wi-Fi
* Wi-Fi + Bluetooth dual mode - connect to the network faster, with network provisioning speed 2 times faster than pure Wi-Fi devices
* App remote control - control the device anytime and anywhere through mobile App
* Smart linkage - In smart scene mode, linkage can be set to sound an alarm. The mobile App will also receive prompts, such as garage door open/close status, timeout notifications and overnight notifications, to remind you to close the garage door.
* Voice control - used with Amazon Echo, Google Home, Yandex, Tmall Genie
* Offline function - when the device is offline, the App will remind the device to go offline after 30 minutes
* Home Sharing - Create a smart home with your family
* Set a schedule - turn connected devices on and off at specified times
* Sharing feature - share with family members for joint control
* Supports Siri - This device is not compatible with HomeKit. But you can add click-to-run scenes to Siri shortcuts in the Smart Life App

{% hint style="success" %}
Bluetooth is only used for network signal connection and cannot be used alone to control devices. Wi-Fi + Bluetooth distribution is faster
{% endhint %}

***

## Safety Consultation and Precautions

1. The installation process of this product involves strong electricity and must be installed by professionals in accordance with electrical specifications and product instructions;
2. This product is for indoor use only, please do not use it in humid environments or outdoors;
3. This product is only suitable for safe use in areas below 2,000 meters above sea level;
4. Pay attention to moisture-proof, do not spill water or other liquids on this product;
5. Do not place this product near a heat source;
6. Do not attempt to repair this product yourself, this work should be performed by authorized professionals;
7. Do not use it with overload. Please make sure that the 10A overcurrent protection circuit breaker on the front of this product is working properly before powering on. It is recommended that the stripping length of the terminal connecting wire is 6-8 mm;
8. This product should not be installed or fixed in a place that can be touched by human hands, such as outside the wall. It should be installed in an appliance or a hidden box;
9. The position of the fixed antenna should be as far away as possible from metal, wires and the module itself. (Applicable to external antenna models).

***

## Main Applications <a href="#shellyplus1-snsw-001x16eu-mainapplications" id="shellyplus1-snsw-001x16eu-mainapplications"></a>

* Residential
* MDU (Multi Dwelling Units - apartments, condominiums, hotels, etc.)
* Light commercial (small office buildings, small retail/restaurant/gas station, etc.)
* Government/municipal
* University/college

***

## Integrations <a href="#shellyplus1-snsw-001x16eu-integrations" id="shellyplus1-snsw-001x16eu-integrations"></a>

* Google Assistant
* Amazon Alexa
* Yandex Alice
* Baidu Xiaodu
* Tmall Genie

***

## Supported Load Types <a href="#shellyplus1-snsw-001x16eu-supportedloadtypes" id="shellyplus1-snsw-001x16eu-supportedloadtypes"></a>

* Incandescent bulb
* LED light

***

## Installation

{% hint style="danger" %}
Please make sure the main power switch is turned off before installation
{% endhint %}

1. Connect wires according to the wiring diagram;
2. Insert the module into the junction box;
3. Turn on the main power switch and add devices according to the [**quick setup**](#quick-setup)**.**

<figure><img src="https://3898863868-files.gitbook.io/~/files/v0/b/gitbook-x-prod.appspot.com/o/spaces%2F-MDHxt7lj9funy2SIeFB%2Fuploads%2FdQ7dTAdyeGetY5btYv0P%2Finstall%20to%20the%20wall%20-%202.png?alt=media&amp;token=336ec27e-24a9-4048-bc69-2e08a7bc732c" alt=""><figcaption><p>Insert into the junction box</p></figcaption></figure>

***

## Wiring Schematic

<figure><img src="https://3898863868-files.gitbook.io/~/files/v0/b/gitbook-x-prod.appspot.com/o/spaces%2F-MDHxt7lj9funy2SIeFB%2Fuploads%2FEE1moGuvXq1tlR3iNu5j%2F2ch%20-%20without%20swith.png?alt=media&amp;token=b238fd94-0e87-48ba-aa23-792ed7f2a239" alt=""><figcaption><p>Without Switch</p></figcaption></figure>

<figure><img src="https://3898863868-files.gitbook.io/~/files/v0/b/gitbook-x-prod.appspot.com/o/spaces%2F-MDHxt7lj9funy2SIeFB%2Fuploads%2FVICWnrdlTybxSYj68805%2F2ch%20-%202switvh.png?alt=media&amp;token=603fa5e2-9c51-45d6-ad82-d9c08d72a1b3" alt=""><figcaption><p>Connect 2 Switches</p></figcaption></figure>

<figure><img src="https://3898863868-files.gitbook.io/~/files/v0/b/gitbook-x-prod.appspot.com/o/spaces%2F-MDHxt7lj9funy2SIeFB%2Fuploads%2FuHosUGOcAtibCx1Y2ggE%2F2ch%20-%204switch.png?alt=media&amp;token=8351e586-dc3b-4df6-a99d-19a3d1cf6ac7" alt=""><figcaption><p>Connect 4 3-way Switches</p></figcaption></figure>

{% hint style="success" %}
The mechanical switch can only be used with AC100 - 240V.
{% endhint %}

***

## Tech Specs <a href="#s4dtx" id="s4dtx"></a>

* Voltage: AC100 - 240V | 50/60Hz
* Dimensions: 39.2 x 39.2 x 18mm (without mounting clip) | 43 x 39.2 x 22.3mm (with mounting clip)&#x20;
* Wireless Standard: Wi-Fi - 2.4GHz + Bluetooth
* Max. Load: LED 100W x 2 - 220V | LED 60W x 2 - 110V

<figure><img src="https://3898863868-files.gitbook.io/~/files/v0/b/gitbook-x-prod.appspot.com/o/spaces%2F-MDHxt7lj9funy2SIeFB%2Fuploads%2FVvk232aj1uBlKC6NcWUC%2F2ch%20-%20size.png?alt=media&amp;token=2d9dd954-0031-46c8-888f-31082100d94b" alt=""><figcaption><p>Size</p></figcaption></figure>

***

## Quick Setup

### 1. Register an account <a href="#izkpz" id="izkpz"></a>

<details>

<summary>Use the 'Smart Life' App</summary>

Please jump to the '[**Use Smart Life App**](/smart-life/user-manual-for-smart-life)' page to view

</details>

### 2. Add Device <a href="#pxw57" id="pxw57"></a>

Open the Smart Life App, click the '+' in the upper right corner of the homepage, enter the add device (accessory) page, select it, and follow the prompts

{% hint style="success" %}
**2 ways to put the module into network pairing mode**

* Press the reset key for about 10 seconds
* Press the traditional dimmer off 10 seconds until the indicator light is flashing quickly

<img src="https://3898863868-files.gitbook.io/~/files/v0/b/gitbook-x-prod.appspot.com/o/spaces%2F-MDHxt7lj9funy2SIeFB%2Fuploads%2FSiZuXLXBpOA1YuJ5mZta%2F2ch%20dimmer%20-%20pair%20network.png?alt=media&amp;token=fd60dc10-9db8-43c2-b9f7-eb93782260aa" alt="" data-size="original">
{% endhint %}

{% hint style="success" %}
If the addition fails, please press and hold the network configuration button again and try again.
{% endhint %}

### 3. Control the Device <a href="#kjvoo" id="kjvoo"></a>

Use the App to control. If you can control the device normally, it means the device is working properly.

***

## Indicator Light Status Description

| **Indicator Status** | **Description**              |
| -------------------- | ---------------------------- |
| Blue flashes quickly | Connecting the network       |
| Blue is always on    | Network connection is normal |
| Indicator off        | Device offline/disconnected  |

***

## Toxic and Hazardous Substances Statement

<table data-header-hidden data-full-width="false"><thead><tr><th width="141"></th><th width="91"></th><th width="89"></th><th width="87"></th><th width="96"></th><th width="105"></th><th></th></tr></thead><tbody><tr><td>Part Name</td><td>铅 (Pb)</td><td>汞 (Hg)</td><td>镉(Cd)</td><td>六价铬<br>(Cr(VI))</td><td>多溴联苯<br>(PBB)</td><td>多溴二苯醚<br>(PBDE)</td></tr><tr><td>Plastic Shell</td><td>O</td><td>O</td><td>O</td><td>O</td><td>O</td><td>O</td></tr><tr><td>Plastic bracket</td><td>O</td><td>O</td><td>O</td><td>O</td><td>O</td><td>O</td></tr><tr><td>Electronic Component</td><td>O</td><td>O</td><td>O</td><td>O</td><td>O</td><td>O</td></tr><tr><td>PCBA</td><td>O</td><td>O</td><td>O</td><td>O</td><td>O</td><td>O</td></tr><tr><td>Metal</td><td>O</td><td>O</td><td>O</td><td>O</td><td>O</td><td>O</td></tr></tbody></table>

This form is prepared in accordance with the provisions of SJ/T 11364.

* O: Indicates that the content of the hazardous substance in all homogeneous materials of this part is below the limit requirements specified in GB/T 26572.
* ×: Indicates that the content of the hazardous substance in at least one homogeneous material of this part exceeds the limit requirements specified in GB/T 26572.

***

## Instructions for Use of Micropower Equipment

1. The Wi-Fi technology used in this product complies with the technical requirements of general micropower equipment Class F equipment in the 'Micropower Short-range Radio Transmission Equipment Catalog and Technical Requirements' for data transmission applications. It adopts integrated antenna, control, adjustment and switch Please refer to the relevant content in the product manual for usage instructions;
2. You are not allowed to change the usage scenarios or conditions without authorization, expand the transmission frequency range, increase the transmission power (including installing additional RF power amplifiers), and you are not allowed to change the transmitting antenna without authorization;
3. Shall not cause harmful interference to other legal radio stations, nor shall it offer protection against harmful interference;
4. Should withstand interference from industrial, scientific and medical (ISM) application equipment that radiates radio frequency energy or other legitimate radio stations;
5. If it causes harmful interference to other legal radio stations (stations), you should stop using it immediately and take measures to eliminate the interference before continuing to use it;
6. In aircraft and in accordance with laws and regulations, relevant national regulations, and standards designated radio astronomy observatories, weather radar stations, satellite earth stations (including measurement and control, ranging, receiving, and navigation stations) and other military and civilian radio stations (stations), airports, etc. Micropower equipment used in electromagnetic environment protection areas must comply with the regulations of electromagnetic environment protection and relevant industry authorities;
7. It is prohibited to use all types of model remote controls within a radius of 5,000 meters with the center point of the airport runway as the center;
8. The operating temperature of micropower equipment is -10℃ - 40℃, and the power supply is AC100 - 240V | 50/60Hz

***

## Warranty Instructions

The after-sales service of this product is strictly in accordance with the "Consumer Rights and Interests Protection Law of the People's Republic of China" and the "Product Quality Law of the People's Republic of China" to implement after-sales three-guarantee service. The service content is as follows:

### Warranty Policy

During the validity period of the Three Guarantees, you can enjoy free returns, exchanges, and repair services in accordance with this provision. Returns, exchanges, and repairs should be handled with invoices.

1. Returns without reason within 7 days from the day after receipt (e-commerce purchase channel), the user will bear the logistics costs.
2. This product has performance failures listed in the "Product Performance Failure Table". After after-sales service testing and confirmation, you can enjoy the following services for free:

| Service Type | Service Policy                                                                    |
| ------------ | --------------------------------------------------------------------------------- |
| Return       | Return of product due to quality reasons within 7 days from the day after receipt |
| Exchange     | Exchange for product quality reasons within 15 days from the day after receipt    |
| Repair       | Repair due to product quality within 1 year from the day after receipt            |

{% hint style="info" %}
Friendly reminder: Since packaging boxes are required to ensure the safety of product transportation during transportation, it is recommended that you keep the packaging boxes for at least 30 days from the day after signing for the product.
{% endhint %}

### Non-warranty Regulations

1. Unauthorized repair, misuse, collision, neglect, abuse, liquid intrusion, accident, alteration, incorrect use of non-product accessories, or tearing, alteration of labels, and anti-counterfeiting marks;
2. The three-pack validity period has expired;
3. Damage caused by force majeure;
4. Failure to comply with the performance failures listed in the "Product Performance Failure Table";
5. This product and its accessories have performance failures listed in the "Product Performance Failure Table" due to human reasons.

***


# SMG-01WB

User Manual for SMG-01WB Wi-Fi Garage Door Opener

***

## Appearance

<figure><img src="https://3898863868-files.gitbook.io/~/files/v0/b/gitbook-x-prod.appspot.com/o/spaces%2F-MDHxt7lj9funy2SIeFB%2Fuploads%2Fb9giujTbKzwQS6KGnDxU%2Fsmg-01wb-1000px.jpg?alt=media&amp;token=cb875cbe-bfcc-47f5-a870-c5ed931a6756" alt="" width="375"><figcaption><p>SMG-01WB</p></figcaption></figure>

***

## Introduce <a href="#a7ulc" id="a7ulc"></a>

### Features <a href="#h4js5" id="h4js5"></a>

* No gateway required - You don’t need to purchase a gateway for this device, the device connects directly to your house’s Wi-Fi
* Wi-Fi + Bluetooth dual mode - connect to the network faster, with network provisioning speed 2 times faster than pure Wi-Fi devices
* App remote control - control the device anytime and anywhere through mobile App
* Smart linkage - In smart scene mode, linkage can be set to sound an alarm. The mobile App will also receive prompts, such as garage door open/close status, timeout notifications and overnight notifications, to remind you to close the garage door.
* Voice control - used with Amazon Echo, Google Home, Yandex, Tmall Genie
* History - You can view the history of your garage door switch
* Offline function - when the device is offline, the App will remind the device to go offline after 30 minutes
* Home Sharing - Create a smart home with your family
* Set a schedule - turn connected devices on and off at specified times
* Sharing feature - share with family members for joint control
* Supports Siri - This device is not compatible with HomeKit. But you can add click-to-run scenes to Siri shortcuts in the Smart Life App

{% hint style="success" %}
Bluetooth is only used for network signal connection and cannot be used alone to control devices. Wi-Fi + Bluetooth distribution is faster
{% endhint %}

***

## Safety consultation and precautions

1. The installation process of this product involves strong electricity and must be installed by professionals in accordance with electrical specifications and product instructions;
2. This product is for indoor use only, please do not use it in humid environments or outdoors;
3. This product is only suitable for safe use in areas below 2,000 meters above sea level;
4. Pay attention to moisture-proof, do not spill water or other liquids on this product;
5. Do not place this product near a heat source;
6. Do not attempt to repair this product yourself, this work should be performed by authorized professionals;
7. Do not use it with overload. Please make sure that the 10A overcurrent protection circuit breaker on the front of this product is working properly before powering on. It is recommended that the stripping length of the terminal connecting wire is 6-8 mm;
8. This product should not be installed or fixed in a place that can be touched by human hands, such as outside the wall. It should be installed in an appliance or a hidden box;
9. The position of the fixed antenna should be as far away as possible from metal, wires and the module itself. (Applicable to external antenna models).

***

## Installation

{% hint style="danger" %}
Please make sure the main power switch is turned off before installation
{% endhint %}

1. Use a screwdriver to loosen the screws of the equipment terminal, and connect the neutral wire to the N hole and the live wire to the L hole as shown in the figure; S1 and S2 are connected to the signal wire and the switch; S3 and S4 are connected to the induction door sensor;
2. Turn on the main power switch and add devices according to the [**quick setup.**](#quick-setup)

***

## Wiring Schematic

<figure><img src="https://3898863868-files.gitbook.io/~/files/v0/b/gitbook-x-prod.appspot.com/o/spaces%2F-MDHxt7lj9funy2SIeFB%2Fuploads%2Fa0T7q9e7sbTvHqSTBTBj%2Fsmg-01wb.png?alt=media&amp;token=8caaf01b-7b7d-443c-9985-8cfdbe38c958" alt=""><figcaption><p>SMG-01WB</p></figcaption></figure>

{% hint style="success" %}
The mechanical switch can only be used with DC12V or below, and has no function with AC voltage.
{% endhint %}

***

## Tech Specs <a href="#s4dtx" id="s4dtx"></a>

* Voltage: 100 - 250VAC | 50/60Hz
* Dimensions: 39.2 x 39.2 x 18mm (without mounting clip) | 43 x 39.2 x 22.3mm (with mounting clip)&#x20;
* Wireless Standard: Wi-Fi - 2.4GHz + Bluetooth
* Cable length: 5 meters

***

## Quick Setup

### 1. Register an account <a href="#izkpz" id="izkpz"></a>

<details>

<summary>Use the 'Smart Life' App</summary>

Please jump to the '[**Use Smart Life App**](/smart-life/user-manual-for-smart-life)' page to view

</details>

### 2. Add Device <a href="#pxw57" id="pxw57"></a>

Open the Smart Life App, click the '+' in the upper right corner of the homepage, enter the add device (accessory) page, select it, and follow the prompts

{% hint style="success" %}
Press the reset key for about 10 seconds to put the module into network pairing mode

<img src="https://3898863868-files.gitbook.io/~/files/v0/b/gitbook-x-prod.appspot.com/o/spaces%2F-MDHxt7lj9funy2SIeFB%2Fuploads%2FVqglHmKxA7cYXaEaGxtC%2F1%20method%20to%20network%20pairing.png?alt=media&amp;token=ae9b092f-5fc2-4f95-ae98-d1813d8e791e" alt="" data-size="original">
{% endhint %}

{% hint style="success" %}
If the addition fails, please press and hold the network configuration button again and try again.
{% endhint %}

### 3. Control the Device <a href="#kjvoo" id="kjvoo"></a>

Use the App to control. If you can control the device normally, it means the device is working properly.

***

## Indicator Light Status Description

| **Indicator Status** | **Description**              |
| -------------------- | ---------------------------- |
| Blue flashes quickly | Connecting the network       |
| Blue is always on    | Network connection is normal |
| Indicator off        | Device offline/disconnected  |

***

## Toxic and Hazardous Substances Statement

<table data-header-hidden data-full-width="false"><thead><tr><th width="141"></th><th width="91"></th><th width="89"></th><th width="87"></th><th width="96"></th><th width="105"></th><th></th></tr></thead><tbody><tr><td>Part Name</td><td>铅 (Pb)</td><td>汞 (Hg)</td><td>镉(Cd)</td><td>六价铬<br>(Cr(VI))</td><td>多溴联苯<br>(PBB)</td><td>多溴二苯醚<br>(PBDE)</td></tr><tr><td>Plastic Shell</td><td>O</td><td>O</td><td>O</td><td>O</td><td>O</td><td>O</td></tr><tr><td>Plastic bracket</td><td>O</td><td>O</td><td>O</td><td>O</td><td>O</td><td>O</td></tr><tr><td>Electronic Component</td><td>O</td><td>O</td><td>O</td><td>O</td><td>O</td><td>O</td></tr><tr><td>PCBA</td><td>O</td><td>O</td><td>O</td><td>O</td><td>O</td><td>O</td></tr><tr><td>Metal</td><td>O</td><td>O</td><td>O</td><td>O</td><td>O</td><td>O</td></tr></tbody></table>

This form is prepared in accordance with the provisions of SJ/T 11364.

* O: Indicates that the content of the hazardous substance in all homogeneous materials of this part is below the limit requirements specified in GB/T 26572.
* ×: Indicates that the content of the hazardous substance in at least one homogeneous material of this part exceeds the limit requirements specified in GB/T 26572.

***

## Instructions for Use of Micropower Equipment

1. The Wi-Fi technology used in this product complies with the technical requirements of general micropower equipment Class F equipment in the 'Micropower Short-range Radio Transmission Equipment Catalog and Technical Requirements' for data transmission applications. It adopts integrated antenna, control, adjustment and switch Please refer to the relevant content in the product manual for usage instructions;
2. You are not allowed to change the usage scenarios or conditions without authorization, expand the transmission frequency range, increase the transmission power (including installing additional RF power amplifiers), and you are not allowed to change the transmitting antenna without authorization;
3. Shall not cause harmful interference to other legal radio stations, nor shall it offer protection against harmful interference;
4. Should withstand interference from industrial, scientific and medical (ISM) application equipment that radiates radio frequency energy or other legitimate radio stations;
5. If it causes harmful interference to other legal radio stations (stations), you should stop using it immediately and take measures to eliminate the interference before continuing to use it;
6. In aircraft and in accordance with laws and regulations, relevant national regulations, and standards designated radio astronomy observatories, weather radar stations, satellite earth stations (including measurement and control, ranging, receiving, and navigation stations) and other military and civilian radio stations (stations), airports, etc. Micropower equipment used in electromagnetic environment protection areas must comply with the regulations of electromagnetic environment protection and relevant industry authorities;
7. It is prohibited to use all types of model remote controls within a radius of 5,000 meters with the center point of the airport runway as the center;
8. The operating temperature of micropower equipment is -10℃ - 40℃, and the power supply is 220 V AC, 10 A; 24 - 38 V DC, 10A; 38 - 60 V DC, 1A.

***

## Warranty Instructions

The after-sales service of this product is strictly in accordance with the "Consumer Rights and Interests Protection Law of the People's Republic of China" and the "Product Quality Law of the People's Republic of China" to implement after-sales three-guarantee service. The service content is as follows:

### Warranty Policy

During the validity period of the Three Guarantees, you can enjoy free returns, exchanges, and repair services in accordance with this provision. Returns, exchanges, and repairs should be handled with invoices.

1. Returns without reason within 7 days from the day after receipt (e-commerce purchase channel), the user will bear the logistics costs.
2. This product has performance failures listed in the "Product Performance Failure Table". After after-sales service testing and confirmation, you can enjoy the following services for free:

| Service Type | Service Policy                                                                    |
| ------------ | --------------------------------------------------------------------------------- |
| Return       | Return of product due to quality reasons within 7 days from the day after receipt |
| Exchange     | Exchange for product quality reasons within 15 days from the day after receipt    |
| Repair       | Repair due to product quality within 1 year from the day after receipt            |

{% hint style="info" %}
Friendly reminder: Since packaging boxes are required to ensure the safety of product transportation during transportation, it is recommended that you keep the packaging boxes for at least 30 days from the day after signing for the product.
{% endhint %}

### Non-warranty Regulations

1. Unauthorized repair, misuse, collision, neglect, abuse, liquid intrusion, accident, alteration, incorrect use of non-product accessories, or tearing, alteration of labels, and anti-counterfeiting marks;
2. The three-pack validity period has expired;
3. Damage caused by force majeure;
4. Failure to comply with the performance failures listed in the "Product Performance Failure Table";
5. This product and its accessories have performance failures listed in the "Product Performance Failure Table" due to human reasons.

***


# SMS-01WB & SMS-02WB

User Manual for SMS-01WB 1CH & SMS-02WB 2CH Wi-Fi Single-phase Clamp

## Appearance

<figure><img src="https://3898863868-files.gitbook.io/~/files/v0/b/gitbook-x-prod.appspot.com/o/spaces%2F-MDHxt7lj9funy2SIeFB%2Fuploads%2Fv9PnMtQnomqARE979ixa%2Fsms-01wb%20-%201000px%20-%203.jpg?alt=media&amp;token=cd78afba-57a4-4841-b146-cc13674aba47" alt="" width="375"><figcaption><p>SMS-01WB</p></figcaption></figure>

<figure><img src="https://3898863868-files.gitbook.io/~/files/v0/b/gitbook-x-prod.appspot.com/o/spaces%2F-MDHxt7lj9funy2SIeFB%2Fuploads%2FJiFnCLIJaB67hGiulcL2%2Fsms-02wb%20-%201000px%20-%203.jpg?alt=media&amp;token=86c6ff55-9dbc-49e9-a1a0-d54c8e74a2ba" alt="" width="375"><figcaption><p>SMS-02WB</p></figcaption></figure>

***

## Introduce <a href="#a7ulc" id="a7ulc"></a>

### Short Description <a href="#shellyplus1-snsw-001x16eu-shortdescription" id="shellyplus1-snsw-001x16eu-shortdescription"></a>

* SMS-01WB & SMS-02WB Single Phase Clamp helps you monitor the amount of electricity usage in our facility by connecting the clamp to the power cable. It can measure voltage, current, power factor, and active power. Single-phase power clamps are commonly used by electricians, technicians, and engineers to troubleshoot electrical problems, monitor power consumption, and verify the performance of electrical equipment. They are also used in energy audits to identify areas of energy waste and potential cost savings.
* SMS-01WB & SMS-01WB can be accessed, controlled and monitored remotely from any place where the user has internet connectivity, as long as the device is connected to a Wi-Fi router and the Internet.
* It can be retrofitted into standard electrical wall boxes, behind power sockets and light switches or other places with limited space.

### Features <a href="#h4js5" id="h4js5"></a>

* Automation Device: Single-phase electricity-compatible, Tuya automation device, easy to satisfy with multiple usage scenarios.
* Multi-parameters Measurement: Support real-time measurement of energy consumption, voltage, current, power factor, active power, and frequency.
* Easy Installation: Compact size, adopts universal 35mm standard guide rail installation, no screws required, buckle fixation.
* Wide Applications: Suitable for a variety of occasions, both residential and commercial applications, such as rental houses, shopping malls, schools, factories, etc.
* No gateway required - You don’t need to purchase a gateway for this device, the device connects directly to your house’s Wi-Fi
* Wi-Fi + Bluetooth dual mode - connect to the network faster, with network provisioning speed 2 times faster than pure Wi-Fi devices
* App remote control - Support energy production measurement and historical consumption recording, you can see the usage trends by day, month, and year anytime and anywhere through mobile App
* Smart linkage - In smart scene mode, linkage can be set to sound an alarm. The mobile App will also receive prompts, such as garage door open/close status, timeout notifications and overnight notifications, to remind you to close the garage door.
* Voice control - used with Amazon Echo, Google Home, Yandex, Tmall Genie
* Offline function - when the device is offline, the App will remind the device to go offline after 30 minutes
* Home Sharing - Create a smart home with your family
* Set a schedule - turn connected devices on and off at specified times
* Sharing feature - share with family members for joint control

{% hint style="success" %}
Bluetooth is only used for network signal connection and cannot be used alone to control devices. Wi-Fi + Bluetooth distribution is faster
{% endhint %}

***

## Safety Consultation and Precautions

1. The installation process of this product involves strong electricity and must be installed by professionals in accordance with electrical specifications and product instructions;
2. This product is for indoor use only, please do not use it in humid environments or outdoors;
3. This product is only suitable for safe use in areas below 2,000 meters above sea level;
4. Pay attention to moisture-proof, do not spill water or other liquids on this product;
5. Do not place this product near a heat source;
6. Do not attempt to repair this product yourself, this work should be performed by authorized professionals;
7. Do not use it with overload. Please make sure that the 10A overcurrent protection circuit breaker on the front of this product is working properly before powering on. It is recommended that the stripping length of the terminal connecting wire is 6-8 mm;
8. This product should not be installed or fixed in a place that can be touched by human hands, such as outside the wall. It should be installed in an appliance or a hidden box;
9. The position of the fixed antenna should be as far away as possible from metal, wires and the module itself. (Applicable to external antenna models).

***

## Main Applications <a href="#shellyplus1-snsw-001x16eu-mainapplications" id="shellyplus1-snsw-001x16eu-mainapplications"></a>

* Residential
* MDU (Multi Dwelling Units - apartments, condominiums, hotels, etc.)
* Government/municipal
* University/college

***

## Integrations <a href="#shellyplus1-snsw-001x16eu-integrations" id="shellyplus1-snsw-001x16eu-integrations"></a>

* Google Assistant
* Amazon Alexa
* Yandex Alice
* Baidu Xiaodu
* Tmall Genie

***

## Installation

{% hint style="danger" %}
Please make sure the main power switch is turned off before installation
{% endhint %}

<figure><img src="https://3898863868-files.gitbook.io/~/files/v0/b/gitbook-x-prod.appspot.com/o/spaces%2F-MDHxt7lj9funy2SIeFB%2Fuploads%2FrqBnqljppuKy2kgaeno8%2FSMS-01WB.png?alt=media&amp;token=1dc488e0-6d19-4107-8fa0-ed9fd62799e3" alt="" width="563"><figcaption><p>SMS-01WB</p></figcaption></figure>

<figure><img src="https://3898863868-files.gitbook.io/~/files/v0/b/gitbook-x-prod.appspot.com/o/spaces%2F-MDHxt7lj9funy2SIeFB%2Fuploads%2F8zeYSHELUoV8pU5nAdPh%2FSMS-02WB.png?alt=media&amp;token=821d7761-713a-40a3-a7d1-46c72929a434" alt=""><figcaption><p>SMS-02WB</p></figcaption></figure>

1. Open the clamp to see the arrow (P1→P2) or (K→L) or you can find it on the sticker outside the clamp. This is the direction of CT. The CT supports bi-directional sensing. If the direction of the CT is opposite to the direction of the current, the power will be negative;
2. Apply the CT on the electric cable and ensure the direction of the CT is correct when installing in different scenarios. Reference [**wiring schematics**](#wiring-schematic)
3. Turn on the main power switch and add devices according to the [**quick setup.**](#quick-setup)

***

## Wiring Schematic

### To measure energy consumption

The clamp's arrow should face the correct direction of the electricity current flows like CT1 in the wiring diagram. In this case, the power will be positive, and the energy consumption will be accumulated.

### To measure energy generation

The clamp's arrow should face the inverter like CT2 in the wiring diagram. In this case, the current direction is opposite that of the CT. The power will be negative, and the energy generation will be accumulated.

<figure><img src="https://3898863868-files.gitbook.io/~/files/v0/b/gitbook-x-prod.appspot.com/o/spaces%2F-MDHxt7lj9funy2SIeFB%2Fuploads%2Fac9pdyKQNaVgpfGAvB5k%2Fsingle-phase%20diagram%20-%202000px.png?alt=media&amp;token=e375e9f0-1aa5-4652-a121-7e75fb87aea8" alt=""><figcaption><p>Wiring Schematic 1</p></figcaption></figure>

### Measure 'From Grid' or 'To Grid'

To monitor how much energy is pulled from and sent back from the grid, install the CT on the leads coming from your mains like the CT1 below.

For CT1:&#x20;

* If the measured current direction is K → L, the energy consumption is accumulated as ‘From Grid’ energy.&#x20;
* If the measured current direction is L → K, the energy generation is accumulated as ‘To Grid’ energy.

<figure><img src="https://3898863868-files.gitbook.io/~/files/v0/b/gitbook-x-prod.appspot.com/o/spaces%2F-MDHxt7lj9funy2SIeFB%2Fuploads%2Fp1coYJXXfH5aPOtOwB4S%2Fsingle-phase%20diagram%202-%202000px.png?alt=media&amp;token=2a0302e8-14b5-427c-ac58-df4f601db598" alt=""><figcaption><p>Wiring Schematic 2</p></figcaption></figure>

***

## Tech Specs <a href="#s4dtx" id="s4dtx"></a>

* Voltage: AC100 - 240V | 50/60Hz
* Dimensions: 39.2 x 39.2 x 18mm (without mounting clip) | 43 x 39.2 x 22.3mm (with mounting clip)
* Wireless Standard: Wi-Fi - 2.4GHz + Bluetooth
* Measuring Range: 0.2 - 80A - 1CH | 0.2 - 80A) x 2 - 2CH

<figure><img src="https://3898863868-files.gitbook.io/~/files/v0/b/gitbook-x-prod.appspot.com/o/spaces%2F-MDHxt7lj9funy2SIeFB%2Fuploads%2FVvk232aj1uBlKC6NcWUC%2F2ch%20-%20size.png?alt=media&amp;token=2d9dd954-0031-46c8-888f-31082100d94b" alt=""><figcaption><p>Size</p></figcaption></figure>

***

## Quick Setup

### 1. Register an account <a href="#izkpz" id="izkpz"></a>

<details>

<summary>Use the 'Smart Life' App</summary>

Please jump to the '[**Use Smart Life App**](/smart-life/user-manual-for-smart-life)' page to view

</details>

### 2. Add Device <a href="#pxw57" id="pxw57"></a>

Open the Smart Life App, click the '+' in the upper right corner of the homepage, enter the add device (accessory) page, select it, and follow the prompts

{% hint style="success" %}
Press the reset key for about 10 seconds to put the module into network pairing mode

<img src="https://3898863868-files.gitbook.io/~/files/v0/b/gitbook-x-prod.appspot.com/o/spaces%2F-MDHxt7lj9funy2SIeFB%2Fuploads%2FVqglHmKxA7cYXaEaGxtC%2F1%20method%20to%20network%20pairing.png?alt=media&amp;token=ae9b092f-5fc2-4f95-ae98-d1813d8e791e" alt="" data-size="original">
{% endhint %}

{% hint style="success" %}
If the addition fails, please press and hold the network configuration button again and try again.
{% endhint %}

### 3. Control the Device <a href="#kjvoo" id="kjvoo"></a>

Use the App to control. If you can control the device normally, it means the device is working properly.

***

## Indicator Light Status Description

| **Indicator Status** | **Description**              |
| -------------------- | ---------------------------- |
| Blue flashes quickly | Connecting the network       |
| Blue is always on    | Network connection is normal |
| Indicator off        | Device offline/disconnected  |

***

## Toxic and Hazardous Substances Statement

<table data-header-hidden data-full-width="false"><thead><tr><th width="141"></th><th width="91"></th><th width="89"></th><th width="87"></th><th width="96"></th><th width="105"></th><th></th></tr></thead><tbody><tr><td>Part Name</td><td>铅 (Pb)</td><td>汞 (Hg)</td><td>镉(Cd)</td><td>六价铬<br>(Cr(VI))</td><td>多溴联苯<br>(PBB)</td><td>多溴二苯醚<br>(PBDE)</td></tr><tr><td>Plastic Shell</td><td>O</td><td>O</td><td>O</td><td>O</td><td>O</td><td>O</td></tr><tr><td>Plastic bracket</td><td>O</td><td>O</td><td>O</td><td>O</td><td>O</td><td>O</td></tr><tr><td>Electronic Component</td><td>O</td><td>O</td><td>O</td><td>O</td><td>O</td><td>O</td></tr><tr><td>PCBA</td><td>O</td><td>O</td><td>O</td><td>O</td><td>O</td><td>O</td></tr><tr><td>Metal</td><td>O</td><td>O</td><td>O</td><td>O</td><td>O</td><td>O</td></tr></tbody></table>

This form is prepared in accordance with the provisions of SJ/T 11364.

* O: Indicates that the content of the hazardous substance in all homogeneous materials of this part is below the limit requirements specified in GB/T 26572.
* ×: Indicates that the content of the hazardous substance in at least one homogeneous material of this part exceeds the limit requirements specified in GB/T 26572.

***

## Instructions for Use of Micropower Equipment

1. The Wi-Fi technology used in this product complies with the technical requirements of general micropower equipment Class F equipment in the 'Micropower Short-range Radio Transmission Equipment Catalog and Technical Requirements' for data transmission applications. It adopts integrated antenna, control, adjustment and switch Please refer to the relevant content in the product manual for usage instructions;
2. You are not allowed to change the usage scenarios or conditions without authorization, expand the transmission frequency range, increase the transmission power (including installing additional RF power amplifiers), and you are not allowed to change the transmitting antenna without authorization;
3. Shall not cause harmful interference to other legal radio stations, nor shall it offer protection against harmful interference;
4. Should withstand interference from industrial, scientific and medical (ISM) application equipment that radiates radio frequency energy or other legitimate radio stations;
5. If it causes harmful interference to other legal radio stations (stations), you should stop using it immediately and take measures to eliminate the interference before continuing to use it;
6. In aircraft and in accordance with laws and regulations, relevant national regulations, and standards designated radio astronomy observatories, weather radar stations, satellite earth stations (including measurement and control, ranging, receiving, and navigation stations) and other military and civilian radio stations (stations), airports, etc. Micropower equipment used in electromagnetic environment protection areas must comply with the regulations of electromagnetic environment protection and relevant industry authorities;
7. It is prohibited to use all types of model remote controls within a radius of 5,000 meters with the center point of the airport runway as the center;
8. The operating temperature of micropower equipment is -10℃ - 40℃, and the power supply is AC100 - 240V | 50/60Hz

***

## Warranty Instructions

The after-sales service of this product is strictly in accordance with the "Consumer Rights and Interests Protection Law of the People's Republic of China" and the "Product Quality Law of the People's Republic of China" to implement after-sales three-guarantee service. The service content is as follows:

### Warranty Policy

During the validity period of the Three Guarantees, you can enjoy free returns, exchanges, and repair services in accordance with this provision. Returns, exchanges, and repairs should be handled with invoices.

1. Returns without reason within 7 days from the day after receipt (e-commerce purchase channel), the user will bear the logistics costs.
2. This product has performance failures listed in the "Product Performance Failure Table". After after-sales service testing and confirmation, you can enjoy the following services for free:

| Service Type | Service Policy                                                                    |
| ------------ | --------------------------------------------------------------------------------- |
| Return       | Return of product due to quality reasons within 7 days from the day after receipt |
| Exchange     | Exchange for product quality reasons within 15 days from the day after receipt    |
| Repair       | Repair due to product quality within 1 year from the day after receipt            |

{% hint style="info" %}
Friendly reminder: Since packaging boxes are required to ensure the safety of product transportation during transportation, it is recommended that you keep the packaging boxes for at least 30 days from the day after signing for the product.
{% endhint %}

### Non-warranty Regulations

1. Unauthorized repair, misuse, collision, neglect, abuse, liquid intrusion, accident, alteration, incorrect use of non-product accessories, or tearing, alteration of labels, and anti-counterfeiting marks;
2. The three-pack validity period has expired;
3. Damage caused by force majeure;
4. Failure to comply with the performance failures listed in the "Product Performance Failure Table";
5. This product and its accessories have performance failures listed in the "Product Performance Failure Table" due to human reasons.

***


# Zigbee Series


# SML-01Z

User Manual for SML-01Z 1CH Zigbee Switch Module

***

## Appearance

<figure><img src="https://3898863868-files.gitbook.io/~/files/v0/b/gitbook-x-prod.appspot.com/o/spaces%2F-MDHxt7lj9funy2SIeFB%2Fuploads%2FHKUemYWRezfEItLPL3N3%2Fsml-01z-1000px.jpg?alt=media&amp;token=b52f61f5-fa2e-44de-af0f-13a9a528b9f8" alt="" width="375"><figcaption><p>SML-01Z</p></figcaption></figure>

***

## Introduce <a href="#a7ulc" id="a7ulc"></a>

### Short Description <a href="#shellyplus1-snsw-001x16eu-shortdescription" id="shellyplus1-snsw-001x16eu-shortdescription"></a>

* SML-01Z is a small form factor smart switch which allows remote control of electric appliances through a mobile phone, tablet and home automation system.
* SML-01Z can be accessed, controlled and monitored remotely from any place where the user has internet connectivity, as long as the device is connected to a Zigee gateway and the Internet.
* It can be retrofitted into standard electrical wall boxes, behind power sockets and light switches or other places with limited space.

### Features <a href="#h4js5" id="h4js5"></a>

* App remote control - control the device anytime and anywhere through mobile App
* Smart linkage - In smart scene mode, linkage can be set to sound an alarm. The mobile App will also receive prompts, such as garage door open/close status, timeout notifications and overnight notifications, to remind you to close the garage door.
* Voice control - used with Amazon Echo, Google Home, Yandex, Tmall Genie
* Offline function - when the device is offline, the App will remind the device to go offline after 30 minutes
* Home Sharing - Create a smart home with your family
* Set a schedule - turn connected devices on and off at specified times
* Sharing feature - share with family members for joint control
* Supports Siri - This device is not compatible with HomeKit. But you can add click-to-run scenes to Siri shortcuts in the Smart Life App

***

## Safety Consultation and Precautions

1. The installation process of this product involves strong electricity and must be installed by professionals in accordance with electrical specifications and product instructions;
2. This product is for indoor use only, please do not use it in humid environments or outdoors;
3. This product is only suitable for safe use in areas below 2,000 meters above sea level;
4. Pay attention to moisture-proof, do not spill water or other liquids on this product;
5. Do not place this product near a heat source;
6. Do not attempt to repair this product yourself, this work should be performed by authorized professionals;
7. Do not use it with overload. Please make sure that the 10A overcurrent protection circuit breaker on the front of this product is working properly before powering on. It is recommended that the stripping length of the terminal connecting wire is 6-8 mm;
8. This product should not be installed or fixed in a place that can be touched by human hands, such as outside the wall. It should be installed in an appliance or a hidden box;
9. The position of the fixed antenna should be as far away as possible from metal, wires and the module itself. (Applicable to external antenna models).

***

## Main Applications <a href="#shellyplus1-snsw-001x16eu-mainapplications" id="shellyplus1-snsw-001x16eu-mainapplications"></a>

* Residential
* MDU (Multi Dwelling Units - apartments, condominiums, hotels, etc.)
* Light commercial (small office buildings, small retail/restaurant/gas station, etc.)
* Government/municipal
* University/college

***

## Integrations <a href="#shellyplus1-snsw-001x16eu-integrations" id="shellyplus1-snsw-001x16eu-integrations"></a>

* Google Assistant
* Amazon Alexa
* Yandex Alice
* Baidu Xiaodu
* Tmall Genie

***

## Supported Load Types <a href="#shellyplus1-snsw-001x16eu-supportedloadtypes" id="shellyplus1-snsw-001x16eu-supportedloadtypes"></a>

* Resistive (incandescent bulbs, heating devices)
* Capacitive (capacitor banks, electronic equipment, motor start capacitors)
* Inductive with RC Snubber (LED light drivers, transformers, fans, refrigerators, air-conditioners)

***

## Installation

{% hint style="danger" %}
Please make sure the main power switch is turned off before installation
{% endhint %}

1. Connect wires according to the wiring diagram;
2. Insert the module into the junction box;
3. Turn on the main power switch and add devices according to the [**quick setup.**](#quick-setup)

<figure><img src="https://3898863868-files.gitbook.io/~/files/v0/b/gitbook-x-prod.appspot.com/o/spaces%2F-MDHxt7lj9funy2SIeFB%2Fuploads%2FvdFcwHNV6jJoOXKSA6mC%2Finstall%20to%20the%20wall%20-%201.png?alt=media&amp;token=62270ef7-55d4-47ab-bd75-8ef523921b11" alt=""><figcaption><p>Insert into the junction box</p></figcaption></figure>

***

## Wiring Schematic

<figure><img src="https://3898863868-files.gitbook.io/~/files/v0/b/gitbook-x-prod.appspot.com/o/spaces%2F-MDHxt7lj9funy2SIeFB%2Fuploads%2FXQFuKcIyUseqvp14ZhbZ%2F1ch%20-%20without%20switch.png?alt=media&amp;token=dbb0acb8-84a5-44e4-8127-432f175fe4ff" alt=""><figcaption><p>Without Switch</p></figcaption></figure>

<figure><img src="https://3898863868-files.gitbook.io/~/files/v0/b/gitbook-x-prod.appspot.com/o/spaces%2F-MDHxt7lj9funy2SIeFB%2Fuploads%2FVnMQAjf36JSYWatleh0z%2F1ch%20-%201%20switch.png?alt=media&amp;token=ddebd351-10a6-4c5b-b991-f6d74a8e7a98" alt=""><figcaption><p>Connect 1 Switch</p></figcaption></figure>

<figure><img src="https://3898863868-files.gitbook.io/~/files/v0/b/gitbook-x-prod.appspot.com/o/spaces%2F-MDHxt7lj9funy2SIeFB%2Fuploads%2F4zGE93NkO6ue7iYH58jc%2F1ch%20-%202%20switch.png?alt=media&amp;token=0912a5eb-93e7-4300-9df9-673a637e7a8e" alt=""><figcaption><p>Connect 2 3-way Switches</p></figcaption></figure>

{% hint style="success" %}
The mechanical switch can only be used with AC100 - 240V.
{% endhint %}

***

## Tech Specs <a href="#s4dtx" id="s4dtx"></a>

* Voltage: AC100 - 240V | 50/60Hz
* Dimensions: 39.2 x 39.2 x 18mm (without mounting clip) | 43 x 39.2 x 22.3mm (with mounting clip)&#x20;
* Wireless Standard: Zigbee 3.0
* Max. Load: LED 250W | 10A

<figure><img src="https://3898863868-files.gitbook.io/~/files/v0/b/gitbook-x-prod.appspot.com/o/spaces%2F-MDHxt7lj9funy2SIeFB%2Fuploads%2FBldcfXsEWy89au2EJTd6%2Fx2000px.png?alt=media&amp;token=2b65f422-155d-48cf-9880-7903b97df1bd" alt=""><figcaption><p>Size</p></figcaption></figure>

***

## Quick Setup

### 1. Register an account <a href="#izkpz" id="izkpz"></a>

<details>

<summary>Use the 'Smart Life' App</summary>

Please jump to the '[**Use Smart Life App**](/smart-life/user-manual-for-smart-life)' page to view

</details>

### 2. Add Device <a href="#pxw57" id="pxw57"></a>

Open the Smart Life App, open the control panel of the Zigbee gateway, click the '+' in the homepage, enter the add device page, select it, and follow the prompts

{% hint style="success" %}
**2 ways to put the module into network pairing mode**

* Press the reset key for about 10 seconds
* Press the traditional switch 5 times until the indicator light is flashing quickly

<img src="https://3898863868-files.gitbook.io/~/files/v0/b/gitbook-x-prod.appspot.com/o/spaces%2F-MDHxt7lj9funy2SIeFB%2Fuploads%2Fch7IStLZdbl4GJZIC5FT%2F1ch-zigbee%20-%20network%20pairing.png?alt=media&amp;token=bba8a66f-fa05-401f-940a-3dda207f31f9" alt="" data-size="original">
{% endhint %}

{% hint style="success" %}
If the addition fails, please press and hold the network configuration button again and try again.
{% endhint %}

### 3. Control the Device <a href="#kjvoo" id="kjvoo"></a>

Use the App to control. If you can control the device normally, it means the device is working properly.

***

## System Requirements

1. Wi-Fi Router&#x20;
2. ZigBee Gateway
3. iPhone, iPad (iOS 7.0 or higher) | Android Devices (4.0 or higher)

<figure><img src="https://3898863868-files.gitbook.io/~/files/v0/b/gitbook-x-prod.appspot.com/o/spaces%2F-MDHxt7lj9funy2SIeFB%2Fuploads%2Fdi751C8Vc8uJ4MF8nYkT%2Fzigbee%20system%20requirement.png?alt=media&amp;token=adbd75e3-cfae-4f7e-83ea-ce8d57727d0e" alt="" width="563"><figcaption></figcaption></figure>

***

## Indicator Light Status Description

| **Indicator Status** | **Description**              |
| -------------------- | ---------------------------- |
| Blue flashes quickly | Connecting the network       |
| Blue is always on    | Network connection is normal |
| Indicator off        | Device offline/disconnected  |

***

## Toxic and Hazardous Substances Statement

<table data-header-hidden data-full-width="false"><thead><tr><th width="141"></th><th width="91"></th><th width="89"></th><th width="87"></th><th width="96"></th><th width="105"></th><th></th></tr></thead><tbody><tr><td>Part Name</td><td>铅 (Pb)</td><td>汞 (Hg)</td><td>镉(Cd)</td><td>六价铬<br>(Cr(VI))</td><td>多溴联苯<br>(PBB)</td><td>多溴二苯醚<br>(PBDE)</td></tr><tr><td>Plastic Shell</td><td>O</td><td>O</td><td>O</td><td>O</td><td>O</td><td>O</td></tr><tr><td>Plastic bracket</td><td>O</td><td>O</td><td>O</td><td>O</td><td>O</td><td>O</td></tr><tr><td>Electronic Component</td><td>O</td><td>O</td><td>O</td><td>O</td><td>O</td><td>O</td></tr><tr><td>PCBA</td><td>O</td><td>O</td><td>O</td><td>O</td><td>O</td><td>O</td></tr><tr><td>Metal</td><td>O</td><td>O</td><td>O</td><td>O</td><td>O</td><td>O</td></tr></tbody></table>

This form is prepared in accordance with the provisions of SJ/T 11364.

* O: Indicates that the content of the hazardous substance in all homogeneous materials of this part is below the limit requirements specified in GB/T 26572.
* ×: Indicates that the content of the hazardous substance in at least one homogeneous material of this part exceeds the limit requirements specified in GB/T 26572.

***

## Instructions for Use of Micropower Equipment

1. The Wi-Fi technology used in this product complies with the technical requirements of general micropower equipment Class F equipment in the 'Micropower Short-range Radio Transmission Equipment Catalog and Technical Requirements' for data transmission applications. It adopts integrated antenna, control, adjustment and switch Please refer to the relevant content in the product manual for usage instructions;
2. You are not allowed to change the usage scenarios or conditions without authorization, expand the transmission frequency range, increase the transmission power (including installing additional RF power amplifiers), and you are not allowed to change the transmitting antenna without authorization;
3. Shall not cause harmful interference to other legal radio stations, nor shall it offer protection against harmful interference;
4. Should withstand interference from industrial, scientific and medical (ISM) application equipment that radiates radio frequency energy or other legitimate radio stations;
5. If it causes harmful interference to other legal radio stations (stations), you should stop using it immediately and take measures to eliminate the interference before continuing to use it;
6. In aircraft and in accordance with laws and regulations, relevant national regulations, and standards designated radio astronomy observatories, weather radar stations, satellite earth stations (including measurement and control, ranging, receiving, and navigation stations) and other military and civilian radio stations (stations), airports, etc. Micropower equipment used in electromagnetic environment protection areas must comply with the regulations of electromagnetic environment protection and relevant industry authorities;
7. It is prohibited to use all types of model remote controls within a radius of 5,000 meters with the center point of the airport runway as the center;
8. The operating temperature of micropower equipment is -10℃ - 40℃, and the power supply is AC100 - 240V | 50/60Hz

***

## Warranty Instructions

The after-sales service of this product is strictly in accordance with the "Consumer Rights and Interests Protection Law of the People's Republic of China" and the "Product Quality Law of the People's Republic of China" to implement after-sales three-guarantee service. The service content is as follows:

### Warranty Policy

During the validity period of the Three Guarantees, you can enjoy free returns, exchanges, and repair services in accordance with this provision. Returns, exchanges, and repairs should be handled with invoices.

1. Returns without reason within 7 days from the day after receipt (e-commerce purchase channel), the user will bear the logistics costs.
2. This product has performance failures listed in the "Product Performance Failure Table". After after-sales service testing and confirmation, you can enjoy the following services for free:

| Service Type | Service Policy                                                                    |
| ------------ | --------------------------------------------------------------------------------- |
| Return       | Return of product due to quality reasons within 7 days from the day after receipt |
| Exchange     | Exchange for product quality reasons within 15 days from the day after receipt    |
| Repair       | Repair due to product quality within 1 year from the day after receipt            |

{% hint style="info" %}
Friendly reminder: Since packaging boxes are required to ensure the safety of product transportation during transportation, it is recommended that you keep the packaging boxes for at least 30 days from the day after signing for the product.
{% endhint %}

### Non-warranty Regulations

1. Unauthorized repair, misuse, collision, neglect, abuse, liquid intrusion, accident, alteration, incorrect use of non-product accessories, or tearing, alteration of labels, and anti-counterfeiting marks;
2. The three-pack validity period has expired;
3. Damage caused by force majeure;
4. Failure to comply with the performance failures listed in the "Product Performance Failure Table";
5. This product and its accessories have performance failures listed in the "Product Performance Failure Table" due to human reasons.

***


# SML-01Z-16A

User Manual for SML-01Z-16A 1CH High Power Zigbee Switch Module

***

## Appearance

<figure><img src="https://3898863868-files.gitbook.io/~/files/v0/b/gitbook-x-prod.appspot.com/o/spaces%2F-MDHxt7lj9funy2SIeFB%2Fuploads%2FJE7DuZkHxtPSb9gv5AbH%2Fsml-01z-16a-1000px.jpg?alt=media&amp;token=77b282f2-6bd9-44b2-a0a8-7d2ee2caf672" alt="" width="375"><figcaption><p>SML-01Z-16A</p></figcaption></figure>

***

## Introduce <a href="#a7ulc" id="a7ulc"></a>

### Short Description <a href="#shellyplus1-snsw-001x16eu-shortdescription" id="shellyplus1-snsw-001x16eu-shortdescription"></a>

* SML-01Z-16A is a small form factor smart switch which allows remote control of electric appliances through a mobile phone, tablet and home automation system.
* SML-01Z-16A can be accessed, controlled and monitored remotely from any place where the user has internet connectivity, as long as the device is connected to a Zigee gateway and the Internet.
* It can be retrofitted into standard electrical wall boxes, behind power sockets and light switches or other places with limited space.

### Features <a href="#h4js5" id="h4js5"></a>

* App remote control - control the device anytime and anywhere through mobile App
* Smart linkage - In smart scene mode, linkage can be set to sound an alarm. The mobile App will also receive prompts, such as garage door open/close status, timeout notifications and overnight notifications, to remind you to close the garage door.
* Voice control - used with Amazon Echo, Google Home, Yandex, Tmall Genie
* Offline function - when the device is offline, the App will remind the device to go offline after 30 minutes
* Home Sharing - Create a smart home with your family
* Set a schedule - turn connected devices on and off at specified times
* Sharing feature - share with family members for joint control
* Supports Siri - This device is not compatible with HomeKit. But you can add click-to-run scenes to Siri shortcuts in the Smart Life App

***

## Safety Consultation and Precautions

1. The installation process of this product involves strong electricity and must be installed by professionals in accordance with electrical specifications and product instructions;
2. This product is for indoor use only, please do not use it in humid environments or outdoors;
3. This product is only suitable for safe use in areas below 2,000 meters above sea level;
4. Pay attention to moisture-proof, do not spill water or other liquids on this product;
5. Do not place this product near a heat source;
6. Do not attempt to repair this product yourself, this work should be performed by authorized professionals;
7. Do not use it with overload. Please make sure that the 10A overcurrent protection circuit breaker on the front of this product is working properly before powering on. It is recommended that the stripping length of the terminal connecting wire is 6-8 mm;
8. This product should not be installed or fixed in a place that can be touched by human hands, such as outside the wall. It should be installed in an appliance or a hidden box;
9. The position of the fixed antenna should be as far away as possible from metal, wires and the module itself. (Applicable to external antenna models).

***

## Main Applications <a href="#shellyplus1-snsw-001x16eu-mainapplications" id="shellyplus1-snsw-001x16eu-mainapplications"></a>

* Residential
* MDU (Multi Dwelling Units - apartments, condominiums, hotels, etc.)
* Light commercial (small office buildings, small retail/restaurant/gas station, etc.)
* Government/municipal
* University/college

***

## Integrations <a href="#shellyplus1-snsw-001x16eu-integrations" id="shellyplus1-snsw-001x16eu-integrations"></a>

* Google Assistant
* Amazon Alexa
* Yandex Alice
* Baidu Xiaodu
* Tmall Genie

***

## Supported Load Types <a href="#shellyplus1-snsw-001x16eu-supportedloadtypes" id="shellyplus1-snsw-001x16eu-supportedloadtypes"></a>

* Resistive (incandescent bulbs, heating devices)
* Capacitive (capacitor banks, electronic equipment, motor start capacitors)
* Inductive with RC Snubber (LED light drivers, transformers, fans, refrigerators, air-conditioners)

***

## Installation

{% hint style="danger" %}
Please make sure the main power switch is turned off before installation
{% endhint %}

1. Connect wires according to the wiring diagram;
2. Insert the module into the junction box;
3. Turn on the main power switch and add devices according to the [**quick setup.**](#quick-setup)

<figure><img src="https://3898863868-files.gitbook.io/~/files/v0/b/gitbook-x-prod.appspot.com/o/spaces%2F-MDHxt7lj9funy2SIeFB%2Fuploads%2FvdFcwHNV6jJoOXKSA6mC%2Finstall%20to%20the%20wall%20-%201.png?alt=media&amp;token=62270ef7-55d4-47ab-bd75-8ef523921b11" alt=""><figcaption><p>Insert into the junction box</p></figcaption></figure>

***

## Wiring Schematic

<figure><img src="https://3898863868-files.gitbook.io/~/files/v0/b/gitbook-x-prod.appspot.com/o/spaces%2F-MDHxt7lj9funy2SIeFB%2Fuploads%2FXQFuKcIyUseqvp14ZhbZ%2F1ch%20-%20without%20switch.png?alt=media&amp;token=dbb0acb8-84a5-44e4-8127-432f175fe4ff" alt=""><figcaption><p>Without Switch</p></figcaption></figure>

<figure><img src="https://3898863868-files.gitbook.io/~/files/v0/b/gitbook-x-prod.appspot.com/o/spaces%2F-MDHxt7lj9funy2SIeFB%2Fuploads%2FVnMQAjf36JSYWatleh0z%2F1ch%20-%201%20switch.png?alt=media&amp;token=ddebd351-10a6-4c5b-b991-f6d74a8e7a98" alt=""><figcaption><p>Connect 1 Switch</p></figcaption></figure>

<figure><img src="https://3898863868-files.gitbook.io/~/files/v0/b/gitbook-x-prod.appspot.com/o/spaces%2F-MDHxt7lj9funy2SIeFB%2Fuploads%2F4zGE93NkO6ue7iYH58jc%2F1ch%20-%202%20switch.png?alt=media&amp;token=0912a5eb-93e7-4300-9df9-673a637e7a8e" alt=""><figcaption><p>Connect 2 3-way Switches</p></figcaption></figure>

{% hint style="success" %}
The mechanical switch can only be used with AC100 - 240V.
{% endhint %}

***

## Tech Specs <a href="#s4dtx" id="s4dtx"></a>

* Voltage: AC100 - 240V | 50/60Hz
* Dimensions: 39.2 x 39.2 x 18mm (without mounting clip) | 43 x 39.2 x 22.3mm (with mounting clip)&#x20;
* Wireless Standard: Zigbee 3.0
* Max. Load: LED 300W | 16A

<figure><img src="https://3898863868-files.gitbook.io/~/files/v0/b/gitbook-x-prod.appspot.com/o/spaces%2F-MDHxt7lj9funy2SIeFB%2Fuploads%2FBldcfXsEWy89au2EJTd6%2Fx2000px.png?alt=media&amp;token=2b65f422-155d-48cf-9880-7903b97df1bd" alt=""><figcaption><p>Size</p></figcaption></figure>

***

## Quick Setup

### 1. Register an account <a href="#izkpz" id="izkpz"></a>

<details>

<summary>Use the 'Smart Life' App</summary>

Please jump to the '[**Use Smart Life App**](/smart-life/user-manual-for-smart-life)' page to view

</details>

### 2. Add Device <a href="#pxw57" id="pxw57"></a>

Open the Smart Life App, open the control panel of the Zigbee gateway, click the '+' in the homepage, enter the add device page, select it, and follow the prompts

{% hint style="success" %}
**2 ways to put the module into network pairing mode**

* Press the reset key for about 10 seconds
* Press the traditional switch 5 times until the indicator light is flashing quickly

<img src="https://3898863868-files.gitbook.io/~/files/v0/b/gitbook-x-prod.appspot.com/o/spaces%2F-MDHxt7lj9funy2SIeFB%2Fuploads%2Fch7IStLZdbl4GJZIC5FT%2F1ch-zigbee%20-%20network%20pairing.png?alt=media&amp;token=bba8a66f-fa05-401f-940a-3dda207f31f9" alt="" data-size="original">
{% endhint %}

{% hint style="success" %}
If the addition fails, please press and hold the network configuration button again and try again.
{% endhint %}

### 3. Control the Device <a href="#kjvoo" id="kjvoo"></a>

Use the App to control. If you can control the device normally, it means the device is working properly.

***

## System Requirements

1. Wi-Fi Router&#x20;
2. ZigBee Gateway
3. iPhone, iPad (iOS 7.0 or higher) | Android Devices (4.0 or higher)

<figure><img src="https://3898863868-files.gitbook.io/~/files/v0/b/gitbook-x-prod.appspot.com/o/spaces%2F-MDHxt7lj9funy2SIeFB%2Fuploads%2Fdi751C8Vc8uJ4MF8nYkT%2Fzigbee%20system%20requirement.png?alt=media&amp;token=adbd75e3-cfae-4f7e-83ea-ce8d57727d0e" alt="" width="563"><figcaption></figcaption></figure>

***

## Indicator Light Status Description

| **Indicator Status** | **Description**              |
| -------------------- | ---------------------------- |
| Blue flashes quickly | Connecting the network       |
| Blue is always on    | Network connection is normal |
| Indicator off        | Device offline/disconnected  |

***

## Toxic and Hazardous Substances Statement

<table data-header-hidden data-full-width="false"><thead><tr><th width="141"></th><th width="91"></th><th width="89"></th><th width="87"></th><th width="96"></th><th width="105"></th><th></th></tr></thead><tbody><tr><td>Part Name</td><td>铅 (Pb)</td><td>汞 (Hg)</td><td>镉(Cd)</td><td>六价铬<br>(Cr(VI))</td><td>多溴联苯<br>(PBB)</td><td>多溴二苯醚<br>(PBDE)</td></tr><tr><td>Plastic Shell</td><td>O</td><td>O</td><td>O</td><td>O</td><td>O</td><td>O</td></tr><tr><td>Plastic bracket</td><td>O</td><td>O</td><td>O</td><td>O</td><td>O</td><td>O</td></tr><tr><td>Electronic Component</td><td>O</td><td>O</td><td>O</td><td>O</td><td>O</td><td>O</td></tr><tr><td>PCBA</td><td>O</td><td>O</td><td>O</td><td>O</td><td>O</td><td>O</td></tr><tr><td>Metal</td><td>O</td><td>O</td><td>O</td><td>O</td><td>O</td><td>O</td></tr></tbody></table>

This form is prepared in accordance with the provisions of SJ/T 11364.

* O: Indicates that the content of the hazardous substance in all homogeneous materials of this part is below the limit requirements specified in GB/T 26572.
* ×: Indicates that the content of the hazardous substance in at least one homogeneous material of this part exceeds the limit requirements specified in GB/T 26572.

***

## Instructions for Use of Micropower Equipment

1. The Wi-Fi technology used in this product complies with the technical requirements of general micropower equipment Class F equipment in the 'Micropower Short-range Radio Transmission Equipment Catalog and Technical Requirements' for data transmission applications. It adopts integrated antenna, control, adjustment and switch Please refer to the relevant content in the product manual for usage instructions;
2. You are not allowed to change the usage scenarios or conditions without authorization, expand the transmission frequency range, increase the transmission power (including installing additional RF power amplifiers), and you are not allowed to change the transmitting antenna without authorization;
3. Shall not cause harmful interference to other legal radio stations, nor shall it offer protection against harmful interference;
4. Should withstand interference from industrial, scientific and medical (ISM) application equipment that radiates radio frequency energy or other legitimate radio stations;
5. If it causes harmful interference to other legal radio stations (stations), you should stop using it immediately and take measures to eliminate the interference before continuing to use it;
6. In aircraft and in accordance with laws and regulations, relevant national regulations, and standards designated radio astronomy observatories, weather radar stations, satellite earth stations (including measurement and control, ranging, receiving, and navigation stations) and other military and civilian radio stations (stations), airports, etc. Micropower equipment used in electromagnetic environment protection areas must comply with the regulations of electromagnetic environment protection and relevant industry authorities;
7. It is prohibited to use all types of model remote controls within a radius of 5,000 meters with the center point of the airport runway as the center;
8. The operating temperature of micropower equipment is -10℃ - 40℃, and the power supply is AC100 - 240V | 50/60Hz

***

## Warranty Instructions

The after-sales service of this product is strictly in accordance with the "Consumer Rights and Interests Protection Law of the People's Republic of China" and the "Product Quality Law of the People's Republic of China" to implement after-sales three-guarantee service. The service content is as follows:

### Warranty Policy

During the validity period of the Three Guarantees, you can enjoy free returns, exchanges, and repair services in accordance with this provision. Returns, exchanges, and repairs should be handled with invoices.

1. Returns without reason within 7 days from the day after receipt (e-commerce purchase channel), the user will bear the logistics costs.
2. This product has performance failures listed in the "Product Performance Failure Table". After after-sales service testing and confirmation, you can enjoy the following services for free:

| Service Type | Service Policy                                                                    |
| ------------ | --------------------------------------------------------------------------------- |
| Return       | Return of product due to quality reasons within 7 days from the day after receipt |
| Exchange     | Exchange for product quality reasons within 15 days from the day after receipt    |
| Repair       | Repair due to product quality within 1 year from the day after receipt            |

{% hint style="info" %}
Friendly reminder: Since packaging boxes are required to ensure the safety of product transportation during transportation, it is recommended that you keep the packaging boxes for at least 30 days from the day after signing for the product.
{% endhint %}

### Non-warranty Regulations

1. Unauthorized repair, misuse, collision, neglect, abuse, liquid intrusion, accident, alteration, incorrect use of non-product accessories, or tearing, alteration of labels, and anti-counterfeiting marks;
2. The three-pack validity period has expired;
3. Damage caused by force majeure;
4. Failure to comply with the performance failures listed in the "Product Performance Failure Table";
5. This product and its accessories have performance failures listed in the "Product Performance Failure Table" due to human reasons.

***


# SML-01Z-ES-16A

User Manual for SML-01Z-ES-16A 1CH High Power Zigbee Switch Module - Energy Monitor

***

## Appearance

<figure><img src="https://3898863868-files.gitbook.io/~/files/v0/b/gitbook-x-prod.appspot.com/o/spaces%2F-MDHxt7lj9funy2SIeFB%2Fuploads%2FU3H5k4b02TzD6aeRkLYS%2Fsml-01z-es-16a-1000px.jpg?alt=media&amp;token=1bbbe148-c29d-4e8b-bcb8-336f52d31424" alt="" width="375"><figcaption><p>SML-01Z-ES-16A</p></figcaption></figure>

***

## Introduce <a href="#a7ulc" id="a7ulc"></a>

### Short Description <a href="#shellyplus1-snsw-001x16eu-shortdescription" id="shellyplus1-snsw-001x16eu-shortdescription"></a>

* SML-01Z-ES-16A is a small form factor smart switch which allows remote control of electric appliances through a mobile phone, tablet and home automation system.
* SML-01Z-ES-16A can be accessed, controlled and monitored remotely from any place where the user has internet connectivity, as long as the device is connected to a Zigee gateway and the Internet.
* It can be retrofitted into standard electrical wall boxes, behind power sockets and light switches or other places with limited space.

### Features <a href="#h4js5" id="h4js5"></a>

* App remote control - control the device anytime and anywhere through mobile App
* Smart linkage - In smart scene mode, linkage can be set to sound an alarm. The mobile App will also receive prompts, such as garage door open/close status, timeout notifications and overnight notifications, to remind you to close the garage door.
* Voice control - used with Amazon Echo, Google Home, Yandex, Tmall Genie
* Offline function - when the device is offline, the App will remind the device to go offline after 30 minutes
* Home Sharing - Create a smart home with your family
* Set a schedule - turn connected devices on and off at specified times
* Sharing feature - share with family members for joint control
* Supports Siri - This device is not compatible with HomeKit. But you can add click-to-run scenes to Siri shortcuts in the Smart Life App
* <mark style="color:red;">**With Energy Monitor function**</mark>

***

## Safety Consultation and Precautions

1. The installation process of this product involves strong electricity and must be installed by professionals in accordance with electrical specifications and product instructions;
2. This product is for indoor use only, please do not use it in humid environments or outdoors;
3. This product is only suitable for safe use in areas below 2,000 meters above sea level;
4. Pay attention to moisture-proof, do not spill water or other liquids on this product;
5. Do not place this product near a heat source;
6. Do not attempt to repair this product yourself, this work should be performed by authorized professionals;
7. Do not use it with overload. Please make sure that the 10A overcurrent protection circuit breaker on the front of this product is working properly before powering on. It is recommended that the stripping length of the terminal connecting wire is 6-8 mm;
8. This product should not be installed or fixed in a place that can be touched by human hands, such as outside the wall. It should be installed in an appliance or a hidden box;
9. The position of the fixed antenna should be as far away as possible from metal, wires and the module itself. (Applicable to external antenna models).

***

## Main Applications <a href="#shellyplus1-snsw-001x16eu-mainapplications" id="shellyplus1-snsw-001x16eu-mainapplications"></a>

* Residential
* MDU (Multi Dwelling Units - apartments, condominiums, hotels, etc.)
* Light commercial (small office buildings, small retail/restaurant/gas station, etc.)
* Government/municipal
* University/college

***

## Integrations <a href="#shellyplus1-snsw-001x16eu-integrations" id="shellyplus1-snsw-001x16eu-integrations"></a>

* Google Assistant
* Amazon Alexa
* Yandex Alice
* Baidu Xiaodu
* Tmall Genie

***

## Supported Load Types <a href="#shellyplus1-snsw-001x16eu-supportedloadtypes" id="shellyplus1-snsw-001x16eu-supportedloadtypes"></a>

* Resistive (incandescent bulbs, heating devices)
* Capacitive (capacitor banks, electronic equipment, motor start capacitors)
* Inductive with RC Snubber (LED light drivers, transformers, fans, refrigerators, air-conditioners)

***

## Installation

{% hint style="danger" %}
Please make sure the main power switch is turned off before installation
{% endhint %}

1. Connect wires according to the wiring diagram;
2. Insert the module into the junction box;
3. Turn on the main power switch and add devices according to the [**quick setup.**](#quick-setup)

<figure><img src="https://3898863868-files.gitbook.io/~/files/v0/b/gitbook-x-prod.appspot.com/o/spaces%2F-MDHxt7lj9funy2SIeFB%2Fuploads%2FvdFcwHNV6jJoOXKSA6mC%2Finstall%20to%20the%20wall%20-%201.png?alt=media&amp;token=62270ef7-55d4-47ab-bd75-8ef523921b11" alt=""><figcaption><p>Insert into the junction box</p></figcaption></figure>

***

## Wiring Schematic

<figure><img src="https://3898863868-files.gitbook.io/~/files/v0/b/gitbook-x-prod.appspot.com/o/spaces%2F-MDHxt7lj9funy2SIeFB%2Fuploads%2FXQFuKcIyUseqvp14ZhbZ%2F1ch%20-%20without%20switch.png?alt=media&amp;token=dbb0acb8-84a5-44e4-8127-432f175fe4ff" alt=""><figcaption><p>Without Switch</p></figcaption></figure>

<figure><img src="https://3898863868-files.gitbook.io/~/files/v0/b/gitbook-x-prod.appspot.com/o/spaces%2F-MDHxt7lj9funy2SIeFB%2Fuploads%2FVnMQAjf36JSYWatleh0z%2F1ch%20-%201%20switch.png?alt=media&amp;token=ddebd351-10a6-4c5b-b991-f6d74a8e7a98" alt=""><figcaption><p>Connect 1 Switch</p></figcaption></figure>

<figure><img src="https://3898863868-files.gitbook.io/~/files/v0/b/gitbook-x-prod.appspot.com/o/spaces%2F-MDHxt7lj9funy2SIeFB%2Fuploads%2F4zGE93NkO6ue7iYH58jc%2F1ch%20-%202%20switch.png?alt=media&amp;token=0912a5eb-93e7-4300-9df9-673a637e7a8e" alt=""><figcaption><p>Connect 2 3-way Switches</p></figcaption></figure>

{% hint style="success" %}
The mechanical switch can only be used with AC100 - 240V.
{% endhint %}

***

## Tech Specs <a href="#s4dtx" id="s4dtx"></a>

* Voltage: AC100 - 240V | 50/60Hz
* Dimensions: 39.2 x 39.2 x 18mm (without mounting clip) | 43 x 39.2 x 22.3mm (with mounting clip)&#x20;
* Wireless Standard: Zigbee 3.0
* Max. Load: LED 300W | 16A

<figure><img src="https://3898863868-files.gitbook.io/~/files/v0/b/gitbook-x-prod.appspot.com/o/spaces%2F-MDHxt7lj9funy2SIeFB%2Fuploads%2FBldcfXsEWy89au2EJTd6%2Fx2000px.png?alt=media&amp;token=2b65f422-155d-48cf-9880-7903b97df1bd" alt=""><figcaption><p>Size</p></figcaption></figure>

***

## Quick Setup

### 1. Register an account <a href="#izkpz" id="izkpz"></a>

<details>

<summary>Use the 'Smart Life' App</summary>

Please jump to the '[**Use Smart Life App**](/smart-life/user-manual-for-smart-life)' page to view

</details>

### 2. Add Device <a href="#pxw57" id="pxw57"></a>

Open the Smart Life App, open the control panel of the Zigbee gateway, click the '+' in the homepage, enter the add device page, select it, and follow the prompts

{% hint style="success" %}
**2 ways to put the module into network pairing mode**

* Press the reset key for about 10 seconds
* Press the traditional switch 5 times until the indicator light is flashing quickly

<img src="https://3898863868-files.gitbook.io/~/files/v0/b/gitbook-x-prod.appspot.com/o/spaces%2F-MDHxt7lj9funy2SIeFB%2Fuploads%2Fch7IStLZdbl4GJZIC5FT%2F1ch-zigbee%20-%20network%20pairing.png?alt=media&amp;token=bba8a66f-fa05-401f-940a-3dda207f31f9" alt="" data-size="original">
{% endhint %}

{% hint style="success" %}
If the addition fails, please press and hold the network configuration button again and try again.
{% endhint %}

### 3. Control the Device <a href="#kjvoo" id="kjvoo"></a>

Use the App to control. If you can control the device normally, it means the device is working properly.

***

## System Requirements

1. Wi-Fi Router&#x20;
2. ZigBee Gateway
3. iPhone, iPad (iOS 7.0 or higher) | Android Devices (4.0 or higher)

<figure><img src="https://3898863868-files.gitbook.io/~/files/v0/b/gitbook-x-prod.appspot.com/o/spaces%2F-MDHxt7lj9funy2SIeFB%2Fuploads%2Fdi751C8Vc8uJ4MF8nYkT%2Fzigbee%20system%20requirement.png?alt=media&amp;token=adbd75e3-cfae-4f7e-83ea-ce8d57727d0e" alt="" width="563"><figcaption></figcaption></figure>

***

## Indicator Light Status Description

| **Indicator Status** | **Description**              |
| -------------------- | ---------------------------- |
| Blue flashes quickly | Connecting the network       |
| Blue is always on    | Network connection is normal |
| Indicator off        | Device offline/disconnected  |

***

## Toxic and Hazardous Substances Statement

<table data-header-hidden data-full-width="false"><thead><tr><th width="141"></th><th width="91"></th><th width="89"></th><th width="87"></th><th width="96"></th><th width="105"></th><th></th></tr></thead><tbody><tr><td>Part Name</td><td>铅 (Pb)</td><td>汞 (Hg)</td><td>镉(Cd)</td><td>六价铬<br>(Cr(VI))</td><td>多溴联苯<br>(PBB)</td><td>多溴二苯醚<br>(PBDE)</td></tr><tr><td>Plastic Shell</td><td>O</td><td>O</td><td>O</td><td>O</td><td>O</td><td>O</td></tr><tr><td>Plastic bracket</td><td>O</td><td>O</td><td>O</td><td>O</td><td>O</td><td>O</td></tr><tr><td>Electronic Component</td><td>O</td><td>O</td><td>O</td><td>O</td><td>O</td><td>O</td></tr><tr><td>PCBA</td><td>O</td><td>O</td><td>O</td><td>O</td><td>O</td><td>O</td></tr><tr><td>Metal</td><td>O</td><td>O</td><td>O</td><td>O</td><td>O</td><td>O</td></tr></tbody></table>

This form is prepared in accordance with the provisions of SJ/T 11364.

* O: Indicates that the content of the hazardous substance in all homogeneous materials of this part is below the limit requirements specified in GB/T 26572.
* ×: Indicates that the content of the hazardous substance in at least one homogeneous material of this part exceeds the limit requirements specified in GB/T 26572.

***

## Instructions for Use of Micropower Equipment

1. The Wi-Fi technology used in this product complies with the technical requirements of general micropower equipment Class F equipment in the 'Micropower Short-range Radio Transmission Equipment Catalog and Technical Requirements' for data transmission applications. It adopts integrated antenna, control, adjustment and switch Please refer to the relevant content in the product manual for usage instructions;
2. You are not allowed to change the usage scenarios or conditions without authorization, expand the transmission frequency range, increase the transmission power (including installing additional RF power amplifiers), and you are not allowed to change the transmitting antenna without authorization;
3. Shall not cause harmful interference to other legal radio stations, nor shall it offer protection against harmful interference;
4. Should withstand interference from industrial, scientific and medical (ISM) application equipment that radiates radio frequency energy or other legitimate radio stations;
5. If it causes harmful interference to other legal radio stations (stations), you should stop using it immediately and take measures to eliminate the interference before continuing to use it;
6. In aircraft and in accordance with laws and regulations, relevant national regulations, and standards designated radio astronomy observatories, weather radar stations, satellite earth stations (including measurement and control, ranging, receiving, and navigation stations) and other military and civilian radio stations (stations), airports, etc. Micropower equipment used in electromagnetic environment protection areas must comply with the regulations of electromagnetic environment protection and relevant industry authorities;
7. It is prohibited to use all types of model remote controls within a radius of 5,000 meters with the center point of the airport runway as the center;
8. The operating temperature of micropower equipment is -10℃ - 40℃, and the power supply is AC100 - 240V | 50/60Hz

***

## Warranty Instructions

The after-sales service of this product is strictly in accordance with the "Consumer Rights and Interests Protection Law of the People's Republic of China" and the "Product Quality Law of the People's Republic of China" to implement after-sales three-guarantee service. The service content is as follows:

### Warranty Policy

During the validity period of the Three Guarantees, you can enjoy free returns, exchanges, and repair services in accordance with this provision. Returns, exchanges, and repairs should be handled with invoices.

1. Returns without reason within 7 days from the day after receipt (e-commerce purchase channel), the user will bear the logistics costs.
2. This product has performance failures listed in the "Product Performance Failure Table". After after-sales service testing and confirmation, you can enjoy the following services for free:

| Service Type | Service Policy                                                                    |
| ------------ | --------------------------------------------------------------------------------- |
| Return       | Return of product due to quality reasons within 7 days from the day after receipt |
| Exchange     | Exchange for product quality reasons within 15 days from the day after receipt    |
| Repair       | Repair due to product quality within 1 year from the day after receipt            |

{% hint style="info" %}
Friendly reminder: Since packaging boxes are required to ensure the safety of product transportation during transportation, it is recommended that you keep the packaging boxes for at least 30 days from the day after signing for the product.
{% endhint %}

### Non-warranty Regulations

1. Unauthorized repair, misuse, collision, neglect, abuse, liquid intrusion, accident, alteration, incorrect use of non-product accessories, or tearing, alteration of labels, and anti-counterfeiting marks;
2. The three-pack validity period has expired;
3. Damage caused by force majeure;
4. Failure to comply with the performance failures listed in the "Product Performance Failure Table";
5. This product and its accessories have performance failures listed in the "Product Performance Failure Table" due to human reasons.

***


# SML-02Z

User Manual for SML-02Z 2CH Zigbee Switch Module

***

## Appearance

<figure><img src="https://3898863868-files.gitbook.io/~/files/v0/b/gitbook-x-prod.appspot.com/o/spaces%2F-MDHxt7lj9funy2SIeFB%2Fuploads%2F25YhLNkj4kSHXIGeHVLl%2Fsml-02z-1000px.jpg?alt=media&amp;token=a6fa3417-0b98-4de2-8fc1-81437bc497e9" alt="" width="375"><figcaption><p>SML-02Z</p></figcaption></figure>

***

## Introduce <a href="#a7ulc" id="a7ulc"></a>

### Short Description <a href="#shellyplus1-snsw-001x16eu-shortdescription" id="shellyplus1-snsw-001x16eu-shortdescription"></a>

* SML-02Z is a small form factor smart switch which allows remote control of electric appliances through a mobile phone, tablet and home automation system.
* SML-02Z can be accessed, controlled and monitored remotely from any place where the user has internet connectivity, as long as the device is connected to a Zigee gateway and the Internet.
* It can be retrofitted into standard electrical wall boxes, behind power sockets and light switches or other places with limited space.

### Features <a href="#h4js5" id="h4js5"></a>

* App remote control - control the device anytime and anywhere through mobile App
* Smart linkage - In smart scene mode, linkage can be set to sound an alarm. The mobile App will also receive prompts, such as garage door open/close status, timeout notifications and overnight notifications, to remind you to close the garage door.
* Voice control - used with Amazon Echo, Google Home, Yandex, Tmall Genie
* Offline function - when the device is offline, the App will remind the device to go offline after 30 minutes
* Home Sharing - Create a smart home with your family
* Set a schedule - turn connected devices on and off at specified times
* Sharing feature - share with family members for joint control
* Supports Siri - This device is not compatible with HomeKit. But you can add click-to-run scenes to Siri shortcuts in the Smart Life App

***

## Safety Consultation and Precautions

1. The installation process of this product involves strong electricity and must be installed by professionals in accordance with electrical specifications and product instructions;
2. This product is for indoor use only, please do not use it in humid environments or outdoors;
3. This product is only suitable for safe use in areas below 2,000 meters above sea level;
4. Pay attention to moisture-proof, do not spill water or other liquids on this product;
5. Do not place this product near a heat source;
6. Do not attempt to repair this product yourself, this work should be performed by authorized professionals;
7. Do not use it with overload. Please make sure that the 10A overcurrent protection circuit breaker on the front of this product is working properly before powering on. It is recommended that the stripping length of the terminal connecting wire is 6-8 mm;
8. This product should not be installed or fixed in a place that can be touched by human hands, such as outside the wall. It should be installed in an appliance or a hidden box;
9. The position of the fixed antenna should be as far away as possible from metal, wires and the module itself. (Applicable to external antenna models).

***

## Main Applications <a href="#shellyplus1-snsw-001x16eu-mainapplications" id="shellyplus1-snsw-001x16eu-mainapplications"></a>

* Residential
* MDU (Multi Dwelling Units - apartments, condominiums, hotels, etc.)
* Light commercial (small office buildings, small retail/restaurant/gas station, etc.)
* Government/municipal
* University/college

***

## Integrations <a href="#shellyplus1-snsw-001x16eu-integrations" id="shellyplus1-snsw-001x16eu-integrations"></a>

* Google Assistant
* Amazon Alexa
* Yandex Alice
* Baidu Xiaodu
* Tmall Genie

***

## Supported Load Types <a href="#shellyplus1-snsw-001x16eu-supportedloadtypes" id="shellyplus1-snsw-001x16eu-supportedloadtypes"></a>

* Resistive (incandescent bulbs, heating devices)
* Capacitive (capacitor banks, electronic equipment, motor start capacitors)
* Inductive with RC Snubber (LED light drivers, transformers, fans, refrigerators, air-conditioners)

***

## Installation

{% hint style="danger" %}
Please make sure the main power switch is turned off before installation
{% endhint %}

1. Connect wires according to the wiring diagram;
2. Insert the module into the junction box;
3. Turn on the main power switch and add devices according to the [**quick setup.**](#quick-setup)

<figure><img src="https://3898863868-files.gitbook.io/~/files/v0/b/gitbook-x-prod.appspot.com/o/spaces%2F-MDHxt7lj9funy2SIeFB%2Fuploads%2FdQ7dTAdyeGetY5btYv0P%2Finstall%20to%20the%20wall%20-%202.png?alt=media&amp;token=336ec27e-24a9-4048-bc69-2e08a7bc732c" alt=""><figcaption><p>Insert into the junction box</p></figcaption></figure>

***

## Wiring Schematic

<figure><img src="https://3898863868-files.gitbook.io/~/files/v0/b/gitbook-x-prod.appspot.com/o/spaces%2F-MDHxt7lj9funy2SIeFB%2Fuploads%2FEE1moGuvXq1tlR3iNu5j%2F2ch%20-%20without%20swith.png?alt=media&amp;token=b238fd94-0e87-48ba-aa23-792ed7f2a239" alt=""><figcaption><p>Without Switch</p></figcaption></figure>

<figure><img src="https://3898863868-files.gitbook.io/~/files/v0/b/gitbook-x-prod.appspot.com/o/spaces%2F-MDHxt7lj9funy2SIeFB%2Fuploads%2FVICWnrdlTybxSYj68805%2F2ch%20-%202switvh.png?alt=media&amp;token=603fa5e2-9c51-45d6-ad82-d9c08d72a1b3" alt=""><figcaption><p>Connect 2 Switches</p></figcaption></figure>

<figure><img src="https://3898863868-files.gitbook.io/~/files/v0/b/gitbook-x-prod.appspot.com/o/spaces%2F-MDHxt7lj9funy2SIeFB%2Fuploads%2FuHosUGOcAtibCx1Y2ggE%2F2ch%20-%204switch.png?alt=media&amp;token=8351e586-dc3b-4df6-a99d-19a3d1cf6ac7" alt=""><figcaption><p>Connect 4 3-way Switches</p></figcaption></figure>

{% hint style="success" %}
The mechanical switch can only be used with AC100 - 240V.
{% endhint %}

***

## Tech Specs <a href="#s4dtx" id="s4dtx"></a>

* Voltage: AC100 - 240V | 50/60Hz
* Dimensions: 39.2 x 39.2 x 18mm (without mounting clip) | 43 x 39.2 x 22.3mm (with mounting clip)&#x20;
* Wireless Standard: Zigbee 3.0
* Max. Load: LED 150W x 2 | 5A x 2

<figure><img src="https://3898863868-files.gitbook.io/~/files/v0/b/gitbook-x-prod.appspot.com/o/spaces%2F-MDHxt7lj9funy2SIeFB%2Fuploads%2FVvk232aj1uBlKC6NcWUC%2F2ch%20-%20size.png?alt=media&amp;token=2d9dd954-0031-46c8-888f-31082100d94b" alt=""><figcaption><p>Size</p></figcaption></figure>

***

## Quick Setup

### 1. Register an account <a href="#izkpz" id="izkpz"></a>

<details>

<summary>Use the 'Smart Life' App</summary>

Please jump to the '[**Use Smart Life App**](/smart-life/user-manual-for-smart-life)' page to view

</details>

### 2. Add Device <a href="#pxw57" id="pxw57"></a>

Open the Smart Life App, open the control panel of the Zigbee gateway, click the '+' in the homepage, enter the add device page, select it, and follow the prompts

{% hint style="success" %}
**2 ways to put the module into network pairing mode**

* Press the reset key for about 10 seconds
* Press the traditional switch 5 times until the indicator light is flashing quickly

<img src="https://3898863868-files.gitbook.io/~/files/v0/b/gitbook-x-prod.appspot.com/o/spaces%2F-MDHxt7lj9funy2SIeFB%2Fuploads%2Fj87tEzn7qNZoTYwuVXgg%2F2CH%20-%20with%20zigbee%20gateway.png?alt=media&amp;token=d67c7674-231a-4d3e-9e2b-124c532cfa0b" alt="" data-size="original">
{% endhint %}

{% hint style="success" %}
If the addition fails, please press and hold the network configuration button again and try again.
{% endhint %}

### 3. Control the Device <a href="#kjvoo" id="kjvoo"></a>

Use the App to control. If you can control the device normally, it means the device is working properly.

***

## System Requirements

1. Wi-Fi Router&#x20;
2. ZigBee Gateway
3. iPhone, iPad (iOS 7.0 or higher) | Android Devices (4.0 or higher)

<figure><img src="https://3898863868-files.gitbook.io/~/files/v0/b/gitbook-x-prod.appspot.com/o/spaces%2F-MDHxt7lj9funy2SIeFB%2Fuploads%2Fdi751C8Vc8uJ4MF8nYkT%2Fzigbee%20system%20requirement.png?alt=media&amp;token=adbd75e3-cfae-4f7e-83ea-ce8d57727d0e" alt="" width="563"><figcaption></figcaption></figure>

***

## Indicator Light Status Description

| **Indicator Status** | **Description**              |
| -------------------- | ---------------------------- |
| Blue flashes quickly | Connecting the network       |
| Blue is always on    | Network connection is normal |
| Indicator off        | Device offline/disconnected  |

***

## Toxic and Hazardous Substances Statement

<table data-header-hidden data-full-width="false"><thead><tr><th width="141"></th><th width="91"></th><th width="89"></th><th width="87"></th><th width="96"></th><th width="105"></th><th></th></tr></thead><tbody><tr><td>Part Name</td><td>铅 (Pb)</td><td>汞 (Hg)</td><td>镉(Cd)</td><td>六价铬<br>(Cr(VI))</td><td>多溴联苯<br>(PBB)</td><td>多溴二苯醚<br>(PBDE)</td></tr><tr><td>Plastic Shell</td><td>O</td><td>O</td><td>O</td><td>O</td><td>O</td><td>O</td></tr><tr><td>Plastic bracket</td><td>O</td><td>O</td><td>O</td><td>O</td><td>O</td><td>O</td></tr><tr><td>Electronic Component</td><td>O</td><td>O</td><td>O</td><td>O</td><td>O</td><td>O</td></tr><tr><td>PCBA</td><td>O</td><td>O</td><td>O</td><td>O</td><td>O</td><td>O</td></tr><tr><td>Metal</td><td>O</td><td>O</td><td>O</td><td>O</td><td>O</td><td>O</td></tr></tbody></table>

This form is prepared in accordance with the provisions of SJ/T 11364.

* O: Indicates that the content of the hazardous substance in all homogeneous materials of this part is below the limit requirements specified in GB/T 26572.
* ×: Indicates that the content of the hazardous substance in at least one homogeneous material of this part exceeds the limit requirements specified in GB/T 26572.

***

## Instructions for Use of Micropower Equipment

1. The Wi-Fi technology used in this product complies with the technical requirements of general micropower equipment Class F equipment in the 'Micropower Short-range Radio Transmission Equipment Catalog and Technical Requirements' for data transmission applications. It adopts integrated antenna, control, adjustment and switch Please refer to the relevant content in the product manual for usage instructions;
2. You are not allowed to change the usage scenarios or conditions without authorization, expand the transmission frequency range, increase the transmission power (including installing additional RF power amplifiers), and you are not allowed to change the transmitting antenna without authorization;
3. Shall not cause harmful interference to other legal radio stations, nor shall it offer protection against harmful interference;
4. Should withstand interference from industrial, scientific and medical (ISM) application equipment that radiates radio frequency energy or other legitimate radio stations;
5. If it causes harmful interference to other legal radio stations (stations), you should stop using it immediately and take measures to eliminate the interference before continuing to use it;
6. In aircraft and in accordance with laws and regulations, relevant national regulations, and standards designated radio astronomy observatories, weather radar stations, satellite earth stations (including measurement and control, ranging, receiving, and navigation stations) and other military and civilian radio stations (stations), airports, etc. Micropower equipment used in electromagnetic environment protection areas must comply with the regulations of electromagnetic environment protection and relevant industry authorities;
7. It is prohibited to use all types of model remote controls within a radius of 5,000 meters with the center point of the airport runway as the center;
8. The operating temperature of micropower equipment is -10℃ - 40℃, and the power supply is AC100 - 240V | 50/60Hz

***

## Warranty Instructions

The after-sales service of this product is strictly in accordance with the "Consumer Rights and Interests Protection Law of the People's Republic of China" and the "Product Quality Law of the People's Republic of China" to implement after-sales three-guarantee service. The service content is as follows:

### Warranty Policy

During the validity period of the Three Guarantees, you can enjoy free returns, exchanges, and repair services in accordance with this provision. Returns, exchanges, and repairs should be handled with invoices.

1. Returns without reason within 7 days from the day after receipt (e-commerce purchase channel), the user will bear the logistics costs.
2. This product has performance failures listed in the "Product Performance Failure Table". After after-sales service testing and confirmation, you can enjoy the following services for free:

| Service Type | Service Policy                                                                    |
| ------------ | --------------------------------------------------------------------------------- |
| Return       | Return of product due to quality reasons within 7 days from the day after receipt |
| Exchange     | Exchange for product quality reasons within 15 days from the day after receipt    |
| Repair       | Repair due to product quality within 1 year from the day after receipt            |

{% hint style="info" %}
Friendly reminder: Since packaging boxes are required to ensure the safety of product transportation during transportation, it is recommended that you keep the packaging boxes for at least 30 days from the day after signing for the product.
{% endhint %}

### Non-warranty Regulations

1. Unauthorized repair, misuse, collision, neglect, abuse, liquid intrusion, accident, alteration, incorrect use of non-product accessories, or tearing, alteration of labels, and anti-counterfeiting marks;
2. The three-pack validity period has expired;
3. Damage caused by force majeure;
4. Failure to comply with the performance failures listed in the "Product Performance Failure Table";
5. This product and its accessories have performance failures listed in the "Product Performance Failure Table" due to human reasons.

***


# SML-02Z-ES

User Manual for SML-02Z-ES 2CH Zigbee Switch Module - Energy Monitor

***

## Appearance

<figure><img src="https://3898863868-files.gitbook.io/~/files/v0/b/gitbook-x-prod.appspot.com/o/spaces%2F-MDHxt7lj9funy2SIeFB%2Fuploads%2FLyuBeAdOiToCr2VyzciE%2Fsml-02z-es-1000px.jpg?alt=media&amp;token=e5c69c9c-232c-48ac-8695-f51127a7560b" alt="" width="375"><figcaption><p>SML-02Z-ES</p></figcaption></figure>

***

## Introduce <a href="#a7ulc" id="a7ulc"></a>

### Short Description <a href="#shellyplus1-snsw-001x16eu-shortdescription" id="shellyplus1-snsw-001x16eu-shortdescription"></a>

* SML-02Z-ES is a small form factor smart switch which allows remote control of electric appliances through a mobile phone, tablet and home automation system.
* SML-02Z-ES can be accessed, controlled and monitored remotely from any place where the user has internet connectivity, as long as the device is connected to a Zigee gateway and the Internet.
* It can be retrofitted into standard electrical wall boxes, behind power sockets and light switches or other places with limited space.

### Features <a href="#h4js5" id="h4js5"></a>

* App remote control - control the device anytime and anywhere through mobile App
* Smart linkage - In smart scene mode, linkage can be set to sound an alarm. The mobile App will also receive prompts, such as garage door open/close status, timeout notifications and overnight notifications, to remind you to close the garage door.
* Voice control - used with Amazon Echo, Google Home, Yandex, Tmall Genie
* Offline function - when the device is offline, the App will remind the device to go offline after 30 minutes
* Home Sharing - Create a smart home with your family
* Set a schedule - turn connected devices on and off at specified times
* Sharing feature - share with family members for joint control
* Supports Siri - This device is not compatible with HomeKit. But you can add click-to-run scenes to Siri shortcuts in the Smart Life App
* <mark style="color:red;">**With Energy Monitor function**</mark>

***

## Safety Consultation and Precautions

1. The installation process of this product involves strong electricity and must be installed by professionals in accordance with electrical specifications and product instructions;
2. This product is for indoor use only, please do not use it in humid environments or outdoors;
3. This product is only suitable for safe use in areas below 2,000 meters above sea level;
4. Pay attention to moisture-proof, do not spill water or other liquids on this product;
5. Do not place this product near a heat source;
6. Do not attempt to repair this product yourself, this work should be performed by authorized professionals;
7. Do not use it with overload. Please make sure that the 10A overcurrent protection circuit breaker on the front of this product is working properly before powering on. It is recommended that the stripping length of the terminal connecting wire is 6-8 mm;
8. This product should not be installed or fixed in a place that can be touched by human hands, such as outside the wall. It should be installed in an appliance or a hidden box;
9. The position of the fixed antenna should be as far away as possible from metal, wires and the module itself. (Applicable to external antenna models).

***

## Main Applications <a href="#shellyplus1-snsw-001x16eu-mainapplications" id="shellyplus1-snsw-001x16eu-mainapplications"></a>

* Residential
* MDU (Multi Dwelling Units - apartments, condominiums, hotels, etc.)
* Light commercial (small office buildings, small retail/restaurant/gas station, etc.)
* Government/municipal
* University/college

***

## Integrations <a href="#shellyplus1-snsw-001x16eu-integrations" id="shellyplus1-snsw-001x16eu-integrations"></a>

* Google Assistant
* Amazon Alexa
* Yandex Alice
* Baidu Xiaodu
* Tmall Genie

***

## Supported Load Types <a href="#shellyplus1-snsw-001x16eu-supportedloadtypes" id="shellyplus1-snsw-001x16eu-supportedloadtypes"></a>

* Resistive (incandescent bulbs, heating devices)
* Capacitive (capacitor banks, electronic equipment, motor start capacitors)
* Inductive with RC Snubber (LED light drivers, transformers, fans, refrigerators, air-conditioners)

***

## Installation

{% hint style="danger" %}
Please make sure the main power switch is turned off before installation
{% endhint %}

1. Connect wires according to the wiring diagram;
2. Insert the module into the junction box;
3. Turn on the main power switch and add devices according to the [**quick setup.**](#quick-setup)

<figure><img src="https://3898863868-files.gitbook.io/~/files/v0/b/gitbook-x-prod.appspot.com/o/spaces%2F-MDHxt7lj9funy2SIeFB%2Fuploads%2FdQ7dTAdyeGetY5btYv0P%2Finstall%20to%20the%20wall%20-%202.png?alt=media&amp;token=336ec27e-24a9-4048-bc69-2e08a7bc732c" alt=""><figcaption><p>Insert into the junction box</p></figcaption></figure>

***

## Wiring Schematic

<figure><img src="https://3898863868-files.gitbook.io/~/files/v0/b/gitbook-x-prod.appspot.com/o/spaces%2F-MDHxt7lj9funy2SIeFB%2Fuploads%2FEE1moGuvXq1tlR3iNu5j%2F2ch%20-%20without%20swith.png?alt=media&amp;token=b238fd94-0e87-48ba-aa23-792ed7f2a239" alt=""><figcaption><p>Without Switch</p></figcaption></figure>

<figure><img src="https://3898863868-files.gitbook.io/~/files/v0/b/gitbook-x-prod.appspot.com/o/spaces%2F-MDHxt7lj9funy2SIeFB%2Fuploads%2F3YWgfwpr59eu3szyQAPI%2F2ch-es%20-%202.png?alt=media&amp;token=7a28a7d8-75bf-410c-bf18-d3642aba5b8d" alt=""><figcaption><p>Connect 2 Switches</p></figcaption></figure>

<figure><img src="https://3898863868-files.gitbook.io/~/files/v0/b/gitbook-x-prod.appspot.com/o/spaces%2F-MDHxt7lj9funy2SIeFB%2Fuploads%2F7Tu4cD8qGtAlMjhCfned%2F2ch-es%20-%202%203-way.png?alt=media&amp;token=33dfc42e-b0d1-45af-99fb-873260e95dfb" alt=""><figcaption><p>Connect 4 3-way Switches</p></figcaption></figure>

{% hint style="success" %}
The mechanical switch can only be used with AC100 - 240V.
{% endhint %}

***

## Tech Specs <a href="#s4dtx" id="s4dtx"></a>

* Voltage: AC100 - 240V | 50/60Hz
* Dimensions: 39.2 x 39.2 x 18mm (without mounting clip) | 43 x 39.2 x 22.3mm (with mounting clip)&#x20;
* Wireless Standard: Zigbee 3.0
* Max. Load: LED 150W x 2 | 5A x 2

<figure><img src="https://3898863868-files.gitbook.io/~/files/v0/b/gitbook-x-prod.appspot.com/o/spaces%2F-MDHxt7lj9funy2SIeFB%2Fuploads%2FVvk232aj1uBlKC6NcWUC%2F2ch%20-%20size.png?alt=media&amp;token=2d9dd954-0031-46c8-888f-31082100d94b" alt=""><figcaption><p>Size</p></figcaption></figure>

***

## Quick Setup

### 1. Register an account <a href="#izkpz" id="izkpz"></a>

<details>

<summary>Use the 'Smart Life' App</summary>

Please jump to the '[**Use Smart Life App**](/smart-life/user-manual-for-smart-life)' page to view

</details>

### 2. Add Device <a href="#pxw57" id="pxw57"></a>

Open the Smart Life App, open the control panel of the Zigbee gateway, click the '+' in the homepage, enter the add device page, select it, and follow the prompts

{% hint style="success" %}
**2 ways to put the module into network pairing mode**

* Press the reset key for about 10 seconds
* Press the traditional switch 5 times until the indicator light is flashing quickly

<img src="https://3898863868-files.gitbook.io/~/files/v0/b/gitbook-x-prod.appspot.com/o/spaces%2F-MDHxt7lj9funy2SIeFB%2Fuploads%2Fj87tEzn7qNZoTYwuVXgg%2F2CH%20-%20with%20zigbee%20gateway.png?alt=media&amp;token=d67c7674-231a-4d3e-9e2b-124c532cfa0b" alt="" data-size="original">
{% endhint %}

{% hint style="success" %}
If the addition fails, please press and hold the network configuration button again and try again.
{% endhint %}

### 3. Control the Device <a href="#kjvoo" id="kjvoo"></a>

Use the App to control. If you can control the device normally, it means the device is working properly.

***

## System Requirements

1. Wi-Fi Router&#x20;
2. ZigBee Gateway
3. iPhone, iPad (iOS 7.0 or higher) | Android Devices (4.0 or higher)

<figure><img src="https://3898863868-files.gitbook.io/~/files/v0/b/gitbook-x-prod.appspot.com/o/spaces%2F-MDHxt7lj9funy2SIeFB%2Fuploads%2Fdi751C8Vc8uJ4MF8nYkT%2Fzigbee%20system%20requirement.png?alt=media&amp;token=adbd75e3-cfae-4f7e-83ea-ce8d57727d0e" alt="" width="563"><figcaption></figcaption></figure>

***

## Indicator Light Status Description

| **Indicator Status** | **Description**              |
| -------------------- | ---------------------------- |
| Blue flashes quickly | Connecting the network       |
| Blue is always on    | Network connection is normal |
| Indicator off        | Device offline/disconnected  |

***

## Toxic and Hazardous Substances Statement

<table data-header-hidden data-full-width="false"><thead><tr><th width="141"></th><th width="91"></th><th width="89"></th><th width="87"></th><th width="96"></th><th width="105"></th><th></th></tr></thead><tbody><tr><td>Part Name</td><td>铅 (Pb)</td><td>汞 (Hg)</td><td>镉(Cd)</td><td>六价铬<br>(Cr(VI))</td><td>多溴联苯<br>(PBB)</td><td>多溴二苯醚<br>(PBDE)</td></tr><tr><td>Plastic Shell</td><td>O</td><td>O</td><td>O</td><td>O</td><td>O</td><td>O</td></tr><tr><td>Plastic bracket</td><td>O</td><td>O</td><td>O</td><td>O</td><td>O</td><td>O</td></tr><tr><td>Electronic Component</td><td>O</td><td>O</td><td>O</td><td>O</td><td>O</td><td>O</td></tr><tr><td>PCBA</td><td>O</td><td>O</td><td>O</td><td>O</td><td>O</td><td>O</td></tr><tr><td>Metal</td><td>O</td><td>O</td><td>O</td><td>O</td><td>O</td><td>O</td></tr></tbody></table>

This form is prepared in accordance with the provisions of SJ/T 11364.

* O: Indicates that the content of the hazardous substance in all homogeneous materials of this part is below the limit requirements specified in GB/T 26572.
* ×: Indicates that the content of the hazardous substance in at least one homogeneous material of this part exceeds the limit requirements specified in GB/T 26572.

***

## Instructions for Use of Micropower Equipment

1. The Wi-Fi technology used in this product complies with the technical requirements of general micropower equipment Class F equipment in the 'Micropower Short-range Radio Transmission Equipment Catalog and Technical Requirements' for data transmission applications. It adopts integrated antenna, control, adjustment and switch Please refer to the relevant content in the product manual for usage instructions;
2. You are not allowed to change the usage scenarios or conditions without authorization, expand the transmission frequency range, increase the transmission power (including installing additional RF power amplifiers), and you are not allowed to change the transmitting antenna without authorization;
3. Shall not cause harmful interference to other legal radio stations, nor shall it offer protection against harmful interference;
4. Should withstand interference from industrial, scientific and medical (ISM) application equipment that radiates radio frequency energy or other legitimate radio stations;
5. If it causes harmful interference to other legal radio stations (stations), you should stop using it immediately and take measures to eliminate the interference before continuing to use it;
6. In aircraft and in accordance with laws and regulations, relevant national regulations, and standards designated radio astronomy observatories, weather radar stations, satellite earth stations (including measurement and control, ranging, receiving, and navigation stations) and other military and civilian radio stations (stations), airports, etc. Micropower equipment used in electromagnetic environment protection areas must comply with the regulations of electromagnetic environment protection and relevant industry authorities;
7. It is prohibited to use all types of model remote controls within a radius of 5,000 meters with the center point of the airport runway as the center;
8. The operating temperature of micropower equipment is -10℃ - 40℃, and the power supply is AC100 - 240V | 50/60Hz

***

## Warranty Instructions

The after-sales service of this product is strictly in accordance with the "Consumer Rights and Interests Protection Law of the People's Republic of China" and the "Product Quality Law of the People's Republic of China" to implement after-sales three-guarantee service. The service content is as follows:

### Warranty Policy

During the validity period of the Three Guarantees, you can enjoy free returns, exchanges, and repair services in accordance with this provision. Returns, exchanges, and repairs should be handled with invoices.

1. Returns without reason within 7 days from the day after receipt (e-commerce purchase channel), the user will bear the logistics costs.
2. This product has performance failures listed in the "Product Performance Failure Table". After after-sales service testing and confirmation, you can enjoy the following services for free:

| Service Type | Service Policy                                                                    |
| ------------ | --------------------------------------------------------------------------------- |
| Return       | Return of product due to quality reasons within 7 days from the day after receipt |
| Exchange     | Exchange for product quality reasons within 15 days from the day after receipt    |
| Repair       | Repair due to product quality within 1 year from the day after receipt            |

{% hint style="info" %}
Friendly reminder: Since packaging boxes are required to ensure the safety of product transportation during transportation, it is recommended that you keep the packaging boxes for at least 30 days from the day after signing for the product.
{% endhint %}

### Non-warranty Regulations

1. Unauthorized repair, misuse, collision, neglect, abuse, liquid intrusion, accident, alteration, incorrect use of non-product accessories, or tearing, alteration of labels, and anti-counterfeiting marks;
2. The three-pack validity period has expired;
3. Damage caused by force majeure;
4. Failure to comply with the performance failures listed in the "Product Performance Failure Table";
5. This product and its accessories have performance failures listed in the "Product Performance Failure Table" due to human reasons.

***


# SML-03Z

User Manual for SML-03Z 3CH Zigbee Switch Module

***

## Appearance

<figure><img src="https://3898863868-files.gitbook.io/~/files/v0/b/gitbook-x-prod.appspot.com/o/spaces%2F-MDHxt7lj9funy2SIeFB%2Fuploads%2FiTa0TU4tLKNBnYkcXQI0%2Fsml-03z-1000px.jpg?alt=media&amp;token=5afce426-9929-4b97-8e53-6d0063b6b513" alt="" width="375"><figcaption><p>SML-03Z</p></figcaption></figure>

***

## Introduce <a href="#a7ulc" id="a7ulc"></a>

### Short Description <a href="#shellyplus1-snsw-001x16eu-shortdescription" id="shellyplus1-snsw-001x16eu-shortdescription"></a>

* SML-03Z is a small form factor smart switch which allows remote control of electric appliances through a mobile phone, tablet and home automation system.
* SML-03Z can be accessed, controlled and monitored remotely from any place where the user has internet connectivity, as long as the device is connected to a Zigee gateway and the Internet.
* It can be retrofitted into standard electrical wall boxes, behind power sockets and light switches or other places with limited space.

### Features <a href="#h4js5" id="h4js5"></a>

* App remote control - control the device anytime and anywhere through mobile App
* Smart linkage - In smart scene mode, linkage can be set to sound an alarm. The mobile App will also receive prompts, such as garage door open/close status, timeout notifications and overnight notifications, to remind you to close the garage door.
* Voice control - used with Amazon Echo, Google Home, Yandex, Tmall Genie
* Offline function - when the device is offline, the App will remind the device to go offline after 30 minutes
* Home Sharing - Create a smart home with your family
* Set a schedule - turn connected devices on and off at specified times
* Sharing feature - share with family members for joint control
* Supports Siri - This device is not compatible with HomeKit. But you can add click-to-run scenes to Siri shortcuts in the Smart Life App

***

## Safety Consultation and Precautions

1. The installation process of this product involves strong electricity and must be installed by professionals in accordance with electrical specifications and product instructions;
2. This product is for indoor use only, please do not use it in humid environments or outdoors;
3. This product is only suitable for safe use in areas below 2,000 meters above sea level;
4. Pay attention to moisture-proof, do not spill water or other liquids on this product;
5. Do not place this product near a heat source;
6. Do not attempt to repair this product yourself, this work should be performed by authorized professionals;
7. Do not use it with overload. Please make sure that the 10A overcurrent protection circuit breaker on the front of this product is working properly before powering on. It is recommended that the stripping length of the terminal connecting wire is 6-8 mm;
8. This product should not be installed or fixed in a place that can be touched by human hands, such as outside the wall. It should be installed in an appliance or a hidden box;
9. The position of the fixed antenna should be as far away as possible from metal, wires and the module itself. (Applicable to external antenna models).

***

## Main Applications <a href="#shellyplus1-snsw-001x16eu-mainapplications" id="shellyplus1-snsw-001x16eu-mainapplications"></a>

* Residential
* MDU (Multi Dwelling Units - apartments, condominiums, hotels, etc.)
* Light commercial (small office buildings, small retail/restaurant/gas station, etc.)
* Government/municipal
* University/college

***

## Integrations <a href="#shellyplus1-snsw-001x16eu-integrations" id="shellyplus1-snsw-001x16eu-integrations"></a>

* Google Assistant
* Amazon Alexa
* Yandex Alice
* Baidu Xiaodu
* Tmall Genie

***

## Supported Load Types <a href="#shellyplus1-snsw-001x16eu-supportedloadtypes" id="shellyplus1-snsw-001x16eu-supportedloadtypes"></a>

* Resistive (incandescent bulbs, heating devices)
* Capacitive (capacitor banks, electronic equipment, motor start capacitors)
* Inductive with RC Snubber (LED light drivers, transformers, fans, refrigerators, air-conditioners)

***

## Installation

{% hint style="danger" %}
Please make sure the main power switch is turned off before installation
{% endhint %}

1. Connect wires according to the wiring diagram;
2. Insert the module into the junction box;
3. Turn on the main power switch and add devices according to the [**quick setup.**](#quick-setup)

<figure><img src="https://3898863868-files.gitbook.io/~/files/v0/b/gitbook-x-prod.appspot.com/o/spaces%2F-MDHxt7lj9funy2SIeFB%2Fuploads%2FJRM6W5sRONNjjFOWdYI4%2Finstall%20to%20the%20wall%20-%203.png?alt=media&amp;token=54f09de9-3920-493f-a21d-250f037b479c" alt=""><figcaption><p>Insert into the junction box</p></figcaption></figure>

***

## Wiring Schematic

<figure><img src="https://3898863868-files.gitbook.io/~/files/v0/b/gitbook-x-prod.appspot.com/o/spaces%2F-MDHxt7lj9funy2SIeFB%2Fuploads%2FAnwbBJtW5waUDnYRlH8o%2F3CH.png?alt=media&amp;token=cf1c09e7-8ac9-4fda-b39a-233ab71e1b56" alt=""><figcaption><p>Without Switch</p></figcaption></figure>

<figure><img src="https://3898863868-files.gitbook.io/~/files/v0/b/gitbook-x-prod.appspot.com/o/spaces%2F-MDHxt7lj9funy2SIeFB%2Fuploads%2FNypUU7qcpQFNkVM9QxLy%2F3CH%20-%203%20switches.png?alt=media&amp;token=0a1d3cfc-4f9e-4315-93dc-fa8ddb387507" alt=""><figcaption><p>Connect 3 Switches</p></figcaption></figure>

<figure><img src="https://3898863868-files.gitbook.io/~/files/v0/b/gitbook-x-prod.appspot.com/o/spaces%2F-MDHxt7lj9funy2SIeFB%2Fuploads%2F9kZCoxQDIWlt2F66RByS%2F3CH%20-%206%20switches.png?alt=media&amp;token=49c8d94d-353f-4b36-82ca-00dc95abb0fe" alt=""><figcaption><p>Connect 6 3-way Switches</p></figcaption></figure>

{% hint style="success" %}
The mechanical switch can only be used with AC100 - 240V.
{% endhint %}

***

## Tech Specs <a href="#s4dtx" id="s4dtx"></a>

* Voltage: AC100 - 240V | 50/60Hz
* Dimensions: 39.2 x 39.2 x 18mm (without mounting clip) | 43 x 39.2 x 22.3mm (with mounting clip)&#x20;
* Wireless Standard: Zigbee 3.0
* Max. Load: LED 150W x 3 | 3.3A x 3

<figure><img src="https://3898863868-files.gitbook.io/~/files/v0/b/gitbook-x-prod.appspot.com/o/spaces%2F-MDHxt7lj9funy2SIeFB%2Fuploads%2FVvk232aj1uBlKC6NcWUC%2F2ch%20-%20size.png?alt=media&amp;token=2d9dd954-0031-46c8-888f-31082100d94b" alt=""><figcaption><p>Size</p></figcaption></figure>

***

## Quick Setup

### 1. Register an account <a href="#izkpz" id="izkpz"></a>

<details>

<summary>Use the 'Smart Life' App</summary>

Please jump to the '[**Use Smart Life App**](/smart-life/user-manual-for-smart-life)' page to view

</details>

### 2. Add Device <a href="#pxw57" id="pxw57"></a>

Open the Smart Life App, open the control panel of the Zigbee gateway, click the '+' in the homepage, enter the add device page, select it, and follow the prompts

{% hint style="success" %}
**2 ways to put the module into network pairing mode**

* Press the reset key for about 10 seconds
* Press the traditional switch 5 times until the indicator light is flashing quickly

<img src="https://3898863868-files.gitbook.io/~/files/v0/b/gitbook-x-prod.appspot.com/o/spaces%2F-MDHxt7lj9funy2SIeFB%2Fuploads%2F6Zt6wsNDwkJi1Dc16jbC%2F3CH%20-%20with%20zigbee%20gateway.png?alt=media&amp;token=bd30f364-9779-49e7-905e-f64c7a17873c" alt="" data-size="original">
{% endhint %}

{% hint style="success" %}
If the addition fails, please press and hold the network configuration button again and try again.
{% endhint %}

### 3. Control the Device <a href="#kjvoo" id="kjvoo"></a>

Use the App to control. If you can control the device normally, it means the device is working properly.

***

## System Requirements

1. Wi-Fi Router&#x20;
2. ZigBee Gateway
3. iPhone, iPad (iOS 7.0 or higher) | Android Devices (4.0 or higher)

<figure><img src="https://3898863868-files.gitbook.io/~/files/v0/b/gitbook-x-prod.appspot.com/o/spaces%2F-MDHxt7lj9funy2SIeFB%2Fuploads%2Fdi751C8Vc8uJ4MF8nYkT%2Fzigbee%20system%20requirement.png?alt=media&amp;token=adbd75e3-cfae-4f7e-83ea-ce8d57727d0e" alt="" width="563"><figcaption></figcaption></figure>

***

## Indicator Light Status Description

| **Indicator Status** | **Description**              |
| -------------------- | ---------------------------- |
| Blue flashes quickly | Connecting the network       |
| Blue is always on    | Network connection is normal |
| Indicator off        | Device offline/disconnected  |

***

## Toxic and Hazardous Substances Statement

<table data-header-hidden data-full-width="false"><thead><tr><th width="141"></th><th width="91"></th><th width="89"></th><th width="87"></th><th width="96"></th><th width="105"></th><th></th></tr></thead><tbody><tr><td>Part Name</td><td>铅 (Pb)</td><td>汞 (Hg)</td><td>镉(Cd)</td><td>六价铬<br>(Cr(VI))</td><td>多溴联苯<br>(PBB)</td><td>多溴二苯醚<br>(PBDE)</td></tr><tr><td>Plastic Shell</td><td>O</td><td>O</td><td>O</td><td>O</td><td>O</td><td>O</td></tr><tr><td>Plastic bracket</td><td>O</td><td>O</td><td>O</td><td>O</td><td>O</td><td>O</td></tr><tr><td>Electronic Component</td><td>O</td><td>O</td><td>O</td><td>O</td><td>O</td><td>O</td></tr><tr><td>PCBA</td><td>O</td><td>O</td><td>O</td><td>O</td><td>O</td><td>O</td></tr><tr><td>Metal</td><td>O</td><td>O</td><td>O</td><td>O</td><td>O</td><td>O</td></tr></tbody></table>

This form is prepared in accordance with the provisions of SJ/T 11364.

* O: Indicates that the content of the hazardous substance in all homogeneous materials of this part is below the limit requirements specified in GB/T 26572.
* ×: Indicates that the content of the hazardous substance in at least one homogeneous material of this part exceeds the limit requirements specified in GB/T 26572.

***

## Instructions for Use of Micropower Equipment

1. The Wi-Fi technology used in this product complies with the technical requirements of general micropower equipment Class F equipment in the 'Micropower Short-range Radio Transmission Equipment Catalog and Technical Requirements' for data transmission applications. It adopts integrated antenna, control, adjustment and switch Please refer to the relevant content in the product manual for usage instructions;
2. You are not allowed to change the usage scenarios or conditions without authorization, expand the transmission frequency range, increase the transmission power (including installing additional RF power amplifiers), and you are not allowed to change the transmitting antenna without authorization;
3. Shall not cause harmful interference to other legal radio stations, nor shall it offer protection against harmful interference;
4. Should withstand interference from industrial, scientific and medical (ISM) application equipment that radiates radio frequency energy or other legitimate radio stations;
5. If it causes harmful interference to other legal radio stations (stations), you should stop using it immediately and take measures to eliminate the interference before continuing to use it;
6. In aircraft and in accordance with laws and regulations, relevant national regulations, and standards designated radio astronomy observatories, weather radar stations, satellite earth stations (including measurement and control, ranging, receiving, and navigation stations) and other military and civilian radio stations (stations), airports, etc. Micropower equipment used in electromagnetic environment protection areas must comply with the regulations of electromagnetic environment protection and relevant industry authorities;
7. It is prohibited to use all types of model remote controls within a radius of 5,000 meters with the center point of the airport runway as the center;
8. The operating temperature of micropower equipment is -10℃ - 40℃, and the power supply is AC100 - 240V | 50/60Hz

***

## Warranty Instructions

The after-sales service of this product is strictly in accordance with the "Consumer Rights and Interests Protection Law of the People's Republic of China" and the "Product Quality Law of the People's Republic of China" to implement after-sales three-guarantee service. The service content is as follows:

### Warranty Policy

During the validity period of the Three Guarantees, you can enjoy free returns, exchanges, and repair services in accordance with this provision. Returns, exchanges, and repairs should be handled with invoices.

1. Returns without reason within 7 days from the day after receipt (e-commerce purchase channel), the user will bear the logistics costs.
2. This product has performance failures listed in the "Product Performance Failure Table". After after-sales service testing and confirmation, you can enjoy the following services for free:

| Service Type | Service Policy                                                                    |
| ------------ | --------------------------------------------------------------------------------- |
| Return       | Return of product due to quality reasons within 7 days from the day after receipt |
| Exchange     | Exchange for product quality reasons within 15 days from the day after receipt    |
| Repair       | Repair due to product quality within 1 year from the day after receipt            |

{% hint style="info" %}
Friendly reminder: Since packaging boxes are required to ensure the safety of product transportation during transportation, it is recommended that you keep the packaging boxes for at least 30 days from the day after signing for the product.
{% endhint %}

### Non-warranty Regulations

1. Unauthorized repair, misuse, collision, neglect, abuse, liquid intrusion, accident, alteration, incorrect use of non-product accessories, or tearing, alteration of labels, and anti-counterfeiting marks;
2. The three-pack validity period has expired;
3. Damage caused by force majeure;
4. Failure to comply with the performance failures listed in the "Product Performance Failure Table";
5. This product and its accessories have performance failures listed in the "Product Performance Failure Table" due to human reasons.

***


# SML-04Z

User Manual for SML-04Z 4CH Zigbee Switch Module

***

## Appearance

<figure><img src="https://3898863868-files.gitbook.io/~/files/v0/b/gitbook-x-prod.appspot.com/o/spaces%2F-MDHxt7lj9funy2SIeFB%2Fuploads%2FIi0ChzNt1qQnEfK9LYpD%2Fsml-04z-1000px.jpg?alt=media&amp;token=0c8cecde-c5a7-4a55-81fe-46a259267d98" alt="" width="375"><figcaption><p>SML-04Z</p></figcaption></figure>

***

## Introduce <a href="#a7ulc" id="a7ulc"></a>

### Short Description <a href="#shellyplus1-snsw-001x16eu-shortdescription" id="shellyplus1-snsw-001x16eu-shortdescription"></a>

* SML-04Z is a small form factor smart switch which allows remote control of electric appliances through a mobile phone, tablet and home automation system.
* SML-04Z can be accessed, controlled and monitored remotely from any place where the user has internet connectivity, as long as the device is connected to a Zigee gateway and the Internet.
* It can be retrofitted into standard electrical wall boxes, behind power sockets and light switches or other places with limited space.

### Features <a href="#h4js5" id="h4js5"></a>

* App remote control - control the device anytime and anywhere through mobile App
* Smart linkage - In smart scene mode, linkage can be set to sound an alarm. The mobile App will also receive prompts, such as garage door open/close status, timeout notifications and overnight notifications, to remind you to close the garage door.
* Voice control - used with Amazon Echo, Google Home, Yandex, Tmall Genie
* Offline function - when the device is offline, the App will remind the device to go offline after 30 minutes
* Home Sharing - Create a smart home with your family
* Set a schedule - turn connected devices on and off at specified times
* Sharing feature - share with family members for joint control
* Supports Siri - This device is not compatible with HomeKit. But you can add click-to-run scenes to Siri shortcuts in the Smart Life App

***

## Safety Consultation and Precautions

1. The installation process of this product involves strong electricity and must be installed by professionals in accordance with electrical specifications and product instructions;
2. This product is for indoor use only, please do not use it in humid environments or outdoors;
3. This product is only suitable for safe use in areas below 2,000 meters above sea level;
4. Pay attention to moisture-proof, do not spill water or other liquids on this product;
5. Do not place this product near a heat source;
6. Do not attempt to repair this product yourself, this work should be performed by authorized professionals;
7. Do not use it with overload. Please make sure that the 10A overcurrent protection circuit breaker on the front of this product is working properly before powering on. It is recommended that the stripping length of the terminal connecting wire is 6-8 mm;
8. This product should not be installed or fixed in a place that can be touched by human hands, such as outside the wall. It should be installed in an appliance or a hidden box;
9. The position of the fixed antenna should be as far away as possible from metal, wires and the module itself. (Applicable to external antenna models).

***

## Main Applications <a href="#shellyplus1-snsw-001x16eu-mainapplications" id="shellyplus1-snsw-001x16eu-mainapplications"></a>

* Residential
* MDU (Multi Dwelling Units - apartments, condominiums, hotels, etc.)
* Light commercial (small office buildings, small retail/restaurant/gas station, etc.)
* Government/municipal
* University/college

***

## Integrations <a href="#shellyplus1-snsw-001x16eu-integrations" id="shellyplus1-snsw-001x16eu-integrations"></a>

* Google Assistant
* Amazon Alexa
* Yandex Alice
* Baidu Xiaodu
* Tmall Genie

***

## Supported Load Types <a href="#shellyplus1-snsw-001x16eu-supportedloadtypes" id="shellyplus1-snsw-001x16eu-supportedloadtypes"></a>

* Resistive (incandescent bulbs, heating devices)
* Capacitive (capacitor banks, electronic equipment, motor start capacitors)
* Inductive with RC Snubber (LED light drivers, transformers, fans, refrigerators, air-conditioners)

***

## Installation

{% hint style="danger" %}
Please make sure the main power switch is turned off before installation
{% endhint %}

1. Connect wires according to the wiring diagram;
2. Insert the module into the junction box;
3. Turn on the main power switch and add devices according to the [**quick setup.**](#quick-setup)

<figure><img src="https://3898863868-files.gitbook.io/~/files/v0/b/gitbook-x-prod.appspot.com/o/spaces%2F-MDHxt7lj9funy2SIeFB%2Fuploads%2FWriST4LRJ7OfjHUSsR1i%2Finstall%20to%20the%20wall%20-%204.png?alt=media&amp;token=0cca0471-7fa5-4d9f-ba59-6e41c00d4bfc" alt=""><figcaption><p>Insert into the junction box</p></figcaption></figure>

***

## Wiring Schematic

<figure><img src="https://3898863868-files.gitbook.io/~/files/v0/b/gitbook-x-prod.appspot.com/o/spaces%2F-MDHxt7lj9funy2SIeFB%2Fuploads%2FGkv4qBglnfksLaN9yLlK%2F4ch%20-%20witchout%20switch.png?alt=media&amp;token=d3def268-3015-444c-99d2-a1b6e87f1844" alt=""><figcaption><p>Without Switch</p></figcaption></figure>

<figure><img src="https://3898863868-files.gitbook.io/~/files/v0/b/gitbook-x-prod.appspot.com/o/spaces%2F-MDHxt7lj9funy2SIeFB%2Fuploads%2FbHg6dgO6n2admdkEe1IO%2F4ch%20-%204.png?alt=media&amp;token=9508769d-bd97-46a5-9354-996f46ad8663" alt=""><figcaption><p>Connect 4 Switches</p></figcaption></figure>

<figure><img src="https://3898863868-files.gitbook.io/~/files/v0/b/gitbook-x-prod.appspot.com/o/spaces%2F-MDHxt7lj9funy2SIeFB%2Fuploads%2FwF69JWjlg7H2yWZNq6sv%2F4ch%20-%204-3way.png?alt=media&amp;token=f7aba3c1-8ab0-4002-9e92-12effccf2a3f" alt=""><figcaption><p>Connect 8 3-way Switches</p></figcaption></figure>

{% hint style="success" %}
The mechanical switch can only be used with AC100 - 240V.
{% endhint %}

***

## Tech Specs <a href="#s4dtx" id="s4dtx"></a>

* Voltage: AC100 - 240V | 50/60Hz
* Dimensions: 39.2 x 39.2 x 18mm (without mounting clip) | 43 x 39.2 x 22.3mm (with mounting clip)&#x20;
* Wireless Standard: Zigbee 3.0
* Max. Load: LED 150W x 4 | 2.5A x 4

<figure><img src="https://3898863868-files.gitbook.io/~/files/v0/b/gitbook-x-prod.appspot.com/o/spaces%2F-MDHxt7lj9funy2SIeFB%2Fuploads%2FVvk232aj1uBlKC6NcWUC%2F2ch%20-%20size.png?alt=media&amp;token=2d9dd954-0031-46c8-888f-31082100d94b" alt=""><figcaption><p>Size</p></figcaption></figure>

***

## Quick Setup

### 1. Register an account <a href="#izkpz" id="izkpz"></a>

<details>

<summary>Use the 'Smart Life' App</summary>

Please jump to the '[**Use Smart Life App**](/smart-life/user-manual-for-smart-life)' page to view

</details>

### 2. Add Device <a href="#pxw57" id="pxw57"></a>

Open the Smart Life App, open the control panel of the Zigbee gateway, click the '+' in the homepage, enter the add device page, select it, and follow the prompts

{% hint style="success" %}
**2 ways to put the module into network pairing mode**

* Press the reset key for about 10 seconds
* Press the traditional switch 5 times until the indicator light is flashing quickly

<img src="https://3898863868-files.gitbook.io/~/files/v0/b/gitbook-x-prod.appspot.com/o/spaces%2F-MDHxt7lj9funy2SIeFB%2Fuploads%2FOaVJhZtKXNCqZnOC5NWk%2F4CH%20-%20with%20zigbee%20gateway.png?alt=media&amp;token=662bff3d-99e4-49d8-bd8b-84870f7bc12c" alt="" data-size="original">
{% endhint %}

{% hint style="success" %}
If the addition fails, please press and hold the network configuration button again and try again.
{% endhint %}

### 3. Control the Device <a href="#kjvoo" id="kjvoo"></a>

Use the App to control. If you can control the device normally, it means the device is working properly.

***

## System Requirements

1. Wi-Fi Router&#x20;
2. ZigBee Gateway
3. iPhone, iPad (iOS 7.0 or higher) | Android Devices (4.0 or higher)

<figure><img src="https://3898863868-files.gitbook.io/~/files/v0/b/gitbook-x-prod.appspot.com/o/spaces%2F-MDHxt7lj9funy2SIeFB%2Fuploads%2Fdi751C8Vc8uJ4MF8nYkT%2Fzigbee%20system%20requirement.png?alt=media&amp;token=adbd75e3-cfae-4f7e-83ea-ce8d57727d0e" alt="" width="563"><figcaption></figcaption></figure>

***

## Indicator Light Status Description

| **Indicator Status** | **Description**              |
| -------------------- | ---------------------------- |
| Blue flashes quickly | Connecting the network       |
| Blue is always on    | Network connection is normal |
| Indicator off        | Device offline/disconnected  |

***

## Toxic and Hazardous Substances Statement

<table data-header-hidden data-full-width="false"><thead><tr><th width="141"></th><th width="91"></th><th width="89"></th><th width="87"></th><th width="96"></th><th width="105"></th><th></th></tr></thead><tbody><tr><td>Part Name</td><td>铅 (Pb)</td><td>汞 (Hg)</td><td>镉(Cd)</td><td>六价铬<br>(Cr(VI))</td><td>多溴联苯<br>(PBB)</td><td>多溴二苯醚<br>(PBDE)</td></tr><tr><td>Plastic Shell</td><td>O</td><td>O</td><td>O</td><td>O</td><td>O</td><td>O</td></tr><tr><td>Plastic bracket</td><td>O</td><td>O</td><td>O</td><td>O</td><td>O</td><td>O</td></tr><tr><td>Electronic Component</td><td>O</td><td>O</td><td>O</td><td>O</td><td>O</td><td>O</td></tr><tr><td>PCBA</td><td>O</td><td>O</td><td>O</td><td>O</td><td>O</td><td>O</td></tr><tr><td>Metal</td><td>O</td><td>O</td><td>O</td><td>O</td><td>O</td><td>O</td></tr></tbody></table>

This form is prepared in accordance with the provisions of SJ/T 11364.

* O: Indicates that the content of the hazardous substance in all homogeneous materials of this part is below the limit requirements specified in GB/T 26572.
* ×: Indicates that the content of the hazardous substance in at least one homogeneous material of this part exceeds the limit requirements specified in GB/T 26572.

***

## Instructions for Use of Micropower Equipment

1. The Wi-Fi technology used in this product complies with the technical requirements of general micropower equipment Class F equipment in the 'Micropower Short-range Radio Transmission Equipment Catalog and Technical Requirements' for data transmission applications. It adopts integrated antenna, control, adjustment and switch Please refer to the relevant content in the product manual for usage instructions;
2. You are not allowed to change the usage scenarios or conditions without authorization, expand the transmission frequency range, increase the transmission power (including installing additional RF power amplifiers), and you are not allowed to change the transmitting antenna without authorization;
3. Shall not cause harmful interference to other legal radio stations, nor shall it offer protection against harmful interference;
4. Should withstand interference from industrial, scientific and medical (ISM) application equipment that radiates radio frequency energy or other legitimate radio stations;
5. If it causes harmful interference to other legal radio stations (stations), you should stop using it immediately and take measures to eliminate the interference before continuing to use it;
6. In aircraft and in accordance with laws and regulations, relevant national regulations, and standards designated radio astronomy observatories, weather radar stations, satellite earth stations (including measurement and control, ranging, receiving, and navigation stations) and other military and civilian radio stations (stations), airports, etc. Micropower equipment used in electromagnetic environment protection areas must comply with the regulations of electromagnetic environment protection and relevant industry authorities;
7. It is prohibited to use all types of model remote controls within a radius of 5,000 meters with the center point of the airport runway as the center;
8. The operating temperature of micropower equipment is -10℃ - 40℃, and the power supply is AC100 - 240V | 50/60Hz

***

## Warranty Instructions

The after-sales service of this product is strictly in accordance with the "Consumer Rights and Interests Protection Law of the People's Republic of China" and the "Product Quality Law of the People's Republic of China" to implement after-sales three-guarantee service. The service content is as follows:

### Warranty Policy

During the validity period of the Three Guarantees, you can enjoy free returns, exchanges, and repair services in accordance with this provision. Returns, exchanges, and repairs should be handled with invoices.

1. Returns without reason within 7 days from the day after receipt (e-commerce purchase channel), the user will bear the logistics costs.
2. This product has performance failures listed in the "Product Performance Failure Table". After after-sales service testing and confirmation, you can enjoy the following services for free:

| Service Type | Service Policy                                                                    |
| ------------ | --------------------------------------------------------------------------------- |
| Return       | Return of product due to quality reasons within 7 days from the day after receipt |
| Exchange     | Exchange for product quality reasons within 15 days from the day after receipt    |
| Repair       | Repair due to product quality within 1 year from the day after receipt            |

{% hint style="info" %}
Friendly reminder: Since packaging boxes are required to ensure the safety of product transportation during transportation, it is recommended that you keep the packaging boxes for at least 30 days from the day after signing for the product.
{% endhint %}

### Non-warranty Regulations

1. Unauthorized repair, misuse, collision, neglect, abuse, liquid intrusion, accident, alteration, incorrect use of non-product accessories, or tearing, alteration of labels, and anti-counterfeiting marks;
2. The three-pack validity period has expired;
3. Damage caused by force majeure;
4. Failure to comply with the performance failures listed in the "Product Performance Failure Table";
5. This product and its accessories have performance failures listed in the "Product Performance Failure Table" due to human reasons.

***


# SML-01Z-L

User Manual for SML-01Z-L 1CH Zigbee Lno-neutral Switch Module

***

## Appearance

<figure><img src="https://3898863868-files.gitbook.io/~/files/v0/b/gitbook-x-prod.appspot.com/o/spaces%2F-MDHxt7lj9funy2SIeFB%2Fuploads%2F2Qqxpr3CntalvsviWL2q%2Fsml-01z-l-1000px.jpg?alt=media&amp;token=85d0f4a6-134a-4d9f-a107-fbf8870b3616" alt="" width="375"><figcaption><p>SML-01Z-L</p></figcaption></figure>

***

## Introduce <a href="#a7ulc" id="a7ulc"></a>

### Short Description <a href="#shellyplus1-snsw-001x16eu-shortdescription" id="shellyplus1-snsw-001x16eu-shortdescription"></a>

* SML-01Z-L is a small form factor smart switch which allows remote control of light through a mobile phone, tablet and home automation system.
* SML-01Z-L can be accessed, controlled and monitored remotely from any place where the user has internet connectivity, as long as the device is connected to a Zigee gateway and the Internet.
* It can be retrofitted into standard electrical wall boxes, behind power sockets and light switches or other places with limited space.

### Features <a href="#h4js5" id="h4js5"></a>

* App remote control - control the device anytime and anywhere through mobile App
* Smart linkage - In smart scene mode, linkage can be set to sound an alarm. The mobile App will also receive prompts, such as garage door open/close status, timeout notifications and overnight notifications, to remind you to close the garage door.
* Voice control - used with Amazon Echo, Google Home, Yandex, Tmall Genie
* Offline function - when the device is offline, the App will remind the device to go offline after 30 minutes
* Home Sharing - Create a smart home with your family
* Set a schedule - turn connected devices on and off at specified times
* Sharing feature - share with family members for joint control
* Supports Siri - This device is not compatible with HomeKit. But you can add click-to-run scenes to Siri shortcuts in the Smart Life App

***

## Safety Consultation and Precautions

1. The installation process of this product involves strong electricity and must be installed by professionals in accordance with electrical specifications and product instructions;
2. This product is for indoor use only, please do not use it in humid environments or outdoors;
3. This product is only suitable for safe use in areas below 2,000 meters above sea level;
4. Pay attention to moisture-proof, do not spill water or other liquids on this product;
5. Do not place this product near a heat source;
6. Do not attempt to repair this product yourself, this work should be performed by authorized professionals;
7. Do not use it with overload. Please make sure that the 10A overcurrent protection circuit breaker on the front of this product is working properly before powering on. It is recommended that the stripping length of the terminal connecting wire is 6-8 mm;
8. This product should not be installed or fixed in a place that can be touched by human hands, such as outside the wall. It should be installed in an appliance or a hidden box;
9. The position of the fixed antenna should be as far away as possible from metal, wires and the module itself. (Applicable to external antenna models).

***

## Main Applications <a href="#shellyplus1-snsw-001x16eu-mainapplications" id="shellyplus1-snsw-001x16eu-mainapplications"></a>

* Residential
* MDU (Multi Dwelling Units - apartments, condominiums, hotels, etc.)
* Light commercial (small office buildings, small retail/restaurant/gas station, etc.)
* Government/municipal
* University/college

***

## Integrations <a href="#shellyplus1-snsw-001x16eu-integrations" id="shellyplus1-snsw-001x16eu-integrations"></a>

* Google Assistant
* Amazon Alexa
* Yandex Alice
* Baidu Xiaodu
* Tmall Genie

***

## Supported Load Types <a href="#shellyplus1-snsw-001x16eu-supportedloadtypes" id="shellyplus1-snsw-001x16eu-supportedloadtypes"></a>

* Incandescent bulb
* LED light

***

## Installation

{% hint style="danger" %}
Please make sure the main power switch is turned off before installation
{% endhint %}

{% hint style="danger" %}
Please do not connect the normal switch with neutral line, otherwise it will be permanently damaged.
{% endhint %}

1. Connect wires according to the wiring diagram;
2. Insert the module into the junction box;
3. Turn on the main power switch and add devices according to the [**quick setup.**](#quick-setup)

<figure><img src="https://3898863868-files.gitbook.io/~/files/v0/b/gitbook-x-prod.appspot.com/o/spaces%2F-MDHxt7lj9funy2SIeFB%2Fuploads%2FvdFcwHNV6jJoOXKSA6mC%2Finstall%20to%20the%20wall%20-%201.png?alt=media&amp;token=62270ef7-55d4-47ab-bd75-8ef523921b11" alt=""><figcaption><p>Insert into the junction box</p></figcaption></figure>

***

## Wiring Schematic

<figure><img src="https://3898863868-files.gitbook.io/~/files/v0/b/gitbook-x-prod.appspot.com/o/spaces%2F-MDHxt7lj9funy2SIeFB%2Fuploads%2F3WAwu2ZzAsaO3viQM1lw%2F1ch%20-%20Lno-neutral%20-%20without%20fitting.png?alt=media&amp;token=7002c3c8-f4c6-486e-a1ce-56c1c044e2d4" alt=""><figcaption><p>Without Fitting</p></figcaption></figure>

<figure><img src="https://3898863868-files.gitbook.io/~/files/v0/b/gitbook-x-prod.appspot.com/o/spaces%2F-MDHxt7lj9funy2SIeFB%2Fuploads%2FAWlHG1hA1RmsHiQ10gbg%2F1ch%20-%20Lno-neutral%20-%20with%20fitting.png?alt=media&amp;token=f0ba9ddb-6896-4752-9412-d773a9ac9d83" alt=""><figcaption><p>Connect with Fitting</p></figcaption></figure>

<figure><img src="https://3898863868-files.gitbook.io/~/files/v0/b/gitbook-x-prod.appspot.com/o/spaces%2F-MDHxt7lj9funy2SIeFB%2Fuploads%2FaDNOleyt9lbUiRV3sdHm%2F1ch%20-%20Lno-neutral%20-%201%203-way.png?alt=media&amp;token=2a2c992c-a9a1-4021-80f9-8e690f8bb240" alt=""><figcaption><p>Connect 2 3-way Switches</p></figcaption></figure>

{% hint style="success" %}
The mechanical switch can only be used with AC200 - 240V.
{% endhint %}

***

## Tech Specs <a href="#s4dtx" id="s4dtx"></a>

* Voltage: AC200 - 240V | 50/60Hz
* Dimensions: 39.2 x 39.2 x 18mm (without mounting clip) | 43 x 39.2 x 22.3mm (with mounting clip)&#x20;
* Wireless Standard: Zigbee 3.0
* Max. Load: 10 - 100W

<figure><img src="https://3898863868-files.gitbook.io/~/files/v0/b/gitbook-x-prod.appspot.com/o/spaces%2F-MDHxt7lj9funy2SIeFB%2Fuploads%2FBldcfXsEWy89au2EJTd6%2Fx2000px.png?alt=media&amp;token=2b65f422-155d-48cf-9880-7903b97df1bd" alt=""><figcaption><p>Size</p></figcaption></figure>

***

## Quick Setup

### 1. Register an account <a href="#izkpz" id="izkpz"></a>

<details>

<summary>Use the 'Smart Life' App</summary>

Please jump to the '[**Use Smart Life App**](/smart-life/user-manual-for-smart-life)' page to view

</details>

### 2. Add Device <a href="#pxw57" id="pxw57"></a>

Open the Smart Life App, open the control panel of the Zigbee gateway, click the '+' in the homepage, enter the add device page, select it, and follow the prompts

{% hint style="success" %}
**2 ways to put the module into network pairing mode**

* Press the reset key for about 5 seconds
* Press the traditional switch 5 times until the indicator light is flashing quickly

<img src="https://3898863868-files.gitbook.io/~/files/v0/b/gitbook-x-prod.appspot.com/o/spaces%2F-MDHxt7lj9funy2SIeFB%2Fuploads%2Fch7IStLZdbl4GJZIC5FT%2F1ch-zigbee%20-%20network%20pairing.png?alt=media&amp;token=bba8a66f-fa05-401f-940a-3dda207f31f9" alt="" data-size="original">
{% endhint %}

{% hint style="success" %}
If the addition fails, please press and hold the network configuration button again and try again.
{% endhint %}

### 3. Control the Device <a href="#kjvoo" id="kjvoo"></a>

Use the App to control. If you can control the device normally, it means the device is working properly.

***

## System Requirements

1. Wi-Fi Router&#x20;
2. ZigBee Gateway
3. iPhone, iPad (iOS 7.0 or higher) | Android Devices (4.0 or higher)

<figure><img src="https://3898863868-files.gitbook.io/~/files/v0/b/gitbook-x-prod.appspot.com/o/spaces%2F-MDHxt7lj9funy2SIeFB%2Fuploads%2Fdi751C8Vc8uJ4MF8nYkT%2Fzigbee%20system%20requirement.png?alt=media&amp;token=adbd75e3-cfae-4f7e-83ea-ce8d57727d0e" alt="" width="563"><figcaption></figcaption></figure>

***

## Indicator Light Status Description

| **Indicator Status** | **Description**              |
| -------------------- | ---------------------------- |
| Blue flashes quickly | Connecting the network       |
| Blue is always on    | Network connection is normal |
| Indicator off        | Device offline/disconnected  |

***

## Toxic and Hazardous Substances Statement

<table data-header-hidden data-full-width="false"><thead><tr><th width="141"></th><th width="91"></th><th width="89"></th><th width="87"></th><th width="96"></th><th width="105"></th><th></th></tr></thead><tbody><tr><td>Part Name</td><td>铅 (Pb)</td><td>汞 (Hg)</td><td>镉(Cd)</td><td>六价铬<br>(Cr(VI))</td><td>多溴联苯<br>(PBB)</td><td>多溴二苯醚<br>(PBDE)</td></tr><tr><td>Plastic Shell</td><td>O</td><td>O</td><td>O</td><td>O</td><td>O</td><td>O</td></tr><tr><td>Plastic bracket</td><td>O</td><td>O</td><td>O</td><td>O</td><td>O</td><td>O</td></tr><tr><td>Electronic Component</td><td>O</td><td>O</td><td>O</td><td>O</td><td>O</td><td>O</td></tr><tr><td>PCBA</td><td>O</td><td>O</td><td>O</td><td>O</td><td>O</td><td>O</td></tr><tr><td>Metal</td><td>O</td><td>O</td><td>O</td><td>O</td><td>O</td><td>O</td></tr></tbody></table>

This form is prepared in accordance with the provisions of SJ/T 11364.

* O: Indicates that the content of the hazardous substance in all homogeneous materials of this part is below the limit requirements specified in GB/T 26572.
* ×: Indicates that the content of the hazardous substance in at least one homogeneous material of this part exceeds the limit requirements specified in GB/T 26572.

***

## Instructions for Use of Micropower Equipment

1. The Wi-Fi technology used in this product complies with the technical requirements of general micropower equipment Class F equipment in the 'Micropower Short-range Radio Transmission Equipment Catalog and Technical Requirements' for data transmission applications. It adopts integrated antenna, control, adjustment and switch Please refer to the relevant content in the product manual for usage instructions;
2. You are not allowed to change the usage scenarios or conditions without authorization, expand the transmission frequency range, increase the transmission power (including installing additional RF power amplifiers), and you are not allowed to change the transmitting antenna without authorization;
3. Shall not cause harmful interference to other legal radio stations, nor shall it offer protection against harmful interference;
4. Should withstand interference from industrial, scientific and medical (ISM) application equipment that radiates radio frequency energy or other legitimate radio stations;
5. If it causes harmful interference to other legal radio stations (stations), you should stop using it immediately and take measures to eliminate the interference before continuing to use it;
6. In aircraft and in accordance with laws and regulations, relevant national regulations, and standards designated radio astronomy observatories, weather radar stations, satellite earth stations (including measurement and control, ranging, receiving, and navigation stations) and other military and civilian radio stations (stations), airports, etc. Micropower equipment used in electromagnetic environment protection areas must comply with the regulations of electromagnetic environment protection and relevant industry authorities;
7. It is prohibited to use all types of model remote controls within a radius of 5,000 meters with the center point of the airport runway as the center;
8. The operating temperature of micropower equipment is -10℃ - 40℃, and the power supply is AC100 - 240V | 50/60Hz

***

## Warranty Instructions

The after-sales service of this product is strictly in accordance with the "Consumer Rights and Interests Protection Law of the People's Republic of China" and the "Product Quality Law of the People's Republic of China" to implement after-sales three-guarantee service. The service content is as follows:

### Warranty Policy

During the validity period of the Three Guarantees, you can enjoy free returns, exchanges, and repair services in accordance with this provision. Returns, exchanges, and repairs should be handled with invoices.

1. Returns without reason within 7 days from the day after receipt (e-commerce purchase channel), the user will bear the logistics costs.
2. This product has performance failures listed in the "Product Performance Failure Table". After after-sales service testing and confirmation, you can enjoy the following services for free:

| Service Type | Service Policy                                                                    |
| ------------ | --------------------------------------------------------------------------------- |
| Return       | Return of product due to quality reasons within 7 days from the day after receipt |
| Exchange     | Exchange for product quality reasons within 15 days from the day after receipt    |
| Repair       | Repair due to product quality within 1 year from the day after receipt            |

{% hint style="info" %}
Friendly reminder: Since packaging boxes are required to ensure the safety of product transportation during transportation, it is recommended that you keep the packaging boxes for at least 30 days from the day after signing for the product.
{% endhint %}

### Non-warranty Regulations

1. Unauthorized repair, misuse, collision, neglect, abuse, liquid intrusion, accident, alteration, incorrect use of non-product accessories, or tearing, alteration of labels, and anti-counterfeiting marks;
2. The three-pack validity period has expired;
3. Damage caused by force majeure;
4. Failure to comply with the performance failures listed in the "Product Performance Failure Table";
5. This product and its accessories have performance failures listed in the "Product Performance Failure Table" due to human reasons.

***


# SML-02Z-L

User Manual for SML-02Z-L 2CH Zigbee Lno-neutral Switch Module

***

## Appearance

<figure><img src="https://3898863868-files.gitbook.io/~/files/v0/b/gitbook-x-prod.appspot.com/o/spaces%2F-MDHxt7lj9funy2SIeFB%2Fuploads%2FwyPTkXcJ72VIwVNxMkVH%2Fsml-02z-l-1000px.jpg?alt=media&amp;token=bef7e232-afde-4d06-b3f9-e4dbc25ce1fd" alt="" width="375"><figcaption><p>SML-02Z-L</p></figcaption></figure>

***

## Introduce <a href="#a7ulc" id="a7ulc"></a>

### Short Description <a href="#shellyplus1-snsw-001x16eu-shortdescription" id="shellyplus1-snsw-001x16eu-shortdescription"></a>

* SML-02Z-L is a small form factor smart switch which allows remote control of light through a mobile phone, tablet and home automation system.
* SML-02Z-L can be accessed, controlled and monitored remotely from any place where the user has internet connectivity, as long as the device is connected to a Zigee gateway and the Internet.
* It can be retrofitted into standard electrical wall boxes, behind power sockets and light switches or other places with limited space.

### Features <a href="#h4js5" id="h4js5"></a>

* App remote control - control the device anytime and anywhere through mobile App
* Smart linkage - In smart scene mode, linkage can be set to sound an alarm. The mobile App will also receive prompts, such as garage door open/close status, timeout notifications and overnight notifications, to remind you to close the garage door.
* Voice control - used with Amazon Echo, Google Home, Yandex, Tmall Genie
* Offline function - when the device is offline, the App will remind the device to go offline after 30 minutes
* Home Sharing - Create a smart home with your family
* Set a schedule - turn connected devices on and off at specified times
* Sharing feature - share with family members for joint control
* Supports Siri - This device is not compatible with HomeKit. But you can add click-to-run scenes to Siri shortcuts in the Smart Life App

***

## Safety Consultation and Precautions

1. The installation process of this product involves strong electricity and must be installed by professionals in accordance with electrical specifications and product instructions;
2. This product is for indoor use only, please do not use it in humid environments or outdoors;
3. This product is only suitable for safe use in areas below 2,000 meters above sea level;
4. Pay attention to moisture-proof, do not spill water or other liquids on this product;
5. Do not place this product near a heat source;
6. Do not attempt to repair this product yourself, this work should be performed by authorized professionals;
7. Do not use it with overload. Please make sure that the 10A overcurrent protection circuit breaker on the front of this product is working properly before powering on. It is recommended that the stripping length of the terminal connecting wire is 6-8 mm;
8. This product should not be installed or fixed in a place that can be touched by human hands, such as outside the wall. It should be installed in an appliance or a hidden box;
9. The position of the fixed antenna should be as far away as possible from metal, wires and the module itself. (Applicable to external antenna models).

***

## Main Applications <a href="#shellyplus1-snsw-001x16eu-mainapplications" id="shellyplus1-snsw-001x16eu-mainapplications"></a>

* Residential
* MDU (Multi Dwelling Units - apartments, condominiums, hotels, etc.)
* Light commercial (small office buildings, small retail/restaurant/gas station, etc.)
* Government/municipal
* University/college

***

## Integrations <a href="#shellyplus1-snsw-001x16eu-integrations" id="shellyplus1-snsw-001x16eu-integrations"></a>

* Google Assistant
* Amazon Alexa
* Yandex Alice
* Baidu Xiaodu
* Tmall Genie

***

## Supported Load Types <a href="#shellyplus1-snsw-001x16eu-supportedloadtypes" id="shellyplus1-snsw-001x16eu-supportedloadtypes"></a>

* Incandescent bulb
* LED light

***

## Installation

{% hint style="danger" %}
Please make sure the main power switch is turned off before installation
{% endhint %}

{% hint style="danger" %}
Please do not connect the normal switch with neutral line, otherwise it will be permanently damaged.
{% endhint %}

1. Connect wires according to the wiring diagram;
2. Insert the module into the junction box;
3. Turn on the main power switch and add devices according to the [**quick setup.**](#quick-setup)

<figure><img src="https://3898863868-files.gitbook.io/~/files/v0/b/gitbook-x-prod.appspot.com/o/spaces%2F-MDHxt7lj9funy2SIeFB%2Fuploads%2FdQ7dTAdyeGetY5btYv0P%2Finstall%20to%20the%20wall%20-%202.png?alt=media&amp;token=336ec27e-24a9-4048-bc69-2e08a7bc732c" alt=""><figcaption><p>Insert into the junction box</p></figcaption></figure>

***

## Wiring Schematic

<figure><img src="https://3898863868-files.gitbook.io/~/files/v0/b/gitbook-x-prod.appspot.com/o/spaces%2F-MDHxt7lj9funy2SIeFB%2Fuploads%2FJMCgb2EWK3JQb9BMZFgA%2F2ch%20-%20Lno-neutral%20-%20without%20fitting.png?alt=media&amp;token=3d835067-edcd-49fb-afdd-f661e203d349" alt=""><figcaption><p>Without Fitting</p></figcaption></figure>

<figure><img src="https://3898863868-files.gitbook.io/~/files/v0/b/gitbook-x-prod.appspot.com/o/spaces%2F-MDHxt7lj9funy2SIeFB%2Fuploads%2FQuw5V2LTu32CqMqxVevJ%2F2ch%20-%20Lno-neutral%20-%20with%20fitting.png?alt=media&amp;token=28791ff0-033b-4dfa-b39e-fbfb0bff1df7" alt=""><figcaption><p>Connect with Fitting</p></figcaption></figure>

<figure><img src="https://3898863868-files.gitbook.io/~/files/v0/b/gitbook-x-prod.appspot.com/o/spaces%2F-MDHxt7lj9funy2SIeFB%2Fuploads%2FKHAaBZSpVmbjveooo5Po%2F2ch%20-%20Lno-neutral%20-%20with%204%203-way%20switch.png?alt=media&amp;token=e862fc8b-05c0-4a91-bdf0-600ab4ae1fe7" alt=""><figcaption><p>Connect 4 3-way Switches</p></figcaption></figure>

{% hint style="success" %}
The mechanical switch can only be used with AC200 - 240V.
{% endhint %}

***

## Tech Specs <a href="#s4dtx" id="s4dtx"></a>

* Voltage: AC200 - 240V | 50/60Hz
* Dimensions: 39.2 x 39.2 x 18mm (without mounting clip) | 43 x 39.2 x 22.3mm (with mounting clip)&#x20;
* Wireless Standard: Zigbee 3.0
* Max. Load: 10 - 100W) x 2

<figure><img src="https://3898863868-files.gitbook.io/~/files/v0/b/gitbook-x-prod.appspot.com/o/spaces%2F-MDHxt7lj9funy2SIeFB%2Fuploads%2FVvk232aj1uBlKC6NcWUC%2F2ch%20-%20size.png?alt=media&amp;token=2d9dd954-0031-46c8-888f-31082100d94b" alt=""><figcaption><p>Size</p></figcaption></figure>

***

## Quick Setup

### 1. Register an account <a href="#izkpz" id="izkpz"></a>

<details>

<summary>Use the 'Smart Life' App</summary>

Please jump to the '[**Use Smart Life App**](/smart-life/user-manual-for-smart-life)' page to view

</details>

### 2. Add Device <a href="#pxw57" id="pxw57"></a>

Open the Smart Life App, open the control panel of the Zigbee gateway, click the '+' in the homepage, enter the add device page, select it, and follow the prompts

{% hint style="success" %}
**2 ways to put the module into network pairing mode**

* Press the reset key for about 5 seconds
* Press the traditional switch 5 times until the indicator light is flashing quickly

<img src="https://3898863868-files.gitbook.io/~/files/v0/b/gitbook-x-prod.appspot.com/o/spaces%2F-MDHxt7lj9funy2SIeFB%2Fuploads%2Fj87tEzn7qNZoTYwuVXgg%2F2CH%20-%20with%20zigbee%20gateway.png?alt=media&amp;token=d67c7674-231a-4d3e-9e2b-124c532cfa0b" alt="" data-size="original">
{% endhint %}

{% hint style="success" %}
If the addition fails, please press and hold the network configuration button again and try again.
{% endhint %}

### 3. Control the Device <a href="#kjvoo" id="kjvoo"></a>

Use the App to control. If you can control the device normally, it means the device is working properly.

***

## System Requirements

1. Wi-Fi Router&#x20;
2. ZigBee Gateway
3. iPhone, iPad (iOS 7.0 or higher) | Android Devices (4.0 or higher)

<figure><img src="https://3898863868-files.gitbook.io/~/files/v0/b/gitbook-x-prod.appspot.com/o/spaces%2F-MDHxt7lj9funy2SIeFB%2Fuploads%2Fdi751C8Vc8uJ4MF8nYkT%2Fzigbee%20system%20requirement.png?alt=media&amp;token=adbd75e3-cfae-4f7e-83ea-ce8d57727d0e" alt="" width="563"><figcaption></figcaption></figure>

***

## Indicator Light Status Description

| **Indicator Status** | **Description**              |
| -------------------- | ---------------------------- |
| Blue flashes quickly | Connecting the network       |
| Blue is always on    | Network connection is normal |
| Indicator off        | Device offline/disconnected  |

***

## Toxic and Hazardous Substances Statement

<table data-header-hidden data-full-width="false"><thead><tr><th width="141"></th><th width="91"></th><th width="89"></th><th width="87"></th><th width="96"></th><th width="105"></th><th></th></tr></thead><tbody><tr><td>Part Name</td><td>铅 (Pb)</td><td>汞 (Hg)</td><td>镉(Cd)</td><td>六价铬<br>(Cr(VI))</td><td>多溴联苯<br>(PBB)</td><td>多溴二苯醚<br>(PBDE)</td></tr><tr><td>Plastic Shell</td><td>O</td><td>O</td><td>O</td><td>O</td><td>O</td><td>O</td></tr><tr><td>Plastic bracket</td><td>O</td><td>O</td><td>O</td><td>O</td><td>O</td><td>O</td></tr><tr><td>Electronic Component</td><td>O</td><td>O</td><td>O</td><td>O</td><td>O</td><td>O</td></tr><tr><td>PCBA</td><td>O</td><td>O</td><td>O</td><td>O</td><td>O</td><td>O</td></tr><tr><td>Metal</td><td>O</td><td>O</td><td>O</td><td>O</td><td>O</td><td>O</td></tr></tbody></table>

This form is prepared in accordance with the provisions of SJ/T 11364.

* O: Indicates that the content of the hazardous substance in all homogeneous materials of this part is below the limit requirements specified in GB/T 26572.
* ×: Indicates that the content of the hazardous substance in at least one homogeneous material of this part exceeds the limit requirements specified in GB/T 26572.

***

## Instructions for Use of Micropower Equipment

1. The Wi-Fi technology used in this product complies with the technical requirements of general micropower equipment Class F equipment in the 'Micropower Short-range Radio Transmission Equipment Catalog and Technical Requirements' for data transmission applications. It adopts integrated antenna, control, adjustment and switch Please refer to the relevant content in the product manual for usage instructions;
2. You are not allowed to change the usage scenarios or conditions without authorization, expand the transmission frequency range, increase the transmission power (including installing additional RF power amplifiers), and you are not allowed to change the transmitting antenna without authorization;
3. Shall not cause harmful interference to other legal radio stations, nor shall it offer protection against harmful interference;
4. Should withstand interference from industrial, scientific and medical (ISM) application equipment that radiates radio frequency energy or other legitimate radio stations;
5. If it causes harmful interference to other legal radio stations (stations), you should stop using it immediately and take measures to eliminate the interference before continuing to use it;
6. In aircraft and in accordance with laws and regulations, relevant national regulations, and standards designated radio astronomy observatories, weather radar stations, satellite earth stations (including measurement and control, ranging, receiving, and navigation stations) and other military and civilian radio stations (stations), airports, etc. Micropower equipment used in electromagnetic environment protection areas must comply with the regulations of electromagnetic environment protection and relevant industry authorities;
7. It is prohibited to use all types of model remote controls within a radius of 5,000 meters with the center point of the airport runway as the center;
8. The operating temperature of micropower equipment is -10℃ - 40℃, and the power supply is AC100 - 240V | 50/60Hz

***

## Warranty Instructions

The after-sales service of this product is strictly in accordance with the "Consumer Rights and Interests Protection Law of the People's Republic of China" and the "Product Quality Law of the People's Republic of China" to implement after-sales three-guarantee service. The service content is as follows:

### Warranty Policy

During the validity period of the Three Guarantees, you can enjoy free returns, exchanges, and repair services in accordance with this provision. Returns, exchanges, and repairs should be handled with invoices.

1. Returns without reason within 7 days from the day after receipt (e-commerce purchase channel), the user will bear the logistics costs.
2. This product has performance failures listed in the "Product Performance Failure Table". After after-sales service testing and confirmation, you can enjoy the following services for free:

| Service Type | Service Policy                                                                    |
| ------------ | --------------------------------------------------------------------------------- |
| Return       | Return of product due to quality reasons within 7 days from the day after receipt |
| Exchange     | Exchange for product quality reasons within 15 days from the day after receipt    |
| Repair       | Repair due to product quality within 1 year from the day after receipt            |

{% hint style="info" %}
Friendly reminder: Since packaging boxes are required to ensure the safety of product transportation during transportation, it is recommended that you keep the packaging boxes for at least 30 days from the day after signing for the product.
{% endhint %}

### Non-warranty Regulations

1. Unauthorized repair, misuse, collision, neglect, abuse, liquid intrusion, accident, alteration, incorrect use of non-product accessories, or tearing, alteration of labels, and anti-counterfeiting marks;
2. The three-pack validity period has expired;
3. Damage caused by force majeure;
4. Failure to comply with the performance failures listed in the "Product Performance Failure Table";
5. This product and its accessories have performance failures listed in the "Product Performance Failure Table" due to human reasons.

***


# SML-03Z-L

User Manual for SML-03Z-L 3CH Zigbee Lno-neutral Switch Module

***

## Appearance

<figure><img src="https://3898863868-files.gitbook.io/~/files/v0/b/gitbook-x-prod.appspot.com/o/spaces%2F-MDHxt7lj9funy2SIeFB%2Fuploads%2FPr9vlqnsQnEzLF14tVk0%2Fsml-03z-l-1000px.jpg?alt=media&amp;token=2368aa0a-fda7-4f5a-9b90-31983ec18b61" alt="" width="375"><figcaption><p>SML-03Z-L</p></figcaption></figure>

***

## Introduce <a href="#a7ulc" id="a7ulc"></a>

### Short Description <a href="#shellyplus1-snsw-001x16eu-shortdescription" id="shellyplus1-snsw-001x16eu-shortdescription"></a>

* SML-03Z-L is a small form factor smart switch which allows remote control of light through a mobile phone, tablet and home automation system.
* SML-03Z-L can be accessed, controlled and monitored remotely from any place where the user has internet connectivity, as long as the device is connected to a Zigee gateway and the Internet.
* It can be retrofitted into standard electrical wall boxes, behind power sockets and light switches or other places with limited space.

### Features <a href="#h4js5" id="h4js5"></a>

* App remote control - control the device anytime and anywhere through mobile App
* Smart linkage - In smart scene mode, linkage can be set to sound an alarm. The mobile App will also receive prompts, such as garage door open/close status, timeout notifications and overnight notifications, to remind you to close the garage door.
* Voice control - used with Amazon Echo, Google Home, Yandex, Tmall Genie
* Offline function - when the device is offline, the App will remind the device to go offline after 30 minutes
* Home Sharing - Create a smart home with your family
* Set a schedule - turn connected devices on and off at specified times
* Sharing feature - share with family members for joint control
* Supports Siri - This device is not compatible with HomeKit. But you can add click-to-run scenes to Siri shortcuts in the Smart Life App

***

## Safety Consultation and Precautions

1. The installation process of this product involves strong electricity and must be installed by professionals in accordance with electrical specifications and product instructions;
2. This product is for indoor use only, please do not use it in humid environments or outdoors;
3. This product is only suitable for safe use in areas below 2,000 meters above sea level;
4. Pay attention to moisture-proof, do not spill water or other liquids on this product;
5. Do not place this product near a heat source;
6. Do not attempt to repair this product yourself, this work should be performed by authorized professionals;
7. Do not use it with overload. Please make sure that the 10A overcurrent protection circuit breaker on the front of this product is working properly before powering on. It is recommended that the stripping length of the terminal connecting wire is 6-8 mm;
8. This product should not be installed or fixed in a place that can be touched by human hands, such as outside the wall. It should be installed in an appliance or a hidden box;
9. The position of the fixed antenna should be as far away as possible from metal, wires and the module itself. (Applicable to external antenna models).

***

## Main Applications <a href="#shellyplus1-snsw-001x16eu-mainapplications" id="shellyplus1-snsw-001x16eu-mainapplications"></a>

* Residential
* MDU (Multi Dwelling Units - apartments, condominiums, hotels, etc.)
* Light commercial (small office buildings, small retail/restaurant/gas station, etc.)
* Government/municipal
* University/college

***

## Integrations <a href="#shellyplus1-snsw-001x16eu-integrations" id="shellyplus1-snsw-001x16eu-integrations"></a>

* Google Assistant
* Amazon Alexa
* Yandex Alice
* Baidu Xiaodu
* Tmall Genie

***

## Supported Load Types <a href="#shellyplus1-snsw-001x16eu-supportedloadtypes" id="shellyplus1-snsw-001x16eu-supportedloadtypes"></a>

* Incandescent bulb
* LED light

***

## Installation

{% hint style="danger" %}
Please make sure the main power switch is turned off before installation
{% endhint %}

{% hint style="danger" %}
Please do not connect the normal switch with neutral line, otherwise it will be permanently damaged.
{% endhint %}

1. Connect wires according to the wiring diagram;
2. Insert the module into the junction box;
3. Turn on the main power switch and add devices according to the [**quick setup.**](#quick-setup)

<figure><img src="https://3898863868-files.gitbook.io/~/files/v0/b/gitbook-x-prod.appspot.com/o/spaces%2F-MDHxt7lj9funy2SIeFB%2Fuploads%2FJRM6W5sRONNjjFOWdYI4%2Finstall%20to%20the%20wall%20-%203.png?alt=media&amp;token=54f09de9-3920-493f-a21d-250f037b479c" alt=""><figcaption><p>Insert into the junction box</p></figcaption></figure>

***

## Wiring Schematic

<figure><img src="https://3898863868-files.gitbook.io/~/files/v0/b/gitbook-x-prod.appspot.com/o/spaces%2F-MDHxt7lj9funy2SIeFB%2Fuploads%2Fa9kt5cxSJuy8qDmOgaC0%2F3ch%20-%20Lno-neutral%20-%20without%20fitting.png?alt=media&amp;token=7742e605-efe4-44d0-9e46-f0250477bbc4" alt=""><figcaption><p>Without Fitting</p></figcaption></figure>

<figure><img src="https://3898863868-files.gitbook.io/~/files/v0/b/gitbook-x-prod.appspot.com/o/spaces%2F-MDHxt7lj9funy2SIeFB%2Fuploads%2FOIpNqtkFXTLqnGMK426s%2F3ch%20-%20Lno-neutral%20-%20with%20fitting.png?alt=media&amp;token=d5422fd7-4e89-406c-afec-851fc7f11456" alt=""><figcaption><p>Connect with Fitting</p></figcaption></figure>

<figure><img src="https://3898863868-files.gitbook.io/~/files/v0/b/gitbook-x-prod.appspot.com/o/spaces%2F-MDHxt7lj9funy2SIeFB%2Fuploads%2F0L4Xv4kNRg0n82P0SdYx%2F3ch%20-%20Lno-neutral%20-%20with%206%203-way%20switch.png?alt=media&amp;token=12c6266e-8e09-44ed-b2fe-f4d4e3f06c54" alt=""><figcaption><p>Connect 6 3-way Switches</p></figcaption></figure>

{% hint style="success" %}
The mechanical switch can only be used with AC200 - 240V.
{% endhint %}

***

## Tech Specs <a href="#s4dtx" id="s4dtx"></a>

* Voltage: AC200 - 240V | 50/60Hz
* Dimensions: 39.2 x 39.2 x 18mm (without mounting clip) | 43 x 39.2 x 22.3mm (with mounting clip)&#x20;
* Wireless Standard: Zigbee 3.0
* Max. Load: 10 - 100W) x 3

<figure><img src="https://3898863868-files.gitbook.io/~/files/v0/b/gitbook-x-prod.appspot.com/o/spaces%2F-MDHxt7lj9funy2SIeFB%2Fuploads%2FVvk232aj1uBlKC6NcWUC%2F2ch%20-%20size.png?alt=media&amp;token=2d9dd954-0031-46c8-888f-31082100d94b" alt=""><figcaption><p>Size</p></figcaption></figure>

***

## Quick Setup

### 1. Register an account <a href="#izkpz" id="izkpz"></a>

<details>

<summary>Use the 'Smart Life' App</summary>

Please jump to the '[**Use Smart Life App**](/smart-life/user-manual-for-smart-life)' page to view

</details>

### 2. Add Device <a href="#pxw57" id="pxw57"></a>

Open the Smart Life App, open the control panel of the Zigbee gateway, click the '+' in the homepage, enter the add device page, select it, and follow the prompts

{% hint style="success" %}
**2 ways to put the module into network pairing mode**

* Press the reset key for about 5 seconds
* Press the traditional switch 5 times until the indicator light is flashing quickly

<img src="https://3898863868-files.gitbook.io/~/files/v0/b/gitbook-x-prod.appspot.com/o/spaces%2F-MDHxt7lj9funy2SIeFB%2Fuploads%2Fj87tEzn7qNZoTYwuVXgg%2F2CH%20-%20with%20zigbee%20gateway.png?alt=media&amp;token=d67c7674-231a-4d3e-9e2b-124c532cfa0b" alt="" data-size="original">
{% endhint %}

{% hint style="success" %}
If the addition fails, please press and hold the network configuration button again and try again.
{% endhint %}

### 3. Control the Device <a href="#kjvoo" id="kjvoo"></a>

Use the App to control. If you can control the device normally, it means the device is working properly.

***

## System Requirements

1. Wi-Fi Router&#x20;
2. ZigBee Gateway
3. iPhone, iPad (iOS 7.0 or higher) | Android Devices (4.0 or higher)

<figure><img src="https://3898863868-files.gitbook.io/~/files/v0/b/gitbook-x-prod.appspot.com/o/spaces%2F-MDHxt7lj9funy2SIeFB%2Fuploads%2Fdi751C8Vc8uJ4MF8nYkT%2Fzigbee%20system%20requirement.png?alt=media&amp;token=adbd75e3-cfae-4f7e-83ea-ce8d57727d0e" alt="" width="563"><figcaption></figcaption></figure>

***

## Indicator Light Status Description

| **Indicator Status** | **Description**              |
| -------------------- | ---------------------------- |
| Blue flashes quickly | Connecting the network       |
| Blue is always on    | Network connection is normal |
| Indicator off        | Device offline/disconnected  |

***

## Toxic and Hazardous Substances Statement

<table data-header-hidden data-full-width="false"><thead><tr><th width="141"></th><th width="91"></th><th width="89"></th><th width="87"></th><th width="96"></th><th width="105"></th><th></th></tr></thead><tbody><tr><td>Part Name</td><td>铅 (Pb)</td><td>汞 (Hg)</td><td>镉(Cd)</td><td>六价铬<br>(Cr(VI))</td><td>多溴联苯<br>(PBB)</td><td>多溴二苯醚<br>(PBDE)</td></tr><tr><td>Plastic Shell</td><td>O</td><td>O</td><td>O</td><td>O</td><td>O</td><td>O</td></tr><tr><td>Plastic bracket</td><td>O</td><td>O</td><td>O</td><td>O</td><td>O</td><td>O</td></tr><tr><td>Electronic Component</td><td>O</td><td>O</td><td>O</td><td>O</td><td>O</td><td>O</td></tr><tr><td>PCBA</td><td>O</td><td>O</td><td>O</td><td>O</td><td>O</td><td>O</td></tr><tr><td>Metal</td><td>O</td><td>O</td><td>O</td><td>O</td><td>O</td><td>O</td></tr></tbody></table>

This form is prepared in accordance with the provisions of SJ/T 11364.

* O: Indicates that the content of the hazardous substance in all homogeneous materials of this part is below the limit requirements specified in GB/T 26572.
* ×: Indicates that the content of the hazardous substance in at least one homogeneous material of this part exceeds the limit requirements specified in GB/T 26572.

***

## Instructions for Use of Micropower Equipment

1. The Wi-Fi technology used in this product complies with the technical requirements of general micropower equipment Class F equipment in the 'Micropower Short-range Radio Transmission Equipment Catalog and Technical Requirements' for data transmission applications. It adopts integrated antenna, control, adjustment and switch Please refer to the relevant content in the product manual for usage instructions;
2. You are not allowed to change the usage scenarios or conditions without authorization, expand the transmission frequency range, increase the transmission power (including installing additional RF power amplifiers), and you are not allowed to change the transmitting antenna without authorization;
3. Shall not cause harmful interference to other legal radio stations, nor shall it offer protection against harmful interference;
4. Should withstand interference from industrial, scientific and medical (ISM) application equipment that radiates radio frequency energy or other legitimate radio stations;
5. If it causes harmful interference to other legal radio stations (stations), you should stop using it immediately and take measures to eliminate the interference before continuing to use it;
6. In aircraft and in accordance with laws and regulations, relevant national regulations, and standards designated radio astronomy observatories, weather radar stations, satellite earth stations (including measurement and control, ranging, receiving, and navigation stations) and other military and civilian radio stations (stations), airports, etc. Micropower equipment used in electromagnetic environment protection areas must comply with the regulations of electromagnetic environment protection and relevant industry authorities;
7. It is prohibited to use all types of model remote controls within a radius of 5,000 meters with the center point of the airport runway as the center;
8. The operating temperature of micropower equipment is -10℃ - 40℃, and the power supply is AC100 - 240V | 50/60Hz

***

## Warranty Instructions

The after-sales service of this product is strictly in accordance with the "Consumer Rights and Interests Protection Law of the People's Republic of China" and the "Product Quality Law of the People's Republic of China" to implement after-sales three-guarantee service. The service content is as follows:

### Warranty Policy

During the validity period of the Three Guarantees, you can enjoy free returns, exchanges, and repair services in accordance with this provision. Returns, exchanges, and repairs should be handled with invoices.

1. Returns without reason within 7 days from the day after receipt (e-commerce purchase channel), the user will bear the logistics costs.
2. This product has performance failures listed in the "Product Performance Failure Table". After after-sales service testing and confirmation, you can enjoy the following services for free:

| Service Type | Service Policy                                                                    |
| ------------ | --------------------------------------------------------------------------------- |
| Return       | Return of product due to quality reasons within 7 days from the day after receipt |
| Exchange     | Exchange for product quality reasons within 15 days from the day after receipt    |
| Repair       | Repair due to product quality within 1 year from the day after receipt            |

{% hint style="info" %}
Friendly reminder: Since packaging boxes are required to ensure the safety of product transportation during transportation, it is recommended that you keep the packaging boxes for at least 30 days from the day after signing for the product.
{% endhint %}

### Non-warranty Regulations

1. Unauthorized repair, misuse, collision, neglect, abuse, liquid intrusion, accident, alteration, incorrect use of non-product accessories, or tearing, alteration of labels, and anti-counterfeiting marks;
2. The three-pack validity period has expired;
3. Damage caused by force majeure;
4. Failure to comply with the performance failures listed in the "Product Performance Failure Table";
5. This product and its accessories have performance failures listed in the "Product Performance Failure Table" due to human reasons.

***


# SMC-01Z

User Manual for SMC-01Z 1CH Zigbee Curtain Module

***

## Appearance

<figure><img src="https://3898863868-files.gitbook.io/~/files/v0/b/gitbook-x-prod.appspot.com/o/spaces%2F-MDHxt7lj9funy2SIeFB%2Fuploads%2Fg3XJAfFew1JXJ3qJuBKe%2Fsmc-01z-1000px.jpg?alt=media&amp;token=b3805647-0fef-40fc-8664-bcd02ac0be43" alt="" width="375"><figcaption><p>SMC-01Z</p></figcaption></figure>

***

## Introduce <a href="#a7ulc" id="a7ulc"></a>

### Short Description <a href="#shellyplus1-snsw-001x16eu-shortdescription" id="shellyplus1-snsw-001x16eu-shortdescription"></a>

* SMC-01Z is a small form factor smart switch which allows remote control of curtain/blind motors through a mobile phone, tablet and home automation system.
* SMC-01Z can be accessed, controlled and monitored remotely from any place where the user has internet connectivity, as long as the device is connected to a Zigbee gateway and the Internet.
* It can be retrofitted into standard electrical wall boxes, behind power sockets and light switches or other places with limited space.

### Features <a href="#h4js5" id="h4js5"></a>

* App remote control - control the device anytime and anywhere through mobile App
* Smart linkage - In smart scene mode, linkage can be set to sound an alarm. The mobile App will also receive prompts, such as garage door open/close status, timeout notifications and overnight notifications, to remind you to close the garage door.
* Voice control - used with Amazon Echo, Google Home, Yandex, Tmall Genie
* Offline function - when the device is offline, the App will remind the device to go offline after 30 minutes
* Home Sharing - Create a smart home with your family
* Set a schedule - turn connected devices on and off at specified times
* Sharing feature - share with family members for joint control
* Supports Siri - This device is not compatible with HomeKit. But you can add click-to-run scenes to Siri shortcuts in the Smart Life App

***

## Safety Consultation and Precautions

1. The installation process of this product involves strong electricity and must be installed by professionals in accordance with electrical specifications and product instructions;
2. This product is for indoor use only, please do not use it in humid environments or outdoors;
3. This product is only suitable for safe use in areas below 2,000 meters above sea level;
4. Pay attention to moisture-proof, do not spill water or other liquids on this product;
5. Do not place this product near a heat source;
6. Do not attempt to repair this product yourself, this work should be performed by authorized professionals;
7. Do not use it with overload. Please make sure that the 10A overcurrent protection circuit breaker on the front of this product is working properly before powering on. It is recommended that the stripping length of the terminal connecting wire is 6-8 mm;
8. This product should not be installed or fixed in a place that can be touched by human hands, such as outside the wall. It should be installed in an appliance or a hidden box;
9. The position of the fixed antenna should be as far away as possible from metal, wires and the module itself. (Applicable to external antenna models).

***

## Main Applications <a href="#shellyplus1-snsw-001x16eu-mainapplications" id="shellyplus1-snsw-001x16eu-mainapplications"></a>

* Residential
* MDU (Multi Dwelling Units - apartments, condominiums, hotels, etc.)
* Government/municipal
* University/college

***

## Integrations <a href="#shellyplus1-snsw-001x16eu-integrations" id="shellyplus1-snsw-001x16eu-integrations"></a>

* Google Assistant
* Amazon Alexa
* Yandex Alice
* Baidu Xiaodu
* Tmall Genie

***

## Supported Load Types <a href="#shellyplus1-snsw-001x16eu-supportedloadtypes" id="shellyplus1-snsw-001x16eu-supportedloadtypes"></a>

* Curtain Motor
* Blind Motor

***

## Installation

{% hint style="danger" %}
Please make sure the main power switch is turned off before installation
{% endhint %}

1. Connect wires according to the wiring diagram;
2. Insert the module into the junction box;
3. Turn on the main power switch and add devices according to the [**quick setup.**](#quick-setup)

<figure><img src="https://3898863868-files.gitbook.io/~/files/v0/b/gitbook-x-prod.appspot.com/o/spaces%2F-MDHxt7lj9funy2SIeFB%2Fuploads%2Fm9dMfSejS9yt0DPawY25%2Finstall%20to%20the%20wall.png?alt=media&amp;token=332b07b8-865b-42f2-9463-2f10738bfec5" alt=""><figcaption><p>Insert into the junction box</p></figcaption></figure>

***

## Wiring Schematic

<figure><img src="https://3898863868-files.gitbook.io/~/files/v0/b/gitbook-x-prod.appspot.com/o/spaces%2F-MDHxt7lj9funy2SIeFB%2Fuploads%2FB1Mcqb6hK5iM2q7HENxa%2F1ch%20curtain.png?alt=media&amp;token=a3e312e0-c535-494e-a70e-30e5e1cdb977" alt=""><figcaption><p>1CH Curtain Module</p></figcaption></figure>

{% hint style="success" %}
The mechanical switch can only be used with AC100 - 240V.
{% endhint %}

***

## Tech Specs <a href="#s4dtx" id="s4dtx"></a>

* Voltage: AC100 - 240V | 50/60Hz
* Dimensions: 39.2 x 39.2 x 18mm (without mounting clip) | 43 x 39.2 x 22.3mm (with mounting clip)&#x20;
* Wireless Standard: Zigbee 3.0
* Max. Load: 3A | 600W

<figure><img src="https://3898863868-files.gitbook.io/~/files/v0/b/gitbook-x-prod.appspot.com/o/spaces%2F-MDHxt7lj9funy2SIeFB%2Fuploads%2FBldcfXsEWy89au2EJTd6%2Fx2000px.png?alt=media&amp;token=2b65f422-155d-48cf-9880-7903b97df1bd" alt=""><figcaption><p>Size</p></figcaption></figure>

***

## Quick Setup

### 1. Register an account <a href="#izkpz" id="izkpz"></a>

<details>

<summary>Use the 'Smart Life' App</summary>

Please jump to the '[**Use Smart Life App**](/smart-life/user-manual-for-smart-life)' page to view

</details>

### 2. Add Device <a href="#pxw57" id="pxw57"></a>

Open the Smart Life App, click the '+' in the upper right corner of the homepage, enter the add device (accessory) page, select it, and follow the prompts

{% hint style="success" %}
**2 ways to put the module into network pairing mode**

* Press the reset key for about 10 seconds
* Press the traditional switch 10 seconds until the indicator light is flashing quickly

<img src="https://3898863868-files.gitbook.io/~/files/v0/b/gitbook-x-prod.appspot.com/o/spaces%2F-MDHxt7lj9funy2SIeFB%2Fuploads%2FoY9BCVD8M9wQgHrbVvSc%2F1ch%20zigbee%20curtain%20pair%20network.png?alt=media&amp;token=a3003810-d2a2-4a6f-87d8-155a351c4360" alt="" data-size="original">
{% endhint %}

{% hint style="success" %}
If the addition fails, please press and hold the network configuration button again and try again.
{% endhint %}

### 3. Control the Device <a href="#kjvoo" id="kjvoo"></a>

Use the App to control. If you can control the device normally, it means the device is working properly.

***

## Indicator Light Status Description

| **Indicator Status** | **Description**              |
| -------------------- | ---------------------------- |
| Blue flashes quickly | Connecting the network       |
| Blue is always on    | Network connection is normal |
| Indicator off        | Device offline/disconnected  |

***

## Toxic and Hazardous Substances Statement

<table data-header-hidden data-full-width="false"><thead><tr><th width="141"></th><th width="91"></th><th width="89"></th><th width="87"></th><th width="96"></th><th width="105"></th><th></th></tr></thead><tbody><tr><td>Part Name</td><td>铅 (Pb)</td><td>汞 (Hg)</td><td>镉(Cd)</td><td>六价铬<br>(Cr(VI))</td><td>多溴联苯<br>(PBB)</td><td>多溴二苯醚<br>(PBDE)</td></tr><tr><td>Plastic Shell</td><td>O</td><td>O</td><td>O</td><td>O</td><td>O</td><td>O</td></tr><tr><td>Plastic bracket</td><td>O</td><td>O</td><td>O</td><td>O</td><td>O</td><td>O</td></tr><tr><td>Electronic Component</td><td>O</td><td>O</td><td>O</td><td>O</td><td>O</td><td>O</td></tr><tr><td>PCBA</td><td>O</td><td>O</td><td>O</td><td>O</td><td>O</td><td>O</td></tr><tr><td>Metal</td><td>O</td><td>O</td><td>O</td><td>O</td><td>O</td><td>O</td></tr></tbody></table>

This form is prepared in accordance with the provisions of SJ/T 11364.

* O: Indicates that the content of the hazardous substance in all homogeneous materials of this part is below the limit requirements specified in GB/T 26572.
* ×: Indicates that the content of the hazardous substance in at least one homogeneous material of this part exceeds the limit requirements specified in GB/T 26572.

***

## Instructions for Use of Micropower Equipment

1. The Wi-Fi technology used in this product complies with the technical requirements of general micropower equipment Class F equipment in the 'Micropower Short-range Radio Transmission Equipment Catalog and Technical Requirements' for data transmission applications. It adopts integrated antenna, control, adjustment and switch Please refer to the relevant content in the product manual for usage instructions;
2. You are not allowed to change the usage scenarios or conditions without authorization, expand the transmission frequency range, increase the transmission power (including installing additional RF power amplifiers), and you are not allowed to change the transmitting antenna without authorization;
3. Shall not cause harmful interference to other legal radio stations, nor shall it offer protection against harmful interference;
4. Should withstand interference from industrial, scientific and medical (ISM) application equipment that radiates radio frequency energy or other legitimate radio stations;
5. If it causes harmful interference to other legal radio stations (stations), you should stop using it immediately and take measures to eliminate the interference before continuing to use it;
6. In aircraft and in accordance with laws and regulations, relevant national regulations, and standards designated radio astronomy observatories, weather radar stations, satellite earth stations (including measurement and control, ranging, receiving, and navigation stations) and other military and civilian radio stations (stations), airports, etc. Micropower equipment used in electromagnetic environment protection areas must comply with the regulations of electromagnetic environment protection and relevant industry authorities;
7. It is prohibited to use all types of model remote controls within a radius of 5,000 meters with the center point of the airport runway as the center;
8. The operating temperature of micropower equipment is -10℃ - 40℃, and the power supply is AC100 - 240V | 50/60Hz

***

## Warranty Instructions

The after-sales service of this product is strictly in accordance with the "Consumer Rights and Interests Protection Law of the People's Republic of China" and the "Product Quality Law of the People's Republic of China" to implement after-sales three-guarantee service. The service content is as follows:

### Warranty Policy

During the validity period of the Three Guarantees, you can enjoy free returns, exchanges, and repair services in accordance with this provision. Returns, exchanges, and repairs should be handled with invoices.

1. Returns without reason within 7 days from the day after receipt (e-commerce purchase channel), the user will bear the logistics costs.
2. This product has performance failures listed in the "Product Performance Failure Table". After after-sales service testing and confirmation, you can enjoy the following services for free:

| Service Type | Service Policy                                                                    |
| ------------ | --------------------------------------------------------------------------------- |
| Return       | Return of product due to quality reasons within 7 days from the day after receipt |
| Exchange     | Exchange for product quality reasons within 15 days from the day after receipt    |
| Repair       | Repair due to product quality within 1 year from the day after receipt            |

{% hint style="info" %}
Friendly reminder: Since packaging boxes are required to ensure the safety of product transportation during transportation, it is recommended that you keep the packaging boxes for at least 30 days from the day after signing for the product.
{% endhint %}

### Non-warranty Regulations

1. Unauthorized repair, misuse, collision, neglect, abuse, liquid intrusion, accident, alteration, incorrect use of non-product accessories, or tearing, alteration of labels, and anti-counterfeiting marks;
2. The three-pack validity period has expired;
3. Damage caused by force majeure;
4. Failure to comply with the performance failures listed in the "Product Performance Failure Table";
5. This product and its accessories have performance failures listed in the "Product Performance Failure Table" due to human reasons.

***


# SMC-02Z

User Manual for SMC-02Z 2CH Zigbee Curtain Module

***

## Appearance

<figure><img src="https://3898863868-files.gitbook.io/~/files/v0/b/gitbook-x-prod.appspot.com/o/spaces%2F-MDHxt7lj9funy2SIeFB%2Fuploads%2FxsenRpzPvq9Uka6cP2Q3%2Fsmc-02z-1000px.jpg?alt=media&amp;token=4ebd96c7-1ecc-4cc1-a294-c0793ae6ceda" alt="" width="375"><figcaption><p>SMC-02Z</p></figcaption></figure>

***

## Introduce <a href="#a7ulc" id="a7ulc"></a>

### Short Description <a href="#shellyplus1-snsw-001x16eu-shortdescription" id="shellyplus1-snsw-001x16eu-shortdescription"></a>

* SMC-02Z is a small form factor smart switch which allows remote control of curtain/blind motors through a mobile phone, tablet and home automation system.
* SMC-02Z can be accessed, controlled and monitored remotely from any place where the user has internet connectivity, as long as the device is connected to a Zigbee gateway and the Internet.
* It can be retrofitted into standard electrical wall boxes, behind power sockets and light switches or other places with limited space.

### Features <a href="#h4js5" id="h4js5"></a>

* App remote control - control the device anytime and anywhere through mobile App
* Smart linkage - In smart scene mode, linkage can be set to sound an alarm. The mobile App will also receive prompts, such as garage door open/close status, timeout notifications and overnight notifications, to remind you to close the garage door.
* Voice control - used with Amazon Echo, Google Home, Yandex, Tmall Genie
* Offline function - when the device is offline, the App will remind the device to go offline after 30 minutes
* Home Sharing - Create a smart home with your family
* Set a schedule - turn connected devices on and off at specified times
* Sharing feature - share with family members for joint control
* Supports Siri - This device is not compatible with HomeKit. But you can add click-to-run scenes to Siri shortcuts in the Smart Life App

***

## Safety Consultation and Precautions

1. The installation process of this product involves strong electricity and must be installed by professionals in accordance with electrical specifications and product instructions;
2. This product is for indoor use only, please do not use it in humid environments or outdoors;
3. This product is only suitable for safe use in areas below 2,000 meters above sea level;
4. Pay attention to moisture-proof, do not spill water or other liquids on this product;
5. Do not place this product near a heat source;
6. Do not attempt to repair this product yourself, this work should be performed by authorized professionals;
7. Do not use it with overload. Please make sure that the 10A overcurrent protection circuit breaker on the front of this product is working properly before powering on. It is recommended that the stripping length of the terminal connecting wire is 6-8 mm;
8. This product should not be installed or fixed in a place that can be touched by human hands, such as outside the wall. It should be installed in an appliance or a hidden box;
9. The position of the fixed antenna should be as far away as possible from metal, wires and the module itself. (Applicable to external antenna models).

***

## Main Applications <a href="#shellyplus1-snsw-001x16eu-mainapplications" id="shellyplus1-snsw-001x16eu-mainapplications"></a>

* Residential
* MDU (Multi Dwelling Units - apartments, condominiums, hotels, etc.)
* Government/municipal
* University/college

***

## Integrations <a href="#shellyplus1-snsw-001x16eu-integrations" id="shellyplus1-snsw-001x16eu-integrations"></a>

* Google Assistant
* Amazon Alexa
* Yandex Alice
* Baidu Xiaodu
* Tmall Genie

***

## Supported Load Types <a href="#shellyplus1-snsw-001x16eu-supportedloadtypes" id="shellyplus1-snsw-001x16eu-supportedloadtypes"></a>

* Curtain Motor
* Blind Motor

***

## Installation

{% hint style="danger" %}
Please make sure the main power switch is turned off before installation
{% endhint %}

1. Connect wires according to the wiring diagram;
2. Insert the module into the junction box;
3. Turn on the main power switch and add devices according to the [**quick setup.**](#quick-setup)

<figure><img src="https://3898863868-files.gitbook.io/~/files/v0/b/gitbook-x-prod.appspot.com/o/spaces%2F-MDHxt7lj9funy2SIeFB%2Fuploads%2FsRrwsABswF31EDBA1SGW%2F2ch%20curtain%20-%20into%20the%20wall.png?alt=media&amp;token=da946875-e21e-430c-a02a-da4bb4f3a840" alt=""><figcaption><p>Insert into the junction box</p></figcaption></figure>

***

## Wiring Schematic

<figure><img src="https://3898863868-files.gitbook.io/~/files/v0/b/gitbook-x-prod.appspot.com/o/spaces%2F-MDHxt7lj9funy2SIeFB%2Fuploads%2FaxMOkQdTtNC6zGB5gXJQ%2F2ch%20curtain.png?alt=media&amp;token=2e23cffd-f9e1-4c0d-8946-972bef01c5aa" alt=""><figcaption><p>2CH Curtain Module</p></figcaption></figure>

{% hint style="success" %}
The mechanical switch can only be used with AC100 - 240V.
{% endhint %}

***

## Tech Specs <a href="#s4dtx" id="s4dtx"></a>

* Voltage: AC100 - 240V | 50/60Hz
* Dimensions: 39.2 x 39.2 x 18mm (without mounting clip) | 43 x 39.2 x 22.3mm (with mounting clip)&#x20;
* Wireless Standard: Zigbee 3.0
* Max. Load: 3A | 600W) x 2

<figure><img src="https://3898863868-files.gitbook.io/~/files/v0/b/gitbook-x-prod.appspot.com/o/spaces%2F-MDHxt7lj9funy2SIeFB%2Fuploads%2FVvk232aj1uBlKC6NcWUC%2F2ch%20-%20size.png?alt=media&amp;token=2d9dd954-0031-46c8-888f-31082100d94b" alt=""><figcaption><p>Size</p></figcaption></figure>

***

## Quick Setup

### 1. Register an account <a href="#izkpz" id="izkpz"></a>

<details>

<summary>Use the 'Smart Life' App</summary>

Please jump to the '[**Use Smart Life App**](/smart-life/user-manual-for-smart-life)' page to view

</details>

### 2. Add Device <a href="#pxw57" id="pxw57"></a>

Open the Smart Life App, click the '+' in the upper right corner of the homepage, enter the add device (accessory) page, select it, and follow the prompts

{% hint style="success" %}
**2 ways to put the module into network pairing mode**

* Press the reset key for about 10 seconds
* Press the traditional switch 10 seconds until the indicator light is flashing quickly

<img src="https://3898863868-files.gitbook.io/~/files/v0/b/gitbook-x-prod.appspot.com/o/spaces%2F-MDHxt7lj9funy2SIeFB%2Fuploads%2F4eGWn5hqNv40g4Ak4WTb%2F2ch%20zigbee%20curtain%20pair%20network.png?alt=media&amp;token=5a48e6f3-0665-4d8d-ab0c-e915099be1cc" alt="" data-size="original">
{% endhint %}

{% hint style="success" %}
If the addition fails, please press and hold the network configuration button again and try again.
{% endhint %}

### 3. Control the Device <a href="#kjvoo" id="kjvoo"></a>

Use the App to control. If you can control the device normally, it means the device is working properly.

***

## Indicator Light Status Description

| **Indicator Status** | **Description**              |
| -------------------- | ---------------------------- |
| Blue flashes quickly | Connecting the network       |
| Blue is always on    | Network connection is normal |
| Indicator off        | Device offline/disconnected  |

***

## Toxic and Hazardous Substances Statement

<table data-header-hidden data-full-width="false"><thead><tr><th width="141"></th><th width="91"></th><th width="89"></th><th width="87"></th><th width="96"></th><th width="105"></th><th></th></tr></thead><tbody><tr><td>Part Name</td><td>铅 (Pb)</td><td>汞 (Hg)</td><td>镉(Cd)</td><td>六价铬<br>(Cr(VI))</td><td>多溴联苯<br>(PBB)</td><td>多溴二苯醚<br>(PBDE)</td></tr><tr><td>Plastic Shell</td><td>O</td><td>O</td><td>O</td><td>O</td><td>O</td><td>O</td></tr><tr><td>Plastic bracket</td><td>O</td><td>O</td><td>O</td><td>O</td><td>O</td><td>O</td></tr><tr><td>Electronic Component</td><td>O</td><td>O</td><td>O</td><td>O</td><td>O</td><td>O</td></tr><tr><td>PCBA</td><td>O</td><td>O</td><td>O</td><td>O</td><td>O</td><td>O</td></tr><tr><td>Metal</td><td>O</td><td>O</td><td>O</td><td>O</td><td>O</td><td>O</td></tr></tbody></table>

This form is prepared in accordance with the provisions of SJ/T 11364.

* O: Indicates that the content of the hazardous substance in all homogeneous materials of this part is below the limit requirements specified in GB/T 26572.
* ×: Indicates that the content of the hazardous substance in at least one homogeneous material of this part exceeds the limit requirements specified in GB/T 26572.

***

## Instructions for Use of Micropower Equipment

1. The Wi-Fi technology used in this product complies with the technical requirements of general micropower equipment Class F equipment in the 'Micropower Short-range Radio Transmission Equipment Catalog and Technical Requirements' for data transmission applications. It adopts integrated antenna, control, adjustment and switch Please refer to the relevant content in the product manual for usage instructions;
2. You are not allowed to change the usage scenarios or conditions without authorization, expand the transmission frequency range, increase the transmission power (including installing additional RF power amplifiers), and you are not allowed to change the transmitting antenna without authorization;
3. Shall not cause harmful interference to other legal radio stations, nor shall it offer protection against harmful interference;
4. Should withstand interference from industrial, scientific and medical (ISM) application equipment that radiates radio frequency energy or other legitimate radio stations;
5. If it causes harmful interference to other legal radio stations (stations), you should stop using it immediately and take measures to eliminate the interference before continuing to use it;
6. In aircraft and in accordance with laws and regulations, relevant national regulations, and standards designated radio astronomy observatories, weather radar stations, satellite earth stations (including measurement and control, ranging, receiving, and navigation stations) and other military and civilian radio stations (stations), airports, etc. Micropower equipment used in electromagnetic environment protection areas must comply with the regulations of electromagnetic environment protection and relevant industry authorities;
7. It is prohibited to use all types of model remote controls within a radius of 5,000 meters with the center point of the airport runway as the center;
8. The operating temperature of micropower equipment is -10℃ - 40℃, and the power supply is AC100 - 240V | 50/60Hz

***

## Warranty Instructions

The after-sales service of this product is strictly in accordance with the "Consumer Rights and Interests Protection Law of the People's Republic of China" and the "Product Quality Law of the People's Republic of China" to implement after-sales three-guarantee service. The service content is as follows:

### Warranty Policy

During the validity period of the Three Guarantees, you can enjoy free returns, exchanges, and repair services in accordance with this provision. Returns, exchanges, and repairs should be handled with invoices.

1. Returns without reason within 7 days from the day after receipt (e-commerce purchase channel), the user will bear the logistics costs.
2. This product has performance failures listed in the "Product Performance Failure Table". After after-sales service testing and confirmation, you can enjoy the following services for free:

| Service Type | Service Policy                                                                    |
| ------------ | --------------------------------------------------------------------------------- |
| Return       | Return of product due to quality reasons within 7 days from the day after receipt |
| Exchange     | Exchange for product quality reasons within 15 days from the day after receipt    |
| Repair       | Repair due to product quality within 1 year from the day after receipt            |

{% hint style="info" %}
Friendly reminder: Since packaging boxes are required to ensure the safety of product transportation during transportation, it is recommended that you keep the packaging boxes for at least 30 days from the day after signing for the product.
{% endhint %}

### Non-warranty Regulations

1. Unauthorized repair, misuse, collision, neglect, abuse, liquid intrusion, accident, alteration, incorrect use of non-product accessories, or tearing, alteration of labels, and anti-counterfeiting marks;
2. The three-pack validity period has expired;
3. Damage caused by force majeure;
4. Failure to comply with the performance failures listed in the "Product Performance Failure Table";
5. This product and its accessories have performance failures listed in the "Product Performance Failure Table" due to human reasons.

***


# SMD-01Z

User Manual for SMD-01Z 1CH Zigbee Dimmer Switch Module

***

## Appearance

<figure><img src="https://3898863868-files.gitbook.io/~/files/v0/b/gitbook-x-prod.appspot.com/o/spaces%2F-MDHxt7lj9funy2SIeFB%2Fuploads%2FJYagmLv4hjmeRzaniEkt%2Fsmd-01z-1000px.jpg?alt=media&amp;token=bb75c9dc-014a-48d0-b1e1-6b99beec37b9" alt="" width="375"><figcaption><p>SMD-01Z</p></figcaption></figure>

***

## Introduce <a href="#a7ulc" id="a7ulc"></a>

### Short Description <a href="#shellyplus1-snsw-001x16eu-shortdescription" id="shellyplus1-snsw-001x16eu-shortdescription"></a>

* SMD-01Z is a small form factor smart switch which allows remote control of light through a mobile phone, tablet and home automation system.
* SMD-01Z can be accessed, controlled and monitored remotely from any place where the user has internet connectivity, as long as the device is connected to a Zigee gateway and the Internet.
* It can be retrofitted into standard electrical wall boxes, behind power sockets and light switches or other places with limited space.

### Features <a href="#h4js5" id="h4js5"></a>

* App remote control - control the device anytime and anywhere through mobile App
* Smart linkage - In smart scene mode, linkage can be set to sound an alarm. The mobile App will also receive prompts, such as garage door open/close status, timeout notifications and overnight notifications, to remind you to close the garage door.
* Voice control - used with Amazon Echo, Google Home, Yandex, Tmall Genie
* Offline function - when the device is offline, the App will remind the device to go offline after 30 minutes
* Home Sharing - Create a smart home with your family
* Set a schedule - turn connected devices on and off at specified times
* Sharing feature - share with family members for joint control
* Supports Siri - This device is not compatible with HomeKit. But you can add click-to-run scenes to Siri shortcuts in the Smart Life App

***

## Safety Consultation and Precautions

1. The installation process of this product involves strong electricity and must be installed by professionals in accordance with electrical specifications and product instructions;
2. This product is for indoor use only, please do not use it in humid environments or outdoors;
3. This product is only suitable for safe use in areas below 2,000 meters above sea level;
4. Pay attention to moisture-proof, do not spill water or other liquids on this product;
5. Do not place this product near a heat source;
6. Do not attempt to repair this product yourself, this work should be performed by authorized professionals;
7. Do not use it with overload. Please make sure that the 10A overcurrent protection circuit breaker on the front of this product is working properly before powering on. It is recommended that the stripping length of the terminal connecting wire is 6-8 mm;
8. This product should not be installed or fixed in a place that can be touched by human hands, such as outside the wall. It should be installed in an appliance or a hidden box;
9. The position of the fixed antenna should be as far away as possible from metal, wires and the module itself. (Applicable to external antenna models).

***

## Main Applications <a href="#shellyplus1-snsw-001x16eu-mainapplications" id="shellyplus1-snsw-001x16eu-mainapplications"></a>

* Residential
* MDU (Multi Dwelling Units - apartments, condominiums, hotels, etc.)
* Light commercial (small office buildings, small retail/restaurant/gas station, etc.)
* Government/municipal
* University/college

***

## Integrations <a href="#shellyplus1-snsw-001x16eu-integrations" id="shellyplus1-snsw-001x16eu-integrations"></a>

* Google Assistant
* Amazon Alexa
* Yandex Alice
* Baidu Xiaodu
* Tmall Genie

***

## Supported Load Types <a href="#shellyplus1-snsw-001x16eu-supportedloadtypes" id="shellyplus1-snsw-001x16eu-supportedloadtypes"></a>

* Incandescent bulb
* LED light

***

## Installation

{% hint style="danger" %}
Please make sure the main power switch is turned off before installation
{% endhint %}

1. Connect wires according to the wiring diagram;
2. Insert the module into the junction box;
3. Turn on the main power switch and add devices according to the [**quick setup.**](#quick-setup)

<figure><img src="https://3898863868-files.gitbook.io/~/files/v0/b/gitbook-x-prod.appspot.com/o/spaces%2F-MDHxt7lj9funy2SIeFB%2Fuploads%2FvdFcwHNV6jJoOXKSA6mC%2Finstall%20to%20the%20wall%20-%201.png?alt=media&amp;token=62270ef7-55d4-47ab-bd75-8ef523921b11" alt=""><figcaption><p>Insert into the junction box</p></figcaption></figure>

***

## Wiring Schematic

<figure><img src="https://3898863868-files.gitbook.io/~/files/v0/b/gitbook-x-prod.appspot.com/o/spaces%2F-MDHxt7lj9funy2SIeFB%2Fuploads%2FXQFuKcIyUseqvp14ZhbZ%2F1ch%20-%20without%20switch.png?alt=media&amp;token=dbb0acb8-84a5-44e4-8127-432f175fe4ff" alt=""><figcaption><p>Without Switch</p></figcaption></figure>

<figure><img src="https://3898863868-files.gitbook.io/~/files/v0/b/gitbook-x-prod.appspot.com/o/spaces%2F-MDHxt7lj9funy2SIeFB%2Fuploads%2FVnMQAjf36JSYWatleh0z%2F1ch%20-%201%20switch.png?alt=media&amp;token=ddebd351-10a6-4c5b-b991-f6d74a8e7a98" alt=""><figcaption><p>Connect 1 Switch</p></figcaption></figure>

<figure><img src="https://3898863868-files.gitbook.io/~/files/v0/b/gitbook-x-prod.appspot.com/o/spaces%2F-MDHxt7lj9funy2SIeFB%2Fuploads%2F4zGE93NkO6ue7iYH58jc%2F1ch%20-%202%20switch.png?alt=media&amp;token=0912a5eb-93e7-4300-9df9-673a637e7a8e" alt=""><figcaption><p>Connect 2 3-way Switches</p></figcaption></figure>

{% hint style="success" %}
The mechanical switch can only be used with AC100 - 240V.
{% endhint %}

***

## Tech Specs <a href="#s4dtx" id="s4dtx"></a>

* Voltage: AC100 - 240V | 50/60Hz
* Dimensions: 39.2 x 39.2 x 18mm (without mounting clip) | 43 x 39.2 x 22.3mm (with mounting clip)&#x20;
* Wireless Standard: Zigbee 3.0
* Max. Load: LED 150W - 220V | LED 80W - 110V

<figure><img src="https://3898863868-files.gitbook.io/~/files/v0/b/gitbook-x-prod.appspot.com/o/spaces%2F-MDHxt7lj9funy2SIeFB%2Fuploads%2FBldcfXsEWy89au2EJTd6%2Fx2000px.png?alt=media&amp;token=2b65f422-155d-48cf-9880-7903b97df1bd" alt=""><figcaption><p>Size</p></figcaption></figure>

***

## Quick Setup

### 1. Register an account <a href="#izkpz" id="izkpz"></a>

<details>

<summary>Use the 'Smart Life' App</summary>

Please jump to the '[**Use Smart Life App**](/smart-life/user-manual-for-smart-life)' page to view

</details>

### 2. Add Device <a href="#pxw57" id="pxw57"></a>

Open the Smart Life App, open the control panel of the Zigbee gateway, click the '+' in the homepage, enter the add device page, select it, and follow the prompts

{% hint style="success" %}
**2 ways to put the module into network pairing mode**

* Press the reset key for about 10 seconds
* Press the traditional dimmer off 10 seconds until the indicator light is flashing quickly

<img src="https://3898863868-files.gitbook.io/~/files/v0/b/gitbook-x-prod.appspot.com/o/spaces%2F-MDHxt7lj9funy2SIeFB%2Fuploads%2Fch7IStLZdbl4GJZIC5FT%2F1ch-zigbee%20-%20network%20pairing.png?alt=media&amp;token=bba8a66f-fa05-401f-940a-3dda207f31f9" alt="" data-size="original">
{% endhint %}

{% hint style="success" %}
If the addition fails, please press and hold the network configuration button again and try again.
{% endhint %}

### 3. Control the Device <a href="#kjvoo" id="kjvoo"></a>

Use the App to control. If you can control the device normally, it means the device is working properly.

***

## System Requirements

1. Wi-Fi Router&#x20;
2. ZigBee Gateway
3. iPhone, iPad (iOS 7.0 or higher) | Android Devices (4.0 or higher)

<figure><img src="https://3898863868-files.gitbook.io/~/files/v0/b/gitbook-x-prod.appspot.com/o/spaces%2F-MDHxt7lj9funy2SIeFB%2Fuploads%2Fdi751C8Vc8uJ4MF8nYkT%2Fzigbee%20system%20requirement.png?alt=media&amp;token=adbd75e3-cfae-4f7e-83ea-ce8d57727d0e" alt="" width="563"><figcaption></figcaption></figure>

***

## Indicator Light Status Description

| **Indicator Status** | **Description**              |
| -------------------- | ---------------------------- |
| Blue flashes quickly | Connecting the network       |
| Blue is always on    | Network connection is normal |
| Indicator off        | Device offline/disconnected  |

***

## Toxic and Hazardous Substances Statement

<table data-header-hidden data-full-width="false"><thead><tr><th width="141"></th><th width="91"></th><th width="89"></th><th width="87"></th><th width="96"></th><th width="105"></th><th></th></tr></thead><tbody><tr><td>Part Name</td><td>铅 (Pb)</td><td>汞 (Hg)</td><td>镉(Cd)</td><td>六价铬<br>(Cr(VI))</td><td>多溴联苯<br>(PBB)</td><td>多溴二苯醚<br>(PBDE)</td></tr><tr><td>Plastic Shell</td><td>O</td><td>O</td><td>O</td><td>O</td><td>O</td><td>O</td></tr><tr><td>Plastic bracket</td><td>O</td><td>O</td><td>O</td><td>O</td><td>O</td><td>O</td></tr><tr><td>Electronic Component</td><td>O</td><td>O</td><td>O</td><td>O</td><td>O</td><td>O</td></tr><tr><td>PCBA</td><td>O</td><td>O</td><td>O</td><td>O</td><td>O</td><td>O</td></tr><tr><td>Metal</td><td>O</td><td>O</td><td>O</td><td>O</td><td>O</td><td>O</td></tr></tbody></table>

This form is prepared in accordance with the provisions of SJ/T 11364.

* O: Indicates that the content of the hazardous substance in all homogeneous materials of this part is below the limit requirements specified in GB/T 26572.
* ×: Indicates that the content of the hazardous substance in at least one homogeneous material of this part exceeds the limit requirements specified in GB/T 26572.

***

## Instructions for Use of Micropower Equipment

1. The Wi-Fi technology used in this product complies with the technical requirements of general micropower equipment Class F equipment in the 'Micropower Short-range Radio Transmission Equipment Catalog and Technical Requirements' for data transmission applications. It adopts integrated antenna, control, adjustment and switch Please refer to the relevant content in the product manual for usage instructions;
2. You are not allowed to change the usage scenarios or conditions without authorization, expand the transmission frequency range, increase the transmission power (including installing additional RF power amplifiers), and you are not allowed to change the transmitting antenna without authorization;
3. Shall not cause harmful interference to other legal radio stations, nor shall it offer protection against harmful interference;
4. Should withstand interference from industrial, scientific and medical (ISM) application equipment that radiates radio frequency energy or other legitimate radio stations;
5. If it causes harmful interference to other legal radio stations (stations), you should stop using it immediately and take measures to eliminate the interference before continuing to use it;
6. In aircraft and in accordance with laws and regulations, relevant national regulations, and standards designated radio astronomy observatories, weather radar stations, satellite earth stations (including measurement and control, ranging, receiving, and navigation stations) and other military and civilian radio stations (stations), airports, etc. Micropower equipment used in electromagnetic environment protection areas must comply with the regulations of electromagnetic environment protection and relevant industry authorities;
7. It is prohibited to use all types of model remote controls within a radius of 5,000 meters with the center point of the airport runway as the center;
8. The operating temperature of micropower equipment is -10℃ - 40℃, and the power supply is AC100 - 240V | 50/60Hz

***

## Warranty Instructions

The after-sales service of this product is strictly in accordance with the "Consumer Rights and Interests Protection Law of the People's Republic of China" and the "Product Quality Law of the People's Republic of China" to implement after-sales three-guarantee service. The service content is as follows:

### Warranty Policy

During the validity period of the Three Guarantees, you can enjoy free returns, exchanges, and repair services in accordance with this provision. Returns, exchanges, and repairs should be handled with invoices.

1. Returns without reason within 7 days from the day after receipt (e-commerce purchase channel), the user will bear the logistics costs.
2. This product has performance failures listed in the "Product Performance Failure Table". After after-sales service testing and confirmation, you can enjoy the following services for free:

| Service Type | Service Policy                                                                    |
| ------------ | --------------------------------------------------------------------------------- |
| Return       | Return of product due to quality reasons within 7 days from the day after receipt |
| Exchange     | Exchange for product quality reasons within 15 days from the day after receipt    |
| Repair       | Repair due to product quality within 1 year from the day after receipt            |

{% hint style="info" %}
Friendly reminder: Since packaging boxes are required to ensure the safety of product transportation during transportation, it is recommended that you keep the packaging boxes for at least 30 days from the day after signing for the product.
{% endhint %}

### Non-warranty Regulations

1. Unauthorized repair, misuse, collision, neglect, abuse, liquid intrusion, accident, alteration, incorrect use of non-product accessories, or tearing, alteration of labels, and anti-counterfeiting marks;
2. The three-pack validity period has expired;
3. Damage caused by force majeure;
4. Failure to comply with the performance failures listed in the "Product Performance Failure Table";
5. This product and its accessories have performance failures listed in the "Product Performance Failure Table" due to human reasons.

***


# SMD-02Z

User Manual for SMD-02Z 2CH Zigbee Dimmer Switch Module

***

## Appearance

<figure><img src="https://3898863868-files.gitbook.io/~/files/v0/b/gitbook-x-prod.appspot.com/o/spaces%2F-MDHxt7lj9funy2SIeFB%2Fuploads%2FGzPeOvuXvgnWw042Ktgl%2Fsmd-02z-1000px.jpg?alt=media&amp;token=a0a99d33-36ec-4a55-9de5-f71502291d16" alt="" width="375"><figcaption><p>SMD-02Z</p></figcaption></figure>

***

## Introduce <a href="#a7ulc" id="a7ulc"></a>

### Short Description <a href="#shellyplus1-snsw-001x16eu-shortdescription" id="shellyplus1-snsw-001x16eu-shortdescription"></a>

* SMD-02Z is a small form factor smart switch which allows remote control of light through a mobile phone, tablet and home automation system.
* SMD-02Z can be accessed, controlled and monitored remotely from any place where the user has internet connectivity, as long as the device is connected to a Zigee gateway and the Internet.
* It can be retrofitted into standard electrical wall boxes, behind power sockets and light switches or other places with limited space.

### Features <a href="#h4js5" id="h4js5"></a>

* App remote control - control the device anytime and anywhere through mobile App
* Smart linkage - In smart scene mode, linkage can be set to sound an alarm. The mobile App will also receive prompts, such as garage door open/close status, timeout notifications and overnight notifications, to remind you to close the garage door.
* Voice control - used with Amazon Echo, Google Home, Yandex, Tmall Genie
* Offline function - when the device is offline, the App will remind the device to go offline after 30 minutes
* Home Sharing - Create a smart home with your family
* Set a schedule - turn connected devices on and off at specified times
* Sharing feature - share with family members for joint control
* Supports Siri - This device is not compatible with HomeKit. But you can add click-to-run scenes to Siri shortcuts in the Smart Life App

***

## Safety Consultation and Precautions

1. The installation process of this product involves strong electricity and must be installed by professionals in accordance with electrical specifications and product instructions;
2. This product is for indoor use only, please do not use it in humid environments or outdoors;
3. This product is only suitable for safe use in areas below 2,000 meters above sea level;
4. Pay attention to moisture-proof, do not spill water or other liquids on this product;
5. Do not place this product near a heat source;
6. Do not attempt to repair this product yourself, this work should be performed by authorized professionals;
7. Do not use it with overload. Please make sure that the 10A overcurrent protection circuit breaker on the front of this product is working properly before powering on. It is recommended that the stripping length of the terminal connecting wire is 6-8 mm;
8. This product should not be installed or fixed in a place that can be touched by human hands, such as outside the wall. It should be installed in an appliance or a hidden box;
9. The position of the fixed antenna should be as far away as possible from metal, wires and the module itself. (Applicable to external antenna models).

***

## Main Applications <a href="#shellyplus1-snsw-001x16eu-mainapplications" id="shellyplus1-snsw-001x16eu-mainapplications"></a>

* Residential
* MDU (Multi Dwelling Units - apartments, condominiums, hotels, etc.)
* Light commercial (small office buildings, small retail/restaurant/gas station, etc.)
* Government/municipal
* University/college

***

## Integrations <a href="#shellyplus1-snsw-001x16eu-integrations" id="shellyplus1-snsw-001x16eu-integrations"></a>

* Google Assistant
* Amazon Alexa
* Yandex Alice
* Baidu Xiaodu
* Tmall Genie

***

## Supported Load Types <a href="#shellyplus1-snsw-001x16eu-supportedloadtypes" id="shellyplus1-snsw-001x16eu-supportedloadtypes"></a>

* Incandescent bulb
* LED light

***

## Installation

{% hint style="danger" %}
Please make sure the main power switch is turned off before installation
{% endhint %}

1. Connect wires according to the wiring diagram;
2. Insert the module into the junction box;
3. Turn on the main power switch and add devices according to the [**quick setup.**](#quick-setup)

<figure><img src="https://3898863868-files.gitbook.io/~/files/v0/b/gitbook-x-prod.appspot.com/o/spaces%2F-MDHxt7lj9funy2SIeFB%2Fuploads%2FdQ7dTAdyeGetY5btYv0P%2Finstall%20to%20the%20wall%20-%202.png?alt=media&amp;token=336ec27e-24a9-4048-bc69-2e08a7bc732c" alt=""><figcaption><p>Insert into the junction box</p></figcaption></figure>

***

## Wiring Schematic

<figure><img src="https://3898863868-files.gitbook.io/~/files/v0/b/gitbook-x-prod.appspot.com/o/spaces%2F-MDHxt7lj9funy2SIeFB%2Fuploads%2FEE1moGuvXq1tlR3iNu5j%2F2ch%20-%20without%20swith.png?alt=media&amp;token=b238fd94-0e87-48ba-aa23-792ed7f2a239" alt=""><figcaption><p>Without Switch</p></figcaption></figure>

<figure><img src="https://3898863868-files.gitbook.io/~/files/v0/b/gitbook-x-prod.appspot.com/o/spaces%2F-MDHxt7lj9funy2SIeFB%2Fuploads%2FVICWnrdlTybxSYj68805%2F2ch%20-%202switvh.png?alt=media&amp;token=603fa5e2-9c51-45d6-ad82-d9c08d72a1b3" alt=""><figcaption><p>Connect 2 Switches</p></figcaption></figure>

<figure><img src="https://3898863868-files.gitbook.io/~/files/v0/b/gitbook-x-prod.appspot.com/o/spaces%2F-MDHxt7lj9funy2SIeFB%2Fuploads%2FuHosUGOcAtibCx1Y2ggE%2F2ch%20-%204switch.png?alt=media&amp;token=8351e586-dc3b-4df6-a99d-19a3d1cf6ac7" alt=""><figcaption><p>Connect 4 3-way Switches</p></figcaption></figure>

{% hint style="success" %}
The mechanical switch can only be used with AC100 - 240V.
{% endhint %}

***

## Tech Specs <a href="#s4dtx" id="s4dtx"></a>

* Voltage: AC100 - 240V | 50/60Hz
* Dimensions: 39.2 x 39.2 x 18mm (without mounting clip) | 43 x 39.2 x 22.3mm (with mounting clip)&#x20;
* Wireless Standard: Zigbee 3.0
* Max. Load: LED 150W - 220V | LED 80W - 110V) x 2

<figure><img src="https://3898863868-files.gitbook.io/~/files/v0/b/gitbook-x-prod.appspot.com/o/spaces%2F-MDHxt7lj9funy2SIeFB%2Fuploads%2FVvk232aj1uBlKC6NcWUC%2F2ch%20-%20size.png?alt=media&amp;token=2d9dd954-0031-46c8-888f-31082100d94b" alt=""><figcaption><p>Size</p></figcaption></figure>

***

## Quick Setup

### 1. Register an account <a href="#izkpz" id="izkpz"></a>

<details>

<summary>Use the 'Smart Life' App</summary>

Please jump to the '[**Use Smart Life App**](/smart-life/user-manual-for-smart-life)' page to view

</details>

### 2. Add Device <a href="#pxw57" id="pxw57"></a>

Open the Smart Life App, open the control panel of the Zigbee gateway, click the '+' in the homepage, enter the add device page, select it, and follow the prompts

{% hint style="success" %}
**2 ways to put the module into network pairing mode**

* Press the reset key for about 10 seconds
* Press the traditional dimmer off 10 seconds until the indicator light is flashing quickly

<img src="https://3898863868-files.gitbook.io/~/files/v0/b/gitbook-x-prod.appspot.com/o/spaces%2F-MDHxt7lj9funy2SIeFB%2Fuploads%2Fj87tEzn7qNZoTYwuVXgg%2F2CH%20-%20with%20zigbee%20gateway.png?alt=media&amp;token=d67c7674-231a-4d3e-9e2b-124c532cfa0b" alt="" data-size="original">
{% endhint %}

{% hint style="success" %}
If the addition fails, please press and hold the network configuration button again and try again.
{% endhint %}

### 3. Control the Device <a href="#kjvoo" id="kjvoo"></a>

Use the App to control. If you can control the device normally, it means the device is working properly.

***

## System Requirements

1. Wi-Fi Router&#x20;
2. ZigBee Gateway
3. iPhone, iPad (iOS 7.0 or higher) | Android Devices (4.0 or higher)

<figure><img src="https://3898863868-files.gitbook.io/~/files/v0/b/gitbook-x-prod.appspot.com/o/spaces%2F-MDHxt7lj9funy2SIeFB%2Fuploads%2Fdi751C8Vc8uJ4MF8nYkT%2Fzigbee%20system%20requirement.png?alt=media&amp;token=adbd75e3-cfae-4f7e-83ea-ce8d57727d0e" alt="" width="563"><figcaption></figcaption></figure>

***

## Indicator Light Status Description

| **Indicator Status** | **Description**              |
| -------------------- | ---------------------------- |
| Blue flashes quickly | Connecting the network       |
| Blue is always on    | Network connection is normal |
| Indicator off        | Device offline/disconnected  |

***

## Toxic and Hazardous Substances Statement

<table data-header-hidden data-full-width="false"><thead><tr><th width="141"></th><th width="91"></th><th width="89"></th><th width="87"></th><th width="96"></th><th width="105"></th><th></th></tr></thead><tbody><tr><td>Part Name</td><td>铅 (Pb)</td><td>汞 (Hg)</td><td>镉(Cd)</td><td>六价铬<br>(Cr(VI))</td><td>多溴联苯<br>(PBB)</td><td>多溴二苯醚<br>(PBDE)</td></tr><tr><td>Plastic Shell</td><td>O</td><td>O</td><td>O</td><td>O</td><td>O</td><td>O</td></tr><tr><td>Plastic bracket</td><td>O</td><td>O</td><td>O</td><td>O</td><td>O</td><td>O</td></tr><tr><td>Electronic Component</td><td>O</td><td>O</td><td>O</td><td>O</td><td>O</td><td>O</td></tr><tr><td>PCBA</td><td>O</td><td>O</td><td>O</td><td>O</td><td>O</td><td>O</td></tr><tr><td>Metal</td><td>O</td><td>O</td><td>O</td><td>O</td><td>O</td><td>O</td></tr></tbody></table>

This form is prepared in accordance with the provisions of SJ/T 11364.

* O: Indicates that the content of the hazardous substance in all homogeneous materials of this part is below the limit requirements specified in GB/T 26572.
* ×: Indicates that the content of the hazardous substance in at least one homogeneous material of this part exceeds the limit requirements specified in GB/T 26572.

***

## Instructions for Use of Micropower Equipment

1. The Wi-Fi technology used in this product complies with the technical requirements of general micropower equipment Class F equipment in the 'Micropower Short-range Radio Transmission Equipment Catalog and Technical Requirements' for data transmission applications. It adopts integrated antenna, control, adjustment and switch Please refer to the relevant content in the product manual for usage instructions;
2. You are not allowed to change the usage scenarios or conditions without authorization, expand the transmission frequency range, increase the transmission power (including installing additional RF power amplifiers), and you are not allowed to change the transmitting antenna without authorization;
3. Shall not cause harmful interference to other legal radio stations, nor shall it offer protection against harmful interference;
4. Should withstand interference from industrial, scientific and medical (ISM) application equipment that radiates radio frequency energy or other legitimate radio stations;
5. If it causes harmful interference to other legal radio stations (stations), you should stop using it immediately and take measures to eliminate the interference before continuing to use it;
6. In aircraft and in accordance with laws and regulations, relevant national regulations, and standards designated radio astronomy observatories, weather radar stations, satellite earth stations (including measurement and control, ranging, receiving, and navigation stations) and other military and civilian radio stations (stations), airports, etc. Micropower equipment used in electromagnetic environment protection areas must comply with the regulations of electromagnetic environment protection and relevant industry authorities;
7. It is prohibited to use all types of model remote controls within a radius of 5,000 meters with the center point of the airport runway as the center;
8. The operating temperature of micropower equipment is -10℃ - 40℃, and the power supply is AC100 - 240V | 50/60Hz

***

## Warranty Instructions

The after-sales service of this product is strictly in accordance with the "Consumer Rights and Interests Protection Law of the People's Republic of China" and the "Product Quality Law of the People's Republic of China" to implement after-sales three-guarantee service. The service content is as follows:

### Warranty Policy

During the validity period of the Three Guarantees, you can enjoy free returns, exchanges, and repair services in accordance with this provision. Returns, exchanges, and repairs should be handled with invoices.

1. Returns without reason within 7 days from the day after receipt (e-commerce purchase channel), the user will bear the logistics costs.
2. This product has performance failures listed in the "Product Performance Failure Table". After after-sales service testing and confirmation, you can enjoy the following services for free:

| Service Type | Service Policy                                                                    |
| ------------ | --------------------------------------------------------------------------------- |
| Return       | Return of product due to quality reasons within 7 days from the day after receipt |
| Exchange     | Exchange for product quality reasons within 15 days from the day after receipt    |
| Repair       | Repair due to product quality within 1 year from the day after receipt            |

{% hint style="info" %}
Friendly reminder: Since packaging boxes are required to ensure the safety of product transportation during transportation, it is recommended that you keep the packaging boxes for at least 30 days from the day after signing for the product.
{% endhint %}

### Non-warranty Regulations

1. Unauthorized repair, misuse, collision, neglect, abuse, liquid intrusion, accident, alteration, incorrect use of non-product accessories, or tearing, alteration of labels, and anti-counterfeiting marks;
2. The three-pack validity period has expired;
3. Damage caused by force majeure;
4. Failure to comply with the performance failures listed in the "Product Performance Failure Table";
5. This product and its accessories have performance failures listed in the "Product Performance Failure Table" due to human reasons.

***


# SMG-01Z

User Manual for SMG-01Z Zigbee Garage Door Opener

***

## Appearance

<figure><img src="https://3898863868-files.gitbook.io/~/files/v0/b/gitbook-x-prod.appspot.com/o/spaces%2F-MDHxt7lj9funy2SIeFB%2Fuploads%2FZrHTMNOZzXKsL5WV6pj0%2Fsmg-01z-1000px.jpg?alt=media&amp;token=7384a041-fa02-4bd1-895b-5512c510baa3" alt="" width="375"><figcaption><p>SMG-01Z</p></figcaption></figure>

***

## Introduce <a href="#a7ulc" id="a7ulc"></a>

### Features <a href="#h4js5" id="h4js5"></a>

* App remote control - control the device anytime and anywhere through mobile App
* Smart linkage - In smart scene mode, linkage can be set to sound an alarm. The mobile App will also receive prompts, such as garage door open/close status, timeout notifications and overnight notifications, to remind you to close the garage door.
* Voice control - used with Amazon Echo, Google Home, Yandex, Tmall Genie
* History - You can view the history of your garage door switch
* Offline function - when the device is offline, the App will remind the device to go offline after 30 minutes
* Home Sharing - Create a smart home with your family
* Set a schedule - turn connected devices on and off at specified times
* Sharing feature - share with family members for joint control
* Supports Siri - This device is not compatible with HomeKit. But you can add click-to-run scenes to Siri shortcuts in the Smart Life App

***

## Safety consultation and precautions

1. The installation process of this product involves strong electricity and must be installed by professionals in accordance with electrical specifications and product instructions;
2. This product is for indoor use only, please do not use it in humid environments or outdoors;
3. This product is only suitable for safe use in areas below 2,000 meters above sea level;
4. Pay attention to moisture-proof, do not spill water or other liquids on this product;
5. Do not place this product near a heat source;
6. Do not attempt to repair this product yourself, this work should be performed by authorized professionals;
7. Do not use it with overload. Please make sure that the 10A overcurrent protection circuit breaker on the front of this product is working properly before powering on. It is recommended that the stripping length of the terminal connecting wire is 6-8 mm;
8. This product should not be installed or fixed in a place that can be touched by human hands, such as outside the wall. It should be installed in an appliance or a hidden box;
9. The position of the fixed antenna should be as far away as possible from metal, wires and the module itself. (Applicable to external antenna models).

***

## Installation

{% hint style="danger" %}
Please make sure the main power switch is turned off before installation
{% endhint %}

1. Use a screwdriver to loosen the screws of the equipment terminal, and connect the neutral wire to the N hole and the live wire to the L hole as shown in the figure; S1 and S2 are connected to the signal wire and the switch; S3 and S4 are connected to the induction door sensor;
2. Turn on the main power switch and add devices according to the [**quick setup.**](#quick-setup)

***

## Wiring Schematic

<figure><img src="https://3898863868-files.gitbook.io/~/files/v0/b/gitbook-x-prod.appspot.com/o/spaces%2F-MDHxt7lj9funy2SIeFB%2Fuploads%2Fa0T7q9e7sbTvHqSTBTBj%2Fsmg-01wb.png?alt=media&amp;token=8caaf01b-7b7d-443c-9985-8cfdbe38c958" alt=""><figcaption><p>SMG-01WB</p></figcaption></figure>

{% hint style="success" %}
The mechanical switch can only be used with DC12V or below, and has no function with AC voltage.
{% endhint %}

***

## Tech Specs <a href="#s4dtx" id="s4dtx"></a>

* Voltage: AC100 - 250V | 50/60Hz
* Dimensions: 39.2 x 39.2 x 18mm (without mounting clip) | 43 x 39.2 x 22.3mm (with mounting clip)
* Wireless Standard: Zigbee 3.0
* Cable length: 5 meters

***

## Quick Setup

### 1. Register an account <a href="#izkpz" id="izkpz"></a>

<details>

<summary>Use the 'Smart Life' App</summary>

Please jump to the '[**Use Smart Life App**](/smart-life/user-manual-for-smart-life)' page to view

</details>

### 2. Add Device <a href="#pxw57" id="pxw57"></a>

Open the Smart Life App, open the control panel of the Zigbee gateway, click the '+' in the homepage, enter the add device page, select it, and follow the prompts

{% hint style="success" %}
Press the reset key for about 10 seconds to put the module into network pairing mode

<img src="https://3898863868-files.gitbook.io/~/files/v0/b/gitbook-x-prod.appspot.com/o/spaces%2F-MDHxt7lj9funy2SIeFB%2Fuploads%2FAPp9RGedS1PMD8CW84lz%2Fzigbee%20garage%20pair%20network.png?alt=media&amp;token=ae696e79-a097-4625-b9b4-1188965a29f5" alt="" data-size="original">
{% endhint %}

{% hint style="success" %}
If the addition fails, please press and hold the network configuration button again and try again.
{% endhint %}

### 3. Control the Device <a href="#kjvoo" id="kjvoo"></a>

Use the App to control. If you can control the device normally, it means the device is working properly.

***

## Indicator Light Status Description

| **Indicator Status** | **Description**              |
| -------------------- | ---------------------------- |
| Blue flashes quickly | Connecting the network       |
| Blue is always on    | Network connection is normal |
| Indicator off        | Device offline/disconnected  |

***

## Toxic and Hazardous Substances Statement

<table data-header-hidden data-full-width="false"><thead><tr><th width="141"></th><th width="91"></th><th width="89"></th><th width="87"></th><th width="96"></th><th width="105"></th><th></th></tr></thead><tbody><tr><td>Part Name</td><td>铅 (Pb)</td><td>汞 (Hg)</td><td>镉(Cd)</td><td>六价铬<br>(Cr(VI))</td><td>多溴联苯<br>(PBB)</td><td>多溴二苯醚<br>(PBDE)</td></tr><tr><td>Plastic Shell</td><td>O</td><td>O</td><td>O</td><td>O</td><td>O</td><td>O</td></tr><tr><td>Plastic bracket</td><td>O</td><td>O</td><td>O</td><td>O</td><td>O</td><td>O</td></tr><tr><td>Electronic Component</td><td>O</td><td>O</td><td>O</td><td>O</td><td>O</td><td>O</td></tr><tr><td>PCBA</td><td>O</td><td>O</td><td>O</td><td>O</td><td>O</td><td>O</td></tr><tr><td>Metal</td><td>O</td><td>O</td><td>O</td><td>O</td><td>O</td><td>O</td></tr></tbody></table>

This form is prepared in accordance with the provisions of SJ/T 11364.

* O: Indicates that the content of the hazardous substance in all homogeneous materials of this part is below the limit requirements specified in GB/T 26572.
* ×: Indicates that the content of the hazardous substance in at least one homogeneous material of this part exceeds the limit requirements specified in GB/T 26572.

***

## Instructions for Use of Micropower Equipment

1. The Wi-Fi technology used in this product complies with the technical requirements of general micropower equipment Class F equipment in the 'Micropower Short-range Radio Transmission Equipment Catalog and Technical Requirements' for data transmission applications. It adopts integrated antenna, control, adjustment and switch Please refer to the relevant content in the product manual for usage instructions;
2. You are not allowed to change the usage scenarios or conditions without authorization, expand the transmission frequency range, increase the transmission power (including installing additional RF power amplifiers), and you are not allowed to change the transmitting antenna without authorization;
3. Shall not cause harmful interference to other legal radio stations, nor shall it offer protection against harmful interference;
4. Should withstand interference from industrial, scientific and medical (ISM) application equipment that radiates radio frequency energy or other legitimate radio stations;
5. If it causes harmful interference to other legal radio stations (stations), you should stop using it immediately and take measures to eliminate the interference before continuing to use it;
6. In aircraft and in accordance with laws and regulations, relevant national regulations, and standards designated radio astronomy observatories, weather radar stations, satellite earth stations (including measurement and control, ranging, receiving, and navigation stations) and other military and civilian radio stations (stations), airports, etc. Micropower equipment used in electromagnetic environment protection areas must comply with the regulations of electromagnetic environment protection and relevant industry authorities;
7. It is prohibited to use all types of model remote controls within a radius of 5,000 meters with the center point of the airport runway as the center;
8. The operating temperature of micropower equipment is -10℃ - 40℃, and the power supply is 220 V AC, 10 A; 24 - 38 V DC, 10A; 38 - 60 V DC, 1A.

***

## Warranty Instructions

The after-sales service of this product is strictly in accordance with the "Consumer Rights and Interests Protection Law of the People's Republic of China" and the "Product Quality Law of the People's Republic of China" to implement after-sales three-guarantee service. The service content is as follows:

### Warranty Policy

During the validity period of the Three Guarantees, you can enjoy free returns, exchanges, and repair services in accordance with this provision. Returns, exchanges, and repairs should be handled with invoices.

1. Returns without reason within 7 days from the day after receipt (e-commerce purchase channel), the user will bear the logistics costs.
2. This product has performance failures listed in the "Product Performance Failure Table". After after-sales service testing and confirmation, you can enjoy the following services for free:

| Service Type | Service Policy                                                                    |
| ------------ | --------------------------------------------------------------------------------- |
| Return       | Return of product due to quality reasons within 7 days from the day after receipt |
| Exchange     | Exchange for product quality reasons within 15 days from the day after receipt    |
| Repair       | Repair due to product quality within 1 year from the day after receipt            |

{% hint style="info" %}
Friendly reminder: Since packaging boxes are required to ensure the safety of product transportation during transportation, it is recommended that you keep the packaging boxes for at least 30 days from the day after signing for the product.
{% endhint %}

### Non-warranty Regulations

1. Unauthorized repair, misuse, collision, neglect, abuse, liquid intrusion, accident, alteration, incorrect use of non-product accessories, or tearing, alteration of labels, and anti-counterfeiting marks;
2. The three-pack validity period has expired;
3. Damage caused by force majeure;
4. Failure to comply with the performance failures listed in the "Product Performance Failure Table";
5. This product and its accessories have performance failures listed in the "Product Performance Failure Table" due to human reasons.

***


# SMS-01Z & SMS-02Z

User Manual for SMS-01Z 1CH & SMS-02Z 2CH Zigbee Single-phase Clamp

***

## Appearance

<figure><img src="https://3898863868-files.gitbook.io/~/files/v0/b/gitbook-x-prod.appspot.com/o/spaces%2F-MDHxt7lj9funy2SIeFB%2Fuploads%2F8JHmLDNyVjL6HlwM7dkc%2Fsml-01wb-1000px.jpg?alt=media&amp;token=7023d6a6-640c-405d-88fb-ea5d046d7b91" alt="" width="375"><figcaption><p>SMS-01Z</p></figcaption></figure>

***

## Introduce <a href="#a7ulc" id="a7ulc"></a>

### Short Description <a href="#shellyplus1-snsw-001x16eu-shortdescription" id="shellyplus1-snsw-001x16eu-shortdescription"></a>

* SMS-01Z & SMS-02Z Single Phase Clamp helps you monitor the amount of electricity usage in our facility by connecting the clamp to the power cable. It can measure voltage, current, power factor, and active power. Single-phase power clamps are commonly used by electricians, technicians, and engineers to troubleshoot electrical problems, monitor power consumption, and verify the performance of electrical equipment. They are also used in energy audits to identify areas of energy waste and potential cost savings.
* SMS-01WB & SMS-01WB can be accessed, controlled and monitored remotely from any place where the user has internet connectivity, as long as the device is connected to a Zigbee gateway and the Internet.

### Features <a href="#h4js5" id="h4js5"></a>

* Automation Device: Single-phase electricity-compatible, Tuya automation device, easy to satisfy with multiple usage scenarios.
* Multi-parameters Measurement: Support real-time measurement of energy consumption, voltage, current, power factor, active power, and frequency.
* Easy Installation: Compact size, adopts universal 35mm standard guide rail installation, no screws required, buckle fixation.
* Wide Applications: Suitable for a variety of occasions, both residential and commercial applications, such as rental houses, shopping malls, schools, factories, etc.
* App remote control - Support energy production measurement and historical consumption recording, you can see the usage trends by day, month, and year anytime and anywhere through mobile App
* Smart linkage - In smart scene mode, linkage can be set to sound an alarm. The mobile App will also receive prompts, such as garage door open/close status, timeout notifications and overnight notifications, to remind you to close the garage door.
* Voice control - used with Amazon Echo, Google Home, Yandex, Tmall Genie
* Offline function - when the device is offline, the App will remind the device to go offline after 30 minutes
* Home Sharing - Create a smart home with your family
* Set a schedule - turn connected devices on and off at specified times
* Sharing feature - share with family members for joint control

***

## Safety Consultation and Precautions

1. The installation process of this product involves strong electricity and must be installed by professionals in accordance with electrical specifications and product instructions;
2. This product is for indoor use only, please do not use it in humid environments or outdoors;
3. This product is only suitable for safe use in areas below 2,000 meters above sea level;
4. Pay attention to moisture-proof, do not spill water or other liquids on this product;
5. Do not place this product near a heat source;
6. Do not attempt to repair this product yourself, this work should be performed by authorized professionals;
7. Do not use it with overload. Please make sure that the 10A overcurrent protection circuit breaker on the front of this product is working properly before powering on. It is recommended that the stripping length of the terminal connecting wire is 6-8 mm;
8. This product should not be installed or fixed in a place that can be touched by human hands, such as outside the wall. It should be installed in an appliance or a hidden box;
9. The position of the fixed antenna should be as far away as possible from metal, wires and the module itself. (Applicable to external antenna models).

***

## Main Applications <a href="#shellyplus1-snsw-001x16eu-mainapplications" id="shellyplus1-snsw-001x16eu-mainapplications"></a>

* Residential
* MDU (Multi Dwelling Units - apartments, condominiums, hotels, etc.)
* Government/municipal
* University/college

***

## Integrations <a href="#shellyplus1-snsw-001x16eu-integrations" id="shellyplus1-snsw-001x16eu-integrations"></a>

* Google Assistant
* Amazon Alexa
* Yandex Alice
* Baidu Xiaodu
* Tmall Genie

***

## Installation

{% hint style="danger" %}
Please make sure the main power switch is turned off before installation
{% endhint %}

1. Open the clamp to see the arrow (P1→P2) or (K→L) or you can find it on the sticker outside the clamp. This is the direction of CT. The CT supports bi-directional sensing. If the direction of the CT is opposite to the direction of the current, the power will be negative;
2. Apply the CT on the electric cable and ensure the direction of the CT is correct when installing in different scenarios. Reference [**wiring schematics**](#wiring-schematic)
3. Turn on the main power switch and add devices according to the [**quick setup.**](#quick-setup)

<figure><img src="https://3898863868-files.gitbook.io/~/files/v0/b/gitbook-x-prod.appspot.com/o/spaces%2F-MDHxt7lj9funy2SIeFB%2Fuploads%2FrqBnqljppuKy2kgaeno8%2FSMS-01WB.png?alt=media&amp;token=1dc488e0-6d19-4107-8fa0-ed9fd62799e3" alt="" width="563"><figcaption><p>SMS-01WB</p></figcaption></figure>

<figure><img src="https://3898863868-files.gitbook.io/~/files/v0/b/gitbook-x-prod.appspot.com/o/spaces%2F-MDHxt7lj9funy2SIeFB%2Fuploads%2F8zeYSHELUoV8pU5nAdPh%2FSMS-02WB.png?alt=media&amp;token=821d7761-713a-40a3-a7d1-46c72929a434" alt=""><figcaption><p>SMS-02WB</p></figcaption></figure>

***

## Wiring Schematic

### To measure energy consumption

The clamp's arrow should face the correct direction of the electricity current flows like CT1 in the wiring diagram. In this case, the power will be positive, and the energy consumption will be accumulated.

### To measure energy generation

The clamp's arrow should face the inverter like CT2 in the wiring diagram. In this case, the current direction is opposite that of the CT. The power will be negative, and the energy generation will be accumulated.

<figure><img src="https://3898863868-files.gitbook.io/~/files/v0/b/gitbook-x-prod.appspot.com/o/spaces%2F-MDHxt7lj9funy2SIeFB%2Fuploads%2Fac9pdyKQNaVgpfGAvB5k%2Fsingle-phase%20diagram%20-%202000px.png?alt=media&amp;token=e375e9f0-1aa5-4652-a121-7e75fb87aea8" alt=""><figcaption><p>Wiring Schematic 1</p></figcaption></figure>

### Measure 'From Grid' or 'To Grid'

To monitor how much energy is pulled from and sent back from the grid, install the CT on the leads coming from your mains like the CT1 below.

For CT1:&#x20;

* If the measured current direction is K → L, the energy consumption is accumulated as ‘From Grid’ energy.&#x20;
* If the measured current direction is L → K, the energy generation is accumulated as ‘To Grid’ energy.

<figure><img src="https://3898863868-files.gitbook.io/~/files/v0/b/gitbook-x-prod.appspot.com/o/spaces%2F-MDHxt7lj9funy2SIeFB%2Fuploads%2Fp1coYJXXfH5aPOtOwB4S%2Fsingle-phase%20diagram%202-%202000px.png?alt=media&amp;token=2a0302e8-14b5-427c-ac58-df4f601db598" alt=""><figcaption><p>Wiring Schematic 2</p></figcaption></figure>

***

## Tech Specs <a href="#s4dtx" id="s4dtx"></a>

* Voltage: AC100 - 240V | 50/60Hz
* Dimensions: 39.2 x 39.2 x 18mm (without mounting clip) | 43 x 39.2 x 22.3mm (with mounting clip)
* Wireless Standard: Zigbee 3.0
* Measuring Range: 0.2 - 80A - 1CH | 0.2 - 80A) x 2 - 2CH

<figure><img src="https://3898863868-files.gitbook.io/~/files/v0/b/gitbook-x-prod.appspot.com/o/spaces%2F-MDHxt7lj9funy2SIeFB%2Fuploads%2FVvk232aj1uBlKC6NcWUC%2F2ch%20-%20size.png?alt=media&amp;token=2d9dd954-0031-46c8-888f-31082100d94b" alt=""><figcaption><p>Size</p></figcaption></figure>

***

## Quick Setup

### 1. Register an account <a href="#izkpz" id="izkpz"></a>

<details>

<summary>Use the 'Smart Life' App</summary>

Please jump to the '[**Use Smart Life App**](/smart-life/user-manual-for-smart-life)' page to view

</details>

### 2. Add Device <a href="#pxw57" id="pxw57"></a>

Open the Smart Life App, open the control panel of the Zigbee gateway, click the '+' in the homepage, enter the add device page, select it, and follow the prompts

{% hint style="success" %}
Press the reset key for about 10 seconds to put the module into network pairing mode

<img src="https://3898863868-files.gitbook.io/~/files/v0/b/gitbook-x-prod.appspot.com/o/spaces%2F-MDHxt7lj9funy2SIeFB%2Fuploads%2FAPp9RGedS1PMD8CW84lz%2Fzigbee%20garage%20pair%20network.png?alt=media&amp;token=ae696e79-a097-4625-b9b4-1188965a29f5" alt="" data-size="original">
{% endhint %}

{% hint style="success" %}
If the addition fails, please press and hold the network configuration button again and try again.
{% endhint %}

### 3. Control the Device <a href="#kjvoo" id="kjvoo"></a>

Use the App to control. If you can control the device normally, it means the device is working properly.

***

## Indicator Light Status Description

| **Indicator Status** | **Description**              |
| -------------------- | ---------------------------- |
| Blue flashes quickly | Connecting the network       |
| Blue is always on    | Network connection is normal |
| Indicator off        | Device offline/disconnected  |

***

## Toxic and Hazardous Substances Statement

<table data-header-hidden data-full-width="false"><thead><tr><th width="141"></th><th width="91"></th><th width="89"></th><th width="87"></th><th width="96"></th><th width="105"></th><th></th></tr></thead><tbody><tr><td>Part Name</td><td>铅 (Pb)</td><td>汞 (Hg)</td><td>镉(Cd)</td><td>六价铬<br>(Cr(VI))</td><td>多溴联苯<br>(PBB)</td><td>多溴二苯醚<br>(PBDE)</td></tr><tr><td>Plastic Shell</td><td>O</td><td>O</td><td>O</td><td>O</td><td>O</td><td>O</td></tr><tr><td>Plastic bracket</td><td>O</td><td>O</td><td>O</td><td>O</td><td>O</td><td>O</td></tr><tr><td>Electronic Component</td><td>O</td><td>O</td><td>O</td><td>O</td><td>O</td><td>O</td></tr><tr><td>PCBA</td><td>O</td><td>O</td><td>O</td><td>O</td><td>O</td><td>O</td></tr><tr><td>Metal</td><td>O</td><td>O</td><td>O</td><td>O</td><td>O</td><td>O</td></tr></tbody></table>

This form is prepared in accordance with the provisions of SJ/T 11364.

* O: Indicates that the content of the hazardous substance in all homogeneous materials of this part is below the limit requirements specified in GB/T 26572.
* ×: Indicates that the content of the hazardous substance in at least one homogeneous material of this part exceeds the limit requirements specified in GB/T 26572.

***

## Instructions for Use of Micropower Equipment

1. The Wi-Fi technology used in this product complies with the technical requirements of general micropower equipment Class F equipment in the 'Micropower Short-range Radio Transmission Equipment Catalog and Technical Requirements' for data transmission applications. It adopts integrated antenna, control, adjustment and switch Please refer to the relevant content in the product manual for usage instructions;
2. You are not allowed to change the usage scenarios or conditions without authorization, expand the transmission frequency range, increase the transmission power (including installing additional RF power amplifiers), and you are not allowed to change the transmitting antenna without authorization;
3. Shall not cause harmful interference to other legal radio stations, nor shall it offer protection against harmful interference;
4. Should withstand interference from industrial, scientific and medical (ISM) application equipment that radiates radio frequency energy or other legitimate radio stations;
5. If it causes harmful interference to other legal radio stations (stations), you should stop using it immediately and take measures to eliminate the interference before continuing to use it;
6. In aircraft and in accordance with laws and regulations, relevant national regulations, and standards designated radio astronomy observatories, weather radar stations, satellite earth stations (including measurement and control, ranging, receiving, and navigation stations) and other military and civilian radio stations (stations), airports, etc. Micropower equipment used in electromagnetic environment protection areas must comply with the regulations of electromagnetic environment protection and relevant industry authorities;
7. It is prohibited to use all types of model remote controls within a radius of 5,000 meters with the center point of the airport runway as the center;
8. The operating temperature of micropower equipment is -10℃ - 40℃, and the power supply is AC100 - 240V | 50/60Hz

***

## Warranty Instructions

The after-sales service of this product is strictly in accordance with the "Consumer Rights and Interests Protection Law of the People's Republic of China" and the "Product Quality Law of the People's Republic of China" to implement after-sales three-guarantee service. The service content is as follows:

### Warranty Policy

During the validity period of the Three Guarantees, you can enjoy free returns, exchanges, and repair services in accordance with this provision. Returns, exchanges, and repairs should be handled with invoices.

1. Returns without reason within 7 days from the day after receipt (e-commerce purchase channel), the user will bear the logistics costs.
2. This product has performance failures listed in the "Product Performance Failure Table". After after-sales service testing and confirmation, you can enjoy the following services for free:

| Service Type | Service Policy                                                                    |
| ------------ | --------------------------------------------------------------------------------- |
| Return       | Return of product due to quality reasons within 7 days from the day after receipt |
| Exchange     | Exchange for product quality reasons within 15 days from the day after receipt    |
| Repair       | Repair due to product quality within 1 year from the day after receipt            |

{% hint style="info" %}
Friendly reminder: Since packaging boxes are required to ensure the safety of product transportation during transportation, it is recommended that you keep the packaging boxes for at least 30 days from the day after signing for the product.
{% endhint %}

### Non-warranty Regulations

1. Unauthorized repair, misuse, collision, neglect, abuse, liquid intrusion, accident, alteration, incorrect use of non-product accessories, or tearing, alteration of labels, and anti-counterfeiting marks;
2. The three-pack validity period has expired;
3. Damage caused by force majeure;
4. Failure to comply with the performance failures listed in the "Product Performance Failure Table";
5. This product and its accessories have performance failures listed in the "Product Performance Failure Table" due to human reasons.

***


# Matter Series


# SML-01Ma

User Manual for SML-01Ma 1CH Matter Switch Module

***

## Appearance

<figure><img src="https://3898863868-files.gitbook.io/~/files/v0/b/gitbook-x-prod.appspot.com/o/spaces%2F-MDHxt7lj9funy2SIeFB%2Fuploads%2F8JHmLDNyVjL6HlwM7dkc%2Fsml-01wb-1000px.jpg?alt=media&amp;token=7023d6a6-640c-405d-88fb-ea5d046d7b91" alt="" width="375"><figcaption><p>SML-01Ma</p></figcaption></figure>

***

## Introduce <a href="#a7ulc" id="a7ulc"></a>

### Short Description <a href="#shellyplus1-snsw-001x16eu-shortdescription" id="shellyplus1-snsw-001x16eu-shortdescription"></a>

* SML-01Ma is a small form factor smart switch which allows remote control of electric appliances through a mobile phone, tablet and home automation system.
* SML-01Ma can be accessed, controlled and monitored remotely from any place where the user has internet connectivity, as long as the device is connected to a Wi-Fi router and the Internet.
* It can be retrofitted into standard electrical wall boxes, behind power sockets and light switches or other places with limited space.

### Features <a href="#h4js5" id="h4js5"></a>

* App remote control - control the device anytime and anywhere through mobile App
* Smart linkage - In smart scene mode, linkage can be set to sound an alarm. The mobile App will also receive prompts, such as garage door open/close status, timeout notifications and overnight notifications, to remind you to close the garage door.
* Voice control - used with Amazon Echo, Google Home, Yandex, Tmall Genie
* History - You can view the history of your garage door switch
* Offline function - when the device is offline, the App will remind the device to go offline after 30 minutes
* Home Sharing - Create a smart home with your family
* Set a schedule - turn connected devices on and off at specified times
* Sharing feature - share with family members for joint control
* Supports Siri - This device is not compatible with HomeKit. But you can add click-to-run scenes to Siri shortcuts in the Smart Life App

***

## Safety Consultation and Precautions

1. The installation process of this product involves strong electricity and must be installed by professionals in accordance with electrical specifications and product instructions;
2. This product is for indoor use only, please do not use it in humid environments or outdoors;
3. This product is only suitable for safe use in areas below 2,000 meters above sea level;
4. Pay attention to moisture-proof, do not spill water or other liquids on this product;
5. Do not place this product near a heat source;
6. Do not attempt to repair this product yourself, this work should be performed by authorized professionals;
7. Do not use it with overload. Please make sure that the 10A overcurrent protection circuit breaker on the front of this product is working properly before powering on. It is recommended that the stripping length of the terminal connecting wire is 6-8 mm;
8. This product should not be installed or fixed in a place that can be touched by human hands, such as outside the wall. It should be installed in an appliance or a hidden box;
9. The position of the fixed antenna should be as far away as possible from metal, wires and the module itself. (Applicable to external antenna models).

***

## Main Applications <a href="#shellyplus1-snsw-001x16eu-mainapplications" id="shellyplus1-snsw-001x16eu-mainapplications"></a>

* Residential
* MDU (Multi Dwelling Units - apartments, condominiums, hotels, etc.)
* Light commercial (small office buildings, small retail/restaurant/gas station, etc.)
* Government/municipal
* University/college

***

## Integrations <a href="#shellyplus1-snsw-001x16eu-integrations" id="shellyplus1-snsw-001x16eu-integrations"></a>

* Google Assistant
* Amazon Alexa
* Yandex Alice
* Baidu Xiaodu
* Tmall Genie

***

## Supported Load Types <a href="#shellyplus1-snsw-001x16eu-supportedloadtypes" id="shellyplus1-snsw-001x16eu-supportedloadtypes"></a>

* Resistive (incandescent bulbs, heating devices)
* Capacitive (capacitor banks, electronic equipment, motor start capacitors)
* Inductive with RC Snubber (LED light drivers, transformers, fans, refrigerators, air-conditioners)

## Installation

{% hint style="danger" %}
Please make sure the main power switch is turned off before installation
{% endhint %}

1. Connect wires according to the wiring diagram;
2. Insert the module into the junction box;
3. Turn on the main power switch and add devices according to the quick settings.

<figure><img src="https://3898863868-files.gitbook.io/~/files/v0/b/gitbook-x-prod.appspot.com/o/spaces%2F-MDHxt7lj9funy2SIeFB%2Fuploads%2FvdFcwHNV6jJoOXKSA6mC%2Finstall%20to%20the%20wall%20-%201.png?alt=media&amp;token=62270ef7-55d4-47ab-bd75-8ef523921b11" alt=""><figcaption><p>Insert into the junction box</p></figcaption></figure>

## Wiring Schematic

<figure><img src="https://3898863868-files.gitbook.io/~/files/v0/b/gitbook-x-prod.appspot.com/o/spaces%2F-MDHxt7lj9funy2SIeFB%2Fuploads%2FXQFuKcIyUseqvp14ZhbZ%2F1ch%20-%20without%20switch.png?alt=media&amp;token=dbb0acb8-84a5-44e4-8127-432f175fe4ff" alt=""><figcaption><p>Without Switch</p></figcaption></figure>

<figure><img src="https://3898863868-files.gitbook.io/~/files/v0/b/gitbook-x-prod.appspot.com/o/spaces%2F-MDHxt7lj9funy2SIeFB%2Fuploads%2FVnMQAjf36JSYWatleh0z%2F1ch%20-%201%20switch.png?alt=media&amp;token=ddebd351-10a6-4c5b-b991-f6d74a8e7a98" alt=""><figcaption><p>Connect 1 switch</p></figcaption></figure>

<figure><img src="https://3898863868-files.gitbook.io/~/files/v0/b/gitbook-x-prod.appspot.com/o/spaces%2F-MDHxt7lj9funy2SIeFB%2Fuploads%2F4zGE93NkO6ue7iYH58jc%2F1ch%20-%202%20switch.png?alt=media&amp;token=0912a5eb-93e7-4300-9df9-673a637e7a8e" alt=""><figcaption><p>Connect 2 3-way switches</p></figcaption></figure>

{% hint style="success" %}
The mechanical switch can only be used with AC100 - 240V.
{% endhint %}

***

## Tech Specs <a href="#s4dtx" id="s4dtx"></a>

* Voltage: AC100 - 240V | 50/60Hz
* Dimensions: 39.2 x 39.2 x 18mm (without mounting clip) | 43 x 39.2 x 22.3mm (with mounting clip)&#x20;
* Wireless Standard: Matter
* Max. Load: LED 250W | 10A

<figure><img src="https://3898863868-files.gitbook.io/~/files/v0/b/gitbook-x-prod.appspot.com/o/spaces%2F-MDHxt7lj9funy2SIeFB%2Fuploads%2FBldcfXsEWy89au2EJTd6%2Fx2000px.png?alt=media&amp;token=2b65f422-155d-48cf-9880-7903b97df1bd" alt=""><figcaption><p>Size</p></figcaption></figure>

***

## Quick Setup

### 1. Register an account <a href="#izkpz" id="izkpz"></a>

<details>

<summary>Use the 'Smart Life' App</summary>

Please jump to the '[**Use Smart Life App**](/smart-life/user-manual-for-smart-life)' page to view

</details>

### 2. Add Device <a href="#pxw57" id="pxw57"></a>

Open the Smart Life App, click the '+' in the upper right corner of the homepage, enter the add device (accessory) page, select it, and follow the prompts

{% hint style="success" %}
**2 ways to put the module into network pairing mode**

* Press the reset key for about 10 seconds
* Press the traditional switch 5 times until the indicator light is flashing quickly

<img src="https://3898863868-files.gitbook.io/~/files/v0/b/gitbook-x-prod.appspot.com/o/spaces%2F-MDHxt7lj9funy2SIeFB%2Fuploads%2FZNdw6MwnWZiHwEEkzCOr%2F2%20methods%20to%20network%20pairing.png?alt=media&amp;token=0ea66942-0c61-4bac-a806-be01581ab4b3" alt="" data-size="original">
{% endhint %}

{% hint style="success" %}
If the addition fails, please press and hold the network configuration button again and try again.
{% endhint %}

### 3. Control the Device <a href="#kjvoo" id="kjvoo"></a>

Use the App to control. If you can control the device normally, it means the device is working properly.

***

## Indicator Light Status Description

| **Indicator Status** | **Description**              |
| -------------------- | ---------------------------- |
| Blue flashes quickly | Connecting the network       |
| Blue is always on    | Network connection is normal |
| Indicator off        | Device offline/disconnected  |

***

## Toxic and Hazardous Substances Statement

<table data-header-hidden data-full-width="false"><thead><tr><th width="141"></th><th width="91"></th><th width="89"></th><th width="87"></th><th width="96"></th><th width="105"></th><th></th></tr></thead><tbody><tr><td>Part Name</td><td>铅 (Pb)</td><td>汞 (Hg)</td><td>镉(Cd)</td><td>六价铬<br>(Cr(VI))</td><td>多溴联苯<br>(PBB)</td><td>多溴二苯醚<br>(PBDE)</td></tr><tr><td>Plastic Shell</td><td>O</td><td>O</td><td>O</td><td>O</td><td>O</td><td>O</td></tr><tr><td>Plastic bracket</td><td>O</td><td>O</td><td>O</td><td>O</td><td>O</td><td>O</td></tr><tr><td>Electronic Component</td><td>O</td><td>O</td><td>O</td><td>O</td><td>O</td><td>O</td></tr><tr><td>PCBA</td><td>O</td><td>O</td><td>O</td><td>O</td><td>O</td><td>O</td></tr><tr><td>Metal</td><td>O</td><td>O</td><td>O</td><td>O</td><td>O</td><td>O</td></tr></tbody></table>

This form is prepared in accordance with the provisions of SJ/T 11364.

* O: Indicates that the content of the hazardous substance in all homogeneous materials of this part is below the limit requirements specified in GB/T 26572.
* ×: Indicates that the content of the hazardous substance in at least one homogeneous material of this part exceeds the limit requirements specified in GB/T 26572.

***

## Instructions for Use of Micropower Equipment

1. The Wi-Fi technology used in this product complies with the technical requirements of general micropower equipment Class F equipment in the 'Micropower Short-range Radio Transmission Equipment Catalog and Technical Requirements' for data transmission applications. It adopts integrated antenna, control, adjustment and switch Please refer to the relevant content in the product manual for usage instructions;
2. You are not allowed to change the usage scenarios or conditions without authorization, expand the transmission frequency range, increase the transmission power (including installing additional RF power amplifiers), and you are not allowed to change the transmitting antenna without authorization;
3. Shall not cause harmful interference to other legal radio stations, nor shall it offer protection against harmful interference;
4. Should withstand interference from industrial, scientific and medical (ISM) application equipment that radiates radio frequency energy or other legitimate radio stations;
5. If it causes harmful interference to other legal radio stations (stations), you should stop using it immediately and take measures to eliminate the interference before continuing to use it;
6. In aircraft and in accordance with laws and regulations, relevant national regulations, and standards designated radio astronomy observatories, weather radar stations, satellite earth stations (including measurement and control, ranging, receiving, and navigation stations) and other military and civilian radio stations (stations), airports, etc. Micropower equipment used in electromagnetic environment protection areas must comply with the regulations of electromagnetic environment protection and relevant industry authorities;
7. It is prohibited to use all types of model remote controls within a radius of 5,000 meters with the center point of the airport runway as the center;
8. The operating temperature of micropower equipment is -10℃ - 40℃, and the power supply is AC100 - 240V | 50/60Hz

***

## Warranty Instructions

The after-sales service of this product is strictly in accordance with the "Consumer Rights and Interests Protection Law of the People's Republic of China" and the "Product Quality Law of the People's Republic of China" to implement after-sales three-guarantee service. The service content is as follows:

### Warranty Policy

During the validity period of the Three Guarantees, you can enjoy free returns, exchanges, and repair services in accordance with this provision. Returns, exchanges, and repairs should be handled with invoices.

1. Returns without reason within 7 days from the day after receipt (e-commerce purchase channel), the user will bear the logistics costs.
2. This product has performance failures listed in the "Product Performance Failure Table". After after-sales service testing and confirmation, you can enjoy the following services for free:

| Service Type | Service Policy                                                                    |
| ------------ | --------------------------------------------------------------------------------- |
| Return       | Return of product due to quality reasons within 7 days from the day after receipt |
| Exchange     | Exchange for product quality reasons within 15 days from the day after receipt    |
| Repair       | Repair due to product quality within 1 year from the day after receipt            |

{% hint style="info" %}
Friendly reminder: Since packaging boxes are required to ensure the safety of product transportation during transportation, it is recommended that you keep the packaging boxes for at least 30 days from the day after signing for the product.
{% endhint %}

## Non-warranty Regulations

1. Unauthorized repair, misuse, collision, neglect, abuse, liquid intrusion, accident, alteration, incorrect use of non-product accessories, or tearing, alteration of labels, and anti-counterfeiting marks;
2. The three-pack validity period has expired;
3. Damage caused by force majeure;
4. Failure to comply with the performance failures listed in the "Product Performance Failure Table";
5. This product and its accessories have performance failures listed in the "Product Performance Failure Table" due to human reasons.

***


# GM Series Electric Module

## Wi-Fi Series

<details>

<summary>Curtain</summary>

* GMC-01WB
* GMC-01WB-RF
* GMC-02WB
* GMC-02WB-RF

</details>

<details>

<summary>Dimmer</summary>

* GMD-01WB
* GMD-02WB

</details>

<details>

<summary>Garage Door Controller</summary>

* [GMG-01WB](broken://pages/iDdBVvyCfdPTwD8t0BOX)

</details>

<details>

<summary>Lighting - Need Neutral</summary>

* GML-01WB
* GML-01WB-ES
* GML-01WB-16A
* GML-01WB-ES-16A
* GML-02WB
* GML-02WB-ES
* GML-03WB
* GML-03WB-ES
* GML-04WB

</details>

<details>

<summary>Lighting - No Neutral</summary>

* GML-01WB-L
* GML-02WB-L
* GML-03WB-L
* GML-04WB-L

</details>

<details>

<summary>Single-phase Power Clamp</summary>

* GMS-01WB
* GMS-01WB Pro
* GMS-02WB
* GMS-02WB Lite

</details>

## Zigbee Series

<details>

<summary>Curtain</summary>

* GMC-01Z
* GMC-01Z-RF
* GMC-02Z
* GMC-02Z-RF

</details>

<details>

<summary>Dimmer</summary>

* GMD-01Z
* GMD-02Z

</details>

<details>

<summary>Garage Door Controller</summary>

* GMG-01Z

</details>

<details>

<summary>Lighting - Need Neutral</summary>

* GML-01Z
* GML-01Z-ES
* GML-01Z-16A
* GML-01Z-ES-16A
* GML-02Z
* GML-02Z-ES
* GML-03Z
* GML-03Z-ES
* GML-04Z

</details>

<details>

<summary>Lighting - No Neutral</summary>

* GML-01Z-L
* GML-02Z-L
* GML-03Z-L

</details>

<details>

<summary>Single-phase Power Clamp</summary>

* GMS-01Z
* GMS-01Z Pro
* GMS-02Z
* GMS-02Z Lite

</details>


# Wi-Fi Series


# GML-01WB

User Manual for GML-01WB 1CH Wi-Fi Switch Module

***

## Appearance

<figure><img src="https://3898863868-files.gitbook.io/~/files/v0/b/gitbook-x-prod.appspot.com/o/spaces%2F-MDHxt7lj9funy2SIeFB%2Fuploads%2FFl9U7BaHDPSwH2ioX0fo%2F1-gml-01wb-front.jpg?alt=media&amp;token=69228147-7c11-440a-bc07-f99270732966" alt="" width="375"><figcaption><p>GML-01WB</p></figcaption></figure>

***

## Introduce <a href="#a7ulc" id="a7ulc"></a>

### Short Description <a href="#shellyplus1-snsw-001x16eu-shortdescription" id="shellyplus1-snsw-001x16eu-shortdescription"></a>

* GML-01WB is a small form factor smart switch which allows remote control of electric appliances through a mobile phone, tablet and home automation system.
* GML-01WB can be accessed, controlled and monitored remotely from any place where the user has internet connectivity, as long as the device is connected to a Wi-Fi router and the Internet.
* It can be retrofitted into standard electrical wall boxes, behind power sockets and light switches or other places with limited space.

### Features <a href="#h4js5" id="h4js5"></a>

* No gateway required - You don’t need to purchase a gateway for this device, the device connects directly to your house’s Wi-Fi
* Wi-Fi + Bluetooth dual mode - connect to the network faster, with network provisioning speed 2 times faster than pure Wi-Fi devices
* App remote control - control the device anytime and anywhere through mobile App
* Smart linkage - In smart scene mode, linkage can be set to sound an alarm. The mobile App will also receive prompts, such as garage door open/close status, timeout notifications and overnight notifications, to remind you to close the garage door.
* Voice control - used with Amazon Echo, Google Home, Yandex, Tmall Genie
* Offline function - when the device is offline, the App will remind the device to go offline after 30 minutes
* Home Sharing - Create a smart home with your family
* Set a schedule - turn connected devices on and off at specified times
* Sharing feature - share with family members for joint control
* Supports Siri - This device is not compatible with HomeKit. But you can add click-to-run scenes to Siri shortcuts in the Smart Life App

{% hint style="success" %}
Bluetooth is only used for network signal connection and cannot be used alone to control devices. Wi-Fi + Bluetooth distribution is faster
{% endhint %}

***

## Safety Consultation and Precautions

1. The installation process of this product involves strong electricity and must be installed by professionals in accordance with electrical specifications and product instructions;
2. This product is for indoor use only, please do not use it in humid environments or outdoors;
3. This product is only suitable for safe use in areas below 2,000 meters above sea level;
4. Pay attention to moisture-proof, do not spill water or other liquids on this product;
5. Do not place this product near a heat source;
6. Do not attempt to repair this product yourself, this work should be performed by authorized professionals;
7. Do not use it with overload. Please make sure that the 10A overcurrent protection circuit breaker on the front of this product is working properly before powering on. It is recommended that the stripping length of the terminal connecting wire is 6-8 mm;
8. This product should not be installed or fixed in a place that can be touched by human hands, such as outside the wall. It should be installed in an appliance or a hidden box;
9. The position of the fixed antenna should be as far away as possible from metal, wires and the module itself. (Applicable to external antenna models).

***

## Main Applications <a href="#shellyplus1-snsw-001x16eu-mainapplications" id="shellyplus1-snsw-001x16eu-mainapplications"></a>

* Residential
* MDU (Multi Dwelling Units - apartments, condominiums, hotels, etc.)
* Light commercial (small office buildings, small retail/restaurant/gas station, etc.)
* Government/municipal
* University/college

***

## Integrations <a href="#shellyplus1-snsw-001x16eu-integrations" id="shellyplus1-snsw-001x16eu-integrations"></a>

* Google Assistant
* Amazon Alexa
* Yandex Alice
* Baidu Xiaodu
* Tmall Genie

***

## Supported Load Types <a href="#shellyplus1-snsw-001x16eu-supportedloadtypes" id="shellyplus1-snsw-001x16eu-supportedloadtypes"></a>

* Resistive (incandescent bulbs, heating devices)
* Capacitive (capacitor banks, electronic equipment, motor start capacitors)
* Inductive with RC Snubber (LED light drivers, transformers, fans, refrigerators, air-conditioners)

***

## Installation

{% hint style="danger" %}
Please make sure the main power switch is turned off before installation
{% endhint %}

1. Connect wires according to the wiring diagram;
2. Insert the module into the junction box;
3. Turn on the main power switch and add devices according to the [**quick setup.**](#quick-setup)

<figure><img src="https://3898863868-files.gitbook.io/~/files/v0/b/gitbook-x-prod.appspot.com/o/spaces%2F-MDHxt7lj9funy2SIeFB%2Fuploads%2FvdFcwHNV6jJoOXKSA6mC%2Finstall%20to%20the%20wall%20-%201.png?alt=media&amp;token=62270ef7-55d4-47ab-bd75-8ef523921b11" alt=""><figcaption><p>Insert into the junction box</p></figcaption></figure>

***

## Wiring Schematic

<figure><img src="https://3898863868-files.gitbook.io/~/files/v0/b/gitbook-x-prod.appspot.com/o/spaces%2F-MDHxt7lj9funy2SIeFB%2Fuploads%2Fq8FOrdd1LWYoHM6KGlES%2F1ch%20-%20without%20switch.png?alt=media&amp;token=c4ece3db-1a43-48a4-9cdb-8d47525bafc0" alt=""><figcaption><p>Without Switch</p></figcaption></figure>

<figure><img src="https://3898863868-files.gitbook.io/~/files/v0/b/gitbook-x-prod.appspot.com/o/spaces%2F-MDHxt7lj9funy2SIeFB%2Fuploads%2FCAx7zEnUBinUL8yI6iW0%2F1ch%20-%20with%201%20switch.png?alt=media&amp;token=2f0e4a35-ae11-4470-be25-1a0b414a7a66" alt=""><figcaption><p>Connect 1 switch</p></figcaption></figure>

<figure><img src="https://3898863868-files.gitbook.io/~/files/v0/b/gitbook-x-prod.appspot.com/o/spaces%2F-MDHxt7lj9funy2SIeFB%2Fuploads%2FAA7LW5zYMPMMJTVVGdN4%2F1ch%20-%20with%202%203-way%20switch.png?alt=media&amp;token=e8a12e5a-61f7-4f82-aac7-106daecf3117" alt=""><figcaption><p>Connect 2 3-way switches</p></figcaption></figure>

{% hint style="success" %}
The mechanical switch can only be used with AC100 - 240V.
{% endhint %}

***

## Tech Specs <a href="#s4dtx" id="s4dtx"></a>

* Voltage: AC100 - 240V | 50/60Hz
* Dimensions: 45 x 45 x 18mm (without mounting clip) | 50 x 45 x 22mm (with mounting clip)
* Wireless Standard: Wi-Fi - 2.4GHz + Bluetooth
* Max. Load: LED 250W | 10A

***

## Quick Setup

### 1. Register an account <a href="#izkpz" id="izkpz"></a>

<details>

<summary>Use the 'Smart Life' App</summary>

Please jump to the '[**Use Smart Life App**](/smart-life/user-manual-for-smart-life)' page to view

</details>

### 2. Add Device <a href="#pxw57" id="pxw57"></a>

Open the Smart Life App, click the '+' in the upper right corner of the homepage, enter the add device (accessory) page, select it, and follow the prompts

{% hint style="success" %}
**2 ways to put the module into network pairing mode**

* Press the reset key for about 10 seconds
* Press the traditional switch 5 times until the indicator light is flashing quickly

<img src="https://3898863868-files.gitbook.io/~/files/v0/b/gitbook-x-prod.appspot.com/o/spaces%2F-MDHxt7lj9funy2SIeFB%2Fuploads%2FZNdw6MwnWZiHwEEkzCOr%2F2%20methods%20to%20network%20pairing.png?alt=media&amp;token=0ea66942-0c61-4bac-a806-be01581ab4b3" alt="" data-size="original">
{% endhint %}

{% hint style="success" %}
If the addition fails, please press and hold the network configuration button again and try again.
{% endhint %}

### 3. Control the Device <a href="#kjvoo" id="kjvoo"></a>

Use the App to control. If you can control the device normally, it means the device is working properly.

***

## Indicator Light Status Description

| **Indicator Status** | **Description**              |
| -------------------- | ---------------------------- |
| Blue flashes quickly | Connecting the network       |
| Blue is always on    | Network connection is normal |
| Indicator off        | Device offline/disconnected  |

***

## Toxic and Hazardous Substances Statement

<table data-header-hidden data-full-width="false"><thead><tr><th width="141"></th><th width="91"></th><th width="89"></th><th width="87"></th><th width="96"></th><th width="105"></th><th></th></tr></thead><tbody><tr><td>Part Name</td><td>铅 (Pb)</td><td>汞 (Hg)</td><td>镉(Cd)</td><td>六价铬<br>(Cr(VI))</td><td>多溴联苯<br>(PBB)</td><td>多溴二苯醚<br>(PBDE)</td></tr><tr><td>Plastic Shell</td><td>O</td><td>O</td><td>O</td><td>O</td><td>O</td><td>O</td></tr><tr><td>Plastic bracket</td><td>O</td><td>O</td><td>O</td><td>O</td><td>O</td><td>O</td></tr><tr><td>Electronic Component</td><td>O</td><td>O</td><td>O</td><td>O</td><td>O</td><td>O</td></tr><tr><td>PCBA</td><td>O</td><td>O</td><td>O</td><td>O</td><td>O</td><td>O</td></tr><tr><td>Metal</td><td>O</td><td>O</td><td>O</td><td>O</td><td>O</td><td>O</td></tr></tbody></table>

This form is prepared in accordance with the provisions of SJ/T 11364.

* O: Indicates that the content of the hazardous substance in all homogeneous materials of this part is below the limit requirements specified in GB/T 26572.
* ×: Indicates that the content of the hazardous substance in at least one homogeneous material of this part exceeds the limit requirements specified in GB/T 26572.

***

## Instructions for Use of Micropower Equipment

1. The Wi-Fi technology used in this product complies with the technical requirements of general micropower equipment Class F equipment in the 'Micropower Short-range Radio Transmission Equipment Catalog and Technical Requirements' for data transmission applications. It adopts integrated antenna, control, adjustment and switch Please refer to the relevant content in the product manual for usage instructions;
2. You are not allowed to change the usage scenarios or conditions without authorization, expand the transmission frequency range, increase the transmission power (including installing additional RF power amplifiers), and you are not allowed to change the transmitting antenna without authorization;
3. Shall not cause harmful interference to other legal radio stations, nor shall it offer protection against harmful interference;
4. Should withstand interference from industrial, scientific and medical (ISM) application equipment that radiates radio frequency energy or other legitimate radio stations;
5. If it causes harmful interference to other legal radio stations (stations), you should stop using it immediately and take measures to eliminate the interference before continuing to use it;
6. In aircraft and in accordance with laws and regulations, relevant national regulations, and standards designated radio astronomy observatories, weather radar stations, satellite earth stations (including measurement and control, ranging, receiving, and navigation stations) and other military and civilian radio stations (stations), airports, etc. Micropower equipment used in electromagnetic environment protection areas must comply with the regulations of electromagnetic environment protection and relevant industry authorities;
7. It is prohibited to use all types of model remote controls within a radius of 5,000 meters with the center point of the airport runway as the center;
8. The operating temperature of micropower equipment is -10℃ - 40℃, and the power supply is AC100 - 240V | 50/60Hz

***

## Warranty Instructions

The after-sales service of this product is strictly in accordance with the "Consumer Rights and Interests Protection Law of the People's Republic of China" and the "Product Quality Law of the People's Republic of China" to implement after-sales three-guarantee service. The service content is as follows:

### Warranty Policy

During the validity period of the Three Guarantees, you can enjoy free returns, exchanges, and repair services in accordance with this provision. Returns, exchanges, and repairs should be handled with invoices.

1. Returns without reason within 7 days from the day after receipt (e-commerce purchase channel), the user will bear the logistics costs.
2. This product has performance failures listed in the "Product Performance Failure Table". After after-sales service testing and confirmation, you can enjoy the following services for free:

| Service Type | Service Policy                                                                    |
| ------------ | --------------------------------------------------------------------------------- |
| Return       | Return of product due to quality reasons within 7 days from the day after receipt |
| Exchange     | Exchange for product quality reasons within 15 days from the day after receipt    |
| Repair       | Repair due to product quality within 1 year from the day after receipt            |

{% hint style="info" %}
Friendly reminder: Since packaging boxes are required to ensure the safety of product transportation during transportation, it is recommended that you keep the packaging boxes for at least 30 days from the day after signing for the product.
{% endhint %}

### Non-warranty Regulations

1. Unauthorized repair, misuse, collision, neglect, abuse, liquid intrusion, accident, alteration, incorrect use of non-product accessories, or tearing, alteration of labels, and anti-counterfeiting marks;
2. The three-pack validity period has expired;
3. Damage caused by force majeure;
4. Failure to comply with the performance failures listed in the "Product Performance Failure Table";
5. This product and its accessories have performance failures listed in the "Product Performance Failure Table" due to human reasons.

***


# GML-01WB-16A

User Manual for GML-01WB-16A 1CH High Power Wi-Fi Switch Module

***

## Appearance

<figure><img src="https://3898863868-files.gitbook.io/~/files/v0/b/gitbook-x-prod.appspot.com/o/spaces%2F-MDHxt7lj9funy2SIeFB%2Fuploads%2FfpbDZr1LrnyeZ46YCbUj%2F3-gml-01wb-16a-front.jpg?alt=media&amp;token=2d1dc0b6-6a21-4411-9381-f8c580e97fbb" alt="" width="375"><figcaption><p>GML-01WB-16A</p></figcaption></figure>

***

## Introduce <a href="#a7ulc" id="a7ulc"></a>

### Short Description <a href="#shellyplus1-snsw-001x16eu-shortdescription" id="shellyplus1-snsw-001x16eu-shortdescription"></a>

* GML-01WB-16A is a small form factor smart switch which allows remote control of electric appliances through a mobile phone, tablet and home automation system.
* GML-01WB-16A can be accessed, controlled and monitored remotely from any place where the user has internet connectivity, as long as the device is connected to a Wi-Fi router and the Internet.
* It can be retrofitted into standard electrical wall boxes, behind power sockets and light switches or other places with limited space.

### Features <a href="#h4js5" id="h4js5"></a>

* No gateway required - You don’t need to purchase a gateway for this device, the device connects directly to your house’s Wi-Fi
* Wi-Fi + Bluetooth dual mode - connect to the network faster, with network provisioning speed 2 times faster than pure Wi-Fi devices
* App remote control - control the device anytime and anywhere through mobile App
* Smart linkage - In smart scene mode, linkage can be set to sound an alarm. The mobile App will also receive prompts, such as garage door open/close status, timeout notifications and overnight notifications, to remind you to close the garage door.
* Voice control - used with Amazon Echo, Google Home, Yandex, Tmall Genie
* Offline function - when the device is offline, the App will remind the device to go offline after 30 minutes
* Home Sharing - Create a smart home with your family
* Set a schedule - turn connected devices on and off at specified times
* Sharing feature - share with family members for joint control
* Supports Siri - This device is not compatible with HomeKit. But you can add click-to-run scenes to Siri shortcuts in the Smart Life App

{% hint style="success" %}
Bluetooth is only used for network signal connection and cannot be used alone to control devices. Wi-Fi + Bluetooth distribution is faster
{% endhint %}

***

## Safety Consultation and Precautions

1. The installation process of this product involves strong electricity and must be installed by professionals in accordance with electrical specifications and product instructions;
2. This product is for indoor use only, please do not use it in humid environments or outdoors;
3. This product is only suitable for safe use in areas below 2,000 meters above sea level;
4. Pay attention to moisture-proof, do not spill water or other liquids on this product;
5. Do not place this product near a heat source;
6. Do not attempt to repair this product yourself, this work should be performed by authorized professionals;
7. Do not use it with overload. Please make sure that the 10A overcurrent protection circuit breaker on the front of this product is working properly before powering on. It is recommended that the stripping length of the terminal connecting wire is 6-8 mm;
8. This product should not be installed or fixed in a place that can be touched by human hands, such as outside the wall. It should be installed in an appliance or a hidden box;
9. The position of the fixed antenna should be as far away as possible from metal, wires and the module itself. (Applicable to external antenna models).

***

## Main Applications <a href="#shellyplus1-snsw-001x16eu-mainapplications" id="shellyplus1-snsw-001x16eu-mainapplications"></a>

* Residential
* MDU (Multi Dwelling Units - apartments, condominiums, hotels, etc.)
* Light commercial (small office buildings, small retail/restaurant/gas station, etc.)
* Government/municipal
* University/college

***

## Integrations <a href="#shellyplus1-snsw-001x16eu-integrations" id="shellyplus1-snsw-001x16eu-integrations"></a>

* Google Assistant
* Amazon Alexa
* Yandex Alice
* Baidu Xiaodu
* Tmall Genie

***

## Supported Load Types <a href="#shellyplus1-snsw-001x16eu-supportedloadtypes" id="shellyplus1-snsw-001x16eu-supportedloadtypes"></a>

* Resistive (incandescent bulbs, heating devices)
* Capacitive (capacitor banks, electronic equipment, motor start capacitors)
* Inductive with RC Snubber (LED light drivers, transformers, fans, refrigerators, air-conditioners)

***

## Installation

{% hint style="danger" %}
Please make sure the main power switch is turned off before installation
{% endhint %}

1. Connect wires according to the wiring diagram;
2. Insert the module into the junction box;
3. Turn on the main power switch and add devices according to the [**quick setup.**](#quick-setup)

<figure><img src="https://3898863868-files.gitbook.io/~/files/v0/b/gitbook-x-prod.appspot.com/o/spaces%2F-MDHxt7lj9funy2SIeFB%2Fuploads%2FvdFcwHNV6jJoOXKSA6mC%2Finstall%20to%20the%20wall%20-%201.png?alt=media&amp;token=62270ef7-55d4-47ab-bd75-8ef523921b11" alt=""><figcaption><p>Insert into the junction box</p></figcaption></figure>

***

## Wiring Schematic

<figure><img src="https://3898863868-files.gitbook.io/~/files/v0/b/gitbook-x-prod.appspot.com/o/spaces%2F-MDHxt7lj9funy2SIeFB%2Fuploads%2Fq8FOrdd1LWYoHM6KGlES%2F1ch%20-%20without%20switch.png?alt=media&amp;token=c4ece3db-1a43-48a4-9cdb-8d47525bafc0" alt=""><figcaption><p>Without Switch</p></figcaption></figure>

<figure><img src="https://3898863868-files.gitbook.io/~/files/v0/b/gitbook-x-prod.appspot.com/o/spaces%2F-MDHxt7lj9funy2SIeFB%2Fuploads%2FCAx7zEnUBinUL8yI6iW0%2F1ch%20-%20with%201%20switch.png?alt=media&amp;token=2f0e4a35-ae11-4470-be25-1a0b414a7a66" alt=""><figcaption><p>Connect 1 switch</p></figcaption></figure>

<figure><img src="https://3898863868-files.gitbook.io/~/files/v0/b/gitbook-x-prod.appspot.com/o/spaces%2F-MDHxt7lj9funy2SIeFB%2Fuploads%2FAA7LW5zYMPMMJTVVGdN4%2F1ch%20-%20with%202%203-way%20switch.png?alt=media&amp;token=e8a12e5a-61f7-4f82-aac7-106daecf3117" alt=""><figcaption><p>Connect 2 3-way switches</p></figcaption></figure>

{% hint style="success" %}
The mechanical switch can only be used with AC100 - 240V.
{% endhint %}

***

## Tech Specs <a href="#s4dtx" id="s4dtx"></a>

* Voltage: AC100 - 240V | 50/60Hz
* Dimensions: 45 x 45 x 18mm (without mounting clip) | 50 x 45 x 22mm (with mounting clip)
* Wireless Standard: Wi-Fi - 2.4GHz + Bluetooth
* Max. Load: LED 300W | 16A

***

## Quick Setup

### 1. Register an account <a href="#izkpz" id="izkpz"></a>

<details>

<summary>Use the 'Smart Life' App</summary>

Please jump to the '[**Use Smart Life App**](/smart-life/user-manual-for-smart-life)' page to view

</details>

### 2. Add Device <a href="#pxw57" id="pxw57"></a>

Open the Smart Life App, click the '+' in the upper right corner of the homepage, enter the add device (accessory) page, select it, and follow the prompts

{% hint style="success" %}
**2 ways to put the module into network pairing mode**

* Press the reset key for about 10 seconds
* Press the traditional switch 5 times until the indicator light is flashing quickly

<img src="https://3898863868-files.gitbook.io/~/files/v0/b/gitbook-x-prod.appspot.com/o/spaces%2F-MDHxt7lj9funy2SIeFB%2Fuploads%2FZNdw6MwnWZiHwEEkzCOr%2F2%20methods%20to%20network%20pairing.png?alt=media&amp;token=0ea66942-0c61-4bac-a806-be01581ab4b3" alt="" data-size="original">
{% endhint %}

{% hint style="success" %}
If the addition fails, please press and hold the network configuration button again and try again.
{% endhint %}

### 3. Control the Device <a href="#kjvoo" id="kjvoo"></a>

Use the App to control. If you can control the device normally, it means the device is working properly.

***

## Indicator Light Status Description

| **Indicator Status** | **Description**              |
| -------------------- | ---------------------------- |
| Blue flashes quickly | Connecting the network       |
| Blue is always on    | Network connection is normal |
| Indicator off        | Device offline/disconnected  |

***

## Toxic and Hazardous Substances Statement

<table data-header-hidden data-full-width="false"><thead><tr><th width="141"></th><th width="91"></th><th width="89"></th><th width="87"></th><th width="96"></th><th width="105"></th><th></th></tr></thead><tbody><tr><td>Part Name</td><td>铅 (Pb)</td><td>汞 (Hg)</td><td>镉(Cd)</td><td>六价铬<br>(Cr(VI))</td><td>多溴联苯<br>(PBB)</td><td>多溴二苯醚<br>(PBDE)</td></tr><tr><td>Plastic Shell</td><td>O</td><td>O</td><td>O</td><td>O</td><td>O</td><td>O</td></tr><tr><td>Plastic bracket</td><td>O</td><td>O</td><td>O</td><td>O</td><td>O</td><td>O</td></tr><tr><td>Electronic Component</td><td>O</td><td>O</td><td>O</td><td>O</td><td>O</td><td>O</td></tr><tr><td>PCBA</td><td>O</td><td>O</td><td>O</td><td>O</td><td>O</td><td>O</td></tr><tr><td>Metal</td><td>O</td><td>O</td><td>O</td><td>O</td><td>O</td><td>O</td></tr></tbody></table>

This form is prepared in accordance with the provisions of SJ/T 11364.

* O: Indicates that the content of the hazardous substance in all homogeneous materials of this part is below the limit requirements specified in GB/T 26572.
* ×: Indicates that the content of the hazardous substance in at least one homogeneous material of this part exceeds the limit requirements specified in GB/T 26572.

***

## Instructions for Use of Micropower Equipment

1. The Wi-Fi technology used in this product complies with the technical requirements of general micropower equipment Class F equipment in the 'Micropower Short-range Radio Transmission Equipment Catalog and Technical Requirements' for data transmission applications. It adopts integrated antenna, control, adjustment and switch Please refer to the relevant content in the product manual for usage instructions;
2. You are not allowed to change the usage scenarios or conditions without authorization, expand the transmission frequency range, increase the transmission power (including installing additional RF power amplifiers), and you are not allowed to change the transmitting antenna without authorization;
3. Shall not cause harmful interference to other legal radio stations, nor shall it offer protection against harmful interference;
4. Should withstand interference from industrial, scientific and medical (ISM) application equipment that radiates radio frequency energy or other legitimate radio stations;
5. If it causes harmful interference to other legal radio stations (stations), you should stop using it immediately and take measures to eliminate the interference before continuing to use it;
6. In aircraft and in accordance with laws and regulations, relevant national regulations, and standards designated radio astronomy observatories, weather radar stations, satellite earth stations (including measurement and control, ranging, receiving, and navigation stations) and other military and civilian radio stations (stations), airports, etc. Micropower equipment used in electromagnetic environment protection areas must comply with the regulations of electromagnetic environment protection and relevant industry authorities;
7. It is prohibited to use all types of model remote controls within a radius of 5,000 meters with the center point of the airport runway as the center;
8. The operating temperature of micropower equipment is -10℃ - 40℃, and the power supply is AC100 - 240V | 50/60Hz

***

## Warranty Instructions

The after-sales service of this product is strictly in accordance with the "Consumer Rights and Interests Protection Law of the People's Republic of China" and the "Product Quality Law of the People's Republic of China" to implement after-sales three-guarantee service. The service content is as follows:

### Warranty Policy

During the validity period of the Three Guarantees, you can enjoy free returns, exchanges, and repair services in accordance with this provision. Returns, exchanges, and repairs should be handled with invoices.

1. Returns without reason within 7 days from the day after receipt (e-commerce purchase channel), the user will bear the logistics costs.
2. This product has performance failures listed in the "Product Performance Failure Table". After after-sales service testing and confirmation, you can enjoy the following services for free:

| Service Type | Service Policy                                                                    |
| ------------ | --------------------------------------------------------------------------------- |
| Return       | Return of product due to quality reasons within 7 days from the day after receipt |
| Exchange     | Exchange for product quality reasons within 15 days from the day after receipt    |
| Repair       | Repair due to product quality within 1 year from the day after receipt            |

{% hint style="info" %}
Friendly reminder: Since packaging boxes are required to ensure the safety of product transportation during transportation, it is recommended that you keep the packaging boxes for at least 30 days from the day after signing for the product.
{% endhint %}

### Non-warranty Regulations

1. Unauthorized repair, misuse, collision, neglect, abuse, liquid intrusion, accident, alteration, incorrect use of non-product accessories, or tearing, alteration of labels, and anti-counterfeiting marks;
2. The three-pack validity period has expired;
3. Damage caused by force majeure;
4. Failure to comply with the performance failures listed in the "Product Performance Failure Table";
5. This product and its accessories have performance failures listed in the "Product Performance Failure Table" due to human reasons.

***


# GML-02WB

User Manual for GML-02WB 2CH Wi-Fi Switch Module

***

## Appearance

<figure><img src="https://3898863868-files.gitbook.io/~/files/v0/b/gitbook-x-prod.appspot.com/o/spaces%2F-MDHxt7lj9funy2SIeFB%2Fuploads%2FnVeGvGCsuNUUTwVQr4WH%2F5-gml-02wb-front.jpg?alt=media&amp;token=b2d51d19-4439-45e7-9fda-9be25aa98ccf" alt="" width="375"><figcaption><p>GML-02WB</p></figcaption></figure>

***

## Introduce <a href="#a7ulc" id="a7ulc"></a>

### Short Description <a href="#shellyplus1-snsw-001x16eu-shortdescription" id="shellyplus1-snsw-001x16eu-shortdescription"></a>

* GML-02WB is a small form factor smart switch which allows remote control of electric appliances through a mobile phone, tablet and home automation system.
* GML-02WB can be accessed, controlled and monitored remotely from any place where the user has internet connectivity, as long as the device is connected to a Wi-Fi router and the Internet.
* It can be retrofitted into standard electrical wall boxes, behind power sockets and light switches or other places with limited space.

### Features <a href="#h4js5" id="h4js5"></a>

* No gateway required - You don’t need to purchase a gateway for this device, the device connects directly to your house’s Wi-Fi
* Wi-Fi + Bluetooth dual mode - connect to the network faster, with network provisioning speed 2 times faster than pure Wi-Fi devices
* App remote control - control the device anytime and anywhere through mobile App
* Smart linkage - In smart scene mode, linkage can be set to sound an alarm. The mobile App will also receive prompts, such as garage door open/close status, timeout notifications and overnight notifications, to remind you to close the garage door.
* Voice control - used with Amazon Echo, Google Home, Yandex, Tmall Genie
* Offline function - when the device is offline, the App will remind the device to go offline after 30 minutes
* Home Sharing - Create a smart home with your family
* Set a schedule - turn connected devices on and off at specified times
* Sharing feature - share with family members for joint control
* Supports Siri - This device is not compatible with HomeKit. But you can add click-to-run scenes to Siri shortcuts in the Smart Life App

{% hint style="success" %}
Bluetooth is only used for network signal connection and cannot be used alone to control devices. Wi-Fi + Bluetooth distribution is faster
{% endhint %}

***

## Safety Consultation and Precautions

1. The installation process of this product involves strong electricity and must be installed by professionals in accordance with electrical specifications and product instructions;
2. This product is for indoor use only, please do not use it in humid environments or outdoors;
3. This product is only suitable for safe use in areas below 2,000 meters above sea level;
4. Pay attention to moisture-proof, do not spill water or other liquids on this product;
5. Do not place this product near a heat source;
6. Do not attempt to repair this product yourself, this work should be performed by authorized professionals;
7. Do not use it with overload. Please make sure that the 10A overcurrent protection circuit breaker on the front of this product is working properly before powering on. It is recommended that the stripping length of the terminal connecting wire is 6-8 mm;
8. This product should not be installed or fixed in a place that can be touched by human hands, such as outside the wall. It should be installed in an appliance or a hidden box;
9. The position of the fixed antenna should be as far away as possible from metal, wires and the module itself. (Applicable to external antenna models).

***

## Main Applications <a href="#shellyplus1-snsw-001x16eu-mainapplications" id="shellyplus1-snsw-001x16eu-mainapplications"></a>

* Residential
* MDU (Multi Dwelling Units - apartments, condominiums, hotels, etc.)
* Light commercial (small office buildings, small retail/restaurant/gas station, etc.)
* Government/municipal
* University/college

***

## Integrations <a href="#shellyplus1-snsw-001x16eu-integrations" id="shellyplus1-snsw-001x16eu-integrations"></a>

* Google Assistant
* Amazon Alexa
* Yandex Alice
* Baidu Xiaodu
* Tmall Genie

***

## Supported Load Types <a href="#shellyplus1-snsw-001x16eu-supportedloadtypes" id="shellyplus1-snsw-001x16eu-supportedloadtypes"></a>

* Resistive (incandescent bulbs, heating devices)
* Capacitive (capacitor banks, electronic equipment, motor start capacitors)
* Inductive with RC Snubber (LED light drivers, transformers, fans, refrigerators, air-conditioners)

## Installation

{% hint style="danger" %}
Please make sure the main power switch is turned off before installation
{% endhint %}

1. Connect wires according to the wiring diagram;
2. Insert the module into the junction box;
3. Turn on the main power switch and add devices according to the [**quick setup.**](#quick-setup)

<figure><img src="https://3898863868-files.gitbook.io/~/files/v0/b/gitbook-x-prod.appspot.com/o/spaces%2F-MDHxt7lj9funy2SIeFB%2Fuploads%2FdQ7dTAdyeGetY5btYv0P%2Finstall%20to%20the%20wall%20-%202.png?alt=media&amp;token=336ec27e-24a9-4048-bc69-2e08a7bc732c" alt=""><figcaption><p>Insert into the junction box</p></figcaption></figure>

***

## Wiring Schematic

<figure><img src="https://3898863868-files.gitbook.io/~/files/v0/b/gitbook-x-prod.appspot.com/o/spaces%2F-MDHxt7lj9funy2SIeFB%2Fuploads%2FW7DM4PV5sO1coJja8pdi%2F2ch%20-%20without%20switch.png?alt=media&amp;token=d473d118-45bc-4772-905f-c100cc0adc08" alt=""><figcaption><p>Without Switch</p></figcaption></figure>

<figure><img src="https://3898863868-files.gitbook.io/~/files/v0/b/gitbook-x-prod.appspot.com/o/spaces%2F-MDHxt7lj9funy2SIeFB%2Fuploads%2FGd5yPZULjmdaXt5KlNqd%2F2ch%20-%20with%202%20switch.png?alt=media&amp;token=95deb1fa-ff39-4956-92a1-de413ba78920" alt=""><figcaption><p>Connect 2 switches</p></figcaption></figure>

<figure><img src="https://3898863868-files.gitbook.io/~/files/v0/b/gitbook-x-prod.appspot.com/o/spaces%2F-MDHxt7lj9funy2SIeFB%2Fuploads%2FXqUJFV9SixtsD1Jkkl4y%2F2ch%20-%20with%204%203-way%20switch.png?alt=media&amp;token=3e5074e5-d5ce-4d09-9972-646130aa0308" alt=""><figcaption><p>Connect 4 3-way switches</p></figcaption></figure>

{% hint style="success" %}
The mechanical switch can only be used with AC100 - 240V.
{% endhint %}

***

## Tech Specs <a href="#s4dtx" id="s4dtx"></a>

* Voltage: AC100 - 240V | 50/60Hz
* Dimensions: 45 x 45 x 18mm (without mounting clip) | 50 x 45 x 22mm (with mounting clip)
* Wireless Standard: Wi-Fi - 2.4GHz + Bluetooth
* Max. Load: LED 150W x 2 | 5A x 2

***

## Quick Setup

### 1. Register an account <a href="#izkpz" id="izkpz"></a>

<details>

<summary>Use the 'Smart Life' App</summary>

Please jump to the '[**Use Smart Life App**](/smart-life/user-manual-for-smart-life)' page to view

</details>

### 2. Add Device <a href="#pxw57" id="pxw57"></a>

Open the Smart Life App, click the '+' in the upper right corner of the homepage, enter the add device (accessory) page, select it, and follow the prompts

{% hint style="success" %}
**2 ways to put the module into network pairing mode**

* Press the reset key for about 10 seconds
* Press the traditional switch 5 times until the indicator light is flashing quickly

<img src="https://3898863868-files.gitbook.io/~/files/v0/b/gitbook-x-prod.appspot.com/o/spaces%2F-MDHxt7lj9funy2SIeFB%2Fuploads%2FSiZuXLXBpOA1YuJ5mZta%2F2ch%20dimmer%20-%20pair%20network.png?alt=media&amp;token=fd60dc10-9db8-43c2-b9f7-eb93782260aa" alt="" data-size="original">
{% endhint %}

{% hint style="success" %}
If the addition fails, please press and hold the network configuration button again and try again.
{% endhint %}

### 3. Control the Device <a href="#kjvoo" id="kjvoo"></a>

Use the App to control. If you can control the device normally, it means the device is working properly.

***

## Indicator Light Status Description

| **Indicator Status** | **Description**              |
| -------------------- | ---------------------------- |
| Blue flashes quickly | Connecting the network       |
| Blue is always on    | Network connection is normal |
| Indicator off        | Device offline/disconnected  |

***

## Toxic and Hazardous Substances Statement

<table data-header-hidden data-full-width="false"><thead><tr><th width="141"></th><th width="91"></th><th width="89"></th><th width="87"></th><th width="96"></th><th width="105"></th><th></th></tr></thead><tbody><tr><td>Part Name</td><td>铅 (Pb)</td><td>汞 (Hg)</td><td>镉(Cd)</td><td>六价铬<br>(Cr(VI))</td><td>多溴联苯<br>(PBB)</td><td>多溴二苯醚<br>(PBDE)</td></tr><tr><td>Plastic Shell</td><td>O</td><td>O</td><td>O</td><td>O</td><td>O</td><td>O</td></tr><tr><td>Plastic bracket</td><td>O</td><td>O</td><td>O</td><td>O</td><td>O</td><td>O</td></tr><tr><td>Electronic Component</td><td>O</td><td>O</td><td>O</td><td>O</td><td>O</td><td>O</td></tr><tr><td>PCBA</td><td>O</td><td>O</td><td>O</td><td>O</td><td>O</td><td>O</td></tr><tr><td>Metal</td><td>O</td><td>O</td><td>O</td><td>O</td><td>O</td><td>O</td></tr></tbody></table>

This form is prepared in accordance with the provisions of SJ/T 11364.

* O: Indicates that the content of the hazardous substance in all homogeneous materials of this part is below the limit requirements specified in GB/T 26572.
* ×: Indicates that the content of the hazardous substance in at least one homogeneous material of this part exceeds the limit requirements specified in GB/T 26572.

***

## Instructions for Use of Micropower Equipment

1. The Wi-Fi technology used in this product complies with the technical requirements of general micropower equipment Class F equipment in the 'Micropower Short-range Radio Transmission Equipment Catalog and Technical Requirements' for data transmission applications. It adopts integrated antenna, control, adjustment and switch Please refer to the relevant content in the product manual for usage instructions;
2. You are not allowed to change the usage scenarios or conditions without authorization, expand the transmission frequency range, increase the transmission power (including installing additional RF power amplifiers), and you are not allowed to change the transmitting antenna without authorization;
3. Shall not cause harmful interference to other legal radio stations, nor shall it offer protection against harmful interference;
4. Should withstand interference from industrial, scientific and medical (ISM) application equipment that radiates radio frequency energy or other legitimate radio stations;
5. If it causes harmful interference to other legal radio stations (stations), you should stop using it immediately and take measures to eliminate the interference before continuing to use it;
6. In aircraft and in accordance with laws and regulations, relevant national regulations, and standards designated radio astronomy observatories, weather radar stations, satellite earth stations (including measurement and control, ranging, receiving, and navigation stations) and other military and civilian radio stations (stations), airports, etc. Micropower equipment used in electromagnetic environment protection areas must comply with the regulations of electromagnetic environment protection and relevant industry authorities;
7. It is prohibited to use all types of model remote controls within a radius of 5,000 meters with the center point of the airport runway as the center;
8. The operating temperature of micropower equipment is -10℃ - 40℃, and the power supply is AC100 - 240V | 50/60Hz

***

## Warranty Instructions

The after-sales service of this product is strictly in accordance with the "Consumer Rights and Interests Protection Law of the People's Republic of China" and the "Product Quality Law of the People's Republic of China" to implement after-sales three-guarantee service. The service content is as follows:

### Warranty Policy

During the validity period of the Three Guarantees, you can enjoy free returns, exchanges, and repair services in accordance with this provision. Returns, exchanges, and repairs should be handled with invoices.

1. Returns without reason within 7 days from the day after receipt (e-commerce purchase channel), the user will bear the logistics costs.
2. This product has performance failures listed in the "Product Performance Failure Table". After after-sales service testing and confirmation, you can enjoy the following services for free:

| Service Type | Service Policy                                                                    |
| ------------ | --------------------------------------------------------------------------------- |
| Return       | Return of product due to quality reasons within 7 days from the day after receipt |
| Exchange     | Exchange for product quality reasons within 15 days from the day after receipt    |
| Repair       | Repair due to product quality within 1 year from the day after receipt            |

{% hint style="info" %}
Friendly reminder: Since packaging boxes are required to ensure the safety of product transportation during transportation, it is recommended that you keep the packaging boxes for at least 30 days from the day after signing for the product.
{% endhint %}

### Non-warranty Regulations

1. Unauthorized repair, misuse, collision, neglect, abuse, liquid intrusion, accident, alteration, incorrect use of non-product accessories, or tearing, alteration of labels, and anti-counterfeiting marks;
2. The three-pack validity period has expired;
3. Damage caused by force majeure;
4. Failure to comply with the performance failures listed in the "Product Performance Failure Table";
5. This product and its accessories have performance failures listed in the "Product Performance Failure Table" due to human reasons.

***


# GMC-01WB

User Manual for GMC-01WB 1CH Wi-Fi Curtain Module

***

## Appearance

<figure><img src="https://3898863868-files.gitbook.io/~/files/v0/b/gitbook-x-prod.appspot.com/o/spaces%2F-MDHxt7lj9funy2SIeFB%2Fuploads%2FCudAMqIMr8jTxP45xiD4%2F7-gmc-01wb-front.jpg?alt=media&amp;token=7665af2c-c86f-483f-9c20-0b4d79f3e1b9" alt="" width="375"><figcaption><p>GMC-01WB</p></figcaption></figure>

***

## Introduce <a href="#a7ulc" id="a7ulc"></a>

### Short Description <a href="#shellyplus1-snsw-001x16eu-shortdescription" id="shellyplus1-snsw-001x16eu-shortdescription"></a>

* GMC-01WB is a small form factor smart switch which allows remote control of curtain/blind motors through a mobile phone, tablet and home automation system.
* GMC-01WB can be accessed, controlled and monitored remotely from any place where the user has internet connectivity, as long as the device is connected to a Wi-Fi router and the Internet.
* It can be retrofitted into standard electrical wall boxes, behind power sockets and light switches or other places with limited space.

### Features <a href="#h4js5" id="h4js5"></a>

* No gateway required - You don’t need to purchase a gateway for this device, the device connects directly to your house’s Wi-Fi
* Wi-Fi + Bluetooth dual mode - connect to the network faster, with network provisioning speed 2 times faster than pure Wi-Fi devices
* App remote control - control the device anytime and anywhere through mobile App
* Smart linkage - In smart scene mode, linkage can be set to sound an alarm. The mobile App will also receive prompts, such as garage door open/close status, timeout notifications and overnight notifications, to remind you to close the garage door.
* Voice control - used with Amazon Echo, Google Home, Yandex, Tmall Genie
* Offline function - when the device is offline, the App will remind the device to go offline after 30 minutes
* Home Sharing - Create a smart home with your family
* Set a schedule - turn connected devices on and off at specified times
* Sharing feature - share with family members for joint control
* Supports Siri - This device is not compatible with HomeKit. But you can add click-to-run scenes to Siri shortcuts in the Smart Life App

{% hint style="success" %}
Bluetooth is only used for network signal connection and cannot be used alone to control devices. Wi-Fi + Bluetooth distribution is faster
{% endhint %}

***

## Safety Consultation and Precautions

1. The installation process of this product involves strong electricity and must be installed by professionals in accordance with electrical specifications and product instructions;
2. This product is for indoor use only, please do not use it in humid environments or outdoors;
3. This product is only suitable for safe use in areas below 2,000 meters above sea level;
4. Pay attention to moisture-proof, do not spill water or other liquids on this product;
5. Do not place this product near a heat source;
6. Do not attempt to repair this product yourself, this work should be performed by authorized professionals;
7. Do not use it with overload. Please make sure that the 10A overcurrent protection circuit breaker on the front of this product is working properly before powering on. It is recommended that the stripping length of the terminal connecting wire is 6-8 mm;
8. This product should not be installed or fixed in a place that can be touched by human hands, such as outside the wall. It should be installed in an appliance or a hidden box;
9. The position of the fixed antenna should be as far away as possible from metal, wires and the module itself. (Applicable to external antenna models).

***

## Main Applications <a href="#shellyplus1-snsw-001x16eu-mainapplications" id="shellyplus1-snsw-001x16eu-mainapplications"></a>

* Residential
* MDU (Multi Dwelling Units - apartments, condominiums, hotels, etc.)
* Government/municipal
* University/college

***

## Integrations <a href="#shellyplus1-snsw-001x16eu-integrations" id="shellyplus1-snsw-001x16eu-integrations"></a>

* Google Assistant
* Amazon Alexa
* Yandex Alice
* Baidu Xiaodu
* Tmall Genie

***

## Supported Load Types <a href="#shellyplus1-snsw-001x16eu-supportedloadtypes" id="shellyplus1-snsw-001x16eu-supportedloadtypes"></a>

* Curtain Motor
* Blind Motor

***

## Installation

{% hint style="danger" %}
Please make sure the main power switch is turned off before installation
{% endhint %}

1. Connect wires according to the wiring diagram;
2. Insert the module into the junction box;
3. Turn on the main power switch and add devices according to the [**quick setup.**](#quick-setup)

<figure><img src="https://3898863868-files.gitbook.io/~/files/v0/b/gitbook-x-prod.appspot.com/o/spaces%2F-MDHxt7lj9funy2SIeFB%2Fuploads%2Fm9dMfSejS9yt0DPawY25%2Finstall%20to%20the%20wall.png?alt=media&amp;token=332b07b8-865b-42f2-9463-2f10738bfec5" alt=""><figcaption><p>Insert into the junction box</p></figcaption></figure>

***

## Wiring Schematic

<figure><img src="https://3898863868-files.gitbook.io/~/files/v0/b/gitbook-x-prod.appspot.com/o/spaces%2F-MDHxt7lj9funy2SIeFB%2Fuploads%2FB1Mcqb6hK5iM2q7HENxa%2F1ch%20curtain.png?alt=media&amp;token=a3e312e0-c535-494e-a70e-30e5e1cdb977" alt=""><figcaption><p>1CH Curtain Module</p></figcaption></figure>

{% hint style="success" %}
The mechanical switch can only be used with AC100 - 240V.
{% endhint %}

***

## Tech Specs <a href="#s4dtx" id="s4dtx"></a>

* Voltage: AC100 - 240V | 50/60Hz
* Dimensions: 45 x 45 x 18mm (without mounting clip) | 50 x 45 x 22mm (with mounting clip)
* Wireless Standard: Wi-Fi - 2.4GHz + Bluetooth
* Max. Load: 3A | 600W

***

## Quick Setup

### 1. Register an account <a href="#izkpz" id="izkpz"></a>

<details>

<summary>Use the 'Smart Life' App</summary>

Please jump to the '[**Use Smart Life App**](/smart-life/user-manual-for-smart-life)' page to view

</details>

### 2. Add Device <a href="#pxw57" id="pxw57"></a>

Open the Smart Life App, click the '+' in the upper right corner of the homepage, enter the add device (accessory) page, select it, and follow the prompts

{% hint style="success" %}
**2 ways to put the module into network pairing mode**

* Press the reset key for about 10 seconds
* Press the traditional switch 10 seconds until the indicator light is flashing quickly

<img src="https://3898863868-files.gitbook.io/~/files/v0/b/gitbook-x-prod.appspot.com/o/spaces%2F-MDHxt7lj9funy2SIeFB%2Fuploads%2FmbInGDysXabAi1dyhJj1%2F1ch%20curtain%20-%20pair%20network.png?alt=media&amp;token=acd23bac-53e8-4201-8d5e-4c0fa1c9050e" alt="" data-size="original">
{% endhint %}

{% hint style="success" %}
If the addition fails, please press and hold the network configuration button again and try again.
{% endhint %}

### 3. Control the Device <a href="#kjvoo" id="kjvoo"></a>

Use the App to control. If you can control the device normally, it means the device is working properly.

***

## Indicator Light Status Description

| **Indicator Status** | **Description**              |
| -------------------- | ---------------------------- |
| Blue flashes quickly | Connecting the network       |
| Blue is always on    | Network connection is normal |
| Indicator off        | Device offline/disconnected  |

***

## Toxic and Hazardous Substances Statement

<table data-header-hidden data-full-width="false"><thead><tr><th width="141"></th><th width="91"></th><th width="89"></th><th width="87"></th><th width="96"></th><th width="105"></th><th></th></tr></thead><tbody><tr><td>Part Name</td><td>铅 (Pb)</td><td>汞 (Hg)</td><td>镉(Cd)</td><td>六价铬<br>(Cr(VI))</td><td>多溴联苯<br>(PBB)</td><td>多溴二苯醚<br>(PBDE)</td></tr><tr><td>Plastic Shell</td><td>O</td><td>O</td><td>O</td><td>O</td><td>O</td><td>O</td></tr><tr><td>Plastic bracket</td><td>O</td><td>O</td><td>O</td><td>O</td><td>O</td><td>O</td></tr><tr><td>Electronic Component</td><td>O</td><td>O</td><td>O</td><td>O</td><td>O</td><td>O</td></tr><tr><td>PCBA</td><td>O</td><td>O</td><td>O</td><td>O</td><td>O</td><td>O</td></tr><tr><td>Metal</td><td>O</td><td>O</td><td>O</td><td>O</td><td>O</td><td>O</td></tr></tbody></table>

This form is prepared in accordance with the provisions of SJ/T 11364.

* O: Indicates that the content of the hazardous substance in all homogeneous materials of this part is below the limit requirements specified in GB/T 26572.
* ×: Indicates that the content of the hazardous substance in at least one homogeneous material of this part exceeds the limit requirements specified in GB/T 26572.

***

## Instructions for Use of Micropower Equipment

1. The Wi-Fi technology used in this product complies with the technical requirements of general micropower equipment Class F equipment in the 'Micropower Short-range Radio Transmission Equipment Catalog and Technical Requirements' for data transmission applications. It adopts integrated antenna, control, adjustment and switch Please refer to the relevant content in the product manual for usage instructions;
2. You are not allowed to change the usage scenarios or conditions without authorization, expand the transmission frequency range, increase the transmission power (including installing additional RF power amplifiers), and you are not allowed to change the transmitting antenna without authorization;
3. Shall not cause harmful interference to other legal radio stations, nor shall it offer protection against harmful interference;
4. Should withstand interference from industrial, scientific and medical (ISM) application equipment that radiates radio frequency energy or other legitimate radio stations;
5. If it causes harmful interference to other legal radio stations (stations), you should stop using it immediately and take measures to eliminate the interference before continuing to use it;
6. In aircraft and in accordance with laws and regulations, relevant national regulations, and standards designated radio astronomy observatories, weather radar stations, satellite earth stations (including measurement and control, ranging, receiving, and navigation stations) and other military and civilian radio stations (stations), airports, etc. Micropower equipment used in electromagnetic environment protection areas must comply with the regulations of electromagnetic environment protection and relevant industry authorities;
7. It is prohibited to use all types of model remote controls within a radius of 5,000 meters with the center point of the airport runway as the center;
8. The operating temperature of micropower equipment is -10℃ - 40℃, and the power supply is AC100 - 240V | 50/60Hz

***

## Warranty Instructions

The after-sales service of this product is strictly in accordance with the "Consumer Rights and Interests Protection Law of the People's Republic of China" and the "Product Quality Law of the People's Republic of China" to implement after-sales three-guarantee service. The service content is as follows:

### Warranty Policy

During the validity period of the Three Guarantees, you can enjoy free returns, exchanges, and repair services in accordance with this provision. Returns, exchanges, and repairs should be handled with invoices.

1. Returns without reason within 7 days from the day after receipt (e-commerce purchase channel), the user will bear the logistics costs.
2. This product has performance failures listed in the "Product Performance Failure Table". After after-sales service testing and confirmation, you can enjoy the following services for free:

| Service Type | Service Policy                                                                    |
| ------------ | --------------------------------------------------------------------------------- |
| Return       | Return of product due to quality reasons within 7 days from the day after receipt |
| Exchange     | Exchange for product quality reasons within 15 days from the day after receipt    |
| Repair       | Repair due to product quality within 1 year from the day after receipt            |

{% hint style="info" %}
Friendly reminder: Since packaging boxes are required to ensure the safety of product transportation during transportation, it is recommended that you keep the packaging boxes for at least 30 days from the day after signing for the product.
{% endhint %}

### Non-warranty Regulations

1. Unauthorized repair, misuse, collision, neglect, abuse, liquid intrusion, accident, alteration, incorrect use of non-product accessories, or tearing, alteration of labels, and anti-counterfeiting marks;
2. The three-pack validity period has expired;
3. Damage caused by force majeure;
4. Failure to comply with the performance failures listed in the "Product Performance Failure Table";
5. This product and its accessories have performance failures listed in the "Product Performance Failure Table" due to human reasons.

***


# GMG-01WB

User Manual for GMG-01WB Wi-Fi Garage Door Opener

***

## Appearance

<figure><img src="https://3898863868-files.gitbook.io/~/files/v0/b/gitbook-x-prod.appspot.com/o/spaces%2F-MDHxt7lj9funy2SIeFB%2Fuploads%2F1jjUzYj2hdL2xqWcpy3y%2F8-gmg-01wb-front.jpg?alt=media&amp;token=015691b9-030d-49a2-83e2-5d63273bfdce" alt="" width="375"><figcaption><p>GMG-01WB</p></figcaption></figure>

***

## Introduce <a href="#a7ulc" id="a7ulc"></a>

### Features <a href="#h4js5" id="h4js5"></a>

* No gateway required - You don’t need to purchase a gateway for this device, the device connects directly to your house’s Wi-Fi
* Wi-Fi + Bluetooth dual mode - connect to the network faster, with network provisioning speed 2 times faster than pure Wi-Fi devices
* App remote control - control the device anytime and anywhere through mobile App
* Smart linkage - In smart scene mode, linkage can be set to sound an alarm. The mobile App will also receive prompts, such as garage door open/close status, timeout notifications and overnight notifications, to remind you to close the garage door.
* Voice control - used with Amazon Echo, Google Home, Yandex, Tmall Genie
* History - You can view the history of your garage door switch
* Offline function - when the device is offline, the App will remind the device to go offline after 30 minutes
* Home Sharing - Create a smart home with your family
* Set a schedule - turn connected devices on and off at specified times
* Sharing feature - share with family members for joint control
* Supports Siri - This device is not compatible with HomeKit. But you can add click-to-run scenes to Siri shortcuts in the Smart Life App

{% hint style="success" %}
Bluetooth is only used for network signal connection and cannot be used alone to control devices. Wi-Fi + Bluetooth distribution is faster
{% endhint %}

***

## Safety consultation and precautions

1. The installation process of this product involves strong electricity and must be installed by professionals in accordance with electrical specifications and product instructions;
2. This product is for indoor use only, please do not use it in humid environments or outdoors;
3. This product is only suitable for safe use in areas below 2,000 meters above sea level;
4. Pay attention to moisture-proof, do not spill water or other liquids on this product;
5. Do not place this product near a heat source;
6. Do not attempt to repair this product yourself, this work should be performed by authorized professionals;
7. Do not use it with overload. Please make sure that the 10A overcurrent protection circuit breaker on the front of this product is working properly before powering on. It is recommended that the stripping length of the terminal connecting wire is 6-8 mm;
8. This product should not be installed or fixed in a place that can be touched by human hands, such as outside the wall. It should be installed in an appliance or a hidden box;
9. The position of the fixed antenna should be as far away as possible from metal, wires and the module itself. (Applicable to external antenna models).

***

## Installation

{% hint style="danger" %}
Please make sure the main power switch is turned off before installation
{% endhint %}

1. Use a screwdriver to loosen the screws of the equipment terminal, and connect the neutral wire to the N hole and the live wire to the L hole as shown in the figure; S1 and S2 are connected to the signal wire and the switch; S3 and S4 are connected to the induction door sensor;
2. Turn on the main power switch and add devices according to the [**quick setup.**](#quick-setup)

***

## Wiring Schematic

<figure><img src="https://3898863868-files.gitbook.io/~/files/v0/b/gitbook-x-prod.appspot.com/o/spaces%2F-MDHxt7lj9funy2SIeFB%2Fuploads%2FeURjjB3ufXqgz53ceyvQ%2Fgmg-01x%20wiring%20diagram.png?alt=media&amp;token=099720af-97b2-4455-b39f-135d92a31c4a" alt=""><figcaption><p>GMG-01WB</p></figcaption></figure>

{% hint style="success" %}
The mechanical switch can only be used with DC12V or below, and has no function with AC voltage.
{% endhint %}

***

## Tech Specs <a href="#s4dtx" id="s4dtx"></a>

* Voltage: 100 - 250VAC | 50/60Hz
* Dimensions: 45 x 45 x 18mm (without mounting clip) | 50 x 45 x 22mm (with mounting clip)
* Wireless Standard: Wi-Fi - 2.4GHz + Bluetooth
* Cable length: 5 meters

***

## Quick Setup

### 1. Register an account <a href="#izkpz" id="izkpz"></a>

<details>

<summary>Use the 'Smart Life' App</summary>

Please jump to the '[**Use Smart Life App**](/smart-life/user-manual-for-smart-life)' page to view

</details>

### 2. Add Device <a href="#pxw57" id="pxw57"></a>

Open the Smart Life App, click the '+' in the upper right corner of the homepage, enter the add device (accessory) page, select it, and follow the prompts

{% hint style="success" %}
Press the reset key for about 10 seconds to put the module into network pairing mode

<img src="https://3898863868-files.gitbook.io/~/files/v0/b/gitbook-x-prod.appspot.com/o/spaces%2F-MDHxt7lj9funy2SIeFB%2Fuploads%2FVqglHmKxA7cYXaEaGxtC%2F1%20method%20to%20network%20pairing.png?alt=media&amp;token=ae9b092f-5fc2-4f95-ae98-d1813d8e791e" alt="" data-size="original">
{% endhint %}

{% hint style="success" %}
If the addition fails, please press and hold the network configuration button again and try again.
{% endhint %}

### 3. Control the Device <a href="#kjvoo" id="kjvoo"></a>

Use the App to control. If you can control the device normally, it means the device is working properly.

***

## Indicator Light Status Description

| **Indicator Status** | **Description**              |
| -------------------- | ---------------------------- |
| Blue flashes quickly | Connecting the network       |
| Blue is always on    | Network connection is normal |
| Indicator off        | Device offline/disconnected  |

***

## Toxic and Hazardous Substances Statement

<table data-header-hidden data-full-width="false"><thead><tr><th width="141"></th><th width="91"></th><th width="89"></th><th width="87"></th><th width="96"></th><th width="105"></th><th></th></tr></thead><tbody><tr><td>Part Name</td><td>铅 (Pb)</td><td>汞 (Hg)</td><td>镉(Cd)</td><td>六价铬<br>(Cr(VI))</td><td>多溴联苯<br>(PBB)</td><td>多溴二苯醚<br>(PBDE)</td></tr><tr><td>Plastic Shell</td><td>O</td><td>O</td><td>O</td><td>O</td><td>O</td><td>O</td></tr><tr><td>Plastic bracket</td><td>O</td><td>O</td><td>O</td><td>O</td><td>O</td><td>O</td></tr><tr><td>Electronic Component</td><td>O</td><td>O</td><td>O</td><td>O</td><td>O</td><td>O</td></tr><tr><td>PCBA</td><td>O</td><td>O</td><td>O</td><td>O</td><td>O</td><td>O</td></tr><tr><td>Metal</td><td>O</td><td>O</td><td>O</td><td>O</td><td>O</td><td>O</td></tr></tbody></table>

This form is prepared in accordance with the provisions of SJ/T 11364.

* O: Indicates that the content of the hazardous substance in all homogeneous materials of this part is below the limit requirements specified in GB/T 26572.
* ×: Indicates that the content of the hazardous substance in at least one homogeneous material of this part exceeds the limit requirements specified in GB/T 26572.

***

## Instructions for Use of Micropower Equipment

1. The Wi-Fi technology used in this product complies with the technical requirements of general micropower equipment Class F equipment in the 'Micropower Short-range Radio Transmission Equipment Catalog and Technical Requirements' for data transmission applications. It adopts integrated antenna, control, adjustment and switch Please refer to the relevant content in the product manual for usage instructions;
2. You are not allowed to change the usage scenarios or conditions without authorization, expand the transmission frequency range, increase the transmission power (including installing additional RF power amplifiers), and you are not allowed to change the transmitting antenna without authorization;
3. Shall not cause harmful interference to other legal radio stations, nor shall it offer protection against harmful interference;
4. Should withstand interference from industrial, scientific and medical (ISM) application equipment that radiates radio frequency energy or other legitimate radio stations;
5. If it causes harmful interference to other legal radio stations (stations), you should stop using it immediately and take measures to eliminate the interference before continuing to use it;
6. In aircraft and in accordance with laws and regulations, relevant national regulations, and standards designated radio astronomy observatories, weather radar stations, satellite earth stations (including measurement and control, ranging, receiving, and navigation stations) and other military and civilian radio stations (stations), airports, etc. Micropower equipment used in electromagnetic environment protection areas must comply with the regulations of electromagnetic environment protection and relevant industry authorities;
7. It is prohibited to use all types of model remote controls within a radius of 5,000 meters with the center point of the airport runway as the center;
8. The operating temperature of micropower equipment is -10℃ - 40℃, and the power supply is 220 V AC, 10 A; 24 - 38 V DC, 10A; 38 - 60 V DC, 1A.

***

## Warranty Instructions

The after-sales service of this product is strictly in accordance with the "Consumer Rights and Interests Protection Law of the People's Republic of China" and the "Product Quality Law of the People's Republic of China" to implement after-sales three-guarantee service. The service content is as follows:

### Warranty Policy

During the validity period of the Three Guarantees, you can enjoy free returns, exchanges, and repair services in accordance with this provision. Returns, exchanges, and repairs should be handled with invoices.

1. Returns without reason within 7 days from the day after receipt (e-commerce purchase channel), the user will bear the logistics costs.
2. This product has performance failures listed in the "Product Performance Failure Table". After after-sales service testing and confirmation, you can enjoy the following services for free:

| Service Type | Service Policy                                                                    |
| ------------ | --------------------------------------------------------------------------------- |
| Return       | Return of product due to quality reasons within 7 days from the day after receipt |
| Exchange     | Exchange for product quality reasons within 15 days from the day after receipt    |
| Repair       | Repair due to product quality within 1 year from the day after receipt            |

{% hint style="info" %}
Friendly reminder: Since packaging boxes are required to ensure the safety of product transportation during transportation, it is recommended that you keep the packaging boxes for at least 30 days from the day after signing for the product.
{% endhint %}

### Non-warranty Regulations

1. Unauthorized repair, misuse, collision, neglect, abuse, liquid intrusion, accident, alteration, incorrect use of non-product accessories, or tearing, alteration of labels, and anti-counterfeiting marks;
2. The three-pack validity period has expired;
3. Damage caused by force majeure;
4. Failure to comply with the performance failures listed in the "Product Performance Failure Table";
5. This product and its accessories have performance failures listed in the "Product Performance Failure Table" due to human reasons.

***


# Zigbee Series


# GML-01Z

User Manual for GML-01Z 1CH Zigbee Switch Module

***

## Appearance

<figure><img src="https://3898863868-files.gitbook.io/~/files/v0/b/gitbook-x-prod.appspot.com/o/spaces%2F-MDHxt7lj9funy2SIeFB%2Fuploads%2FP3MfpIYpDpEph6ariuwP%2F9-gml-01z-front.jpg?alt=media&amp;token=2928b334-ab7d-46f2-9613-cc30fa10d04f" alt="" width="375"><figcaption><p>GML-01Z</p></figcaption></figure>

***

## Introduce <a href="#a7ulc" id="a7ulc"></a>

### Short Description <a href="#shellyplus1-snsw-001x16eu-shortdescription" id="shellyplus1-snsw-001x16eu-shortdescription"></a>

* GML-01Z is a small form factor smart switch which allows remote control of electric appliances through a mobile phone, tablet and home automation system.
* GML-01Z can be accessed, controlled and monitored remotely from any place where the user has internet connectivity, as long as the device is connected to a Zigee gateway and the Internet.
* It can be retrofitted into standard electrical wall boxes, behind power sockets and light switches or other places with limited space.

### Features <a href="#h4js5" id="h4js5"></a>

* App remote control - control the device anytime and anywhere through mobile App
* Smart linkage - In smart scene mode, linkage can be set to sound an alarm. The mobile App will also receive prompts, such as garage door open/close status, timeout notifications and overnight notifications, to remind you to close the garage door.
* Voice control - used with Amazon Echo, Google Home, Yandex, Tmall Genie
* Offline function - when the device is offline, the App will remind the device to go offline after 30 minutes
* Home Sharing - Create a smart home with your family
* Set a schedule - turn connected devices on and off at specified times
* Sharing feature - share with family members for joint control
* Supports Siri - This device is not compatible with HomeKit. But you can add click-to-run scenes to Siri shortcuts in the Smart Life App

***

## Safety Consultation and Precautions

1. The installation process of this product involves strong electricity and must be installed by professionals in accordance with electrical specifications and product instructions;
2. This product is for indoor use only, please do not use it in humid environments or outdoors;
3. This product is only suitable for safe use in areas below 2,000 meters above sea level;
4. Pay attention to moisture-proof, do not spill water or other liquids on this product;
5. Do not place this product near a heat source;
6. Do not attempt to repair this product yourself, this work should be performed by authorized professionals;
7. Do not use it with overload. Please make sure that the 10A overcurrent protection circuit breaker on the front of this product is working properly before powering on. It is recommended that the stripping length of the terminal connecting wire is 6-8 mm;
8. This product should not be installed or fixed in a place that can be touched by human hands, such as outside the wall. It should be installed in an appliance or a hidden box;
9. The position of the fixed antenna should be as far away as possible from metal, wires and the module itself. (Applicable to external antenna models).

***

## Main Applications <a href="#shellyplus1-snsw-001x16eu-mainapplications" id="shellyplus1-snsw-001x16eu-mainapplications"></a>

* Residential
* MDU (Multi Dwelling Units - apartments, condominiums, hotels, etc.)
* Light commercial (small office buildings, small retail/restaurant/gas station, etc.)
* Government/municipal
* University/college

***

## Integrations <a href="#shellyplus1-snsw-001x16eu-integrations" id="shellyplus1-snsw-001x16eu-integrations"></a>

* Google Assistant
* Amazon Alexa
* Yandex Alice
* Baidu Xiaodu
* Tmall Genie

***

## Supported Load Types <a href="#shellyplus1-snsw-001x16eu-supportedloadtypes" id="shellyplus1-snsw-001x16eu-supportedloadtypes"></a>

* Resistive (incandescent bulbs, heating devices)
* Capacitive (capacitor banks, electronic equipment, motor start capacitors)
* Inductive with RC Snubber (LED light drivers, transformers, fans, refrigerators, air-conditioners)

***

## Installation

{% hint style="danger" %}
Please make sure the main power switch is turned off before installation
{% endhint %}

1. Connect wires according to the wiring diagram;
2. Insert the module into the junction box;
3. Turn on the main power switch and add devices according to the [**quick setup.**](#quick-setup)

<figure><img src="https://3898863868-files.gitbook.io/~/files/v0/b/gitbook-x-prod.appspot.com/o/spaces%2F-MDHxt7lj9funy2SIeFB%2Fuploads%2FvdFcwHNV6jJoOXKSA6mC%2Finstall%20to%20the%20wall%20-%201.png?alt=media&amp;token=62270ef7-55d4-47ab-bd75-8ef523921b11" alt=""><figcaption><p>Insert into the junction box</p></figcaption></figure>

***

## Wiring Schematic

<figure><img src="https://3898863868-files.gitbook.io/~/files/v0/b/gitbook-x-prod.appspot.com/o/spaces%2F-MDHxt7lj9funy2SIeFB%2Fuploads%2Fq8FOrdd1LWYoHM6KGlES%2F1ch%20-%20without%20switch.png?alt=media&amp;token=c4ece3db-1a43-48a4-9cdb-8d47525bafc0" alt=""><figcaption><p>Without Switch</p></figcaption></figure>

<figure><img src="https://3898863868-files.gitbook.io/~/files/v0/b/gitbook-x-prod.appspot.com/o/spaces%2F-MDHxt7lj9funy2SIeFB%2Fuploads%2FCAx7zEnUBinUL8yI6iW0%2F1ch%20-%20with%201%20switch.png?alt=media&amp;token=2f0e4a35-ae11-4470-be25-1a0b414a7a66" alt=""><figcaption><p>Connect 1 switch</p></figcaption></figure>

<figure><img src="https://3898863868-files.gitbook.io/~/files/v0/b/gitbook-x-prod.appspot.com/o/spaces%2F-MDHxt7lj9funy2SIeFB%2Fuploads%2FAA7LW5zYMPMMJTVVGdN4%2F1ch%20-%20with%202%203-way%20switch.png?alt=media&amp;token=e8a12e5a-61f7-4f82-aac7-106daecf3117" alt=""><figcaption><p>Connect 2 3-way switches</p></figcaption></figure>

{% hint style="success" %}
The mechanical switch can only be used with AC100 - 240V.
{% endhint %}

***

## Tech Specs <a href="#s4dtx" id="s4dtx"></a>

* Voltage: AC100 - 240V | 50/60Hz
* Dimensions: 45 x 45 x 18mm (without mounting clip) | 50 x 45 x 22mm (with mounting clip)
* Wireless Standard: Zigbee 3.0
* Max. Load: LED 250W | 10A

***

## Quick Setup

### 1. Register an account <a href="#izkpz" id="izkpz"></a>

<details>

<summary>Use the 'Smart Life' App</summary>

Please jump to the '[**Use Smart Life App**](/smart-life/user-manual-for-smart-life)' page to view

</details>

### 2. Add Device <a href="#pxw57" id="pxw57"></a>

Open the Smart Life App, open the control panel of the Zigbee gateway, click the '+' in the homepage, enter the add device page, select it, and follow the prompts

{% hint style="success" %}
**2 ways to put the module into network pairing mode**

* Press the reset key for about 10 seconds
* Press the traditional switch 5 times until the indicator light is flashing quickly

<img src="https://3898863868-files.gitbook.io/~/files/v0/b/gitbook-x-prod.appspot.com/o/spaces%2F-MDHxt7lj9funy2SIeFB%2Fuploads%2Fch7IStLZdbl4GJZIC5FT%2F1ch-zigbee%20-%20network%20pairing.png?alt=media&amp;token=bba8a66f-fa05-401f-940a-3dda207f31f9" alt="" data-size="original">
{% endhint %}

{% hint style="success" %}
If the addition fails, please press and hold the network configuration button again and try again.
{% endhint %}

### 3. Control the Device <a href="#kjvoo" id="kjvoo"></a>

Use the App to control. If you can control the device normally, it means the device is working properly.

***

## System Requirements

1. Wi-Fi Router&#x20;
2. ZigBee Gateway
3. iPhone, iPad (iOS 7.0 or higher) | Android Devices (4.0 or higher)

<figure><img src="https://3898863868-files.gitbook.io/~/files/v0/b/gitbook-x-prod.appspot.com/o/spaces%2F-MDHxt7lj9funy2SIeFB%2Fuploads%2Fdi751C8Vc8uJ4MF8nYkT%2Fzigbee%20system%20requirement.png?alt=media&amp;token=adbd75e3-cfae-4f7e-83ea-ce8d57727d0e" alt="" width="563"><figcaption></figcaption></figure>

***

## Indicator Light Status Description

| **Indicator Status** | **Description**              |
| -------------------- | ---------------------------- |
| Blue flashes quickly | Connecting the network       |
| Blue is always on    | Network connection is normal |
| Indicator off        | Device offline/disconnected  |

***

## Toxic and Hazardous Substances Statement

<table data-header-hidden data-full-width="false"><thead><tr><th width="141"></th><th width="91"></th><th width="89"></th><th width="87"></th><th width="96"></th><th width="105"></th><th></th></tr></thead><tbody><tr><td>Part Name</td><td>铅 (Pb)</td><td>汞 (Hg)</td><td>镉(Cd)</td><td>六价铬<br>(Cr(VI))</td><td>多溴联苯<br>(PBB)</td><td>多溴二苯醚<br>(PBDE)</td></tr><tr><td>Plastic Shell</td><td>O</td><td>O</td><td>O</td><td>O</td><td>O</td><td>O</td></tr><tr><td>Plastic bracket</td><td>O</td><td>O</td><td>O</td><td>O</td><td>O</td><td>O</td></tr><tr><td>Electronic Component</td><td>O</td><td>O</td><td>O</td><td>O</td><td>O</td><td>O</td></tr><tr><td>PCBA</td><td>O</td><td>O</td><td>O</td><td>O</td><td>O</td><td>O</td></tr><tr><td>Metal</td><td>O</td><td>O</td><td>O</td><td>O</td><td>O</td><td>O</td></tr></tbody></table>

This form is prepared in accordance with the provisions of SJ/T 11364.

* O: Indicates that the content of the hazardous substance in all homogeneous materials of this part is below the limit requirements specified in GB/T 26572.
* ×: Indicates that the content of the hazardous substance in at least one homogeneous material of this part exceeds the limit requirements specified in GB/T 26572.

***

## Instructions for Use of Micropower Equipment

1. The Wi-Fi technology used in this product complies with the technical requirements of general micropower equipment Class F equipment in the 'Micropower Short-range Radio Transmission Equipment Catalog and Technical Requirements' for data transmission applications. It adopts integrated antenna, control, adjustment and switch Please refer to the relevant content in the product manual for usage instructions;
2. You are not allowed to change the usage scenarios or conditions without authorization, expand the transmission frequency range, increase the transmission power (including installing additional RF power amplifiers), and you are not allowed to change the transmitting antenna without authorization;
3. Shall not cause harmful interference to other legal radio stations, nor shall it offer protection against harmful interference;
4. Should withstand interference from industrial, scientific and medical (ISM) application equipment that radiates radio frequency energy or other legitimate radio stations;
5. If it causes harmful interference to other legal radio stations (stations), you should stop using it immediately and take measures to eliminate the interference before continuing to use it;
6. In aircraft and in accordance with laws and regulations, relevant national regulations, and standards designated radio astronomy observatories, weather radar stations, satellite earth stations (including measurement and control, ranging, receiving, and navigation stations) and other military and civilian radio stations (stations), airports, etc. Micropower equipment used in electromagnetic environment protection areas must comply with the regulations of electromagnetic environment protection and relevant industry authorities;
7. It is prohibited to use all types of model remote controls within a radius of 5,000 meters with the center point of the airport runway as the center;
8. The operating temperature of micropower equipment is -10℃ - 40℃, and the power supply is AC100 - 240V | 50/60Hz

***

## Warranty Instructions

The after-sales service of this product is strictly in accordance with the "Consumer Rights and Interests Protection Law of the People's Republic of China" and the "Product Quality Law of the People's Republic of China" to implement after-sales three-guarantee service. The service content is as follows:

### Warranty Policy

During the validity period of the Three Guarantees, you can enjoy free returns, exchanges, and repair services in accordance with this provision. Returns, exchanges, and repairs should be handled with invoices.

1. Returns without reason within 7 days from the day after receipt (e-commerce purchase channel), the user will bear the logistics costs.
2. This product has performance failures listed in the "Product Performance Failure Table". After after-sales service testing and confirmation, you can enjoy the following services for free:

| Service Type | Service Policy                                                                    |
| ------------ | --------------------------------------------------------------------------------- |
| Return       | Return of product due to quality reasons within 7 days from the day after receipt |
| Exchange     | Exchange for product quality reasons within 15 days from the day after receipt    |
| Repair       | Repair due to product quality within 1 year from the day after receipt            |

{% hint style="info" %}
Friendly reminder: Since packaging boxes are required to ensure the safety of product transportation during transportation, it is recommended that you keep the packaging boxes for at least 30 days from the day after signing for the product.
{% endhint %}

### Non-warranty Regulations

1. Unauthorized repair, misuse, collision, neglect, abuse, liquid intrusion, accident, alteration, incorrect use of non-product accessories, or tearing, alteration of labels, and anti-counterfeiting marks;
2. The three-pack validity period has expired;
3. Damage caused by force majeure;
4. Failure to comply with the performance failures listed in the "Product Performance Failure Table";
5. This product and its accessories have performance failures listed in the "Product Performance Failure Table" due to human reasons.

***


# GML-01Z-16A

User Manual for GML-01Z-16A 1CH High Power Zigbee Switch Module

***

## Appearance

<figure><img src="https://3898863868-files.gitbook.io/~/files/v0/b/gitbook-x-prod.appspot.com/o/spaces%2F-MDHxt7lj9funy2SIeFB%2Fuploads%2FkuGmbS3DSbmgpVscP9jw%2F11-gml-01z-16a-front.jpg?alt=media&amp;token=79b077cc-c87b-4860-9576-c4aec42948d6" alt="" width="375"><figcaption><p>GML-01Z-16A</p></figcaption></figure>

***

## Introduce <a href="#a7ulc" id="a7ulc"></a>

### Short Description <a href="#shellyplus1-snsw-001x16eu-shortdescription" id="shellyplus1-snsw-001x16eu-shortdescription"></a>

* GML-01Z-16A is a small form factor smart switch which allows remote control of electric appliances through a mobile phone, tablet and home automation system.
* GML-01Z-16A can be accessed, controlled and monitored remotely from any place where the user has internet connectivity, as long as the device is connected to a Zigee gateway and the Internet.
* It can be retrofitted into standard electrical wall boxes, behind power sockets and light switches or other places with limited space.

### Features <a href="#h4js5" id="h4js5"></a>

* App remote control - control the device anytime and anywhere through mobile App
* Smart linkage - In smart scene mode, linkage can be set to sound an alarm. The mobile App will also receive prompts, such as garage door open/close status, timeout notifications and overnight notifications, to remind you to close the garage door.
* Voice control - used with Amazon Echo, Google Home, Yandex, Tmall Genie
* Offline function - when the device is offline, the App will remind the device to go offline after 30 minutes
* Home Sharing - Create a smart home with your family
* Set a schedule - turn connected devices on and off at specified times
* Sharing feature - share with family members for joint control
* Supports Siri - This device is not compatible with HomeKit. But you can add click-to-run scenes to Siri shortcuts in the Smart Life App

***

## Safety Consultation and Precautions

1. The installation process of this product involves strong electricity and must be installed by professionals in accordance with electrical specifications and product instructions;
2. This product is for indoor use only, please do not use it in humid environments or outdoors;
3. This product is only suitable for safe use in areas below 2,000 meters above sea level;
4. Pay attention to moisture-proof, do not spill water or other liquids on this product;
5. Do not place this product near a heat source;
6. Do not attempt to repair this product yourself, this work should be performed by authorized professionals;
7. Do not use it with overload. Please make sure that the 10A overcurrent protection circuit breaker on the front of this product is working properly before powering on. It is recommended that the stripping length of the terminal connecting wire is 6-8 mm;
8. This product should not be installed or fixed in a place that can be touched by human hands, such as outside the wall. It should be installed in an appliance or a hidden box;
9. The position of the fixed antenna should be as far away as possible from metal, wires and the module itself. (Applicable to external antenna models).

***

## Main Applications <a href="#shellyplus1-snsw-001x16eu-mainapplications" id="shellyplus1-snsw-001x16eu-mainapplications"></a>

* Residential
* MDU (Multi Dwelling Units - apartments, condominiums, hotels, etc.)
* Light commercial (small office buildings, small retail/restaurant/gas station, etc.)
* Government/municipal
* University/college

***

## Integrations <a href="#shellyplus1-snsw-001x16eu-integrations" id="shellyplus1-snsw-001x16eu-integrations"></a>

* Google Assistant
* Amazon Alexa
* Yandex Alice
* Baidu Xiaodu
* Tmall Genie

***

## Supported Load Types <a href="#shellyplus1-snsw-001x16eu-supportedloadtypes" id="shellyplus1-snsw-001x16eu-supportedloadtypes"></a>

* Resistive (incandescent bulbs, heating devices)
* Capacitive (capacitor banks, electronic equipment, motor start capacitors)
* Inductive with RC Snubber (LED light drivers, transformers, fans, refrigerators, air-conditioners)

***

## Installation

{% hint style="danger" %}
Please make sure the main power switch is turned off before installation
{% endhint %}

1. Connect wires according to the wiring diagram;
2. Insert the module into the junction box;
3. Turn on the main power switch and add devices according to the [**quick setup.**](#quick-setup)

<figure><img src="https://3898863868-files.gitbook.io/~/files/v0/b/gitbook-x-prod.appspot.com/o/spaces%2F-MDHxt7lj9funy2SIeFB%2Fuploads%2FvdFcwHNV6jJoOXKSA6mC%2Finstall%20to%20the%20wall%20-%201.png?alt=media&amp;token=62270ef7-55d4-47ab-bd75-8ef523921b11" alt=""><figcaption><p>Insert into the junction box</p></figcaption></figure>

***

## Wiring Schematic

<figure><img src="https://3898863868-files.gitbook.io/~/files/v0/b/gitbook-x-prod.appspot.com/o/spaces%2F-MDHxt7lj9funy2SIeFB%2Fuploads%2FXQFuKcIyUseqvp14ZhbZ%2F1ch%20-%20without%20switch.png?alt=media&amp;token=dbb0acb8-84a5-44e4-8127-432f175fe4ff" alt=""><figcaption><p>Without Switch</p></figcaption></figure>

<figure><img src="https://3898863868-files.gitbook.io/~/files/v0/b/gitbook-x-prod.appspot.com/o/spaces%2F-MDHxt7lj9funy2SIeFB%2Fuploads%2FVnMQAjf36JSYWatleh0z%2F1ch%20-%201%20switch.png?alt=media&amp;token=ddebd351-10a6-4c5b-b991-f6d74a8e7a98" alt=""><figcaption><p>Connect 1 switch</p></figcaption></figure>

<figure><img src="https://3898863868-files.gitbook.io/~/files/v0/b/gitbook-x-prod.appspot.com/o/spaces%2F-MDHxt7lj9funy2SIeFB%2Fuploads%2F4zGE93NkO6ue7iYH58jc%2F1ch%20-%202%20switch.png?alt=media&amp;token=0912a5eb-93e7-4300-9df9-673a637e7a8e" alt=""><figcaption><p>Connect 2 3-way switches</p></figcaption></figure>

{% hint style="success" %}
The mechanical switch can only be used with AC100 - 240V.
{% endhint %}

***

## Tech Specs <a href="#s4dtx" id="s4dtx"></a>

* Voltage: AC100 - 240V | 50/60Hz
* Dimensions: 45 x 45 x 18mm (without mounting clip) | 50 x 45 x 22mm (with mounting clip)
* Wireless Standard: Zigbee 3.0
* Max. Load: LED 300W | 16A

***

## Quick Setup

### 1. Register an account <a href="#izkpz" id="izkpz"></a>

<details>

<summary>Use the 'Smart Life' App</summary>

Please jump to the '[**Use Smart Life App**](/smart-life/user-manual-for-smart-life)' page to view

</details>

### 2. Add Device <a href="#pxw57" id="pxw57"></a>

Open the Smart Life App, open the control panel of the Zigbee gateway, click the '+' in the homepage, enter the add device page, select it, and follow the prompts

{% hint style="success" %}
**2 ways to put the module into network pairing mode**

* Press the reset key for about 10 seconds
* Press the traditional switch 5 times until the indicator light is flashing quickly

<img src="https://3898863868-files.gitbook.io/~/files/v0/b/gitbook-x-prod.appspot.com/o/spaces%2F-MDHxt7lj9funy2SIeFB%2Fuploads%2Fch7IStLZdbl4GJZIC5FT%2F1ch-zigbee%20-%20network%20pairing.png?alt=media&amp;token=bba8a66f-fa05-401f-940a-3dda207f31f9" alt="" data-size="original">
{% endhint %}

{% hint style="success" %}
If the addition fails, please press and hold the network configuration button again and try again.
{% endhint %}

### 3. Control the Device <a href="#kjvoo" id="kjvoo"></a>

Use the App to control. If you can control the device normally, it means the device is working properly.

***

## System Requirements

1. Wi-Fi Router&#x20;
2. ZigBee Gateway
3. iPhone, iPad (iOS 7.0 or higher) | Android Devices (4.0 or higher)

<figure><img src="https://3898863868-files.gitbook.io/~/files/v0/b/gitbook-x-prod.appspot.com/o/spaces%2F-MDHxt7lj9funy2SIeFB%2Fuploads%2Fdi751C8Vc8uJ4MF8nYkT%2Fzigbee%20system%20requirement.png?alt=media&amp;token=adbd75e3-cfae-4f7e-83ea-ce8d57727d0e" alt="" width="563"><figcaption></figcaption></figure>

***

## Indicator Light Status Description

| **Indicator Status** | **Description**              |
| -------------------- | ---------------------------- |
| Blue flashes quickly | Connecting the network       |
| Blue is always on    | Network connection is normal |
| Indicator off        | Device offline/disconnected  |

***

## Toxic and Hazardous Substances Statement

<table data-header-hidden data-full-width="false"><thead><tr><th width="141"></th><th width="91"></th><th width="89"></th><th width="87"></th><th width="96"></th><th width="105"></th><th></th></tr></thead><tbody><tr><td>Part Name</td><td>铅 (Pb)</td><td>汞 (Hg)</td><td>镉(Cd)</td><td>六价铬<br>(Cr(VI))</td><td>多溴联苯<br>(PBB)</td><td>多溴二苯醚<br>(PBDE)</td></tr><tr><td>Plastic Shell</td><td>O</td><td>O</td><td>O</td><td>O</td><td>O</td><td>O</td></tr><tr><td>Plastic bracket</td><td>O</td><td>O</td><td>O</td><td>O</td><td>O</td><td>O</td></tr><tr><td>Electronic Component</td><td>O</td><td>O</td><td>O</td><td>O</td><td>O</td><td>O</td></tr><tr><td>PCBA</td><td>O</td><td>O</td><td>O</td><td>O</td><td>O</td><td>O</td></tr><tr><td>Metal</td><td>O</td><td>O</td><td>O</td><td>O</td><td>O</td><td>O</td></tr></tbody></table>

This form is prepared in accordance with the provisions of SJ/T 11364.

* O: Indicates that the content of the hazardous substance in all homogeneous materials of this part is below the limit requirements specified in GB/T 26572.
* ×: Indicates that the content of the hazardous substance in at least one homogeneous material of this part exceeds the limit requirements specified in GB/T 26572.

***

## Instructions for Use of Micropower Equipment

1. The Wi-Fi technology used in this product complies with the technical requirements of general micropower equipment Class F equipment in the 'Micropower Short-range Radio Transmission Equipment Catalog and Technical Requirements' for data transmission applications. It adopts integrated antenna, control, adjustment and switch Please refer to the relevant content in the product manual for usage instructions;
2. You are not allowed to change the usage scenarios or conditions without authorization, expand the transmission frequency range, increase the transmission power (including installing additional RF power amplifiers), and you are not allowed to change the transmitting antenna without authorization;
3. Shall not cause harmful interference to other legal radio stations, nor shall it offer protection against harmful interference;
4. Should withstand interference from industrial, scientific and medical (ISM) application equipment that radiates radio frequency energy or other legitimate radio stations;
5. If it causes harmful interference to other legal radio stations (stations), you should stop using it immediately and take measures to eliminate the interference before continuing to use it;
6. In aircraft and in accordance with laws and regulations, relevant national regulations, and standards designated radio astronomy observatories, weather radar stations, satellite earth stations (including measurement and control, ranging, receiving, and navigation stations) and other military and civilian radio stations (stations), airports, etc. Micropower equipment used in electromagnetic environment protection areas must comply with the regulations of electromagnetic environment protection and relevant industry authorities;
7. It is prohibited to use all types of model remote controls within a radius of 5,000 meters with the center point of the airport runway as the center;
8. The operating temperature of micropower equipment is -10℃ - 40℃, and the power supply is AC100 - 240V | 50/60Hz

***

## Warranty Instructions

The after-sales service of this product is strictly in accordance with the "Consumer Rights and Interests Protection Law of the People's Republic of China" and the "Product Quality Law of the People's Republic of China" to implement after-sales three-guarantee service. The service content is as follows:

### Warranty Policy

During the validity period of the Three Guarantees, you can enjoy free returns, exchanges, and repair services in accordance with this provision. Returns, exchanges, and repairs should be handled with invoices.

1. Returns without reason within 7 days from the day after receipt (e-commerce purchase channel), the user will bear the logistics costs.
2. This product has performance failures listed in the "Product Performance Failure Table". After after-sales service testing and confirmation, you can enjoy the following services for free:

| Service Type | Service Policy                                                                    |
| ------------ | --------------------------------------------------------------------------------- |
| Return       | Return of product due to quality reasons within 7 days from the day after receipt |
| Exchange     | Exchange for product quality reasons within 15 days from the day after receipt    |
| Repair       | Repair due to product quality within 1 year from the day after receipt            |

{% hint style="info" %}
Friendly reminder: Since packaging boxes are required to ensure the safety of product transportation during transportation, it is recommended that you keep the packaging boxes for at least 30 days from the day after signing for the product.
{% endhint %}

### Non-warranty Regulations

1. Unauthorized repair, misuse, collision, neglect, abuse, liquid intrusion, accident, alteration, incorrect use of non-product accessories, or tearing, alteration of labels, and anti-counterfeiting marks;
2. The three-pack validity period has expired;
3. Damage caused by force majeure;
4. Failure to comply with the performance failures listed in the "Product Performance Failure Table";
5. This product and its accessories have performance failures listed in the "Product Performance Failure Table" due to human reasons.

***


# GML-02Z

User Manual for GML-02Z 2CH Zigbee Switch Module

***

## Appearance

<figure><img src="https://3898863868-files.gitbook.io/~/files/v0/b/gitbook-x-prod.appspot.com/o/spaces%2F-MDHxt7lj9funy2SIeFB%2Fuploads%2FDeeoLSTHaCaTJsuf3uVO%2F13-gml-02z-front.jpg?alt=media&amp;token=933eb51d-02eb-4413-b5f9-aba86c7949b7" alt="" width="375"><figcaption><p>GML-02Z</p></figcaption></figure>

***

## Introduce <a href="#a7ulc" id="a7ulc"></a>

### Short Description <a href="#shellyplus1-snsw-001x16eu-shortdescription" id="shellyplus1-snsw-001x16eu-shortdescription"></a>

* GML-02Z is a small form factor smart switch which allows remote control of electric appliances through a mobile phone, tablet and home automation system.
* GML-02Z can be accessed, controlled and monitored remotely from any place where the user has internet connectivity, as long as the device is connected to a Zigee gateway and the Internet.
* It can be retrofitted into standard electrical wall boxes, behind power sockets and light switches or other places with limited space.

### Features <a href="#h4js5" id="h4js5"></a>

* App remote control - control the device anytime and anywhere through mobile App
* Smart linkage - In smart scene mode, linkage can be set to sound an alarm. The mobile App will also receive prompts, such as garage door open/close status, timeout notifications and overnight notifications, to remind you to close the garage door.
* Voice control - used with Amazon Echo, Google Home, Yandex, Tmall Genie
* Offline function - when the device is offline, the App will remind the device to go offline after 30 minutes
* Home Sharing - Create a smart home with your family
* Set a schedule - turn connected devices on and off at specified times
* Sharing feature - share with family members for joint control
* Supports Siri - This device is not compatible with HomeKit. But you can add click-to-run scenes to Siri shortcuts in the Smart Life App

***

## Safety Consultation and Precautions

1. The installation process of this product involves strong electricity and must be installed by professionals in accordance with electrical specifications and product instructions;
2. This product is for indoor use only, please do not use it in humid environments or outdoors;
3. This product is only suitable for safe use in areas below 2,000 meters above sea level;
4. Pay attention to moisture-proof, do not spill water or other liquids on this product;
5. Do not place this product near a heat source;
6. Do not attempt to repair this product yourself, this work should be performed by authorized professionals;
7. Do not use it with overload. Please make sure that the 10A overcurrent protection circuit breaker on the front of this product is working properly before powering on. It is recommended that the stripping length of the terminal connecting wire is 6-8 mm;
8. This product should not be installed or fixed in a place that can be touched by human hands, such as outside the wall. It should be installed in an appliance or a hidden box;
9. The position of the fixed antenna should be as far away as possible from metal, wires and the module itself. (Applicable to external antenna models).

***

## Main Applications <a href="#shellyplus1-snsw-001x16eu-mainapplications" id="shellyplus1-snsw-001x16eu-mainapplications"></a>

* Residential
* MDU (Multi Dwelling Units - apartments, condominiums, hotels, etc.)
* Light commercial (small office buildings, small retail/restaurant/gas station, etc.)
* Government/municipal
* University/college

***

## Integrations <a href="#shellyplus1-snsw-001x16eu-integrations" id="shellyplus1-snsw-001x16eu-integrations"></a>

* Google Assistant
* Amazon Alexa
* Yandex Alice
* Baidu Xiaodu
* Tmall Genie

***

## Supported Load Types <a href="#shellyplus1-snsw-001x16eu-supportedloadtypes" id="shellyplus1-snsw-001x16eu-supportedloadtypes"></a>

* Resistive (incandescent bulbs, heating devices)
* Capacitive (capacitor banks, electronic equipment, motor start capacitors)
* Inductive with RC Snubber (LED light drivers, transformers, fans, refrigerators, air-conditioners)

***

## Installation

{% hint style="danger" %}
Please make sure the main power switch is turned off before installation
{% endhint %}

1. Connect wires according to the wiring diagram;
2. Insert the module into the junction box;
3. Turn on the main power switch and add devices according to the [**quick setup.**](#quick-setup)

<figure><img src="https://3898863868-files.gitbook.io/~/files/v0/b/gitbook-x-prod.appspot.com/o/spaces%2F-MDHxt7lj9funy2SIeFB%2Fuploads%2FdQ7dTAdyeGetY5btYv0P%2Finstall%20to%20the%20wall%20-%202.png?alt=media&amp;token=336ec27e-24a9-4048-bc69-2e08a7bc732c" alt=""><figcaption><p>Insert into the junction box</p></figcaption></figure>

***

## Wiring Schematic

<figure><img src="https://3898863868-files.gitbook.io/~/files/v0/b/gitbook-x-prod.appspot.com/o/spaces%2F-MDHxt7lj9funy2SIeFB%2Fuploads%2FW7DM4PV5sO1coJja8pdi%2F2ch%20-%20without%20switch.png?alt=media&amp;token=d473d118-45bc-4772-905f-c100cc0adc08" alt=""><figcaption><p>Without Switch</p></figcaption></figure>

<figure><img src="https://3898863868-files.gitbook.io/~/files/v0/b/gitbook-x-prod.appspot.com/o/spaces%2F-MDHxt7lj9funy2SIeFB%2Fuploads%2FGd5yPZULjmdaXt5KlNqd%2F2ch%20-%20with%202%20switch.png?alt=media&amp;token=95deb1fa-ff39-4956-92a1-de413ba78920" alt=""><figcaption><p>Connect 2 switch</p></figcaption></figure>

<figure><img src="https://3898863868-files.gitbook.io/~/files/v0/b/gitbook-x-prod.appspot.com/o/spaces%2F-MDHxt7lj9funy2SIeFB%2Fuploads%2FXqUJFV9SixtsD1Jkkl4y%2F2ch%20-%20with%204%203-way%20switch.png?alt=media&amp;token=3e5074e5-d5ce-4d09-9972-646130aa0308" alt=""><figcaption><p>Connect 4 3-way switches</p></figcaption></figure>

{% hint style="success" %}
The mechanical switch can only be used with AC100 - 240V.
{% endhint %}

***

## Tech Specs <a href="#s4dtx" id="s4dtx"></a>

* Voltage: AC100 - 240V | 50/60Hz
* Dimensions: 45 x 45 x 18mm (without mounting clip) | 50 x 45 x 22mm (with mounting clip)
* Wireless Standard: Zigbee 3.0
* Max. Load: LED 150W x 2 | 5A x 2

***

## Quick Setup

### 1. Register an account <a href="#izkpz" id="izkpz"></a>

<details>

<summary>Use the 'Smart Life' App</summary>

Please jump to the '[**Use Smart Life App**](/smart-life/user-manual-for-smart-life)' page to view

</details>

### 2. Add Device <a href="#pxw57" id="pxw57"></a>

Open the Smart Life App, open the control panel of the Zigbee gateway, click the '+' in the homepage, enter the add device page, select it, and follow the prompts

{% hint style="success" %}
**2 ways to put the module into network pairing mode**

* Press the reset key for about 10 seconds
* Press the traditional switch 5 times until the indicator light is flashing quickly

<img src="https://3898863868-files.gitbook.io/~/files/v0/b/gitbook-x-prod.appspot.com/o/spaces%2F-MDHxt7lj9funy2SIeFB%2Fuploads%2Fj87tEzn7qNZoTYwuVXgg%2F2CH%20-%20with%20zigbee%20gateway.png?alt=media&amp;token=d67c7674-231a-4d3e-9e2b-124c532cfa0b" alt="" data-size="original">
{% endhint %}

{% hint style="success" %}
If the addition fails, please press and hold the network configuration button again and try again.
{% endhint %}

### 3. Control the Device <a href="#kjvoo" id="kjvoo"></a>

Use the App to control. If you can control the device normally, it means the device is working properly.

***

## System Requirements

1. Wi-Fi Router&#x20;
2. ZigBee Gateway
3. iPhone, iPad (iOS 7.0 or higher) | Android Devices (4.0 or higher)

<figure><img src="https://3898863868-files.gitbook.io/~/files/v0/b/gitbook-x-prod.appspot.com/o/spaces%2F-MDHxt7lj9funy2SIeFB%2Fuploads%2Fdi751C8Vc8uJ4MF8nYkT%2Fzigbee%20system%20requirement.png?alt=media&amp;token=adbd75e3-cfae-4f7e-83ea-ce8d57727d0e" alt="" width="563"><figcaption></figcaption></figure>

***

## Indicator Light Status Description

| **Indicator Status** | **Description**              |
| -------------------- | ---------------------------- |
| Blue flashes quickly | Connecting the network       |
| Blue is always on    | Network connection is normal |
| Indicator off        | Device offline/disconnected  |

***

## Toxic and Hazardous Substances Statement

<table data-header-hidden data-full-width="false"><thead><tr><th width="141"></th><th width="91"></th><th width="89"></th><th width="87"></th><th width="96"></th><th width="105"></th><th></th></tr></thead><tbody><tr><td>Part Name</td><td>铅 (Pb)</td><td>汞 (Hg)</td><td>镉(Cd)</td><td>六价铬<br>(Cr(VI))</td><td>多溴联苯<br>(PBB)</td><td>多溴二苯醚<br>(PBDE)</td></tr><tr><td>Plastic Shell</td><td>O</td><td>O</td><td>O</td><td>O</td><td>O</td><td>O</td></tr><tr><td>Plastic bracket</td><td>O</td><td>O</td><td>O</td><td>O</td><td>O</td><td>O</td></tr><tr><td>Electronic Component</td><td>O</td><td>O</td><td>O</td><td>O</td><td>O</td><td>O</td></tr><tr><td>PCBA</td><td>O</td><td>O</td><td>O</td><td>O</td><td>O</td><td>O</td></tr><tr><td>Metal</td><td>O</td><td>O</td><td>O</td><td>O</td><td>O</td><td>O</td></tr></tbody></table>

This form is prepared in accordance with the provisions of SJ/T 11364.

* O: Indicates that the content of the hazardous substance in all homogeneous materials of this part is below the limit requirements specified in GB/T 26572.
* ×: Indicates that the content of the hazardous substance in at least one homogeneous material of this part exceeds the limit requirements specified in GB/T 26572.

***

## Instructions for Use of Micropower Equipment

1. The Wi-Fi technology used in this product complies with the technical requirements of general micropower equipment Class F equipment in the 'Micropower Short-range Radio Transmission Equipment Catalog and Technical Requirements' for data transmission applications. It adopts integrated antenna, control, adjustment and switch Please refer to the relevant content in the product manual for usage instructions;
2. You are not allowed to change the usage scenarios or conditions without authorization, expand the transmission frequency range, increase the transmission power (including installing additional RF power amplifiers), and you are not allowed to change the transmitting antenna without authorization;
3. Shall not cause harmful interference to other legal radio stations, nor shall it offer protection against harmful interference;
4. Should withstand interference from industrial, scientific and medical (ISM) application equipment that radiates radio frequency energy or other legitimate radio stations;
5. If it causes harmful interference to other legal radio stations (stations), you should stop using it immediately and take measures to eliminate the interference before continuing to use it;
6. In aircraft and in accordance with laws and regulations, relevant national regulations, and standards designated radio astronomy observatories, weather radar stations, satellite earth stations (including measurement and control, ranging, receiving, and navigation stations) and other military and civilian radio stations (stations), airports, etc. Micropower equipment used in electromagnetic environment protection areas must comply with the regulations of electromagnetic environment protection and relevant industry authorities;
7. It is prohibited to use all types of model remote controls within a radius of 5,000 meters with the center point of the airport runway as the center;
8. The operating temperature of micropower equipment is -10℃ - 40℃, and the power supply is AC100 - 240V | 50/60Hz

***

## Warranty Instructions

The after-sales service of this product is strictly in accordance with the "Consumer Rights and Interests Protection Law of the People's Republic of China" and the "Product Quality Law of the People's Republic of China" to implement after-sales three-guarantee service. The service content is as follows:

### Warranty Policy

During the validity period of the Three Guarantees, you can enjoy free returns, exchanges, and repair services in accordance with this provision. Returns, exchanges, and repairs should be handled with invoices.

1. Returns without reason within 7 days from the day after receipt (e-commerce purchase channel), the user will bear the logistics costs.
2. This product has performance failures listed in the "Product Performance Failure Table". After after-sales service testing and confirmation, you can enjoy the following services for free:

| Service Type | Service Policy                                                                    |
| ------------ | --------------------------------------------------------------------------------- |
| Return       | Return of product due to quality reasons within 7 days from the day after receipt |
| Exchange     | Exchange for product quality reasons within 15 days from the day after receipt    |
| Repair       | Repair due to product quality within 1 year from the day after receipt            |

{% hint style="info" %}
Friendly reminder: Since packaging boxes are required to ensure the safety of product transportation during transportation, it is recommended that you keep the packaging boxes for at least 30 days from the day after signing for the product.
{% endhint %}

### Non-warranty Regulations

1. Unauthorized repair, misuse, collision, neglect, abuse, liquid intrusion, accident, alteration, incorrect use of non-product accessories, or tearing, alteration of labels, and anti-counterfeiting marks;
2. The three-pack validity period has expired;
3. Damage caused by force majeure;
4. Failure to comply with the performance failures listed in the "Product Performance Failure Table";
5. This product and its accessories have performance failures listed in the "Product Performance Failure Table" due to human reasons.

***


# GMC-01Z

User Manual for GMC-01Z 1CH Zigbee Curtain Module

***

## Appearance

<figure><img src="https://3898863868-files.gitbook.io/~/files/v0/b/gitbook-x-prod.appspot.com/o/spaces%2F-MDHxt7lj9funy2SIeFB%2Fuploads%2FcnaOivGejfypg7RdYRgL%2F15-gmc-01z-front.jpg?alt=media&amp;token=1d6bdf2a-63eb-4fe9-8277-4a0cde0477c7" alt="" width="375"><figcaption><p>GMC-01Z</p></figcaption></figure>

***

## Introduce <a href="#a7ulc" id="a7ulc"></a>

### Short Description <a href="#shellyplus1-snsw-001x16eu-shortdescription" id="shellyplus1-snsw-001x16eu-shortdescription"></a>

* GMC-01Z is a small form factor smart switch which allows remote control of curtain/blind motors through a mobile phone, tablet and home automation system.
* GMC-01Z can be accessed, controlled and monitored remotely from any place where the user has internet connectivity, as long as the device is connected to a Zigbee gateway and the Internet.
* It can be retrofitted into standard electrical wall boxes, behind power sockets and light switches or other places with limited space.

### Features <a href="#h4js5" id="h4js5"></a>

* App remote control - control the device anytime and anywhere through mobile App
* Smart linkage - In smart scene mode, linkage can be set to sound an alarm. The mobile App will also receive prompts, such as garage door open/close status, timeout notifications and overnight notifications, to remind you to close the garage door.
* Voice control - used with Amazon Echo, Google Home, Yandex, Tmall Genie
* Offline function - when the device is offline, the App will remind the device to go offline after 30 minutes
* Home Sharing - Create a smart home with your family
* Set a schedule - turn connected devices on and off at specified times
* Sharing feature - share with family members for joint control
* Supports Siri - This device is not compatible with HomeKit. But you can add click-to-run scenes to Siri shortcuts in the Smart Life App

***

## Safety Consultation and Precautions

1. The installation process of this product involves strong electricity and must be installed by professionals in accordance with electrical specifications and product instructions;
2. This product is for indoor use only, please do not use it in humid environments or outdoors;
3. This product is only suitable for safe use in areas below 2,000 meters above sea level;
4. Pay attention to moisture-proof, do not spill water or other liquids on this product;
5. Do not place this product near a heat source;
6. Do not attempt to repair this product yourself, this work should be performed by authorized professionals;
7. Do not use it with overload. Please make sure that the 10A overcurrent protection circuit breaker on the front of this product is working properly before powering on. It is recommended that the stripping length of the terminal connecting wire is 6-8 mm;
8. This product should not be installed or fixed in a place that can be touched by human hands, such as outside the wall. It should be installed in an appliance or a hidden box;
9. The position of the fixed antenna should be as far away as possible from metal, wires and the module itself. (Applicable to external antenna models).

***

## Main Applications <a href="#shellyplus1-snsw-001x16eu-mainapplications" id="shellyplus1-snsw-001x16eu-mainapplications"></a>

* Residential
* MDU (Multi Dwelling Units - apartments, condominiums, hotels, etc.)
* Government/municipal
* University/college

***

## Integrations <a href="#shellyplus1-snsw-001x16eu-integrations" id="shellyplus1-snsw-001x16eu-integrations"></a>

* Google Assistant
* Amazon Alexa
* Yandex Alice
* Baidu Xiaodu
* Tmall Genie

***

## Supported Load Types <a href="#shellyplus1-snsw-001x16eu-supportedloadtypes" id="shellyplus1-snsw-001x16eu-supportedloadtypes"></a>

* Curtain Motor
* Blind Motor

***

## Installation

{% hint style="danger" %}
Please make sure the main power switch is turned off before installation
{% endhint %}

1. Connect wires according to the wiring diagram;
2. Insert the module into the junction box;
3. Turn on the main power switch and add devices according to the [**quick setup.**](#quick-setup)

<figure><img src="https://3898863868-files.gitbook.io/~/files/v0/b/gitbook-x-prod.appspot.com/o/spaces%2F-MDHxt7lj9funy2SIeFB%2Fuploads%2Fm9dMfSejS9yt0DPawY25%2Finstall%20to%20the%20wall.png?alt=media&amp;token=332b07b8-865b-42f2-9463-2f10738bfec5" alt=""><figcaption><p>Insert into the junction box</p></figcaption></figure>

***

## Wiring Schematic

<figure><img src="https://3898863868-files.gitbook.io/~/files/v0/b/gitbook-x-prod.appspot.com/o/spaces%2F-MDHxt7lj9funy2SIeFB%2Fuploads%2FB1Mcqb6hK5iM2q7HENxa%2F1ch%20curtain.png?alt=media&amp;token=a3e312e0-c535-494e-a70e-30e5e1cdb977" alt=""><figcaption><p>1CH Curtain Module</p></figcaption></figure>

{% hint style="success" %}
The mechanical switch can only be used with AC100 - 240V.
{% endhint %}

***

## Tech Specs <a href="#s4dtx" id="s4dtx"></a>

* Voltage: AC100 - 240V | 50/60Hz
* Dimensions: 45 x 45 x 18mm (without mounting clip) | 50 x 45 x 22mm (with mounting clip)
* Wireless Standard: Zigbee 3.0
* Max. Load: 3A | 600W

***

## Quick Setup

### 1. Register an account <a href="#izkpz" id="izkpz"></a>

<details>

<summary>Use the 'Smart Life' App</summary>

Please jump to the '[**Use Smart Life App**](/smart-life/user-manual-for-smart-life)' page to view

</details>

### 2. Add Device <a href="#pxw57" id="pxw57"></a>

Open the Smart Life App, click the '+' in the upper right corner of the homepage, enter the add device (accessory) page, select it, and follow the prompts

{% hint style="success" %}
**2 ways to put the module into network pairing mode**

* Press the reset key for about 10 seconds
* Press the traditional switch 10 seconds until the indicator light is flashing quickly

<img src="https://3898863868-files.gitbook.io/~/files/v0/b/gitbook-x-prod.appspot.com/o/spaces%2F-MDHxt7lj9funy2SIeFB%2Fuploads%2FoY9BCVD8M9wQgHrbVvSc%2F1ch%20zigbee%20curtain%20pair%20network.png?alt=media&amp;token=a3003810-d2a2-4a6f-87d8-155a351c4360" alt="" data-size="original">
{% endhint %}

{% hint style="success" %}
If the addition fails, please press and hold the network configuration button again and try again.
{% endhint %}

### 3. Control the Device <a href="#kjvoo" id="kjvoo"></a>

Use the App to control. If you can control the device normally, it means the device is working properly.

***

## Indicator Light Status Description

| **Indicator Status** | **Description**              |
| -------------------- | ---------------------------- |
| Blue flashes quickly | Connecting the network       |
| Blue is always on    | Network connection is normal |
| Indicator off        | Device offline/disconnected  |

***

## Toxic and Hazardous Substances Statement

<table data-header-hidden data-full-width="false"><thead><tr><th width="141"></th><th width="91"></th><th width="89"></th><th width="87"></th><th width="96"></th><th width="105"></th><th></th></tr></thead><tbody><tr><td>Part Name</td><td>铅 (Pb)</td><td>汞 (Hg)</td><td>镉(Cd)</td><td>六价铬<br>(Cr(VI))</td><td>多溴联苯<br>(PBB)</td><td>多溴二苯醚<br>(PBDE)</td></tr><tr><td>Plastic Shell</td><td>O</td><td>O</td><td>O</td><td>O</td><td>O</td><td>O</td></tr><tr><td>Plastic bracket</td><td>O</td><td>O</td><td>O</td><td>O</td><td>O</td><td>O</td></tr><tr><td>Electronic Component</td><td>O</td><td>O</td><td>O</td><td>O</td><td>O</td><td>O</td></tr><tr><td>PCBA</td><td>O</td><td>O</td><td>O</td><td>O</td><td>O</td><td>O</td></tr><tr><td>Metal</td><td>O</td><td>O</td><td>O</td><td>O</td><td>O</td><td>O</td></tr></tbody></table>

This form is prepared in accordance with the provisions of SJ/T 11364.

* O: Indicates that the content of the hazardous substance in all homogeneous materials of this part is below the limit requirements specified in GB/T 26572.
* ×: Indicates that the content of the hazardous substance in at least one homogeneous material of this part exceeds the limit requirements specified in GB/T 26572.

***

## Instructions for Use of Micropower Equipment

1. The Wi-Fi technology used in this product complies with the technical requirements of general micropower equipment Class F equipment in the 'Micropower Short-range Radio Transmission Equipment Catalog and Technical Requirements' for data transmission applications. It adopts integrated antenna, control, adjustment and switch Please refer to the relevant content in the product manual for usage instructions;
2. You are not allowed to change the usage scenarios or conditions without authorization, expand the transmission frequency range, increase the transmission power (including installing additional RF power amplifiers), and you are not allowed to change the transmitting antenna without authorization;
3. Shall not cause harmful interference to other legal radio stations, nor shall it offer protection against harmful interference;
4. Should withstand interference from industrial, scientific and medical (ISM) application equipment that radiates radio frequency energy or other legitimate radio stations;
5. If it causes harmful interference to other legal radio stations (stations), you should stop using it immediately and take measures to eliminate the interference before continuing to use it;
6. In aircraft and in accordance with laws and regulations, relevant national regulations, and standards designated radio astronomy observatories, weather radar stations, satellite earth stations (including measurement and control, ranging, receiving, and navigation stations) and other military and civilian radio stations (stations), airports, etc. Micropower equipment used in electromagnetic environment protection areas must comply with the regulations of electromagnetic environment protection and relevant industry authorities;
7. It is prohibited to use all types of model remote controls within a radius of 5,000 meters with the center point of the airport runway as the center;
8. The operating temperature of micropower equipment is -10℃ - 40℃, and the power supply is AC100 - 240V | 50/60Hz

***

## Warranty Instructions

The after-sales service of this product is strictly in accordance with the "Consumer Rights and Interests Protection Law of the People's Republic of China" and the "Product Quality Law of the People's Republic of China" to implement after-sales three-guarantee service. The service content is as follows:

### Warranty Policy

During the validity period of the Three Guarantees, you can enjoy free returns, exchanges, and repair services in accordance with this provision. Returns, exchanges, and repairs should be handled with invoices.

1. Returns without reason within 7 days from the day after receipt (e-commerce purchase channel), the user will bear the logistics costs.
2. This product has performance failures listed in the "Product Performance Failure Table". After after-sales service testing and confirmation, you can enjoy the following services for free:

| Service Type | Service Policy                                                                    |
| ------------ | --------------------------------------------------------------------------------- |
| Return       | Return of product due to quality reasons within 7 days from the day after receipt |
| Exchange     | Exchange for product quality reasons within 15 days from the day after receipt    |
| Repair       | Repair due to product quality within 1 year from the day after receipt            |

{% hint style="info" %}
Friendly reminder: Since packaging boxes are required to ensure the safety of product transportation during transportation, it is recommended that you keep the packaging boxes for at least 30 days from the day after signing for the product.
{% endhint %}

### Non-warranty Regulations

1. Unauthorized repair, misuse, collision, neglect, abuse, liquid intrusion, accident, alteration, incorrect use of non-product accessories, or tearing, alteration of labels, and anti-counterfeiting marks;
2. The three-pack validity period has expired;
3. Damage caused by force majeure;
4. Failure to comply with the performance failures listed in the "Product Performance Failure Table";
5. This product and its accessories have performance failures listed in the "Product Performance Failure Table" due to human reasons.

***


# GMG-01Z

User Manual for GMG-01Z Zigbee Garage Door Opener

***

## Appearance

<figure><img src="https://3898863868-files.gitbook.io/~/files/v0/b/gitbook-x-prod.appspot.com/o/spaces%2F-MDHxt7lj9funy2SIeFB%2Fuploads%2FQlLJ8FgFQP7Uy5z9Clme%2F16-gmg-01z-front.jpg?alt=media&amp;token=f5803243-f35c-4c47-8dea-8b9be41d75f9" alt="" width="375"><figcaption><p>GMG-01Z</p></figcaption></figure>

***

## Introduce <a href="#a7ulc" id="a7ulc"></a>

### Features <a href="#h4js5" id="h4js5"></a>

* App remote control - control the device anytime and anywhere through mobile App
* Smart linkage - In smart scene mode, linkage can be set to sound an alarm. The mobile App will also receive prompts, such as garage door open/close status, timeout notifications and overnight notifications, to remind you to close the garage door.
* Voice control - used with Amazon Echo, Google Home, Yandex, Tmall Genie
* History - You can view the history of your garage door switch
* Offline function - when the device is offline, the App will remind the device to go offline after 30 minutes
* Home Sharing - Create a smart home with your family
* Set a schedule - turn connected devices on and off at specified times
* Sharing feature - share with family members for joint control
* Supports Siri - This device is not compatible with HomeKit. But you can add click-to-run scenes to Siri shortcuts in the Smart Life App

***

## Safety consultation and precautions

1. The installation process of this product involves strong electricity and must be installed by professionals in accordance with electrical specifications and product instructions;
2. This product is for indoor use only, please do not use it in humid environments or outdoors;
3. This product is only suitable for safe use in areas below 2,000 meters above sea level;
4. Pay attention to moisture-proof, do not spill water or other liquids on this product;
5. Do not place this product near a heat source;
6. Do not attempt to repair this product yourself, this work should be performed by authorized professionals;
7. Do not use it with overload. Please make sure that the 10A overcurrent protection circuit breaker on the front of this product is working properly before powering on. It is recommended that the stripping length of the terminal connecting wire is 6-8 mm;
8. This product should not be installed or fixed in a place that can be touched by human hands, such as outside the wall. It should be installed in an appliance or a hidden box;
9. The position of the fixed antenna should be as far away as possible from metal, wires and the module itself. (Applicable to external antenna models).

***

## Installation

{% hint style="danger" %}
Please make sure the main power switch is turned off before installation
{% endhint %}

1. Use a screwdriver to loosen the screws of the equipment terminal, and connect the neutral wire to the N hole and the live wire to the L hole as shown in the figure; S1 and S2 are connected to the signal wire and the switch; S3 and S4 are connected to the induction door sensor;
2. Turn on the main power switch and add devices according to the [**quick setup.**](#quick-setup)

***

## Wiring Schematic

<figure><img src="https://3898863868-files.gitbook.io/~/files/v0/b/gitbook-x-prod.appspot.com/o/spaces%2F-MDHxt7lj9funy2SIeFB%2Fuploads%2FFgHuVtf9OJxWJCQv9qqT%2Fgmg-01x%20wiring%20diagram.png?alt=media&amp;token=f22f6e04-b750-401b-8062-f80647320752" alt=""><figcaption><p>GMG-01Z</p></figcaption></figure>

{% hint style="success" %}
The mechanical switch can only be used with DC12V or below, and has no function with AC voltage.
{% endhint %}

***

## Tech Specs <a href="#s4dtx" id="s4dtx"></a>

* Voltage: AC100 - 250V | 50/60Hz
* Dimensions: 45 x 45 x 18mm (without mounting clip) | 50 x 45 x 22mm (with mounting clip)
* Wireless Standard: Zigbee 3.0
* Cable length: 5 meters

***

## Quick Setup

### 1. Register an account <a href="#izkpz" id="izkpz"></a>

<details>

<summary>Use the 'Smart Life' App</summary>

Please jump to the '[**Use Smart Life App**](/smart-life/user-manual-for-smart-life)' page to view

</details>

### 2. Add Device <a href="#pxw57" id="pxw57"></a>

Open the Smart Life App, open the control panel of the Zigbee gateway, click the '+' in the homepage, enter the add device page, select it, and follow the prompts

{% hint style="success" %}
Press the reset key for about 10 seconds to put the module into network pairing mode

<img src="https://3898863868-files.gitbook.io/~/files/v0/b/gitbook-x-prod.appspot.com/o/spaces%2F-MDHxt7lj9funy2SIeFB%2Fuploads%2FAPp9RGedS1PMD8CW84lz%2Fzigbee%20garage%20pair%20network.png?alt=media&amp;token=ae696e79-a097-4625-b9b4-1188965a29f5" alt="" data-size="original">
{% endhint %}

{% hint style="success" %}
If the addition fails, please press and hold the network configuration button again and try again.
{% endhint %}

### 3. Control the Device <a href="#kjvoo" id="kjvoo"></a>

Use the App to control. If you can control the device normally, it means the device is working properly.

***

## Indicator Light Status Description

| **Indicator Status** | **Description**              |
| -------------------- | ---------------------------- |
| Blue flashes quickly | Connecting the network       |
| Blue is always on    | Network connection is normal |
| Indicator off        | Device offline/disconnected  |

***

## Toxic and Hazardous Substances Statement

<table data-header-hidden data-full-width="false"><thead><tr><th width="141"></th><th width="91"></th><th width="89"></th><th width="87"></th><th width="96"></th><th width="105"></th><th></th></tr></thead><tbody><tr><td>Part Name</td><td>铅 (Pb)</td><td>汞 (Hg)</td><td>镉(Cd)</td><td>六价铬<br>(Cr(VI))</td><td>多溴联苯<br>(PBB)</td><td>多溴二苯醚<br>(PBDE)</td></tr><tr><td>Plastic Shell</td><td>O</td><td>O</td><td>O</td><td>O</td><td>O</td><td>O</td></tr><tr><td>Plastic bracket</td><td>O</td><td>O</td><td>O</td><td>O</td><td>O</td><td>O</td></tr><tr><td>Electronic Component</td><td>O</td><td>O</td><td>O</td><td>O</td><td>O</td><td>O</td></tr><tr><td>PCBA</td><td>O</td><td>O</td><td>O</td><td>O</td><td>O</td><td>O</td></tr><tr><td>Metal</td><td>O</td><td>O</td><td>O</td><td>O</td><td>O</td><td>O</td></tr></tbody></table>

This form is prepared in accordance with the provisions of SJ/T 11364.

* O: Indicates that the content of the hazardous substance in all homogeneous materials of this part is below the limit requirements specified in GB/T 26572.
* ×: Indicates that the content of the hazardous substance in at least one homogeneous material of this part exceeds the limit requirements specified in GB/T 26572.

***

## Instructions for Use of Micropower Equipment

1. The Wi-Fi technology used in this product complies with the technical requirements of general micropower equipment Class F equipment in the 'Micropower Short-range Radio Transmission Equipment Catalog and Technical Requirements' for data transmission applications. It adopts integrated antenna, control, adjustment and switch Please refer to the relevant content in the product manual for usage instructions;
2. You are not allowed to change the usage scenarios or conditions without authorization, expand the transmission frequency range, increase the transmission power (including installing additional RF power amplifiers), and you are not allowed to change the transmitting antenna without authorization;
3. Shall not cause harmful interference to other legal radio stations, nor shall it offer protection against harmful interference;
4. Should withstand interference from industrial, scientific and medical (ISM) application equipment that radiates radio frequency energy or other legitimate radio stations;
5. If it causes harmful interference to other legal radio stations (stations), you should stop using it immediately and take measures to eliminate the interference before continuing to use it;
6. In aircraft and in accordance with laws and regulations, relevant national regulations, and standards designated radio astronomy observatories, weather radar stations, satellite earth stations (including measurement and control, ranging, receiving, and navigation stations) and other military and civilian radio stations (stations), airports, etc. Micropower equipment used in electromagnetic environment protection areas must comply with the regulations of electromagnetic environment protection and relevant industry authorities;
7. It is prohibited to use all types of model remote controls within a radius of 5,000 meters with the center point of the airport runway as the center;
8. The operating temperature of micropower equipment is -10℃ - 40℃, and the power supply is 220 V AC, 10 A; 24 - 38 V DC, 10A; 38 - 60 V DC, 1A.

***

## Warranty Instructions

The after-sales service of this product is strictly in accordance with the "Consumer Rights and Interests Protection Law of the People's Republic of China" and the "Product Quality Law of the People's Republic of China" to implement after-sales three-guarantee service. The service content is as follows:

### Warranty Policy

During the validity period of the Three Guarantees, you can enjoy free returns, exchanges, and repair services in accordance with this provision. Returns, exchanges, and repairs should be handled with invoices.

1. Returns without reason within 7 days from the day after receipt (e-commerce purchase channel), the user will bear the logistics costs.
2. This product has performance failures listed in the "Product Performance Failure Table". After after-sales service testing and confirmation, you can enjoy the following services for free:

| Service Type | Service Policy                                                                    |
| ------------ | --------------------------------------------------------------------------------- |
| Return       | Return of product due to quality reasons within 7 days from the day after receipt |
| Exchange     | Exchange for product quality reasons within 15 days from the day after receipt    |
| Repair       | Repair due to product quality within 1 year from the day after receipt            |

{% hint style="info" %}
Friendly reminder: Since packaging boxes are required to ensure the safety of product transportation during transportation, it is recommended that you keep the packaging boxes for at least 30 days from the day after signing for the product.
{% endhint %}

### Non-warranty Regulations

1. Unauthorized repair, misuse, collision, neglect, abuse, liquid intrusion, accident, alteration, incorrect use of non-product accessories, or tearing, alteration of labels, and anti-counterfeiting marks;
2. The three-pack validity period has expired;
3. Damage caused by force majeure;
4. Failure to comply with the performance failures listed in the "Product Performance Failure Table";
5. This product and its accessories have performance failures listed in the "Product Performance Failure Table" due to human reasons.

***


# Smart Life


# Use Smart Life App

This topic describes how to use the Smart Life app.

## Download app <a href="#title-0-download-20app" id="title-0-download-20app"></a>

Search for **Smart Life** in Apple’s App Store and other major app stores, or scan the following QR code to download the Smart Life app.

![Use Smart Life App](https://airtake-public-data-1254153901.cos.ap-shanghai.myqcloud.com/goat/20200317/1429af48422a4501a96ec6c87852d410.png)

## User accounts <a href="#title-1-user-20accounts" id="title-1-user-20accounts"></a>

### Register account <a href="#title-2-register-20account" id="title-2-register-20account"></a>

1. Tap **Log in with Password** > **Register** in the top right corner of the page to go to the **Register** page.

   ![Use Smart Life App](https://airtake-public-data-1254153901.cos.ap-shanghai.myqcloud.com/content-platform/hestia/169571404830b1e9f7ee7.png)
2. Enter a mobile phone number or email address, agree on the **User Agreement**, **Privacy Policy**, and **Third-Party Information Sharing List**, and then tap **Get Verification Code**.
3. Enter the returned verification code to navigate to the password setting page. Set a password as required and tap **Done**.

   ![Use Smart Life App](https://airtake-public-data-1254153901.cos.ap-shanghai.myqcloud.com/content-platform/hestia/1695695374ca7849d2f82.png)

### Log in with app account or third-party account <a href="#title-3-log-20in-20with-20app-20account-20or-20third-party-20account" id="title-3-log-20in-20with-20app-20account-20or-20third-party-20account"></a>

1. The Smart Life app automatically reads the mobile phone number from the SIM card on the current mobile phone. Users can tap **Quick Login** to log in to the app.
2. Open the app. If you have registered an account of the app, tap **Log In** to go to the login page.
3. Enter the registered mobile phone number or email address and the password and tap **Log In**.
4. Log in with a third-party account.

   If WeChat or Tencent QQ is installed on the mobile phone and a WeChat or Tencent QQ account is created, tap the WeChat or Tencent QQ icon on the login page. On the authorization page that appears, enable authorized login with the WeChat or Tencent QQ account. For an iPhone, an Apple ID can also be used for login.

   ![Use Smart Life App](https://airtake-public-data-1254153901.cos.ap-shanghai.myqcloud.com/content-platform/hestia/16957141194149b57c719.png)

### Configure biometric login <a href="#title-4-configure-20biometric-20login" id="title-4-configure-20biometric-20login"></a>

The biometric login feature makes login more convenient and secure. The app for iOS supports **Face ID**, and the app for Android supports **Touch ID**. During biometric login, the user does not need to enter the account and password, or perform other login operations. Login can be enabled even if the password is forgotten. On the **Account and Security** page, the user can enable or disable login with the face ID.

![Use Smart Life App](https://airtake-public-data-1254153901.cos.ap-shanghai.myqcloud.com/content-platform/hestia/1639477683b77144e7cee.png)

### Change an account <a href="#title-5-change-20an-20account" id="title-5-change-20an-20account"></a>

1. After login to the app, tap **Me** and then the **settings** icon.
2. On the **Settings** page, tap **Account and Security**.

   ![Use Smart Life App](https://airtake-public-data-1254153901.cos.ap-shanghai.myqcloud.com/content-platform/hestia/165062793921bc47fe43c.png)
3. Tap **Mobile Number** to change the mobile phone number, or **Email Address** to change the email address. To change the mobile phone number,
   1. choose **Mobile Number** > **Change Phone Number**.
   2. On the page that appears, enter your password and tap **Next**. On the **Bind Mobile Number** page, enter a new mobile phone number and tap **Get Verification Code**. On the **Enter Verification Code** page, enter the returned verification code.

      ![Use Smart Life App](https://airtake-public-data-1254153901.cos.ap-shanghai.myqcloud.com/content-platform/hestia/16394778096253dee0c6a.png)

### Reset a password <a href="#title-6-reset-20a-20password" id="title-6-reset-20a-20password"></a>

If the login password is forgotten, the user can reset the password based on the following steps:

1. On the **Log In** page, tap **Forgot Password**.
2. Enter the registered mobile phone number or email address and tap **Get Verification Code**.

   ![Use Smart Life App](https://airtake-public-data-1254153901.cos.ap-shanghai.myqcloud.com/content-platform/hestia/16394778505e895991827.png)
3. Enter the code that was sent to the mobile phone number or email address.
4. On the page that appears, enter a new password and tap **Done**. Then, the password is reset, and the app is automatically logged in.
5. For security concerns, the app detects risks in the user’s phone system during login. If the app detects a root or jailbreaking risk, a **security reminder** is displayed. The user can determine whether to exit the app or not. It is disabled by default.

   ![Use Smart Life App](https://airtake-public-data-1254153901.cos.ap-shanghai.myqcloud.com/content-platform/hestia/1639477967ee0c33fada7.png)

### Try out the app <a href="#title-7-try-20out-20the-20app" id="title-7-try-20out-20the-20app"></a>

1. Open the app and tap **Try as Guest**.

   A dialog box appears, indicating that cloud storage, third-party voice control, and device sharing are not supported in trial mode.
2. Tap **Continue**. The **Home** page appears.
3. Complete account information to try out all available features of the app.

   ![Use Smart Life App](https://airtake-public-data-1254153901.cos.ap-shanghai.myqcloud.com/content-platform/hestia/16957144596f731282017.png)

## Use the app <a href="#title-8-use-20the-20app" id="title-8-use-20the-20app"></a>

### Manage homes and home members <a href="#title-9-manage-20homes-20and-20home-20members" id="title-9-manage-20homes-20and-20home-20members"></a>

1. After login to the app as a new user, the **Home** page where devices are listed appears. The user’s avatar is displayed in the top-left corner of the page. Before home information is completed, the **Home** page does not display environment or room information.
2. In the bottom navigation bar, tap **Me** > **Home Management** to go to the **Home Management** page.
3. After the new user taps **Home Management**, the user can edit the information about **adding a home** on the page that appears.
4. If a home has already been added, tap **Create a home** on the **Home Management** page to go to the **Create a home** page.

   ![Use Smart Life App](https://airtake-public-data-1254153901.cos.ap-shanghai.myqcloud.com/content-platform/hestia/1650628140cc17e469fde.png)
5. Enter a name for the home in the **Home Name** field. A maximum of 25 characters is allowed.
6. **Home location** is set based on your phone’s location. Tap **Location**. On the **Location** page, verify that the location is correct and tap **OK** in the top right corner of the page. The location is set based on the phone location. The user can also change the location by setting the coordinate.

   ![Use Smart Life App](https://airtake-public-data-1254153901.cos.ap-shanghai.myqcloud.com/content-platform/hestia/163947821790fa9cad504.png)
7. Select rooms in the **Rooms** section. The user can use the default room names on the app or tap **Add Room** to customize a room name. A maximum of 25 characters is allowed for a room name.
8. After the home information is completed, go back to the **Home** page. The information, such as the weather, temperature, and room names, is displayed. If more than one home is added, tap the home name in the top left corner of the page to switch between and manage **homes**.

   ![Use Smart Life App](https://airtake-public-data-1254153901.cos.ap-shanghai.myqcloud.com/content-platform/hestia/16426660570855e19011f.png)
9. In the drop-down list, tap **Home Management** to manage homes, **create a home**, or **join a home**. An account can be used to control multiple homes. The smart devices in different homes are independent of each other.

   ![Use Smart Life App](https://airtake-public-data-1254153901.cos.ap-shanghai.myqcloud.com/content-platform/hestia/16426661177bc38848f14.png)
10. Tap a home name, such as **This is my home ya**, and select **Home Management** from the drop-down list. On the **Home Management** page, tap the home name to go to the **Home Settings** page.

    ![Use Smart Life App](https://airtake-public-data-1254153901.cos.ap-shanghai.myqcloud.com/content-platform/hestia/1639478380eb75c2357db.png)
11. If a user is invited to join a home, the user will receive a notification on the app. The user will also receive a notification in the message center.

    ![Use Smart Life App](https://airtake-public-data-1254153901.cos.ap-shanghai.myqcloud.com/content-platform/hestia/1628610189935489297d1.png)

## Add a device <a href="#title-10-add-20a-20device" id="title-10-add-20a-20device"></a>

Tap **Add Device** or the plus icon (**+**) in the top right corner on the **Home** page to go to the device adding page. On the **Add Device** tab that appears, devices can be **automatically found** or **manually added**. To **automatically add devices**, the app must be granted Wi-Fi and Bluetooth permissions.

![Use Smart Life App](https://airtake-public-data-1254153901.cos.ap-shanghai.myqcloud.com/content-platform/hestia/16426662881517dcfa1b6.png)

### Automatically add devices <a href="#title-11-automatically-20add-20devices" id="title-11-automatically-20add-20devices"></a>

1. \*\*This method enables simultaneously searching for multiple devices, including Wi-Fi devices, Bluetooth gateways, Bluetooth mesh devices, Zigbee gateways, and Zigbee devices connected to the gateway. \*\*All devices found can be added with one tap.
2. If the search times out and no devices are found, follow the instructions to troubleshoot the issue and try again, or try to **manually add devices**.

   ![Use Smart Life App](https://airtake-public-data-1254153901.cos.ap-shanghai.myqcloud.com/content-platform/hestia/1639478941dddba83f0d7.png)
3. In this mode, allow the app to access Wi-Fi and Bluetooth for searching for devices. \*\*Wi-Fi devices can be found only when Wi-Fi is enabled. \*\*Nearby Bluetooth devices can be found only when Bluetooth access is allowed.

   ![Use Smart Life App](https://airtake-public-data-1254153901.cos.ap-shanghai.myqcloud.com/content-platform/hestia/1639478995e4538b07bae.png)
4. Tap **Turn on Wi-Fi** or **Turn on Bluetooth** to enable Wi-Fi or Bluetooth as instructed.

   ![Use Smart Life App](https://airtake-public-data-1254153901.cos.ap-shanghai.myqcloud.com/content-platform/hestia/1639479041f56dace63e1.png)
5. If a gateway has been added to the app, it can be **automatically recognized** to pair associated sub-devices. If multiple gateways exist, a dialog box appears for the user to choose among these gateways.

   ![Use Smart Life App](https://airtake-public-data-1254153901.cos.ap-shanghai.myqcloud.com/content-platform/hestia/16426664489c56681af42.png)
6. To accelerate pairing with Bluetooth devices, the app supports the automatic discovery of nearby Bluetooth devices. Once the **Home** page is opened, the app automatically searches for Bluetooth devices pending pairing and shows discovered Bluetooth devices in a dialog box.
7. The user can choose **Do not add** or **Go to add** to determine whether to add these Bluetooth devices. Make sure that Bluetooth access is allowed and the Bluetooth devices are pending pairing during scanning.

   ![Use Smart Life App](https://airtake-public-data-1254153901.cos.ap-shanghai.myqcloud.com/content-platform/hestia/1639479176dc9578df5f3.png)
8. When the indicators on Narrowband Internet of Things (NB-IoT), Wi-Fi, and Bluetooth devices are blinking quickly, these devices can be added in the **Auto Scan** method. To use this method, prepare a Wi-Fi network. Only 2.4 GHz Wi-Fi networks are supported.

   ![Use Smart Life App](https://airtake-public-data-1254153901.cos.ap-shanghai.myqcloud.com/content-platform/hestia/1639479264960d6321c40.png)

### Manually add Wi-Fi devices <a href="#title-12-manually-20add-20wi-fi-20devices" id="title-12-manually-20add-20wi-fi-20devices"></a>

1. Select a device type. On the page that appears, enter the password for connecting to the 2.4 GHz Wi-Fi network. The **location** permission must be granted to automatically find Wi-Fi networks.

   ![Use Smart Life App](https://airtake-public-data-1254153901.cos.ap-shanghai.myqcloud.com/content-platform/hestia/16394793059541c07de4b.png)
2. Two pairing modes are provided in the app. The Wi-Fi Easy Connect (EZ) mode is the default mode, and the access point (AP) mode is the compatible mode. The user can tap the pairing mode drop-down list in the top-right corner of the page to switch between the pairing modes. The user can also tap the camera icon in the top right corner of the **Reset the device** dialog box to view the video tutorial.

   ![Use Smart Life App](https://airtake-public-data-1254153901.cos.ap-shanghai.myqcloud.com/content-platform/hestia/163947934442fc4ac98ec.png)

### Manually add Wi-Fi devices in EZ mode <a href="#title-13-manually-20add-20wi-fi-20devices-20in-20ez-20mode" id="title-13-manually-20add-20wi-fi-20devices-20in-20ez-20mode"></a>

1. In EZ mode, follow the instructions to enable the indicator to blink quickly.

   ![Use Smart Life App](https://airtake-public-data-1254153901.cos.ap-shanghai.myqcloud.com/content-platform/hestia/16394793925dfa83a8cf2.png)
2. Select **Confirm the indicator is blinking rapidly** and tap **Next**. The following first two figures from the left show the pairing process. The user can **customize the names** of added devices and specify the room where the devices are located. A device name can contain a maximum of 64 characters.
3. If pairing fails, apply the tips in the following third figure from the left to troubleshoot the issues. Online customer services are available to support troubleshooting.

   ![Use Smart Life App](https://airtake-public-data-1254153901.cos.ap-shanghai.myqcloud.com/content-platform/hestia/1639479431318cba766b6.png)

### Manually add Wi-Fi devices in AP mode <a href="#title-14-manually-20add-20wi-fi-20devices-20in-20ap-20mode" id="title-14-manually-20add-20wi-fi-20devices-20in-20ap-20mode"></a>

1. If a dual-band network that supports both 2.4 GHz and 5 GHz bands is used, the AP mode can be used to add devices.
2. In AP mode, follow the instructions to enable the indicator to blink slowly, select **Confirm the indicator is blinking slowly**, and then tap **Next**.

   ![Use Smart Life App](https://airtake-public-data-1254153901.cos.ap-shanghai.myqcloud.com/content-platform/hestia/16394794715f9738c0b49.png)
3. In AP mode, on the Wi-Fi setting page of the mobile phone, find the Wi-Fi hotspot starting with `SmartLife`.

   ![Use Smart Life App](https://airtake-public-data-1254153901.cos.ap-shanghai.myqcloud.com/content-platform/hestia/16394795076fed1bf0b83.png)
4. Tap the **Wi-Fi** hotspot to connect the mobile phone to it.
5. After a successful connection, go back to the app to start pairing. The Wi-Fi hotspots of certain devices might use a custom name. The mobile phone must be connected to a 2.4 GHz Wi-Fi network.

   ![Use Smart Life App](https://airtake-public-data-1254153901.cos.ap-shanghai.myqcloud.com/content-platform/hestia/1639479588b5b393978df.png)
6. The device pairing page on the app appears again and the pairing process continues. After the device is added, the user can **customize the device name** and specify the room where the device is located. A device name can contain a maximum of 64 characters.
7. If pairing fails, apply the tips in the following third figure from the left to troubleshoot the issues.

   ![Use Smart Life App](https://airtake-public-data-1254153901.cos.ap-shanghai.myqcloud.com/content-platform/hestia/1639488834a536b62d244.png)

### Manually add Bluetooth devices or devices over Wi-Fi and Bluetooth LE combo <a href="#title-15-manually-20add-20bluetooth-20devices-20or-20devices-20over-20wi-fi-20and-20bluetooth-20le-2" id="title-15-manually-20add-20bluetooth-20devices-20or-20devices-20over-20wi-fi-20and-20bluetooth-20le-2"></a>

1. For Bluetooth devices or devices over Wi-Fi and Bluetooth Low Energy (Bluetooth LE) combo, power on the device first. Then, enable Bluetooth on the mobile phone and open the app. The devices that are ready for pairing will be displayed on the app.

   Support for beacon protocols is added to Bluetooth devices. The beacon broadcast solution applies to smart devices that require optimal price performance and moderate security.

   ![Use Smart Life App](https://airtake-public-data-1254153901.cos.ap-shanghai.myqcloud.com/content-platform/hestia/163947965943ef04aae35.png)

   Bluetooth devices support the extended firmware OTA mode. Different firmware versions of the same product can be managed separately through different channel numbers. This improves the portability and flexibility of OTA updates for Bluetooth devices.

   ![Use Smart Life App](https://airtake-public-data-1254153901.cos.ap-shanghai.myqcloud.com/content-platform/hestia/1639479720f3a21cfbe93.png)
2. Select the device to be added. On the Wi-Fi setting page, enter the password for connecting to the 2.4 GHz Wi-Fi network. Wait for the device to automatically complete pairing. The mobile phone must be connected to a 2.4 GHz Wi-Fi network.

   ![Use Smart Life App](https://airtake-public-data-1254153901.cos.ap-shanghai.myqcloud.com/content-platform/hestia/1639482817be4f9eabd31.png)
3. To skip the Bluetooth feature on the mobile phone, go to the **Add Manually** tab. Select a device type that supports Wi-Fi pairing. In EZ mode, follow the instructions in the figures to enable the indicator to blink quickly, select **Confirm the indicator is blinking quickly**, and then tap **Next**.

   ![Use Smart Life App](https://airtake-public-data-1254153901.cos.ap-shanghai.myqcloud.com/content-platform/hestia/1639482856e0d4cd684b7.png)
4. If the Wi-Fi network is unavailable or Wi-Fi pairing failed, the device that supports Wi-Fi and Bluetooth LE combo can be paired over Bluetooth.

   ![Use Smart Life App](https://airtake-public-data-1254153901.cos.ap-shanghai.myqcloud.com/content-platform/hestia/1642666808ae45341f20c.png)
5. Wait for the device to complete pairing. After the device is added, the user can customize the device name and specify the room where the device is used.

   ![Use Smart Life App](https://airtake-public-data-1254153901.cos.ap-shanghai.myqcloud.com/content-platform/hestia/163948297191f8343f999.png)
6. Compared with ordinary single-mode devices, the devices that support Wi-Fi and Bluetooth LE can be connected to the mobile phone over Bluetooth.
   1. On the **Add Device** tab, select a device type that supports Bluetooth pairing. On the page that appears, follow the guide to enable the indicator to blink quickly, select **Confirm the indicator is blinking quickly**, and then tap **Next**.

      ![Use Smart Life App](https://airtake-public-data-1254153901.cos.ap-shanghai.myqcloud.com/content-platform/hestia/1642666926428e4b2f438.png)
   2. After the app detects the device, tap **Add**. After the device is added, tap **Done**.

      ![Use Smart Life App](https://airtake-public-data-1254153901.cos.ap-shanghai.myqcloud.com/content-platform/hestia/1639483060512970cbcaf.png)
7. If a dual-band network that supports both 2.4 GHz and 5 GHz bands is used, the AP mode can be used to add devices.

   To add a device in AP mode, follow the instructions to enable the indicator to blink slowly, select **Confirm the indicator is blinking slowly**, and then tap **Next**. Then, follow the instructions on subsequent pages to add the device.

   ![Use Smart Life App](https://airtake-public-data-1254153901.cos.ap-shanghai.myqcloud.com/content-platform/hestia/16394831083d40f3d6016.png)

### Manually add Zigbee devices <a href="#title-16-manually-20add-20zigbee-20devices" id="title-16-manually-20add-20zigbee-20devices"></a>

1. A gateway must be added before Zigbee devices are added. To add a gateway, tap **Add Device** on the **Home** page. On the page that appears, tap **Gateway Control** in the left-side navigation pane and select a gateway.
2. Power on the gateway and use an Ethernet cable to connect it to a router.
3. Make sure that the mobile phone and the gateway run over the same local area network (LAN). The mobile phone must be connected to a 2.4 GHz Wi-Fi network.

   ![Use Smart Life App](https://airtake-public-data-1254153901.cos.ap-shanghai.myqcloud.com/content-platform/hestia/1639483163a9372eeb202.png)
4. After the gateway is added, a Zigbee device that is connected to the gateway can be added.

   ![Use Smart Life App](https://airtake-public-data-1254153901.cos.ap-shanghai.myqcloud.com/content-platform/hestia/1639483274128d8382908.png)
5. To add a Zigbee device that is connected to the gateway, go to the gateway page and tap **Add subdevice**. The remaining steps to add the Zigbee device are the same as adding Wi-Fi devices and Bluetooth devices.
6. The latest version of the app supports the **automatic discovery** of nearby Zigbee devices. This allows the user to add multiple devices to the gateway in bulk.

   ![Use Smart Life App](https://airtake-public-data-1254153901.cos.ap-shanghai.myqcloud.com/content-platform/hestia/1639483306827486a1310.png)
7. If the gateway has faults, **replace it with a new gateway**, with all devices and scenes configured for the damaged gateway synchronized to the new gateway. To replace a damaged gateway, tap **Replace a damaged gateway** on the management page for the faulty gateway. On the page that appears, enter the SN code or device ID of the new gateway.

   ![Use Smart Life App](https://airtake-public-data-1254153901.cos.ap-shanghai.myqcloud.com/content-platform/hestia/16394833494f08ade2655.png)

### Manually add IPCs in QR code mode <a href="#title-17-manually-20add-20ipcs-20in-20qr-20code-20mode" id="title-17-manually-20add-20ipcs-20in-20qr-20code-20mode"></a>

In addition to the EZ mode (default) and the AP mode, certain devices, such as IP cameras (IPCs) and gateways, can also be manually added in **QR code** mode. To add an IPC to the network by using a QR code, perform the following steps:

![Use Smart Life App](https://airtake-public-data-1254153901.cos.ap-shanghai.myqcloud.com/content-platform/hestia/16394833907febe9b2b9b.png)

1. Reset the IPC. For more information about how to reset the IPC, tap the **Perform net pairing as prompted** button on the page. When the camera is reset, it flashes quickly or emits a prompt tone.
2. After the camera is reset, select **Make sure the indicator is flashing quickly or a prompt tone is heard** and tap **Next** on the page.

   ![Use Smart Life App](https://airtake-public-data-1254153901.cos.ap-shanghai.myqcloud.com/content-platform/hestia/1639483427f907e88db28.png)
3. The user will be directed to the page to enter the Wi-Fi password.
4. After the Wi-Fi password is entered, tap **Next**. Point the QR code on the screen at the IPC within a distance of 15 cm to 20 cm, until the camera emits a prompt tone.
5. Tap **I Heard a Prompt**. Then, the app initiates the device pairing process.
6. If the device fails to be added, follow the tips to troubleshoot the problem.

   ![Use Smart Life App](https://airtake-public-data-1254153901.cos.ap-shanghai.myqcloud.com/content-platform/hestia/16394834633f7d044d1e9.png)

### Scan QR codes or enter device IDs to add NB-IoT devices <a href="#title-18-scan-20qr-20codes-20or-20enter-20device-20ids-20to-20add-20nb-iot-20devices" id="title-18-scan-20qr-20codes-20or-20enter-20device-20ids-20to-20add-20nb-iot-20devices"></a>

Add an NB-IoT device by scanning the device’s QR code or entering the International Mobile Equipment Identity (IMEI) number on the device label. Grant the app access to the camera on the phone to scan the QR code.

![Use Smart Life App](https://airtake-public-data-1254153901.cos.ap-shanghai.myqcloud.com/content-platform/hestia/16394835390b005780bb2.png)

### Add devices by scanning QR codes <a href="#title-19-add-20devices-20by-20scanning-20qr-20codes" id="title-19-add-20devices-20by-20scanning-20qr-20codes"></a>

To add the QR code-based pairing mode, go to **Tuya IoT Development Platform > Product** > [**Development > Product Configuration > Network Connections Guides**](https://iot.tuya.com/pmg/list) > **Custom Mode**, select **Scan Code**, and then click **OK**. To pair the app with a device that supports QR code-based pairing, use the app to scan the QR code on the device or the outer packaging.

![Use Smart Life App](https://airtake-public-data-1254153901.cos.ap-shanghai.myqcloud.com/content-platform/hestia/1639483591ec1ae3cc3e6.png)

### Add devices in Pegasus pairing mode <a href="#title-20-add-20devices-20in-20pegasus-20pairing-20mode" id="title-20-add-20devices-20in-20pegasus-20pairing-20mode"></a>

The Pegasus pairing mode is different from the EZ mode. When the Pegasus pairing mode is enabled, the app automatically scans for nearby devices that support Pegasus pairing and connect them to the network. Wi-Fi information is not required throughout the process, making pairing faster and more reliable.

![Use Smart Life App](https://airtake-public-data-1254153901.cos.ap-shanghai.myqcloud.com/content-platform/hestia/163948363962308c32443.png)

### LTE Cat.1 communication <a href="#title-21-lte-20cat.1-20communication" id="title-21-lte-20cat.1-20communication"></a>

LTE Cat.1 communication applies to outdoor products and supports QR code and Bluetooth pairing modes. The devices powered by this communication technology support generic features, such as group management, device sharing, OTA updates, scheduled tasks, tap-to-run scenes, and automation scenes.

![Use Smart Life App](https://airtake-public-data-1254153901.cos.ap-shanghai.myqcloud.com/content-platform/hestia/1639483671249e9725faa.png)

### Grant autostart and battery usage permissions to app <a href="#title-22-grant-20autostart-20and-20battery-20usage-20permissions-20to-20app" id="title-22-grant-20autostart-20and-20battery-20usage-20permissions-20to-20app"></a>

A Notification Test message appears when security devices are added to the app on Android mobile phones. To ensure that notifications can be received, tap **Test** and follow the tips to make sure the autostart and battery usage detection permissions are granted to the app.

![Use Smart Life App](https://airtake-public-data-1254153901.cos.ap-shanghai.myqcloud.com/content-platform/hestia/1639483706c6ad7beea77.png)

## Manage lists of devices and rooms <a href="#title-23-manage-20lists-20of-20devices-20and-20rooms" id="title-23-manage-20lists-20of-20devices-20and-20rooms"></a>

### View devices <a href="#title-24-view-20devices" id="title-24-view-20devices"></a>

On the **Home** page, the user can view all devices or view devices by room.

Tap the More icon (**…**) on the right side of the page. On the menu that appears, view devices in a **list view** or a **grid view**.

![Use Smart Life App](https://airtake-public-data-1254153901.cos.ap-shanghai.myqcloud.com/content-platform/hestia/164266931664da792a103.png)

### Manage devices and rooms <a href="#title-25-manage-20devices-20and-20rooms" id="title-25-manage-20devices-20and-20rooms"></a>

1. To manage devices, tap the More icon (**⋯**) next to the devices on the **Home** page. Tap **Device Management**. On the page that appears, a device icon can be dragged to sort the display order of the devices. The user can also press and hold press a device on the **Home** page to navigate to the page for device management. Multiple devices can be selected and deleted in the same operation.

   ![Use Smart Life App](https://airtake-public-data-1254153901.cos.ap-shanghai.myqcloud.com/content-platform/hestia/163948384813b771a2a2b.png)
2. To manage rooms, tap the More icon (**⋯**) next to the devices on the **Home** page. Tap **Room Management**. On the page that appears, tap the management icon in the top right corner of the page. To sort the display order of a room, drag the hamburger button (**≡**) on the right side of the room name. To remove a room, tap the minus icon (**-**) before the room.

   ![Use Smart Life App](https://airtake-public-data-1254153901.cos.ap-shanghai.myqcloud.com/content-platform/hestia/1642669499772ee3aa5da.png)
3. In the device list, if a device is grayed out, the device is offline. Otherwise, the device is online.

### Quickly use common features <a href="#title-26-quickly-20use-20common-20features" id="title-26-quickly-20use-20common-20features"></a>

1. When the devices are displayed in a **grid view**, tap the small arrow in the bottom right corner of a device to access the **extension functions** of the device. For example, tap the switch icon to **switch on or off** strip lights or drag the slider to **adjust the brightness**.

   ![Use Smart Life App](https://airtake-public-data-1254153901.cos.ap-shanghai.myqcloud.com/content-platform/hestia/164266958628ede10a6d5.png)
2. When the devices are displayed in a **list view**, tap **Common Functions** under the device name to quickly control the device. In this case, certain common functions are also available in the dialog box of **extension functions**.

   ![Use Smart Life App](https://airtake-public-data-1254153901.cos.ap-shanghai.myqcloud.com/content-platform/hestia/164266963220de330e7b8.png)

### Recommend scenes for new devices <a href="#title-27-recommend-20scenes-20for-20new-20devices" id="title-27-recommend-20scenes-20for-20new-20devices"></a>

After new devices are paired, the system automatically recommends the matching scenes. The user can check and select the recommended scenes as preferred and quickly get started with smart life.

![Use Smart Life App](https://airtake-public-data-1254153901.cos.ap-shanghai.myqcloud.com/content-platform/hestia/1639484163aa1371cdc50.png)

## Control devices <a href="#title-28-control-20devices" id="title-28-control-20devices"></a>

### Use control panels <a href="#title-29-use-20control-20panels" id="title-29-use-20control-20panels"></a>

1. After a smart device is added, a **device tile** that contains the device icon appears in the device section on the **Home** page. Tap the device tile to enter the control panel of the smart device. The control panel might vary from device to device.
2. If the device gets offline, the **Offline** state is shown in the device tile. In this case, the device cannot be controlled on the control panel.

   ![Use Smart Life App](https://airtake-public-data-1254153901.cos.ap-shanghai.myqcloud.com/content-platform/hestia/1642470350c91c2ef0362.png)
3. Features available on the control panel also depend on the device status. For example, only the **countdown** and **scheduling** features are available when a light is turned off. Features such as **scene setting, color adjustment, and brightness adjustment** are also available when the light is turned on. Tap the edit icon in the top right corner of the control panel to manage the device.

   ![Use Smart Life App](https://airtake-public-data-1254153901.cos.ap-shanghai.myqcloud.com/content-platform/hestia/1639484261d1c9186c372.png)

### Manage devices <a href="#title-30-manage-20devices" id="title-30-manage-20devices"></a>

On the device management page, the device settings and information can be managed:

1. To change the device icon, device name, and location information, tap the edit icon next to the device icon.
2. To view the device ID, IP address, MAC address, time zone, and online/offline status, tap **Device Information**.
3. To enable or disable the automation feature or modify the automation settings, tap **Tap-to-Run** and **Automation**.
4. To share the device with a home member, tap **Share Device**. On the page that appears, enter the email address or mobile phone number that is bound with the app account of a home member.
5. To create a device group for easy group control, tap **Create Group**. On the page that appears, all devices that have the same model as the current device under the current account are displayed. The devices to be added to the group must have the same firmware version.
6. To view FAQs related to the device or send feedback, tap **FAQ & Feedback**.
7. To add a shortcut of the device control panel to the home screen of the mobile phone, tap **Add to Home Screen**. Then, the user can tap this shortcut to enter the control panel of the device.
8. To check the device connection status, tap **Check Device Network**.
9. To check whether any firmware updates are available, tap **Device Update**.
10. To remove the device, tap **Remove Device**. Two options appear: **Disconnect** and **Disconnect and wipe data**. If **Disconnect** is tapped, the device is removed from the device list and **automation scenes** and **tap-to-run scenes** that are related to the device become unavailable.
11. If **Disconnect and wipe data** is tapped, the device is removed from the device list and all data related to the device is erased.

    ![Use Smart Life App](https://airtake-public-data-1254153901.cos.ap-shanghai.myqcloud.com/content-platform/hestia/163948430013e080c6e99.png)

### Automatically update firmware <a href="#title-31-automatically-20update-20firmware" id="title-31-automatically-20update-20firmware"></a>

1. Tap **Device Update** on the device management page.
2. Enable **Automatic updates**.
3. Then, the device will be automatically updated when it remains idle or when no operations are performed on the device.

   ![Use Smart Life App](https://airtake-public-data-1254153901.cos.ap-shanghai.myqcloud.com/content-platform/hestia/1639484361d8c5949ae23.png)

### Change networks <a href="#title-32-change-20networks" id="title-32-change-20networks"></a>

1. Tap **Device Network** on the device management page. On the **Device Network Information** page, tap **Alternate Network**.
2. Select the alternate network to be used, enter the Wi-Fi password, and tap **Confirm**.
3. If the current network is unavailable, the device will be automatically connected to the alternate network.

   This feature is suitable for replacing routers in a home and only applies to Wi-Fi devices. Updating the firmware to the latest version is recommended, so this option can be available on the device management page. If this feature is unavailable on the latest app, contact Tuya’s staff to get support.

   ![Use Smart Life App](https://airtake-public-data-1254153901.cos.ap-shanghai.myqcloud.com/content-platform/hestia/165062974718baa253909.png)

### Review devices <a href="#title-33-review-20devices" id="title-33-review-20devices"></a>

The control panel of a specific device supports device reviews. Comments and suggestions on the device can be submitted to improve the device. This feature only applies to certain product categories, such as air purifiers.

![Use Smart Life App](https://airtake-public-data-1254153901.cos.ap-shanghai.myqcloud.com/content-platform/hestia/16394846027e33148d2e5.png)

### Share devices <a href="#title-34-share-20devices" id="title-34-share-20devices"></a>

1. Tap **Share Device on the device management page to enter the Device Sharing page.**
2. Tap **Add Sharing**. On the page that appears, enter the account with which the devices will be shared, and tap **Done**. Devices can be shared through multiple channels, such as LINE, WhatsApp, or WeChat, shared only once or multiple times, or shared within a period of validity or permanently. This enables device sharing for various categories in different scenarios.NB-IoT devices can be shared to extend the device usage scope.
3. To stop sharing devices with an account, perform the following steps to delete the account: On Android, press and hold the account name and tap **Delete**. On iOS, press and hold the account name, swipe left, and then tap **Delete**.

   ![Use Smart Life App](https://airtake-public-data-1254153901.cos.ap-shanghai.myqcloud.com/content-platform/hestia/16506298683f3c2017305.png)

### Control groups <a href="#title-35-control-20groups" id="title-35-control-20groups"></a>

1. Tap **Create Group** on the management page of a selected device.
2. On the **Select Device** page, select devices to be added to the control group and tap **Save**. Enter a group name, and tap **Confirm**. The **Select Device** page shows all devices of the same model as the selected device.
3. After the group is created, the app automatically displays the group control panel, where the devices can be controlled in groups.

   ![Use Smart Life App](https://airtake-public-data-1254153901.cos.ap-shanghai.myqcloud.com/content-platform/hestia/1650629940c30ac8ebaef.png)
4. On the **Home** page, the created group can be viewed and the devices in the group can be controlled.
5. On the **group control** page, tap the edit icon in the top right corner of the page to manage the group, or tap **Dismiss Group** to dismiss the group.

   ![Use Smart Life App](https://airtake-public-data-1254153901.cos.ap-shanghai.myqcloud.com/content-platform/hestia/1650630001e712c84abd3.png)
6. Standard groups of Bluetooth mesh devices are supported to achieve centralized control of Bluetooth mesh groups.

   ![Use Smart Life App](https://airtake-public-data-1254153901.cos.ap-shanghai.myqcloud.com/content-platform/hestia/16394850718957ddd65a1.png)

### Manage data traffic <a href="#title-36-manage-20data-20traffic" id="title-36-manage-20data-20traffic"></a>

For NB-IoT, LET Cat.1, 4G cameras, and other types of devices with built-in SIM cards, the value-added service **Data Traffic Manage** is available. This feature allows users to purchase, query, and calculate data traffic.

![Use Smart Life App](https://airtake-public-data-1254153901.cos.ap-shanghai.myqcloud.com/content-platform/hestia/16394851070b5745aa13b.png)

## Manage automation and tap-to-run scenes <a href="#title-37-manage-20automation-20and-20tap-to-run-20scenes" id="title-37-manage-20automation-20and-20tap-to-run-20scenes"></a>

### Automation <a href="#title-38-automation" id="title-38-automation"></a>

1. In the bottom navigation bar, tap **Smart** > **Automation** > **Create Scene**, or tap the plus icon (**+**) in the top right corner of the **Automation** tab to enter the page for smart scene settings.
2. Tap **Add Condition** to add one or more conditions. If **Launch Tap-to-Run** is selected, only the current condition can be added. Tap **Add Task** to add one or more tasks. Multiple **Tap-to-Run** and **Enable or Disable Automation** tasks can be added. Tap **Name** to specify the name of the automation. Tap **Effective Period** to set a time during which the created automation scenes are effective.

   ![Use Smart Life App](https://airtake-public-data-1254153901.cos.ap-shanghai.myqcloud.com/content-platform/hestia/1642670997adca6faa981.png)
3. Recommend smart scenes: Simplify the procedure to add the smart scenes recommended with bright colors and eye-catching device elements, and improve the visual effect and user experience of smart scenes.
4. Support voice and SMS notifications of important events when specific conditions are met to ensure home security.
5. Recommend devices for purchase to implement scene linkage.

   ![Use Smart Life App](https://airtake-public-data-1254153901.cos.ap-shanghai.myqcloud.com/content-platform/hestia/16426711173cd86912e41.png)

### Add an automation scene <a href="#title-39-add-20an-20automation-20scene" id="title-39-add-20an-20automation-20scene"></a>

1. On the **Automation** tab, tap **Create Scene** to open the **Create Smart** wizard.
2. In the **Set a condition** step, select a trigger condition. In this example, **When weather changes** is selected.
3. Select a specific condition such as **Temperature** on the **When weather changes** page.
4. On the **Temperature** page, set a temperature value and tap **Next**. The **Set up task** step appears.

   ![Use Smart Life App](https://airtake-public-data-1254153901.cos.ap-shanghai.myqcloud.com/content-platform/hestia/16394852265c9357ac24d.png)
5. Select a task, such as **Execution equipment**.
6. Select a device, such as an **air conditioner**.
7. Set one or more functions on the **Select Function** page. In this example, the device is set to **On**, the temperature is set to **26°C**, the working mode is set to **Cold**, and the wind speed is set to **high**. Tap **Next**.

   ![Use Smart Life App](https://airtake-public-data-1254153901.cos.ap-shanghai.myqcloud.com/content-platform/hestia/1639485320359ec41b65f.png)
8. On the page that appears, tap **Save** to save the condition and task settings.
9. To add more conditions, tap the plus icon (**+**) in the top right corner of the page.
10. These options are supported by **Add Condition**:

* **Launch Tap-to-Run**
* **When weather changes**
* **Schedule**
* **When device status changes**

  ![Use Smart Life App](https://airtake-public-data-1254153901.cos.ap-shanghai.myqcloud.com/content-platform/hestia/163948536154cbf8f6820.png)

### Set sunrise and sunset conditions <a href="#title-40-set-20sunrise-20and-20sunset-20conditions" id="title-40-set-20sunrise-20and-20sunset-20conditions"></a>

1. On the **Automation** tab, tap **Create Scene** to open the **Create Smart** wizard.
2. In the **Set a condition** step, select a trigger condition. In this example, **When weather changes** is selected.
3. Select a specific condition such as **Sunset/Sunrise** on the **When weather changes** page.
4. On the **Sunset/Sunrise** page, select **Sunset** or **Sunrise**, and set a time offset to the sunset or sunrise. Tap **Next**.

   ![Use Smart Life App](https://airtake-public-data-1254153901.cos.ap-shanghai.myqcloud.com/content-platform/hestia/1639485398fec6b791131.png)
5. The **Set up task** step appears.

### Set task when location changes <a href="#title-41-set-20task-20when-20location-20changes" id="title-41-set-20task-20when-20location-20changes"></a>

1. Select a task, such as **When location changes**.
2. On the **Leave or Arrive (beta)** page, set the **Leave** or **Arrive** condition to trigger specified actions when the user arrives at or leaves a place. To set the condition, the app must be authorized to always use the geographic location. Currently, this feature is unavailable on Android mobile phones.
3. Set a location and tap **Next**. This feature can be used to control devices 110 meters to 1,023 meters away from the current location to run preset tasks.

   ![Use Smart Life App](https://airtake-public-data-1254153901.cos.ap-shanghai.myqcloud.com/content-platform/hestia/1639485464c806a8c690a.png)

### Quickly create smart scenes <a href="#title-42-quickly-20create-20smart-20scenes" id="title-42-quickly-20create-20smart-20scenes"></a>

1. The app recommends **out-of-box automation** and **tap-to-run scenes** based on the paired devices. This simplifies device control.
2. To quickly create a scene, tap **Quick Create** on the **Create Smart** page. Set recommended smart scenes.

   ![Use Smart Life App](https://airtake-public-data-1254153901.cos.ap-shanghai.myqcloud.com/content-platform/hestia/16394855012e2e78a59a8.png)

### Add tasks <a href="#title-43-add-20tasks" id="title-43-add-20tasks"></a>

1. To add a task, on the smart scene settings page, tap **Add Task** or the plus icon (**+**) in the **Task** section.
2. A task can be set to a switch of a device in certain conditions or to running an automation scene.

   These task options are supported: **Run the device**, **Select smart scenes**, **Send notification**, and **Delay the action**.

   ![Use Smart Life App](https://airtake-public-data-1254153901.cos.ap-shanghai.myqcloud.com/content-platform/hestia/1639485542d033b831b7b.png)

### Set effective periods <a href="#title-44-set-20effective-20periods" id="title-44-set-20effective-20periods"></a>

Set a period during which specific smart scenes are effective.

For example, if a scene is defined that the nightlight is automatically turned on when the human motion sensor detects the presence of humans, **Night** can be specified as the effective period. In this case, the nightlight will not be automatically turned on in the daytime.

![Use Smart Life App](https://airtake-public-data-1254153901.cos.ap-shanghai.myqcloud.com/content-platform/hestia/1639485582e90b41bce34.png)

### Create automation scene <a href="#title-45-create-20automation-20scene" id="title-45-create-20automation-20scene"></a>

Create an automation scene to implement automated device control. The following figure shows an example automation scene with conditions and tasks set.

The app supports four automation types:

* Linkage among devices: For example, when the air conditioner is switched on, the diffuser and air purifier are automatically switched on.
* Linkage between external environmental conditions and devices: For example, when the ambient temperature is higher than 29°C, the air conditioner is automatically switched on.
* Scheduled tasks: For example, the curtains are opened automatically at 8:00 every morning.
* Geofencing: Specific tasks are triggered when the user arrives at or leaves a place. For example, the air conditioner and water heater are automatically turned on when the user arrives home.

  ![Use Smart Life App](https://airtake-public-data-1254153901.cos.ap-shanghai.myqcloud.com/content-platform/hestia/163948562628513ef226a.png)

### Select notification methods <a href="#title-46-select-20notification-20methods" id="title-46-select-20notification-20methods"></a>

To select notification methods, perform the following steps:

1. On the **Scene** page, tap the plus (**+**) icon in the top-right corner of the page. In the **Set up task** step, tap **Send notification**. The **Select Notification Method** page appears. Select one or more available notification methods: **Message Center**, **Message Notification**, and **Phone Notification**. If the **Message Notification** and **Phone Notification** services are not subscribed to, only **Message Center** can be selected.
2. Selected notification methods and trigger conditions are displayed together on the **Automation** tab.

   ![Use Smart Life App](https://airtake-public-data-1254153901.cos.ap-shanghai.myqcloud.com/content-platform/hestia/163948567127421b501d8.png)

### Support tap-to-run scenes by local gateway <a href="#title-47-support-20tap-to-run-20scenes-20by-20local-20gateway" id="title-47-support-20tap-to-run-20scenes-20by-20local-20gateway"></a>

The new version of the Zigbee gateway supports locally running automation scenes. If all tasks and devices involved in an automation scene use the new Zigbee gateway, the tasks and devices can run based on scene settings, even if the network connection fails.\
This way, if the internet is not available at home, all devices and tasks that are bound with the new version of the Zigbee gateway will still perform device automation as specified.

### Manage tap-to-run scenes <a href="#title-48-manage-20tap-to-run-20scenes" id="title-48-manage-20tap-to-run-20scenes"></a>

1. On the **Tap-to-Run** tab, tap **Add Tap-to-Run** or the plus icon (**+**) in the top right corner of the page to open the **Create Smart** wizard.
2. In the **Set a condition** step, tap **Launch Tap-to-Run**.
3. In the **Set up task** step, **Send notification** and **Select Tap-to-Run** are unavailable.

   ![Use Smart Life App](https://airtake-public-data-1254153901.cos.ap-shanghai.myqcloud.com/content-platform/hestia/16426717204322a5fcf8b.png)
4. Preset automation is required if **Select Automation** is selected as the task during the scene setting.
5. If **Select Automation** is tapped, a list of available automation scenes appears. **Enable** or **disable** a scene by tapping it. Tap **Next**, enter the scene name, and tap **Save**. The **Effective Period** field is unavailable for tap-to-run scenes. For more information, see [Help Center](https://support.tuya.com/en/help/_detail/K9hutfnqcnby1).

   ![Use Smart Life App](https://airtake-public-data-1254153901.cos.ap-shanghai.myqcloud.com/content-platform/hestia/16394857684d20fbf7092.png)

### Create backups of and restore Zigbee gateway linkage data <a href="#title-49-create-20backups-20of-20and-20restore-20zigbee-20gateway-20linkage-20data" id="title-49-create-20backups-20of-20and-20restore-20zigbee-20gateway-20linkage-20data"></a>

The app supports **Zigbee gateway linkage data backup and recovery**. This means that even if the Zigbee gateway is removed, the information about the previous linkage scenes is automatically reserved. After the devices are reconnected to the network by normal pairing or automatic pairing, the linkage information is recovered.

### Add, modify, and delete scenes <a href="#title-50-add-2c-20modify-2c-20and-20delete-20scenes" id="title-50-add-2c-20modify-2c-20and-20delete-20scenes"></a>

Smart scenes include the following types: **tap-to-run** and **automation**.

1. On the **Smart** page, select the **Automation** or **Tap-to-Run** tab. In the top right corner of the tab, tap More (**…**) > **Manage** to edit and sort the automation or tap-to-run scenes.
2. On the page that appears, sort automation or tap-to-run scenes. To delete a scene, swipe the scene to the left and tap **Delete**. On the Cube App for iOS, tap the minus icon (**–**) next to a scene name to delete the scene.

   ![Use Smart Life App](https://airtake-public-data-1254153901.cos.ap-shanghai.myqcloud.com/content-platform/hestia/1642671193aa29112cced.png)
3. On the **Automation** or **Tap-to-Run** tab, tap the More icon (**⋯**) in the top right corner of an existing scene module to enter the **Edit** page.
4. Tap and hold a **condition** or **task** and swipe left to delete it.
5. Tap the plus icon (**+**) beside **If** or **Then** to add a condition or task.
6. To delete the scene, tap **Delete** at the bottom of the **Edit** page.
7. Tap an **automation** scene module to edit or delete the scene in the dialog box.

   ![Use Smart Life App](https://airtake-public-data-1254153901.cos.ap-shanghai.myqcloud.com/content-platform/hestia/1642671245b4acf8adb46.png)

### Add tap-to-run scenes to Siri <a href="#title-51-add-20tap-to-run-20scenes-20to-20siri" id="title-51-add-20tap-to-run-20scenes-20to-20siri"></a>

1. On the **Smart** page, tap **Add to Siri** in the bottom right corner of the page. The **Siri Shortcut** page appears, displaying all supported tap-to-run scenes.
2. Select a **tap-to-run scene** to be triggered by Siri.
3. On the settings page for the tap-to-run scene, specify trigger words and tap **Add to Siri**. When the trigger words are said to Siri, Siri tells the app to trigger a tap-to-run scene.

   :::info The **Add to Siri** feature is supported only on iOS 12.0 or later.\
   :::

   ![Use Smart Life App](https://airtake-public-data-1254153901.cos.ap-shanghai.myqcloud.com/content-platform/hestia/164267130025b401bd6e3.png)

### View scene logs <a href="#title-52-view-20scene-20logs" id="title-52-view-20scene-20logs"></a>

1. On the **Smart** page, select the **Automation** or **Tap-to-Run** tab. In the top right corner of the tab, tap More (**…**) > **Logs** in the top right corner of the page.
2. The **Logs** page appears, displaying the scene-related logs in the last seven days in reverse time order.
3. Tap a log to go to the **Edit** page, where the scene settings can be modified.
4. Logs help to monitor device status. If a device fails to function based on the scene automation settings, an alarm message is sent to the notification center and the failure log is stored. The failure log can be viewed to check devices that fail to be automated based on the scene settings.

   ![Use Smart Life App](https://airtake-public-data-1254153901.cos.ap-shanghai.myqcloud.com/content-platform/hestia/1639486060560b89a9465.png)

### Run scene tasks on LAN <a href="#title-53-run-20scene-20tasks-20on-20lan" id="title-53-run-20scene-20tasks-20on-20lan"></a>

When devices involved in scenes are connected to a LAN but not a public network and the scene conditions are met, automation tasks in the scenes run in the specified sequence to control the involved devices on the LAN.

## Home <a href="#title-54-home" id="title-54-home"></a>

On the **Home** page, the user can perform the following operations:

1. Tap the microphone icon and use voice commands to control devices.
2. Tap the home name in the top left corner of the page to switch between homes or add a home.
3. Tap the weather and environment information section to go to the detailed weather and environment information page, where the weather and environment indicators can be sorted. The **Home** page only displays the first three weather and environment indicators.
4. Tap the plus icon (**+**) to add devices.
5. Tap a **tap-to-run** scene to trigger a scene.
6. Tap a room name to view the status of smart devices in the room.
7. Access energy and security resources to easily view their usage.

   ![Use Smart Life App](https://airtake-public-data-1254153901.cos.ap-shanghai.myqcloud.com/content-platform/hestia/1639486098c8408ea79d8.png)
8. Provide interstitial screens, banners, and more entries to automatically track operation events. Display different content depending on varied user requirements to accurately reach users.

   ![Use Smart Life App](https://airtake-public-data-1254153901.cos.ap-shanghai.myqcloud.com/content-platform/hestia/163948616101e546f3d0e.png)

## Smart <a href="#title-55-smart" id="title-55-smart"></a>

Smart services involve multiple features, such as **energy efficiency** for energy management, **comfortable space** for space environment management, **smart protection** for security scenarios, and **featured services**.

![Use Smart Life App](https://airtake-public-data-1254153901.cos.ap-shanghai.myqcloud.com/content-platform/hestia/164266513605cbf47dd46.png)

### Featured services <a href="#title-56-featured-20services" id="title-56-featured-20services"></a>

The following three value-added services are available on the **Features** page:

* **Cloud Storage for Cameras**: After this service is subscribed to, video recordings are encrypted and uploaded to the cloud server. The uploaded video footage can be viewed with the app at any time. To use this service, one or more smart cameras must be added to the app. Previously uploaded videos cannot be downloaded.
* **Message Notification**: After this service is subscribed to and an event notification condition is triggered, an SMS message is sent to indicate the event and ensure home security.

  Phone calls can be made only to the phone number that is used to register the app account. If an email address is used for account registration, a phone number must be added to receive phone calls.
* **Phone Notification**: After this service is subscribed to and an event notification condition is triggered, a phone call will be made to indicate the event and ensure home security.

  Phone calls can be made only to the phone number that is used to register the app account. If an email address is used for account registration, a phone number must be added to receive phone calls.

  ![Use Smart Life App](https://airtake-public-data-1254153901.cos.ap-shanghai.myqcloud.com/content-platform/hestia/164266513605cbf47dd46.png)

## Me (account information) <a href="#title-57-me-20-account-20information" id="title-57-me-20-account-20information"></a>

The following sections and icons are displayed on the **Me** page:

1. **Third-Party Integration**: The app supports three third-party voice assistants.
2. **Home Management**: Tap **Home Management** to manage homes and home members.
3. **Message Center**: Three types of messages are displayed in **Message Center**, including **Alarm**, **Home**, and **Bulletin**. Specify a do-not-disturb period for these messages.
4. **FAQ & Feedback**: Tap **FAQ & Feedback** to show the **Help & Feedback** page. On this page, the sections such as **Most Asked**, **Chat Bot**, and **My Feedback** are available.
5. **HomeKit Information**: HomeKit-compatible devices can also be controlled with the app.
6. **Watch**: Tap **Watch** to check available devices and tap-to-run scenes. The **Watch** section appears on the app only when an Apple Watch is bound with the user’s iPhone.
7. On the **Me** page, tap the **Settings** icon to go to the **Settings** page. The following options are available:
   * **Personal Information**
   * **Account and Security**
   * **Device Update**
   * **Sound**
   * **App Notification**
   * **Scan device in homepage**
   * **Auto Add Discovered Device**
   * **Dark Mode**
   * **Temperature Unit**
   * **About**
   * **Privacy Settings**
   * **Privacy Policy Management**
   * **Network Diagnosis**
   * **Clear Cache**
   * **Log Out**

     ![Use Smart Life App](https://airtake-public-data-1254153901.cos.ap-shanghai.myqcloud.com/content-platform/hestia/1639486235abee4bd2498.png)

### Third-party voice services <a href="#title-58-third-party-20voice-20services" id="title-58-third-party-20voice-20services"></a>

Choose **Me** > **Third-Party Voice Services** > **More**. On the page that appears, bind the app with a third-party voice assistant.

![Use Smart Life App](https://airtake-public-data-1254153901.cos.ap-shanghai.myqcloud.com/content-platform/hestia/16394862868bb042ba29a.png)

### Message center <a href="#title-59-message-20center" id="title-59-message-20center"></a>

Three types of messages are displayed in **Message Center**: **Alarm**, **Home**, and **Bulletin**.

* **Alarms** include device alarms, automation-related notifications, and alarms of scheduled execution failures.
* **Home-related messages** include messages about adding or removing home members, removing a home, setting a home member as the administrator, adding devices, and sharing devices.
* **Bulletins** include messages about status updates of user feedback and other push notifications from the app. The app messages of the IoT backend operation section newly support H5 links. The messages will be highlighted in the message center of the app. The user can tap on the link to view more content.

  ![Use Smart Life App](https://airtake-public-data-1254153901.cos.ap-shanghai.myqcloud.com/content-platform/hestia/1639486532b760cb7dc07.png)

The do-not-disturb feature can be enabled for a specified period. Perform the following steps:

1. Tap **Do-Not-Disturb Schedule** on the **Notification Settings** page to go to the **Add schedule** page. If this feature is enabled for the first time, tap **Do-Not-Disturb Device** and select the devices for which the notification feature is disabled.

   ![Use Smart Life App](https://airtake-public-data-1254153901.cos.ap-shanghai.myqcloud.com/content-platform/hestia/16394865661fea4469afe.png)
2. Tap the left arrow icon (**<**) in the top left corner of the page to go back to the **Add schedule** page. Set the repetition mode, specify a period, and then tap Save in the top right corner of the page. Then, the **Do-Not-Disturb Schedule** page appears. Enable the **Do-Not-Disturb Schedule** feature on this page.
3. To add another do-not-disturb schedule, tap **Add schedule** on the **Do-Not-Disturb Schedule** page. Set the repetition mode, specify desired devices and a period, and then tap **Save**.

   ![Use Smart Life App](https://airtake-public-data-1254153901.cos.ap-shanghai.myqcloud.com/content-platform/hestia/1639486625abb004b03c2.png)

### Push notification settings <a href="#title-60-push-20notification-20settings" id="title-60-push-20notification-20settings"></a>

1. The following two methods can be used to go to the **Notification Settings** page:
   * Method 1: On the **Me** page, tap the **Settings** icon in the top right corner. Then, tap **App Notification**.

     ![Use Smart Life App](https://airtake-public-data-1254153901.cos.ap-shanghai.myqcloud.com/content-platform/hestia/1639486682d9b87e326dc.png)
   * Method 2: On the **Me** page, tap **Message Center** to go to the message center. Tap the **Settings** icon in the top right corner of the page.

     ![Use Smart Life App](https://airtake-public-data-1254153901.cos.ap-shanghai.myqcloud.com/content-platform/hestia/1639486757cbf642b6273.png)
2. If **Enable Notifications** is disabled, the messages in the **Alarm**, **Home**, and **Bulletin** categories will not be received. If **Enable Notifications** is enabled, the user can separately specify whether to receive **Alarm**, **Home**, and **Bulletin** messages.

   ![Use Smart Life App](https://airtake-public-data-1254153901.cos.ap-shanghai.myqcloud.com/content-platform/hestia/163948680726cc4f1bf66.png)
3. LINE push notifications are supported. Important alarms can be sent as messages through the LINE channel.

   ![Use Smart Life App](https://airtake-public-data-1254153901.cos.ap-shanghai.myqcloud.com/content-platform/hestia/1639486843c8bf1edf3df.png)

### Health center <a href="#title-61-health-20center" id="title-61-health-20center"></a>

On the **Me** page, tap **Health Center** to view the health data of the app.

![Use Smart Life App](https://airtake-public-data-1254153901.cos.ap-shanghai.myqcloud.com/content-platform/hestia/16394869080613e41f988.png)

### FAQ & feedback <a href="#title-62-faq-20-26-20feedback" id="title-62-faq-20-26-20feedback"></a>

1. To view FAQs or send feedback to the app, choose **Me** > **FAQ & Feedback** to go to the **Help & Feedback** page.
2. To view Tuya’s responses to the feedback, tap **My feedback** in the top right corner of the page.
3. In the **FAQ** section, FAQs that might help the use of the app are available.
4. In the **Most Asked** section, filter FAQs by **device**, **device networking issue**, **app use issue**, and **third-party control issue**.
5. To report an issue, tap **Report Issue** at the bottom of the **FAQs & Feedback** page. To report an issue, enter the issue and contact information, specify the issue type and the time when the issue occurred, and then upload related images.
6. Enter keywords in the search box to search for solutions to a specific problem.

   ![Use Smart Life App](https://airtake-public-data-1254153901.cos.ap-shanghai.myqcloud.com/content-platform/hestia/1695712615c7152728cf8.png)

### HomeKit information <a href="#title-63-homekit-20information" id="title-63-homekit-20information"></a>

1. Only certain smart devices support Apple HomeKit. Devices that support Apple HomeKit carry the HomeKit badge on their packages.
2. This feature is used to add devices that support Apple HomeKit to the **Smart Life** app. This way, these devices can be controlled together with other devices that are added to the app based on scene linkages.
3. After HomeKit-compatible devices are added to the **Smart Life** app, these devices can be added again to the **Home** app for iOS.
4. After HomeKit-compatible devices are removed from the **Smart Life** app, these devices are not removed from the **Home** app for iOS.
5. The only way to remove a device that is added to both the **Smart Life** app and the **Home** app is to press the reset button on the device.
6. If a HomeKit-compatible device is added to the **Home** app for iOS first, the device cannot be detected by the **Smart Life** app for Android and pairing cannot be completed.
7. HomeKit-enabled Bluetooth devices can be added to both Tuya’s **all-in-one app** and the **Home** app.

   ![Use Smart Life App](https://airtake-public-data-1254153901.cos.ap-shanghai.myqcloud.com/content-platform/hestia/1639487572a8ba5e110c4.png)

### Watch <a href="#title-64-watch" id="title-64-watch"></a>

1. Choose **Me** > **Watch** to go to the **Watch** page.
2. Tap **Device** to show all smart devices added to the app. A plus icon (**+**) before a device means that the device can be controlled with Apple Watch and is to be added to the device list. Devices that cannot be controlled with Apple Watch are displayed in the **The following devices do not support Apple Watch** section.
3. Tap **Available Tap-To-Run** to show all available **tap-to-run scenes**. Tap the plus icon (**+**) preceding a tap-to-run scene to add the scene to the available tap-to-run scene list.
4. All messages in **Message Center** of the app will also be pushed to Apple Watch.

   ![Use Smart Life App](https://airtake-public-data-1254153901.cos.ap-shanghai.myqcloud.com/content-platform/hestia/1639487635ba0430e25a8.png)

### Settings <a href="#title-65-settings" id="title-65-settings"></a>

On the **Me** page, tap the **Settings** icon to go to the **Settings** page. The following options are available:

* **Personal Information**
* **Account and Security**
* **Sound**
* **App Notification**
* **Scan device in homepage**
* **Dark Mode**
* **Temperature Unit**
* **About**
* **Privacy Settings**
* **Network Diagnosis**
* **Clear Cache**
* **Log Out**
* **Upload Log**: only available for iOS

  ![Use Smart Life App](https://airtake-public-data-1254153901.cos.ap-shanghai.myqcloud.com/content-platform/hestia/1639487693ecb1c1c9f75.png)

### Profile information <a href="#title-66-profile-20information" id="title-66-profile-20information"></a>

1. On the **Me** page, tap the **Settings** icon and select **Personal Information** to go to the **Personal Information** page.
2. On this page, the user can view the account information, and change the profile photo, nickname, temperature scale, and time zone.

   ![Use Smart Life App](https://airtake-public-data-1254153901.cos.ap-shanghai.myqcloud.com/content-platform/hestia/163948775136410b2907d.png)

### Account and security <a href="#title-67-account-20and-20security" id="title-67-account-20and-20security"></a>

1. On the **Me** page, tap the **Settings** icon and select **Account and Security** to go to the **Account and Security** page.
2. On this page, the user can view and change the mobile number, email address, or third-party account such as the WeChat account bound with the app, and check the region in which the app service is deployed. The user can also change the login password, set a gesture password, or delete the account.

   ![Use Smart Life App](https://airtake-public-data-1254153901.cos.ap-shanghai.myqcloud.com/content-platform/hestia/16394878348950dfe3b6d.png)

### Account deletion <a href="#title-68-account-20deletion" id="title-68-account-20deletion"></a>

To delete the current account, perform the following steps:

1. On the **Me** page, tap the **Settings** icon and select **Account and Security** to go to the **Account and Security** page.
2. Tap **Delete Account** > **Continue**. On the page that appears, tap **Get Verification Code** to get a verification code. Enter the returned verification code and tap **Delete**. The account will be deleted after seven days, and all data related to the account is also deleted.
3. If the app is logged in with the account within seven days after the preceding steps, **account deletion** is terminated.

   ![Use Smart Life App](https://airtake-public-data-1254153901.cos.ap-shanghai.myqcloud.com/content-platform/hestia/16394878986bd992d8c1b.png)

### Pattern lock <a href="#title-69-pattern-20lock" id="title-69-pattern-20lock"></a>

1. Tap **Pattern Lock** on the **Account and Security** page and create a gesture password to enable the **Pattern Lock** feature. Then, the gesture password must be used to open the app.
2. If the gesture password is forgotten, tap **Forgot Pattern Lock** at the bottom of the unlocking page. In the dialog box that appears, tap **Re-login**, log in to the app again, and then create a gesture password again.
3. If the gesture password is entered incorrectly five times in a row, the current account will be logged out. Then, the account password must be used to verify the identity and reset the gesture password.

   ![Use Smart Life App](https://airtake-public-data-1254153901.cos.ap-shanghai.myqcloud.com/content-platform/hestia/1639487940b19f8f81725.png)

### About <a href="#title-70-about" id="title-70-about"></a>

1. Tap the Settings icon in the top right corner of the **Me** page and tap \*\*About \*\*to show information about the app.
2. To rate the app in the app store, tap **Rate Us**.
3. To check the licenses of open source components, tap **Open Source Component License**.
4. To promote troubleshooting of app errors or crashes, tap **Upload Log** and upload logs. This feature is only available for the Cube App for iOS.
5. To check the current version of the app, view the version number in the **Current Version** section.
6. To try out the beta version of the Smart Life app, tap **Join Beta Test**.

   ![Use Smart Life App](https://airtake-public-data-1254153901.cos.ap-shanghai.myqcloud.com/content-platform/hestia/1639488123a046b817275.png)

### Privacy settings <a href="#title-71-privacy-20settings" id="title-71-privacy-20settings"></a>

1. To use the featured services, choose **Me** > **Features**. On this page, the user can view the account information, and change the profile photo, nickname, temperature scale, and time zone.
2. The authorization page is added to manage authorizations and check the privacy policy and user agreement.

   ![Use Smart Life App](https://airtake-public-data-1254153901.cos.ap-shanghai.myqcloud.com/content-platform/hestia/1639488179669e15ce496.png)

## App for tablets <a href="#title-72-app-20for-20tablets" id="title-72-app-20for-20tablets"></a>

Extend the support for more terminals and add compatibility with tablets.

![Use Smart Life App](https://airtake-public-data-1254153901.cos.ap-shanghai.myqcloud.com/content-platform/hestia/163948821446c15704e22.png)


# FAQs

FAQ on Smart Life App

## Device Networking <a href="#title-0-device-20networking" id="title-0-device-20networking"></a>

<details>

<summary>My device failed to be paired, but I do not know how to reset the device to start pairing. How can I deal with this problem?</summary>

**Dear user, we are sorry for your inconvenience. You can reset your device in the following ways:For most devices that have a reset button (please refer to the product manual to find the reset button**，**the reset button of most switchgear is the switchgear reset button itself)：**

1. **EZ Mode:** Firstly, make sure the device is powered off for more than 10 seconds before powering on the device. Then long press the reset button on the device for about 5 seconds. Wait a few moments until the lighting starts blinking rAPIDly. The device enters the Smart mode. You can connect the network according to the Smart mode as prompted on the App.
2. **AP Mode:** No need to power down the device, but need to keep the lighting device blinking rAPIDly. Then long press the reset button on the device for about 5 seconds. Wait a few moments until the lighting starts blinking slowly. The device enters the AP mode. You can connect the network according to the AP mode as prompted on the App.
3. Cameras and video doorbell devices need to be [**removed from the App**](https://support.tuya.com/en/help/_detail/K9hutgejuwfh1) before they can be reset.

**For lighting equipment such as smart bulbs：**

1. **EZ Mode:** Firstly, make sure the device is powered off for more than 10 seconds before powering on the device. Then turn on and off three times (on-off-on-off-on) power of the device (2 to 4 seconds between each on and off). Wait a few moments until the lighting starts blinking rAPIDly. The device enters the Smart mode. You can connect the network according to the Smart mode as prompted on the App.
2. **AP Mode:** No need to power down the device, but need to keep the lighting device blinking rAPIDly. Then turn on and off three times (on-off-on-off-on) power of the device (2 to 4 seconds between each on and off). Wait a few moments until the lighting starts blinking slowly. The device enters the AP mode. You can connect the network according to the AP mode as prompted on the App.

**For the smart lock, you need to read the manual and enter the corresponding command to make the door lock enter the network distribution mode. Then you can configure the smart door lock according to the network distribution steps of the App lock prompt.Note:** The device only supports connection to the 2.4G network.Thank you for your support and understanding.

</details>

<details>

<summary>How can I deal with a disconnected device?</summary>

**Dear user, if your device is offline for a long time,** [**you can only manually reset the device to the pairing mode**](https://support.tuya.com/en/help/_detail/K9hut3w10nby8)**, and then manually add the device again. If your device always offline, please check in the following ways:**

1. Check whether the router is powered off or disconnected from the network. If so, the router will take some time to recover. Wait for two minutes and then check whether your device is online.
2. Check whether the router has been replaced, or the Wi-Fi name or password has been changed. If so, remove your device and then add it to the network again.
3. Please confirm whether the device has just updated the firmware. The device will be disconnected from the network when the firmware is updated, and will automatically connect to the network after the update is completed. However, if your network is unstable, it will Appear that you cannot connect after the firmware update is complete. The device needs to be removed and added again.
4. The Wi-Fi signal of the device is too poor (for example: there are several walls separated from the router; the device is surrounded by a metal shell or there are metal objects nearby; nearby high-power Appliances such as air conditioners and refrigerators interfere).
5. The location of the device is too far away from the router (the indoor environment is more complicated, it is easy to go offline after more than 5 meters; the outdoor environment is empty, it is easy to go offline after more than 10 meters).
6. Check whether the firmware is the latest version. To check this on the App, choose Home—Tap device icon—Top right button—Device Update.
7. If the device goes offline after a period of use, but after restarting the router or re-networking the device, the device returns to normal. Indicating that the router is overloaded due to long-term high-load use, and you need to replace it with a more powerful one, or reduce the number of devices connected to the router.
8. [**You can also use a phone hotspot to check whether it is the problem of network**](https://support.tuya.com/en/help/_detail/K9hut2wa7gf8w).

**If your device still fails to connect to the network after the preceding steps, place your device in a network environment with strong and stable signals and connect it to the network again. If your device is still offline, provide us with your App account and** [**device ID**](https://support.tuya.com/en/help/_detail/K9d1qt73ht2rs)**. We will arrange for technical support engineers to troubleshoot this issue.If your device or its indicator light keeps flashing for no reason, please troubleshoot as follows:**

1. Please confirm whether you have removed the device from the App. Some devices will automatically enter the pairing mode after being removed. If the device or device indicator flashes continuously, it means that the device has entered the pairing mode.
2. Please confirm whether you have frequently opened and closed the device in a short period of time, or accidentally long-pressed the power button of the device. Because through the above operations, some devices will be reset to the pairing mode, which causes the device or device indicator flashing constantly.

**If the above conditions have been successfully eliminated, it means that your device hardware has been damaged, causing the device to enter the pairing mode for no reason. Please contact the seller for after-sales processing.**[**If your device is out of control, please click to view the detailed troubleshooting plan.**](https://support.tuya.com/en/help/_detail/K9hut327ks6k9)

</details>

<details>

<summary>The indicator turns steady on from flashing after device pairing, but the pairing still failed at the end. How can I deal with this problem?</summary>

**Dear user, if you are using "Auto Scan" to add devices,** [**please click to view the troubleshooting method**](https://support.tuya.com/en/help/_detail/K9hut3np5c5kv)**.If you are using the manual method to add devices, please troubleshoot as follows:**

1. Please read the product manual carefully before configuring the network, and confirm that our App is the one recommended in the manual. Since smart products of different brands need to be registered on their own cloud servers, it is not possible to configure the network of devices across Apps.
2. Please confirm that your router is not provided by ISP (such wireless routers' compatibility is poor and our devices cannot be added), please use such as ASUS, Netgear,TP-LinK and other brands of wireless routers.
3. Please make sure your router is a Wi-Fi 5 router, or turn off the Wi-Fi 6/802.11ax mode of the 2.4GHz Wi-Fi in the Wi-Fi 6 router. Our devices cannot connect to Wi-Fi compliant with the Wi-Fi 6 standard.
4. Please confirm that the Wi-Fi password encryption method of your router is WPA2-PSK/WPA, our device cannot support WPA2-CERT and WPA3, and the wireless mode cannot be 11n only.
5. Check whether the Wi-Fi password you entered is correct. Check for spaces before and after the Wi-Fi account or password and case sensitivity issues.
6. Ensure that broadcasting is enabled for Wi-Fi and is not hidden. [**Ensure that your device has been added over a Wi-Fi band of 2.4 GHz**](https://support.tuya.com/en/help/_detail/K9hut3qrpuckg) (Check whether the 2.4 GHz band and 5GHz band share the same Wi-Fi account. If so, we recommend that you configure two accounts and switch to the 2.4 GHz band during network connection) .
7. [**Ensure that the DHCP service is enabled for the router.**](https://support.tuya.com/en/help/_detail/K9hut3unp5i74) If not, the IP address will be occupied.
8. Check whether your device is powered on and turned on, and make sure that the device is in the right pairing mode, [**click to view the detailed method**](https://support.tuya.com/en/help/_detail/K9hut3w10nby8)**.**
9. If your device is a Wi-Fi device, please use the "Add Manually" method to add it. [**The "Auto Scan" method may not be able to add your Wi-Fi device**](https://support.tuya.com/en/help/_detail/K9hut3np5c5kv).
10. If you are using iOS 14 and above, please make sure [**you have opened the local network permission and wireless data permission of the App**](https://support.tuya.com/en/help/_detail/K9xcp6qyrjtoy).
11. If you are informed that [**the device has been bound to another account**](https://support.tuya.com/en/help/_detail/K9hw5shsflv6x) during the binding process, [**please follow the instructions on the posted page to unbind the device and add it again**](https://support.tuya.com/en/help/_detail/K9hutgejuwfh1).
12. Please make sure that the signal of the network environment where the device is located is strong and stable. Troubleshooting: Download the Internet Speed Test App (make sure the phone is connected to the 2.4GHz network), place your mobile phone in the same location as the device, and then test the Internet upload and download speed at that location (ensure that the speed is at least: upload ≥ 2 MB/s, download ≥ 2 MB/s or upload ≥ 16 Mbps, download ≥ 16 Mbps), smart camera equipment occupies a large amount of upload bandwidth, and at least 4M of upload bandwidth is required for 1080p image quality (0.5MB/s, 4Mbps), if your device has enabled the cloud storage function, additional 2M upload bandwidth is required, please confirm that your network has sufficient network bandwidth.
13. If the network is normal but the device network connection still fails, check whether the router is overloaded. You can disable a device's Wi-Fi feature to reserve the channel for resource reallocation.
14. If wireless MAC address filtering is enabled for the router, remove your device from the router's MAC address filtering list to ensure that it is allowed to connect to the network. You can also disable MAC address filtering.

**If your device still fails to connect to the network after the preceding steps, provide us with your App account. We will arrange for technical support engineers to troubleshoot this issue.**

</details>

<details>

<summary>How can I set different SSIDs for the 2.4GHz and 5GHz bands of a general router?</summary>

**If your router supports both the 2.4 GHz and 5 GHz bands, but only one Wi-Fi name is displayed on the Wi-Fi search page of your mobile phone, perform these steps:**

1. Go to the Wireless page of the router. (The entry address is usually provided on the label attached to the back of the router).
2. Go to the 2.4 GHz setting page, and set the Wi-Fi name (SSID) to （XXX）-2.4G, where xxx indicates the Wi-Fi name. Save setting.
3. Go to the 5 GHz setting page, and set the Wi-Fi name (SSID) to （XXX）-5G, where xxx indicates the Wi-Fi name. Save setting.

**When the preceding settings are complete, the new Wi-Fi names will Appear on the Wi-Fi settings page of your mobile phone.Note:**&#x41;fter the Wi-Fi names are changed, you need to reconnect the devices that use this wireless router. The password remains the same if it has not been changed.**The following files describe how to configure the routers of some popular brands.**

1. [**Configure a Netgear router**](https://support.tuya.com/en/help/_detail/K9hut3qc3z6tj)
2. [**Configure an ASUS router**](https://support.tuya.com/en/help/_detail/K9hut3rpmypmn)
3. [**Configure a D-Link router**](https://support.tuya.com/en/help/_detail/K9hut3v045c0a)
4. [**Configure a TP-Link router**](https://support.tuya.com/en/help/_detail/K9hut3slm5wzz)

**More settings**：[**How to configure the router as a DHCP server?**](https://support.tuya.com/en/help/_detail/K9hut3unp5i74)

</details>

<details>

<summary>How can I troubleshoot failed device pairing?</summary>

**Hello, if you are using the "auto-discovery" / search networking feature,** [**please click to view the troubleshooting method.**](https://support.tuya.com/zh/help/_detail/K9hut3np5c5kv)**If you are using the manual addition method, please follow the steps below for troubleshooting:**

1. Please carefully read the product manual before network configuration to confirm that our app is the recommended app mentioned in the manual.
2. Check if the device is powered on and connected to the internet through the router. Also, ensure that the device is in the correct pairing state. For detailed instructions.
3. Confirm if the entered Wi-Fi password is correct. Pay attention to any spaces or uppercase/lowercase letters in the Wi-Fi account or password.
4. Make sure that your phone is using the 2.4GHz Wi-Fi frequency to add the device. Check if the 2.4GHz frequency and the 5GHz frequency share the same Wi-Fi account. If they do, it is recommended to modify them to different accounts and change to the 2.4GHz frequency during network configuration.
5. Ensure that the router has DHCP service enabled.
6. If your device is a Wi-Fi device, please use the "Manual Add" method for adding. The "Auto-discovery" method may not work for your Wi-Fi device.
7. If you are using iOS 14 or above, make sure you have granted the app local network access and wireless data permission.
8. If you receive a prompt during the binding process indicating that the device is already bound to another account, please follow the on-screen instructions to unbind the device and then add it again.
9. If the network is functioning properly but the device fails to connect, please check if the router is overloaded. You can try turning off the Wi-Fi function of a device to free up channels and reconfigure.
10. If your router has wireless MAC address filtering enabled, you can try removing the device from the router's MAC filtering list to ensure that the router is not blocking the device from connecting or disable MAC address filtering.
11. Use a professional brand router. If the router is provided by your internet service provider, compatibility issues may arise due to certain functionalities imposed by the provider.

**If all of the above situations have been ruled out and your device still cannot connect to the network, you can provide us with your App account, and we will arrange a professional engineer to conduct in-depth troubleshooting for you.**

1. [**Bluetooth device pairing failed**](https://support.tuya.com/en/help/_detail/K9t9b9ui8ip6y)
2. [**Zigbee device pairing failed**](https://support.tuya.com/en/help/_detail/K9hut33x1a8ta)
3. [**"Auto Scan" pairing failed**](https://support.tuya.com/en/help/_detail/K9hut3np5c5kv)
4. [**EZ mode pairing failed**](https://support.tuya.com/en/help/_detail/K9hut3u83acer)
5. [**AP mode pairing failed**](https://support.tuya.com/en/help/_detail/K9nmmho4pxnv4)

</details>

<details>

<summary>A device becomes offline after a power outage or network disconnection, but why cannot the device automatically reconnect to the network after network recovery?</summary>

#### Please check in the following ways:

* Whether there are too many devices in your home that need to be connected to the Internet, beyond the range that the router can load (ordinary home routers can only load less than 10 devices), so your devices cannot connect to the network;
* Whether the network quality is unstable, so the device fails to connect to the network in time after the incoming call;
* If the device cannot automatically reconnect to the network after being offline, you can try to restart the device;
* If it still fails, you need to reset the device configuration network;
* If your problem still exists, you can submit your problem in App-My-FAQ and Feedback-My Feedback-+New Feedback (selecting the corresponding device when submitting feedback will locate your problem faster), thank you support.

</details>

## App Usage

<details>

<summary>What features and their usage quotas does the Smart Life app support?</summary>

**Tuya IoT platform features the following requirements（If the upper limit is exceeded, it cannot guarantee the user experience.）**

**Tuya Smart & Smart Life Apps**

<img src="https://3898863868-files.gitbook.io/~/files/v0/b/gitbook-x-prod.appspot.com/o/spaces%2F-MDHxt7lj9funy2SIeFB%2Fuploads%2F1tmhod7B9KQt2ps0xT7d%2F180fdb0aaddda279dd6e9d46c703dac.png?alt=media&amp;token=220f464d-8f24-4d0a-9c42-6ddcd39e2ae6" alt="" data-size="original">

**Other**

![](https://3898863868-files.gitbook.io/~/files/v0/b/gitbook-x-prod.appspot.com/o/spaces%2F-MDHxt7lj9funy2SIeFB%2Fuploads%2FTVV16cfYd5jgLay8Jvx5%2F3e3bb454d873fcc232d64637e1830eb.png?alt=media\&token=ed0b40f4-87b0-43a6-a088-f6324b157634)

**Trigger mechanism:**

The quantity limits of the mentioned items are interrelated. It is possible that the upper limit of item B is triggered before the upper limit of item A is reached. Therefore, the principle of the first trigger will be applied to all limits.

**Scope of Quantity Limitations:**

The quantity restrictions apply to the Tuya Smart App, Smart Life App, OEM App, and App SDK.Note: Items such as number of homes, number of home members, number of rooms, number of room devices, number of device group devices, number of home device groups, number of users in device group sharing, number of users in device sharing, number of joined homes, and MQTT message length are still in the gray release phase and may be subject to elastic adjustment. Tuya reserves the right to interpret these requirements.

</details>

<details>

<summary>I have a device whose old schedule (ghost schedule) is active?</summary>

Dear user,  you can try to reset a new timing to refresh the cloud settings. Or you can try to "[**Restore factory defaults**](https://support.tuya.com/en/help/_detail/K9d1qfwrcu2ih)" your device (note: this will make the device disAppear from the list) and add it again. If your problem persists, please contact us again and let us know the specific time and device ID for further investigation.Thank you for your support and understanding.

</details>

<details>

<summary>How do I restore a faulty device to factory settings?</summary>

**Dear user, we are sorry for your inconvenience. If you do so:**

1. Tap the faulty device in the device list to enter the device's control panel.
2. Tap the button in the upper right corner to enter the device setting page.
3. Tap “Remove Device—Disconnect and wipe data” to remove the device from the device list and clear all data related to the device.
4. If your device is offline, your device will unable to restore factory settings, because the device cannot communicate with the App and the cloud after it is offline.

**Note:** If you just click Disconnect, the App will only remove the device from the App, and will not delete any data on the device, nor will the device enter the pairing mode (some devices have their own logic to automatically enter pairing mode after disconnection).

</details>

<details>

<summary>Why can't my phone receive App push, incoming call, device alarm and door bell ring?</summary>

**Dear user, we are sorry for your inconvenience. If you do so:**

1. Verify that your mobile phone allows the App to push messages.
2. Please confirm to open the message push settings in the App, open the App, click Me-Message Center, click the button in the upper right，enable notifications.
3. Check Notifications Settings, whether Do-Not-Disturb Schedule was on.
4. If your mobile phone and device allow the App to push messages but do not receive any messages, check whether the App message center has new message notifications.
5. Some Android mobile phone systems will compulsorily judge our App push as marketing information, thereby forcibly turning off push and sound/vibration reminders.
6. Due to limitations of some Android systems, some Android phones can only receive up to 24 App push messages. If these push messages are not cleared, the phone will not be able to receive new App push messages.

**Note:** If your device is a smart doorbell or smart camera, and you cannot receive the incoming call. This is caused by the restrictions imposed by the mobile phone on our App. You only need to open the App, and you will receive the incoming call normally.

**The power saving function of some Android phones will close the background process of the App, which is also the reason why you cannot receive the App push:**

1. Please turn off the power saving function in the settings, or add the App to the white list of the power saving function (if there is no white list function, you need to turn off the power saving function).
2. Please lock the background process of the App on the background management page of the Android phone, so that the Android system will not automatically close the background process of the App (Android systems with this function can see the "lock" mark on the background process of the App ).
3. Please allow the App to start automatically in the system settings of the Android phone, otherwise the Android system will periodically shut down the background process of the unused App, which will also affect the push of App.

**If message pushing is enabled for the message center and your mobile phone but you still do not receive any messages, provide us with your device ID and the messages that you are supposed to have received. We will arrange for technical support engineers to troubleshoot this issue.The following is the specific setting process of some common mobile phone brands.**

1. [**Samsung phone**](https://support.tuya.com/en/help/_detail/K9l8wdtc8349f)
2. [**XiaoMi phone**](https://support.tuya.com/en/help/_detail/K9l8wdsqkyse6)
3. [**HUAWEI phone**](https://support.tuya.com/en/help/_detail/K9l8wds3cesjq)
4. [**OPPO phone**](https://support.tuya.com/en/help/_detail/K9m8hn1eamdjx)
5. [**VIVO phone**](https://support.tuya.com/en/help/_detail/K9mpty4kjn5ue)

</details>

<details>

<summary>What should I do when a smart task (Tap-To-Run or automation) runs incorrectly?</summary>

**Dear user, we are sorry for your inconvenience.**

1. Ensure that your device is powered on and turned on.
2. Ensure that your device is online in a stable and smooth network environment during task execution.
3. If your device is online and started but the task runs incorrectly, delete that task and add a new one.
4. If the issue persists, remove your device, add it again, and set a new smart task.
5. If you are using a Zigbee device, check whether your device is connected to the gateway. If it is connected to the gateway, check whether too many devices are configured in the scenario. We recommend that you configure a scenario as a group.
6. If you are using a Wi-Fi device, check whether your device is offline，please remove your device, add it again.

**If the issue persists, provide us with your device ID and the specific time when the task failed (the configured validity period, time when the task failed to run, or time when the task ran but at an unexpected time). We will arrange for technical support engineers to troubleshoot this issue.**

1. [**Why doesn't the Leave or Arrive (beta) feature take effect?**](https://support.tuya.com/en/help/_detail/K9d1qtjafyq7i)
2. [**Why does my device turn on/off by itself？**](https://support.tuya.com/en/help/_detail/Ka6rcgxiqic6m)
3. [**The device don't turn on after real sunset，but turn on one hour before sunset?**](https://support.tuya.com/en/help/_detail/K9d1qfuprbrrz)
4. [**Automation programming does not allow me to change the color/brightness/color temperature of the light？**](https://support.tuya.com/en/help/_detail/K9hw4ddoccnyp)
5. [**When creating a smart scene linkage (Automation/Tap-to-Run), can't find the existing device in App in the device list?**](https://support.tuya.com/en/help/_detail/K9hutg0hjzcda)

</details>

<details>

<summary>What should I do when a timed task is not performed correctly?</summary>

**Dear user, we are sorry for your inconvenience. Please check in the following ways:**

1. Ensure that your device is powered on and turned on.
2. Ensure that your device has strong and stable Wi-Fi signals and is in the online state in the App.
3. After the device is scheduled, the device has not been shut down or reset, because shutting down or resetting the device will interrupt the timing process of the device;
4. Ensure that the validity period of the scheduled task is correct. Tap Timing and check whether Repeat covers the required validity period (Monday to Sunday available) of the task.
5. If it is a **Wi-Fi device**, the device may be disconnected from the network, so time-related functions are invalid.
6. If it is a **Bluetooth device**, it cannot always be connected to the phone, so it must be equipped with a Bluetooth gateway to ensure that the time-related functions of the device remain normal.
7. If it is a **Zigbee device**, it must be connected to a Zigbee gateway in order to obtain time and keep time-related functions normal.
8. If the timing does not take effect at the time you set, it may be that [**the time zone of your device is inconsistent with the time zone of your location**](https://support.tuya.com/en/help/_detail/K9huti7rwgcou);
9. If the problem is not improved, please[**restore the device to factory defaults**](https://support.tuya.com/en/help/_detail/K9d1qfwrcu2ih) through the App, set the timer task again after adding the device again.

**If the issue persists, provide us with your device ID and the specific time when the task failed (the configured validity period, time when the task failed to run, or time when the task ran but at an unexpected time). We will arrange for technical support engineers to troubleshoot this issue.**

</details>

<details>

<summary>What should I do when a firmware upgrade fails?</summary>

**Dear user, we are sorry for your inconvenience, and please exclude it as follows:**

1. Check whether the network is stable. We recommend that you move your device to a more stable network environment or use a mobile hot spot to upgrade the firmware again.
2. If you are upgrading the firmware of a Bluetooth device, check whether the App is always running at the frontend. If you exit the App, the firmware upgrade may fail.
3. If you find that your device firmware version is inconsistent with the firmware version of other devices(the same model), and you cannot receive the firmware upgrade pushed by the App, it means that the firmware is still in the testing stage and the device manufacturer has not yet fully pushed it. If you still want to upgrade to the latest firmware, [**you can submit feedback to us**](https://support.tuya.com/en/help/_detail/K9d1qt4l8z508) and we will push the latest firmware for you ([**you need to provide your device's virtual ID**](https://support.tuya.com/en/help/_detail/K9d1qt73ht2rs)).

**If the problem persists, please provide us with your App ID, device ID, and device firmware version number.**

1. Open our App
2. Go to the control panel of the device you want to view and click the button in the upper right corner.
3. Click on "Device Information" and you will see the "Virtual ID" of the device.
4. Click the "Check Firmware Update" button and you will see the firmware version number of the device.

**Thank you for your support and understanding.**

</details>

<details>

<summary>Unable to share devices to my Home/others user?</summary>

* **Dear user. If you do so:**

1. Please confirm whether you are the owner of the device, not the shared device, and whether you are the owner or administrator of the Home (the shared device and normal home members cannot share the device and add home members).
2. Please confirm whether the user has the account of the App (Share devices and add home member must be processed in our App, not in the Alexa or Google Home App).
3. Please confirm whether you and the invitee are registered in the same country/region. You can only share devices registered in the same country/region.
4. Please confirm whether you and the invitee are registered in the same country/region. You can only add users registered in the same country/region to your home.
5. If you use the invitation code to invite others to join your home, but the invitee's App displays that the invitation code has expired, and the invitation code does not exceed the validity period of 3 days, it means that the account of the invitee and you are not the same country / region.

**Mesh devices/Zigbee devices/Infrared devices/Bluetooth devices/Gateway devices are currently not supported for sharing. For a regular home member, it is recommended that you share all the devices with him/her by adding home members. If you want all family members to use the shared Bluetooth device normally, we recommend that you purchase a Bluetooth gateway and use it together, otherwise the Bluetooth device can only be connected to one mobile phone for one person to use at the same time. Once someone connects successfully, the Bluetooth device in other people's App will be displayed as offline. Only after the user disconnects the Bluetooth device, other people can use it normally. There is no such restriction when using the Bluetooth gateway.**

</details>

<details>

<summary>How to configure Tap-to-Run and Automation?</summary>

### Tap-to-Run <a href="#tap-to-run" id="tap-to-run"></a>

There are three types of Tap-to-Run in the App. You can quickly start smart devices in your home by setting up Tap-to-Run, eliminating the setting step one by one.**Operating device: Add the smart device you want to execute the Tap-to-Run.**&#x46;or example: you can enable all devices in your home without going to enable the device one by one.![](https://images.tuyacn.com/goat/20200526/f728b9de5c2c4ba592c23c4fe9a3617a.png)

**Select smart: Add the automation you want to perform with Tap-to-Run(The existing automation is required in advance).**&#x46;or example: you can use Tap-to-Run to open your setting automation without triggering any conditions of automation.![](https://images.tuyacn.com/goat/20200526/c53544c56208474fa186b6140c2600bd.png)

**Delay: add a delayed task.**&#x46;or example: you can add a delay task in Tap-to-Run between two devices actions.

![](https://images.tuyacn.com/goat/20200526/44d5243c822a4a01ac981afd824cd411.png)

### **Automation** <a href="#automation" id="automation"></a>

There are four main types of automation are supported in the App. You can set up automation to fully use the home devices and start your smart life.**When the weather changes: The linkage between external environment conditions and the smart devices, the following external environment conditions can be selected.**&#x46;or example, you can set ‘when the temperature is higher than 29℃, turn on the air conditioner.’![](https://images.tuyacn.com/goat/20200526/0b3026a22b544c24ba736f0eed658478.png)

**When the location changes: The linkage between the geographic location and the device.**&#x46;or example, you can set ‘turn on the air conditioner and water heater automatically when you are near the house, or turn off all home Appliances and turn on motion detection function of the camera when you leave the house.’

![](https://images.tuyacn.com/goat/20200526/5ed84fb48c3d4c06ac3d8755ed56d21f.png)

**Schedule: The linkage between schedule function and the devices.**&#x46;or example, you can set ‘open the curtain at 8am on working days.’

![](https://images.tuyacn.com/goat/20200526/52acceb20ea8483c84d5d3bbff0ea5ce.png)

**When the device status changes: The linkage between the device status change and the devices.**&#x46;or example, you can set ’when the air conditioner is on, the aroma diffuser and air purifier will be automatically turned on, or when the door sensor is on, the alarm will be triggered.’

![](https://images.tuyacn.com/goat/20200526/e7b0db14c9a34fd38358c4bf2d943afd.png)<br>

</details>

<details>

<summary>Can I view videos from the camera's cloud storage, SD card, or real-time video on my computer, web browser, or other devices?</summary>

* China: [https://protect.ismartlife.me](https://protect.ismartlife.me/)
* United States: [https://protect-us.ismartlife.me](https://protect-us.ismartlife.me/)
* Europe: [https://protect-eu.ismartlife.me](https://protect-eu.ismartlife.me/)

After accessing the link, please use the app to scan the QR code and log in to view the videos If you are unable to see your device in the device list, it may not be supported.

</details>

<details>

<summary>Can I use your App on iPad and Android tablets?</summary>

Dear user, our App supports iPad and Android tablets (requires iOS ≥ V10.0 version, Android ≥ V5.0 version). You can find the landscape switch in the settings of the App (My Settings → Tablet Landscape Switch) to switch between landscape and portrait display (ipad only supports landscape display). If the app does not have this switch on your Android tablet, please go to If your problem still exists, you can report the problem you encountered in App-Me-FAQ & Feedback-My feedback-+New feedback .

</details>

## Third-party Voice Assistants <a href="#title-2-third-party-20voice-20assistants" id="title-2-third-party-20voice-20assistants"></a>

<details>

<summary>App can control the device, but it failed to use the Third-party voice control?</summary>

**Dear user, we are sorry for your inconvenience. First, you need to make sure that the device supports the third-party control:**

1. Please confirm whether the device supports voice control and whether it has been successfully bound to the voice speaker. For details, refer to [**the Third-party control**](https://support.tuya.com/en/help/_detail/K9d1qg473y8su) instructions.
2. Please confirm whether the device is online normally. You can see if it is normal through the App operation.
3. Different types of devices can operate different voice commands. Please confirm with the device manufacturer whether the device supports this voice command (the device may not have all functions connected to the voice control module). If the device does not support the voice command, you can add the function as Tap-to-Run/Automation in our App, so that you can control the Tap-to-Run/Automation by voice to meet your needs (currently only Amazon Alexa, Google Assisitant and Baidu Xiaodu supports scene control).
4. Please confirm the device name is easy to identify, it is recommended to take 2 simple and common words, such as "living room light".
5. Please confirm whether the smart device App account bound in Alexa Echo/Google Home has changed. For example, reset the device and add another account (one Third-party control account can only be bound to one App account, an error will be reported if the binding is repeated).
6. If the speaker or Siri responds successfully, but your device does not respond to the operation, it means that the device you are operating should be a Bluetooth or Zigbee device, and you need to match the corresponding gateway to be able to use the speaker or Siri to operate.

**Check that the device has been discovered and joined to the third-party control App：**

1. It is possible that your App and device are under the LAN and can be controlled under the LAN, but the device is already offline under WAN.
2. Unbind the App and third-party smart speakers, and re-bind the skills.
3. Check that the voice instructions you are giving to the third-party control are correct and supported by the third-party controller.
4. Check that you have connected devices to the third-party controller using the same App account as you use to control the devices.

**If the problem still exists after performing the checks above, use the Report Issue feature in the App Help Center to let us know about the problem. Be sure to include your App account user name and the ID of the affected device.**

</details>

<details>

<summary>What kind of voice commands does Alexa Echo support?</summary>

**【Trigger scene】First set the scene in the App, then discover devices; the settings in the App will Appear in the Alexa App's Scene list.**&#x41;lexa, turn on scene name -------------------------- trigger scene**Different types of devices can operate different voice commands. The common ones are as follows:【switch SoCket】**

1. Alexa, turn on the device name -------------------------- Open the device
2. Alexa, turn off device name -------------------------- Switch off device

(Slots, multi-switch products support sub-control, after each custom name on the App, each jack will be displayed on the Alexa App.**【Lighting】** (Control command and lamp type):

1. Alexa, turn on the device name ————————————— Turn on the light
2. Alexa, turn off device name ————————————— Turn off the light
3. Alexa, set device name to percentage —————————— Set the brightness of the lamp (calculated in percentage of brightness)
4. Alexa, brighten/increase Device Name ——— — — Brighten the lamp by 25% (this percentage is required by NAC certification)
5. Alexa, dim/decrease device name ——— — — Dimming the lamp by 25% (this percentage is required for NAC certification)
6. Alexa, set device name to color name ——— — — set the color of the light
7. Alexa, set device name to color temperature name --- --- set the color temperature of the lamp
8. Alexa, make / set device name warmer ——— — — Warm the lights
9. Alexa, make / set device name cooler —————— Cool the lights

**【Air conditioners and heaters】** (temperature control equipment):

1. Alexa, turn on the device name ————————————— Open the device
2. Alexa, turn off device name ————————————— Shut down the device
3. Alexa, set device name temperature to value degrees —————————— set temperature (supported temperature range can be pressed according to customer's standard definition)
4. Alexa, increase device name temperature ———————— temperature increase 1 degree
5. Alexa, decrease device name temperature ———————— temperature down 1 degree
6. Alexa, what’s the temperature of the device name; Alexa, what’s the device name set to?———————————— Asking the temperature of the current device settings

(The set temperature refers to the temperature scale with different degrees Celsius and degrees Celsius. When the voice is controlled, the temperature scale set by the current Alexa Audio shall prevail.)**【Fan】**

1. Alexa, turn on the device name ————————————— Open the device
2. Alexa, turn off device name ————————————— Shut down the device

**Note:** Some fan's wind speed adjustment methods are different. They are divided into the following two categories in voice control.

1. Percentage type：Alexa, Set Device Name to Percent —————— Adjust Fan Wind Speed
2. Stall type：Alexa,set device name to gear number —————— adjust fan position

**【Door lock / magnetic door】**

1. Alexa, lock the device name—————————————— lock door
2. Alexa, unlock the device name————————————Open door
3. Alexa, Is the device name locked? —————————— Query the status of the door lock switch (door magnetic products only support query door switch status)

**【Electric curtain】**

1. Alexa, turn on the device name ————————————— Open the curtain
2. Alexa, turn off device name ————————————— Closing the curtain

(Alexa itself does not support the category of curtains. We treat the curtains as a switch type device. Open the curtains to turn on and close the curtains.Should turn off; so curtains only support opening and closing, do not support pause; the expression of turn on/off curtain is also very different, but only this what to do)**【TV remote control】**

1. Alexa, next channel on device name ————————— switch to the next channel
2. Alexa, channel up on device name ——————— tune to the previous channel
3. Alexa, channel down on device name —————— tune to the next channel
4. Alexa, lower/upper the volume on device name ——————— adjust the sound of the TV

**【Camera】** (You need to use echo show or echo spot to control)

1. Alexa, show the device name—————————— Put the camera screen on the echo show or echo spot
2. Alexa, hide / stop device name —————————- Ending the delivery of the camera screen

**【Other devices】**

1. Alexa, turn on device name ———————————— Open device
2. Alexa, turn off device name ———————————— Switch off device

**Different devices need different control commands, if you need more control commands, please refer to the device manual or ask the seller to obtain them.**

</details>

<details>

<summary>What commands does Google Assistant support?</summary>

**The supporting commands are as follows:**

1. Hey Google, turn on \[removed]
2. Hey Google, turn off \[removed]
3. Hey Google, is \[removed] on / off ?
4. Hey Google, set \[removed] to percent
5. Hey Google, brighten/increase \[removed]
6. Hey Google, dim/decrease \[removed]
7. Hey Google, Dim/Brighten \[removed] by 50%
8. Hey Google, set \[removed] to （ color ）
9. Hey Google, set \[removed] to （color temperature）
10. Hey Google, turn on / off lights in \[removed]
11. Hey Google, Turn on/off all of the lights
12. Hey Google, Start \[removed]
13. Hey Google, Activate \[removed]

</details>

<details>

<summary>Does Zigbee device support voice control?</summary>

Dear user, we are sorry for your inconvenience. Zigbee devices need to be equipped with a Zigbee gateway to achieve voice control.

</details>

<details>

<summary>Does the group created in this App support Alexa voice control?</summary>

Dear user, we are sorry for your inconvenience. Alexa does not support the voice control of Wi-Fi groups created in this App (Bluetooth groups are supported, but it needs to be used with a Bluetooth gateway). It only supports the voice control of groups created by itself in the Alexa App. After synchronizing all Wi-Fi devices to Alexa App, you can create a group of Wi-Fi devices in Alexa App, so that you can use Alexa to control the voice. Thank you for your understanding and support.

</details>

<details>

<summary>After I add a tap-to-run scene to Siri and delete it, I add another tap-to-run scene with the same name to Siri. Why does the system inform me that the name is in use?</summary>

**Dear user, we are sorry for your inconvenience. Siri shortcuts are managed on an iPhone, and you cannot delete Siri shortcuts in the App. To delete Siri shortcuts that are no longer needed, use either of the following methods:**

1. In iOS 12, go to Settings > Siri & Search and tap My Shortcuts. Swipe left over a shortcut and tap Delete.
2. In iOS 13, tap the Shortcuts icon on the home screen, tap the edit icon in the upper left corner, select Siri shortcuts that are no longer needed, and then tap the delete icon in the upper right corner to delete them.

**Thank you for your support and understanding.**

1. [**Why I can't add Tap-to-Run / Automation to Siri?**](https://support.tuya.com/en/help/_detail/K9eikhkoqcbpg)
2. [**Can I use Siri and Apple HomePod to control smart products?**](https://support.tuya.com/en/help/_detail/K9huv4wezuxiy)
3. [**The devices cannot be controlled with the iPhone via Siri and Apple HomePod?**](https://support.tuya.com/en/help/_detail/K9huv4nefjw27)

</details>

<details>

<summary>Can I directly connect my devices to a third-party smart speaker?</summary>

Dear user, we are sorry for your inconvenience. Since each third-party smart speaker is a closed platform, and therefore can not be directly connected, and the [**need to achieve connection by way of binding skills**](https://support.tuya.com/en/help/_detail/K9d1qg473y8su).

</details>

<details>

<summary>Why doesn't a smart speaker respond when I use it to control devices or scenes?</summary>

Dear user, we are sorry for your inconvenience. The smart speaker may fail to accurately identify or understand your command. You can change the device or scene name to a simple one such as bedroom light or living room light and use the new name to control the device or scene. If the problem persists, contact our customer service personnel.

</details>

<details>

<summary>Why does "Incorrect username or password" display when I register an account and bind a skill?</summary>

Dear user,[ **you can use our latest binding method**](https://support.tuya.com/en/help/_detail/K9d1qg473y8su). If the login still fails,It may be that your account is in an incorrect region. Please check whether the account region you selected when binding skills is correct.

**Note：**&#x4F;ne Alexa Echo/Google Home account can only be bound to one App account, an error will be reported if the binding is repeated. Users who login to the App through a third-party login method need to E-mail first, and then modify the login password (there is no initial password for third-party login) and use this E-mail to login to the App account when binding a third-party smart speaker.

</details>